Hello dear readers.
I continue the story about my construction project, today I will tell you how I made wind protection for my house, the whole process of installing it, as well as its role in a frame house. Let's look at mistakes when choosing a membrane, installation, as well as the consequences of misunderstanding its operation.
Wind protection for the walls of a frame house plays a huge role; the condition of the insulation and comfortable living conditions in the house depend on it.
Let's start with a small outline of the article:
- About Us
- How does wind protection work?
- Membrane operating principle
- Role in a frame house
- Errors in film application
- What types of membranes are there?
- Wind protection installation technology
- How it was done for me
- What I might change
Here we go?
About Us
My first interview appeared on the Internet; I gave it to a very talented teacher, Sergei Bondarenko, who, in addition to teaching students, also runs a good website dedicated to teaching computer literacy.
In it you can learn a little about me, about my life, and how I myself came to IT technologies. Read, judging by the comments, the interview was a success.
How does wind protection work?
Windproof film actually performs two functions. Not only does it prevent air masses from penetrating into the insulation when there is wind, but it also acts as a moisture barrier.
A separate type of film is used for arranging insulated roofs. Such films are often called under-roofing membranes, by the way, for some reason many builders neglect them, as it turns out in vain...
Roofing membrane
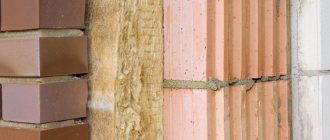
The windproof membrane consists of polymer fibers sintered in a special way. The film itself is designed in such a way that on one side it is smooth and does not allow moisture from the street to penetrate into the house, on the other it has a rough surface.
Role in a frame house
For a frame house, a windproof membrane is of great importance. Since insulation is used in such a house, there is a need to protect it from moisture and blowing. Probably many have seen what happens to insulation when it lies in the open air.
The fibers fluff up, the trapped moisture does not want to leave at all, and freezes in winter, which leads to the loss of the thermal insulation properties of any mineral wool insulation.
This has little to do with polystyrene foam; it is not afraid of moisture and is not subject to moisture accumulation. Therefore, many may consider the use of a membrane in a house with foam insulation unnecessary.
But this is a misconception; the film also protects the frame of the building from atmospheric influences, and fulfills its function of protecting from the wind. This is very important in any house, even a log house, especially a log house.
How to install anti-condensation film
To perform this work correctly, the following procedure must be followed:
- First of all, the rafters must be installed and a layer of insulation laid. After this, you can begin laying a vapor barrier film, for example, Stroybond. It is advisable to do this in dry weather.
- For rafters, it is necessary to maintain a distance between structural elements of no more than 120 cm.
- The anti-condensation film must be laid in such a way that the surface is directed with the absorbent side towards the base. You also need to pay attention to its base, which should not interact with the insulation.
- Construction staples, glue or galvanized nails with a large head are used as fasteners.
- During the installation of vapor barriers, the construction bond is advanced sequentially from the eaves to the ridge, periodically overlapping the overlapping joints with separate horizontal layers. For the created overlap layer in the horizontal plane, a width of no more than 150 mm is allowed, and for the vertical part - no less than 200 mm.
- The areas of film joints must be brought out to the rafter elements of the structure.
- To connect the joints, use a special adhesive film for vapor barrier, for example, Stroybond. It can also be replaced with waterproofing tape.
- When laying the film, you need to make sure that there are no surface irregularities. The appearance of sagging up to 20 mm in the central part of the inter-rafter space is not a violation of technology. Such an artificial defect will help remove condensate vapor from wooden elements.
- The insulation should be located at a distance of no more than 40–60 mm from the film.
When laying waterproofing material, you need to remember that the lower base of the component performs the function of draining water into the corresponding gutter.
At the end of installation of the waterproofing layer, they begin to finally fix the coating. As fasteners, take wooden slats with a cross section of 30 x 50 mm, into which galvanized hardware is hammered . The roof sheathing is installed directly on them.
Errors in film application
Very often, inexperienced builders make mistakes when choosing and installing wind protection for a home. A common occurrence is the use of a vapor barrier on the outside of the house. People simply do not understand the principle of film operation, and they think that a house can be wrapped in any film.
When purchasing, carefully look at what kind of film they offer you! There are not always smart sellers, and you can easily buy a membrane designed for vapor barrier.
I myself have seen such houses, a pitiful sight, but they are already covered with siding or, even better, metal profiles. When using barrier instead of a wind barrier, moisture is not removed from the wall structure and falls into condensation.
As a result, the walls get wet, and if it is a frame house, then the insulation is completely damaged, and if it is a log house, then hello fungus, mold and rot.
Another mistake is using corrugated sheets as the façade of a house and laying it directly on the wind- and moisture-proof membrane and, accordingly, on the insulation. The film simply stops performing its functions and condensation occurs again.
Make a ventilated gap located vertically between the facade and the membrane. This will allow the vapors and moisture that appears on the membrane to evaporate freely, and you will protect yourself from the problems described above.
How to properly lay sheet windbreaks
If we are talking about the most popular frame construction today, then we should adhere to the correct sequence of wall layers. For example, after the finishing material inside the house there should be a vapor barrier and insulation. After them comes the lathing for the ventilation gap and only then the layers of wind protection and facade finishing.
Healthy! It is worth clarifying that some windproofing materials are also vapor permeable and can even be used as additional insulation. In this case, some layers of the wall can be abandoned.
The general algorithm for installing sheet wind protection is as follows:
- First you need to make sure that all surfaces are dry. The same applies to impregnations.
- Then the complete installation of thermal insulation is carried out. If mineral wool sheets are used, it is important to ensure that they fit tightly together.
- At the next stage, the wind protection sheets are cut so that they are installed vertically (in height). It can also be mounted horizontally, but this is not very convenient.
- The sheets should be laid with the rough side down (if there is one). This will greatly simplify subsequent finishing work.
- The sheets are fastened with dowels (it is recommended to choose those with larger caps). As a rule, at least 5 fasteners are required for 1 “square”.
Of course, each specific material has its own nuances. However, regardless of whether roll or sheet material is chosen, novice builders often make a number of mistakes.
What types of membranes are there?
There are a huge number of windproof films on sale. They all differ both in price and quality. If you don’t want to take risks on your home, then don’t skimp. A high-quality membrane cannot be cheap.
I can divide films into three types:
- Cheap membranes look very similar to covering material; I would not use them at home. Seal up a shed or a garage, or use it as a flooring under loose insulation on horizontal surfaces.
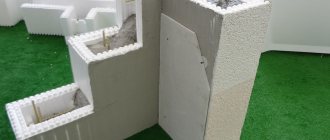
- More expensive and high-quality windproof films with different surface structures and high density. I used this one for the walls of the house, brand Ondutis A120.
I bought such a membrane.
It is the best thing I have ever held in my hands that is available for sale in our city. Of course not Tyvek, but still a pretty thick film. (If there was, Tyvek would have taken it) - Superdiffusive membranes. These films are used for insulated pitched roofs. They absolutely do not allow water to pass through from the outside to the inside, and easily release steam to the outside. Often made in multilayers to obtain appropriate properties. Well, of course, you can also use them on walls. They are absolutely not blown by the wind.
Wind protection installation technology
Before you begin installing the windproof membrane, prepare:
- The required amount of film, counting the squares of the walls.
- Stapler and staples, staples still in your pocket, when you are holding a sheet four meters long, you really don’t want to run after the staples that have run out.
- Scotch tape for gluing canvases. Look for the best one recommended for these purposes.
- An assistant, preferably more than one, especially on the roof.
The principle of laying film on both walls and pitched roofs is almost the same.
- We roll out the strip along the wall of the house to the required length, check for correct positioning with the smooth side facing out (in general, the film should indicate which side is facing out, so if this is not the case, then read the documentation for the membrane)
- We stretch the wind protection along the wall of the house without fanaticism, then punch it with a stapler to the studs or slab sheathing, depending on the structure of the building.
- We stick special double-sided tape to the upper edge of the film, without removing the paper from the tape. We will later pull it out from under the top film.
- We roll out the next row of film and also shoot it. We continue until the wall is completely filled from bottom to top.
- We pull out the paper from the tape and carefully glue the membranes together.
- We nail vertical bars to organize a ventilation gap, with the frequency required for a specific type of facade. It is on these slats that we attach the façade of the building.
Ventilation gap block
It is important to close the windbreak as soon as possible; over time, the film loses its properties as a result of exposure to sunlight. Each film has its own timing, but I would close it in the first month after installing the membrane.
For the roof, everything is done in the same way, from bottom to top, and with sizing. Just be careful, it is very inconvenient to climb the rafters and click the stapler. You need long arms or a helicopter)))
Application area
- Manufacturers offer a wide range of materials. All types of Izospan differ in density, as a result of which they can be either laid on the floor of a frame house or used in a roof structure.
- Izospan is one of the most popular types of insulation due to its price and unique properties. It is suitable for walls, ceilings, basement floors, attics and lofts. Hydrophobic fabric is widely used as a waterproofing layer on ground floors, cement screeds in wet areas and as a wind barrier. Vapor barrier is one of the main advantages of the material.
- The moisture-proof membrane can be used in the construction of a heated floor. The windproof function has significantly expanded the range of application of the material. Depending on the operating conditions, it may be necessary to create a ventilation gap of 40–50 mm, due to which moisture is evaporated. A special feature of the fabric is its ability to reflect thermal radiation.
- The rolled material is not afraid of water, is durable and easy to install, and is easy to use in the attic. Widely used as a roofing vapor barrier for pitched roofs and partitions. At the preliminary stage of roof construction, the plates are installed between the rafters. The second layer of film overlaps the top one by 15–20 cm without tension.
The Izospan operating instructions indicate the basic requirements for the use of the material.
- It is advisable to avoid the strips adhering to the edge of the ridge.
- A ventilation gap (50 mm) must be created, which provides an air flow that promotes the weathering of moisture.
- All connections are treated with sealing tape.
Izospan marked AF is distinguished by the presence of ignition protection, so it is used in flammable areas. The presence of the letters AM means a three-layer film construction that can protect the building structure from any external influence.
On sale you can find material marked AQ. It is this film that has maximum insulation properties.
How it was done for me
In my house I used two types of membranes; for the walls I used an ordinary windproof film, and for the inclined parts of the attic I used a superdiffusion film.
When insulating an attic, the use of a superdiffusion membrane is more relevant. When laying insulation, you don’t have to worry about the gap between the film and the insulation, but lay the mineral water closely. This gap is necessary when using conventional windproof film.
House wall
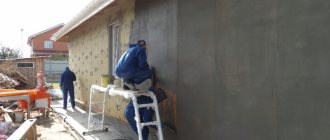
I stretched the canvas as described, started from one corner and walked around the whole house with the roll, simultaneously fastening the film to the racks. When I finished the first row, I started on the second, and so on until the very top.
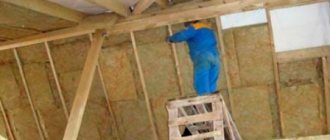
It was interesting to attach the membrane to the rafters, the roll is wide, the rafters are high, no matter how we twisted it, we did it! Two rows of membrane on each superdiffusion slope, and one row of regular wind protection. I placed the usual one where the uninsulated part of the slope is.
Three rows of wind protection
For gluing I used adhesive tape, from the same Ondutis company, I want to say right away that it dries in the sun in a moment, and everything comes off. Where I covered it with siding did not come off, and everything is sticking. In theory, the adhesive substance of these tapes should not dry out under any circumstances... I glued it again after installing the siding, it seems to be holding.
How to attach film waterproofing to a roof
When laying the main tier of film, you must adhere to the following rule: it must run strictly along the entire roof eaves, certainly with a sag of 10–20 mm relative to the rafter structure.
To avoid problems during operation, when laying the rafters, it is necessary to ensure a gap between them of no more than 120 cm . Do not forget about creating an air gap for the insulation and vapor barrier film, which should have a height of approximately 40 mm.
During installation, axton waterproofing is placed only in a horizontal plane . The starting point for work is chosen next to the cornice and gradually moves upward, at each step overlapping the joint line with an overlap of 100–150 mm.
It should be taken into account that the film relative to the rafters should sag no more than 20 mm. Where the edges of the insulation are located, use the overlapping method , not forgetting to stick a special tape, tape or glue to the joints.
The vapor barrier film must be attached to the base over the entire area using a construction stapler . In some cases, galvanized nails may be used. The main requirement is that the hardware has a wide head so as not to compromise the integrity of the material.
When laying the next row of film insulation, it is necessary to ensure its overlap by no more than 200 mm. The exact value of the overlap is determined taking into account the roof slope.
lattice bars are laid directly on the vapor barrier layer . This must be lumber with a diameter of at least 40 x 25 mm, and it must be placed in increments of 150 mm. Having completed this stage, they move on to installing the sheathing.
Features of attaching waterproofing to the ridge of the roof
In the ridge part of the roof, it is necessary to pay attention to the area between the corresponding axis and the waterproofing film, where a gap of no more than 50 mm should be provided. According to the technology, a ridge vent must be created .
So, experts call it a rupture of the insulating material under the corresponding part of the roof. This is a necessary measure to ensure conditions for ventilation of the hidden space.
In areas where the roof structure is attached to various masts, a chimney and an antenna, a hole of the required size is made in film insulation, and then fixed to nearby sheathing elements.
To do this, you can use vapor barrier tape or self-adhesive tape with a double-sided backing. When installing the waterproofing component on roof windows, you must strictly follow the manufacturer's instructions.