Insulation technology
Internal and external thermal insulation of enclosing structures in a corner apartment is carried out taking into account technological features.
We insulate the walls from the inside
Algorithm for insulating the walls of a corner room from the inside in a panel house:
- preparatory work. It is necessary to clean the surface of the old finish, eliminate base defects using mortars;
- waterproofing. A special membrane material or polyethylene film is used. The joints of the waterproofing sheet are glued with tape to create a monolithic coating;
- sheathing. Both wooden and metal guides are relevant. In this case, the wood is treated with antiseptics and fire retardants. The interval between the sheathing elements is selected in accordance with the dimensions of the insulation;
- installation of a heat insulator. The slabs are laid in the openings of the sheathing. Gaps are sealed with construction foam;
- vapor barrier. The membrane is laid in a sealed layer, the joints are taped.
Insulation of a corner apartment from the inside
Next, plasterboard is installed, which serves as the basis for the final cladding of the wall.
External insulation of a corner apartment
Thermal protection of enclosing structures from the outside in a panel building involves the following steps:
- the surface is freed from foreign elements in the form of external units of climate control equipment, satellite dishes, billboards and other objects;
- clean the base, repair chips, cracks and potholes;
- construct the sheathing using metal profiles;
- perform two layers of waterproofing with a layer of vapor barrier between them;
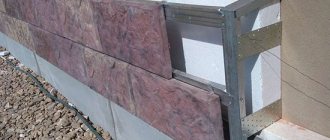
- install insulation slabs between the guides of the steel frame.
Next, finishing work is carried out.
To insulate the outside walls of a brick house, the following technology is used:
- before installing the foam sheets, the brick base is cleaned of the old finishing coating;
- it is necessary to level the surface to ensure the tightest possible fit of the polymer insulation panels. To do this, carefully plaster the base and treat it with primers;
- glue is applied to the back side of the slab in a continuous strip around the perimeter and in portions over the entire area, applied to the base and pressed tightly. The seams are treated with sealant to create a monolithic thermal and hydrobarrier.
After the heat-protective coating has dried, the surface is protected with an additional layer of primer and decorative finishing begins.
Some nuances and features of thermal insulation
The choice of insulation method largely depends on the material from which the walls are made.
In a brick house
Freezing of corners is most often observed in old brick houses. The best option is to insulate the facade. For greater efficiency, it can be combined with installing a heat insulator from the inside. Insulation can be started only after cracks have been eliminated and seams have been filled.
Freezing of corners is typical for brick houses.
In panel
In this case, insulation of the facade is also required. Both sheet and sprayed materials can be used. Internal insulation rarely gives a positive result. In most cases, it becomes a waste of time and money.
In wood or timber
To cover such a building, not only foam plastic is used, but also other sheet materials. The dry method is most often used. Laying insulation on the sheathing promotes the appearance of a ventilation gap, which prevents the formation of condensation and rotting of the wood.
Wooden houses need to be sheathed with insulation.
In frame
The walls of such a building are characterized by low strength. This is taken into account when insulating corners. Thermal insulation is placed between the frames. The wall cake consists of the following layers:
- waterproofing created from a vapor-tight membrane;
- heat insulator;
- finishing layer of plasterboard or fiberboard.
Types of Eltis intercoms
As mentioned earlier, Eltis offers several models of intercom systems. This is not only ELTIS-TsP-100, but also other devices. They differ in the design of the call block, its capabilities and the number of connected subscribers. Today Eltis offers models in the following series:
- Series 420 – 20 subscribers, audio;
- Series 400 – 100 subscribers, audio/video;
- Series 300 – 200 subscribers, audio/video;
- Series 303 – 300 subscribers, audio/video;
- Series 305 – 500 subscribers, audio/video;
- Series 5000 – 1500 subscribers, video.
As you can see, most models allow you to organize both audio and video communication between the call block and apartments. But the final cost of equipment and installation services will depend on how many elements residents want to connect.
Be that as it may, Eltis offers intercom systems for every taste. Regardless of how many people live in your building, you can choose and connect an intercom from Eltis.
Rating of the best wired headphones of 2021
In extreme cases, even significant damage to walls can occur. It starts with plaster. This works similarly to a glass bottle of water placed in the freezer. Freezing water molecules increase their volume, and as they expand, they destroy the structure of others that are in their path. When this happens in a layer of plaster, it begins to fall off the wall.
A wall in an apartment freezes most often due to the fact that a large amount of moisture accumulates in it. As a result, its surface becomes damp or wet. The reasons for this problem may be hidden in the following:
- Poor organization of the ventilation system. Because of this, the natural drying of the walls is significantly worsened. Liquid constantly accumulates in them, regardless of the factors why this happens.
- Insufficient heating during the cold heating season of the year. In this case, the premises in the houses do not warm up properly. Thus, the wall in the apartment freezes in a very short period of time.
- Low competence of the builders carrying out the construction of the building. Often, specialists, due to their laziness or lack of experience, poorly seal cracks directly next to window frames or between structural elements.
- Waterproofing that has become unusable. This problem most often occurs on the upper floors of multi-story buildings. If a wall in an apartment freezes, the owner must understand where to turn. Most often, the management company or housing office is responsible for waterproofing a house on the upper floors.
- The appearance of cracks in the house. This reason is considered by experts to be the most difficult to correct. This is due to the fact that in such situations the house needs to undergo major repairs. If work is not carried out to eliminate cracks, they will increase in size every year. This applies to both length and width.
In private houses, the owners themselves deal with this problem. In multi-apartment buildings, these deficiencies must be corrected by the management company or HOA. If the culprit of freezing is a developer organization that made mistakes during the construction of a house, it is necessary to file a complaint with it.
Cold bridges refer to those areas of the house that should initially be insulated. These include all corner parts. Builders are required to insulate them and use special insulation
Important! Internal insulation has a number of advantages. You will not need to obtain permission to transform the facade from the management company. In addition, you can insulate the apartment from the inside on your own.
In addition, you can insulate the apartment from the inside on your own.
The wall freezes, sealing the joints does not help. What is the reason?
Quite often, apartment owners in prefabricated buildings encounter freezing of the walls. Contacting the HOA or the management company does not bring results. More precisely, the management company or homeowners association claims that the root of the problem is poorly sealed seams, they are being repaired, the joints are sealed properly... But the wall continues to freeze. The reason for this phenomenon is simple: while the joints were not sealed, water leaked into the panels, and it did not go away. And if there is moisture inside the panel, freezing will naturally occur. What to do in such cases? Naturally, the problem must be solved individually, but a certain general algorithm of actions exists.
Who can carry out thermal insulation outside
It is better to leave the insulation of panel walls in the hands of highly professional specialists who have sufficient experience and carry out work in accordance with SNiP and following the sequence of technological operations
Coordination with the relevant authorities to allow insulation of the external walls of a panel house is not required if the building is not of historical value.
At the same time, no matter what kind of insulation you use, the material must meet certain requirements, including:
- high degree of thermal conductivity;
- moisture absorption;
- airtightness;
- Fire safety;
- environmental friendliness;
- long service life.
Important: insulation for temperate climates must be of sufficient thickness - from 8 cm
Construction portal. Honing our skills
When living in a private house, you may encounter dampness under the floor.
This thing is unpleasant and harmful to health.
Underfloor dampness can appear immediately after the house is built or after many years of living in it.
When such a problem persists for a long time, fungus, mold, and other microorganisms appear that cause diseases in those living in the house. There can be several reasons for the appearance of dampness. Some are quite difficult to believe because they are hidden under finishing materials.
The main reasons leading to its occurrence: Insufficient floor insulation Cracks in the foundation Poorly executed blind area along the outer perimeter of the house Lack of drainage Appearance of moisture in the basement Irregularities in the floor structure Incorrectly installed ventilation in the house
The main reasons for freezing corners
How to solve the problem depends on the cause. And there are several of them:
- the house is not well insulated;
- the wall is too thin (in our climatic conditions, brick walls must be built in two layers, two bricks thick);
- low-quality building materials (bricks with chips, voids, holes);
- non-compliance with building codes (the dressing of the masonry was not carried out correctly in the corners);
- a high percentage of wear and tear on the house (the corner freezes due to cracks in the facade of the house itself).
Why do corners freeze?
Because of cold bridges, corners are the most vulnerable part of almost any home. These areas of the building structure have increased thermal conductivity. Any vertical or horizontal angle is a geometric bridge of cold. If there is a construction defect - poorly sealed seams, through voids in the concrete, an insufficient layer of mortar between the bricks, lack of the necessary insulation - problems cannot be avoided. Where there are cold bridges, the wall surface temperature in winter can drop below the dew point (to approximately 9 ° C and 50% humidity) while maintaining room temperature inside the room. It is in such places that due to temperature differences, condensation forms, which leads to the formation of mold, and when frozen it turns into ice crystals. The most logical solution in this case seems to be laying insulation from the inside along the walls. But any such material is essentially a heat insulator, which equally insulates the wall from heat and cold. The use of insulation can even worsen the situation, as it will shift the dew point (the place where cold and warm air touch) to the inner surface of the wall. As a result, cold air from the street will freeze the wall right through, since the heat from the apartment will not be able to penetrate the insulating layer. Wetting and freezing will continue, the insulation will become unusable and will no longer perform its functions. In addition, ice crystals will continue to destroy the wall material, further increasing cold bridges.
When purchasing a country house or an expensive apartment, you can use the services of companies offering thermal imaging. Specialists will help you detect all heat leaks and conclude whether it is possible to correct the builders’ mistakes. This can save owners from many troubles associated with the operation of the house and will save significant money.facade and walls of a corner room in a panel building, how to insulate a log house “into the bowl” and “paw”
Residents of houses very often face the problem of moisture and mold formation on the walls, especially in the corners of houses. This is often due to miscalculations in construction, in which the thermal conductivity of the materials used for the construction and decoration of the house and the internal temperature of the rooms were not taken into account.
Peculiarities
If in winter, condensation in the form of drops of water forms on the inner wall of the room, and subsequently mold, this indicates insufficient thermal insulation of the walls or the material from which they are made. In addition, in the winter, if there are small cracks in the corners, the walls and corners may even freeze due to the flow of very cold air. The reason for this may be either gaps between slabs or bricks, or voids in the slabs themselves. Due to this unpleasant phenomenon:
- pasted wallpaper gets wet and comes off;
- walls painted with water-based paint are covered with unpleasant red stains;
- the layer of plaster gradually collapses, no matter how durable and high-quality it is;
- Fungus and mold appear on the walls.
Basic methods
Modern industry offers several options for insulation, differing in the use of various materials and the method of their application.
- Application of “warm” plaster. In this case, foam granules are added to the plaster instead of sand. This significantly reduces the thermal conductivity and overall weight of the plaster layer. Its use reduces the overall thermal conductivity of walls and corners, while allowing the walls to breathe, which stops the formation of condensation on the walls.
- Use of liquid thermal insulation. Produced by many manufacturers. They are a liquid solution containing microspheres of ceramics, glass or silicone. They have excellent thermal insulation and allow work to be carried out in hard-to-reach places, including the corners of houses.
How is thermal insulation carried out?
Among the many methods of insulation, everyone chooses their own - the most convenient and affordable option. Most often, walls and corners in corner rooms have to be insulated, since, as a rule, two walls in them face the outside of the house. At the same time, there are some subtleties when using certain materials. The process of insulating corners and walls can be carried out even at the stage of building a house and design decisions for decorating rooms. For example, just rounding the internal and external corners of the facade can reduce the temperature difference between the wall and the air inside the room by up to 20%.
Installing lamps in plasterboard panels directly in the corners of the room ensures heating of the walls and shifting the dew point. This eliminates the cause of damp walls in the room.
In addition, when building wooden houses, you should take into account some features of log houses in the “paw” and in the “bowl”. Thus, one of the disadvantages of a “paw” log house is that it is a source of increased heat transfer, and therefore heat consumption. As a result, increased cooling of the inner surface of walls and corners, the formation of moisture on their surface. When using penofol for insulation, it should be taken into account that the main thing in its use is the creation of an air cushion between the wall and the material itself. If this condition is not met, then insulation using penofol will not work and will not be able to perform its functions. In addition, when insulating the outside, the penofol itself sits on three frame support grids.
To reinforce with polystyrene foam using the panel method, it is necessary to calculate an area of material 5–10 cm thick so that it covers the entire surface of the outer wall with a margin. The panels themselves, cut to size, are fixed to the walls and log houses using special glue. After all the foam is fixed and the glue has dried, it is necessary to overlap the fiberglass mesh onto the foam sheets to give mutual strength to the glued sheets. Then the foam sheets are covered with a special putty to protect against moisture penetration inside between the sheets. For the final coating, use structural putty or facade paint.
If the source of thermal insulation failure is unknown, modern technologies can come to the rescue. In this case, it is necessary to use thermal imaging of the room. Specialists in this field will be able to accurately determine the location of the thermal insulation failure and give recommendations on how to eliminate the identified deficiency.
For information on how to properly insulate a house from the outside, see below.
Always use a level when leveling surfaces. You can also make “warm walls” by analogy with “warm floors”. In this case, electric insulation is installed in the walls, this will warm them up enough that the formation of condensation will drop to zero. It is customary to distinguish two main methods of insulation:
FLAX AND JUTE.
Well suited for sealing gaps between logs. They have useful properties such as not spreading fungi; however, it dries just as quickly. The material is easy to use, most often found in the form of strips, and unlike mosses, it does not crumble and is excellent for the construction and insulation of log houses. It has the ability to remove moisture and this occurs due to the capillary structure of the fibers. Jute grows in tropical latitudes, is collected by hand and processed in the same way, because of this the cost of flax may differ from jute. Jute has a tube structure and removes moisture that accumulates between the logs much more intensively. Sold in the form of rope and tape rolls.
How to prevent corners in the house from freezing?
What can be done to prevent the corners of the house from freezing? Practice shows that some architectural changes, such as rounded or beveled corners in a house, can prevent freezing problems. Also, to protect against freezing, you can make pilasters on the outer corners of the building.
But what can be done in log houses? During the construction process, it is necessary to fasten the crown logs at the corners with a special cut-out lock with embedded natural heat-insulating material. This procedure will reliably protect wooden houses from freezing corners.
And in conclusion, one important piece of advice to everyone who is planning to purchase a country home. Currently, there are companies that engage in thermal imaging of buildings. With its help, you can detect heat leaks in order to decide before purchasing whether the builders’ mistakes can be eliminated. This procedure can protect the future owner of the house from the problem of freezing corners in it.
Summing up
It turns out that the only possible solution to the “cold” problem is insulation. However, if possible, it is not recommended to lay heat-insulating material inside.
Ideally, work on insulation and preventing possible freezing of corners should be carried out during the construction of the house. But if you missed the poor quality work of the builders or made a mistake yourself, then you should pay attention to the fact that experts recommend rounding or bevelling the outer and inner corners of buildings.
If the house is already in use, then you can round off the inside. Heat-insulating plaster is also suitable for this. Thanks to this simple procedure, you can reduce the temperature difference by 30%.
Healthy! Pilasters, which many consider to be design elements, act as additional insulation for the outside of the house.
Features of finishing external corners
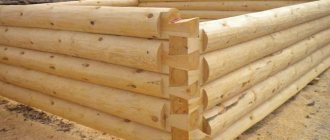
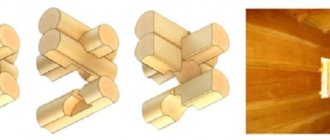
Regardless of what kind of lumber, timber or logs the house is made of, there are two main ways to connect corners:
- “into the bowl”, after the junction there is a certain piece of log;
- “in the paw”, beams or logs are cut without leaving any residue.
Exterior finishing of corners, chopped “into the paw”
When using this method of cutting corners, a very beautiful form of joint is obtained, which can be decorated in an original way, for example, by painting different elements of the log with contrasting colors.
With a corner connection without any residue, insulation becomes of particular importance, since in this option, the corner remains unprotected and, in the absence of good insulation, allows the cold to pass through.
Typically, this method of cutting a log house is used if the cladding of the log house is planned in the future. Closed corners, chopped without leaving any residue, become warmer and more airtight.
Read also: How to make homemade noodles for chicken soup
However, if you cladding a log house that has not undergone complete shrinkage, the cladding may become deformed. At the same time, corners should not be left open for a long time. The ends of logs can crack under the influence of precipitation and sunlight.
You can cover the pre-caulked corners with a regular board. If you fix the board rigidly, then when the log house settles, the logs may hang and cracks may appear. To avoid this, it is necessary to make a vertical slot 2 cm long in the board and, when screwing it to the corner joint, screw a self-tapping screw into the highest point of the slot.
A board nailed in this way will not interfere with the natural shrinkage of the house. If over time the length of the slot turns out to be insufficient, you can unscrew the screw and screw it again to the top point.
After the shrinkage processes are completed, the corners can be sheathed with clapboard or siding. Cladding corner joints chopped into a paw does not cause any particular difficulty, since the corner is cut without leaving any residue, it will not interfere with making the sheathing in the usual way.
Covering external corners, chopped “into a bowl”
In another way, this angle is called “warm”, and this is no coincidence. With this type of cutting, the corners allow less cold to pass through, making the house warmer. But from the outside of the building, the logs protrude outward; often the ends are of unequal length, which does not allow the frame to be installed correctly. The question arises: how to sheathe the corners of a log house in this case?
In some sources you can find advice: gradually cut down the protruding structural elements, and fasten them with staples to strengthen them. However, as a result of sawing off the ends, which are elements of the supporting structure and give strength to the house, the building may lose stability and weaken.
If pins were not installed during construction, then for a weakened structure, even the slightest effort is fraught with destruction. Therefore, you should think carefully before making such a decision.
The cladding of a log house must be done in such a way as to keep all corners intact. When installing the sheathing, it is necessary that the distance from the wall of the house corresponds to the length of the protruding elements.
If the ends are of different lengths, they are filed so that they form an even line. It is quite possible that in this case the frame will recede greatly from the wall, then the dimensions will have to be equalized using thick bars with a section of 50x50 mm.
You can use an alternative option, which involves mounting the frame separately for the wall and separately for the corner. In this case, the corner frame is an independent structural element and is made in four planes. The presence of additional corner elements will increase the consumption of material, but in its finished form such a structure looks very impressive.
How to independently determine freezing of walls in an apartment
There are several options for determining whether a wall in an apartment is freezing
It must first be carefully inspected, paying attention to changes such as:
- peeling of finishing materials (wallpaper, plaster);
- the appearance of condensation;
- the appearance of frost in the morning and evening;
- severe cooling of the surface;
- abundant growth of fungus and mold.
Methods of how to determine freezing of a wall in an apartment allow anyone to do this. All changes seen must be captured on camera, since in the future, during the proceedings, this may become evidence of the guilt of the organization responsible for ensuring normal living conditions for people.
Before you get rid of freezing of the walls in the apartment yourself, you need to carry out an inspection of the premises by a specialist. In this case, it will be possible to obtain compensation for the money spent in the future.
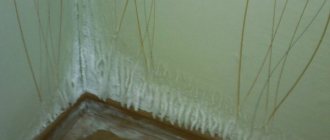
Wet corners in a panel house
Hello. My family lives on the fifth and last floor in a panel house. At one time, we insulated the corner walls (35 cm) and sections of the wall under the windows. We used 40 mm thick polystyrene foam, plastered it on top and hung wallpaper. Also, new triple-glazed plastic windows were installed. There is no high humidity in the apartment, but condensation constantly forms on the windows, as a result of which the slopes become moldy. Sometimes wet areas and mold spots appear on the ceiling in the area of the corner wall, even if it is not very cold outside, up to -5 degrees. Wetting gets worse when food is being prepared in the kitchen.
The roof is insulated with isover, and roofing felt is laid on top of the insulation. The heating in the apartment is good, the radiators are hot, but the rooms are cool, the temperature does not rise above 21-22 degrees, quite cold. Tell me how to get rid of wet corners and condensation? We live in the city of Uralsk, in the West Kazakhstan region. Basil.
Getting rid of freezing corners
The ideal way to solve the problem is to insulate the entire facade from the outside and reliably seal the seams. It is quite possible to repair your own country house, but in an apartment building you will have to turn to the management company for help. But don't despair. And in a separate apartment you can get a good result.
First of all, you need to remove the wallpaper. If there are no visible cracks, then the walls are tapped with a hammer - where there are voids, the sound will be dull. Next, remove the plaster over the detected cavities and thoroughly dry the corner. If there is mold, be sure to treat it with special antifungal agents. Sometimes mold damage is so extensive that the use of acid, blowtorch fire, or milling of the surface is necessary. All cracks and voids are filled with polyurethane foam or liquid foam. This will prevent moisture from entering the room even if there are cracks in the external wall. Finally, they clean off the remaining foam and plaster the corner. It is best to carry out work in the warm season in order to completely get rid of dampness and mold indoors.
If very large voids are found, you should not fill them with mineral wool or tow, as these materials contribute to the accumulation of moisture. It is better to use the same polyurethane foam. It is resistant to moisture, not susceptible to rotting and mold, has high adhesive properties, and does not lose quality when frozen.
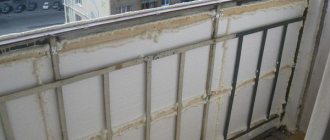
Insulation of the entire façade from the outside
Today, manufacturers offer a variety of materials that greatly facilitate the repair process and take it to a whole new level. For example, special heat-insulating (“warm”) plasters are light mixtures in which microscopic polystyrene foam granules or lightweight natural fillers are used instead of sand. This plaster is several times lighter than regular plaster, it applies and sets well. Due to the presence of air pores, warm mixtures have high vapor permeability, regulate condensation and provide a healthy indoor microclimate. A 50 mm layer of warm plaster has a thermal insulating effect equivalent to one and a half to two bricks or a two-centimeter layer of polystyrene foam.
Not long ago, new materials appeared on the market, produced by different manufacturers under different brands, but united under the common name “liquid thermal insulation”. It is indispensable for problem areas such as freezing corners. The insulating suspension, reminiscent of paint, consists of hollow microspheres (ceramic, glass, silicone or polyurethane) that effectively reflect thermal radiation. Microspheres are suspended in a binding composition of synthetic rubber or acrylic polymers, antifungal and anti-corrosion additives and coloring pigments. This composition gives liquid thermal insulation the properties of waterproofness, flexibility, lightness and strength. The thermal conductivity of liquid heat insulators is significantly lower than that of conventional insulation. Several layers of such paint can replace 5 - 10 cm of polyurethane foam or mineral wool.
True, all this is only from the words of manufacturers and sellers; many practical tests have proven the ineffectiveness of such paint as insulation. Its main task is to reduce heat loss on hot water pipes and boilers.
Application of liquid insulation
The problem of corner freezing can be prevented even at the stage of building a house or renovating a new building. In accordance with the laws of physics, the temperature of the inner surface of the corner is always lower than the temperature of the walls that form this corner. Experienced designers say that ideally the corners of walls, both external and internal, should be rounded or beveled. Rounding or chamfering only the inner corner (with wall material or heat-insulating plaster) can reduce the temperature difference between the walls and the corner by 25-30%. The same role is played by pilasters on the outer corners of the building. This is not only a well-known architectural technique, but also a method of additional insulation.
You can use interesting design solutions. For example, in the corner of the ceiling, mount a plasterboard box with lighting from ordinary incandescent lamps. Working lamps will heat the air inside the structure, thereby moving the dew point inside the wall.
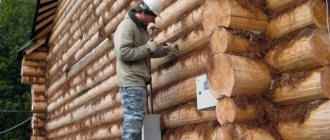
Thermal insulation of house corners from outside
Due to their high thermal conductivity, corners are the most vulnerable part of any home. And the reason for this may be poor sealing of seams, poor insulation, the presence of voids in the concrete. Reliable sealing of seams and insulation of the walls of the house from the outside will help improve the situation. The modern market offers many first-class insulation materials. For example, in the so-called “warm” plaster, polystyrene foam granules are used instead of sand. It is not only several times lighter than a regular mortar, but also perfectly allows steam to pass through, allowing the walls to “breathe” and prevent the formation of condensation. The insulating effect of “warm” plaster can be compared to brickwork. But this is far from the only way to insulate a house from the outside. Recently, so-called “liquid” thermal insulation has appeared on the market, which is produced by various manufacturers under different brands. This insulation is especially relevant for such difficult parts of the house as freezing corners. The insulation solutions contain special microspheres filled with air. They perfectly insulate heat inside the house. Also, the composition of suspensions for facade insulation includes acrylic polymers or synthetic rubber, paint, as well as anti-corrosion and antifungal components. Thanks to the composition, “liquid” solutions for home insulation are light, stable, flexible and waterproof. However, for all their technical perfection, liquid compositions cannot compare with such traditional heat-insulating materials as polystyrene foam, mineral wool, polystyrene foam and polyurethane foam.
In fact, there are only a few justifiable reasons for cladding a log house. And each case has its own logic.
Preventing the appearance of dampness
Following certain rules will help reduce dampness to a minimum and prevent its occurrence in the future.
- Laundry should be dried outside living rooms or with the hood turned on for air removal.
- When cooking, pots and pans should be covered with lids to prevent steam from escaping.
- In the bathroom, where the highest concentration of humidity is, as well as in the kitchen, hoods and ventilation openings should be regularly cleaned to remove excess debris, and these rooms should also be ventilated daily.
- In a private house, you can insulate the attic and also cover the walls with a waterproofing material, preferably with pores.
- All flammable substances that form a lot of moisture, in particular paraffin, should be used extremely rarely indoors.
- All rooms in the house should be ventilated daily.
- Correct errors in the heating system in a timely manner.
- Use a dehumidifier to reduce humidity. This household appliance can easily cope with the problem of dampness, and its compactness allows you to move the dehumidifier from room to room.
Methods for sealing inter-crown gaps
Regardless of what type of material was chosen for insulating a wooden structure, installation work is carried out in several available ways:
- No bends;
- With a bend on one side;
- With a bend on both sides.
Laying insulation without using bends is characterized by high quality of fit and small technological gaps.
The material is laid out around the perimeter of the log house on the base, and the next element is laid on top. Fixation is performed with a construction stapler.
For timber buildings, a one-sided bending installation method is used. To do this, take a compactor whose width is twice the width of the log. The strip is mounted with a one-sided bend on the lock. An additional rope made of jute or flax is installed on the outside of the wall.
Installation of insulation with a double-sided bend is carried out for buildings made of wild logs, fire monitors or rounded logs.
Often, such building materials are characterized by uneven dimensions at different ends.
The inter-crown insulation for the timber is fixed using a stapler, while the strips are folded in half and shifted in width. This allows for correct installation between different sized ends. In addition, this method prevents complete shrinkage of the wood.
The choice of the best insulation option for a house or bathhouse depends on many factors that experienced craftsmen take into account at the beginning of construction.
One of the advantages of log houses is their high heat-saving characteristics.
However, over time, due to shrinkage of the walls of the log house, cracks appear between the logs, the insulation between the crowns of the log house loses its properties and the building becomes cooler. In a climate zone with harsh winters, there is a need for insulation of houses built from logs with a diameter of 180 mm or less.
In this article we will tell you how to insulate a log house from the outside and inside, and what building materials are suitable for this.
A corner in a brick house is freezing, what should I do?
What to do when a corner freezes in a brick house
When the corner of a wall becomes covered with moisture, ice or a layer of frost in a brick house, the situation needs to be resolved radically. First you need to make a diagnosis. Its main stages:
Checks the outside of the house wall
It is this that is the source of the problem; you should not look for the cause inside the home. You should pay attention to the presence of cracks, voids, the quality of the brick and the masonry itself. If cracks are found, it is important to determine the scope of work to eliminate them. Sometimes the splits are small, but they can also form along the wall, horizontally, like cobwebs. Then almost major external repairs will be needed
If a brick house is worn out or in disrepair, then you cannot do without metal ties. When there are no cracks, it is necessary to examine the masonry itself and the brick. In the corner it fits completely differently. It is necessary to determine whether the firmware technology is followed. It is important to pay attention to the gaps between the bricks. There may not be enough solution between them. The building material itself, if it is of poor quality, may have many gaps, pores or cracks. Such a brick causes the corner to freeze.
After diagnosing and determining the cause, you should draw up a scope of work and determine the best way to solve the problem. As a rule, insulation is used on the outside. Experts do not recommend performing interior work.
The corners of the house are freezing - how to insulate them
The corners of the house are freezing - how to insulate them
The only correct solution to get rid of frozen corners in the house is to insulate it. Only thanks to it will the moisture or frost inside go away once and for all. Do not forget that before insulation it is necessary to inspect the wall for cracks and eliminate them in advance. The following solutions are suitable for this:
- Use of iron ties (conductors). They are especially relevant for large longitudinal cracks.
- If the house is private and not multi-story, then the wall may need to be rebuilt. The method is rarely used due to difficulties encountered during the work.
- Strengthening an internal or external wall (additional masonry)
- If the lower corner of a private house on the first floor freezes, then the problem may lie in the foundation. It will need to be reinforced: along the entire wall or part of it. This is labor-intensive and expensive work.
Insulation of walls in an apartment building
As a rule, further insulation is required. This method is used most often and is recommended by experts.