Articles
All photos from the article
A sauna in your own home is the dream of many lovers of healthy relaxation. However, owners of wooden houses are often afraid to install such a bathroom inside, and this is completely in vain - if certain rules are followed, it does not pose any danger. We will tell you which wooden products should be used for baths and saunas, and also look at how to build a sauna with your own hands in a wooden house.
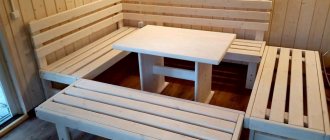
Sauna furniture made of wood perfectly emphasizes the style.
Benefits of a homemade sauna
Building a sauna with your own hands in your home or at your summer cottage is a great way to save money on going to a private company. In addition, the advantages of choosing include:
- The ability to independently choose the type of sauna and heating device (electric model or installation with infrared radiation).
- Ease of installation work, especially when using detailed instructions and manuals from experienced craftsmen.
- Useful properties of a sauna. Regardless of the type of radiation used in the sauna, the owner receives a lot of beneficial effects (relaxing, bactericidal, immunostimulating effect).
- The ability to use a variety of available materials for construction.
No special skills or abilities are required from the master. It is enough to have experience working with tools, and the electrical wiring can be entrusted to a specialist of the appropriate profile. If necessary, you can watch video lessons on construction work.
Installation of shelves and doors
When installing supports for shelves (benches), you need to take into account that the recommended ceiling height in the sauna is no more than 210 cm. To make it convenient to climb onto the bench, a step is made at a height of 25 cm. The bottom shelf is placed at a distance of 65 cm from the floor.
Shelves are an important element of any steam room
The top shelf should be placed at a height of 1-1.1 m. Thus, the distance to the ceiling will be large enough for a tall person to comfortably sit on the bench.
Door Features
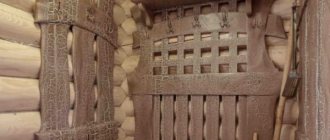
The sauna door can be made entirely of wood or partially glazed. In the first option, the presence of decoration in the form of artistic carvings is welcome. If you choose a door with glass, it should be tinted. The size of the sauna door is selected depending on the opening.
It must be taken into account that the height from the bottom edge of the door to the floor must be at least 10-15 cm. Standard door sizes start from 7x19M (modules). The module is 10 mm. The largest standard size is 10x20M. If you need a wider or taller door, you can order it to be made individually.
The internal door should be without locks or any serious latches. Only magnetic fasteners are allowed.
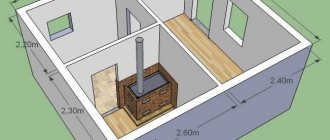
Principles of sauna design
The most optimal location for a sauna is to arrange a steam room and dressing room in a separate building. In private ownership, this can be a separate room in the house (especially for an infrared model). Any sauna has the following structure:
- Entrance corridor. Its size doesn't matter. The corridor is necessary for optimal heat retention in the room, for the location of outerwear and shoes.
- Waiting room. There is a table, sofas or armchairs, shelves and hangers for clothes and a change of linen. In the fullest sense, this is a recreation area. All wires, control panels, and distribution boards are routed to the same area.
- Cabin with heating device. Infrared installations, an electric oven, shelves and sun loungers are installed here.
Some of the premises may be missing if the sauna is installed in the form of a cabin (for example, in an apartment).
Installation of a vertical frame
The sheathing is made from slats, and before that a vapor barrier is installed. Bituminous paper or glassine is used as a vapor barrier layer. If the walls of the apartment are brick, they must be insulated with glassine. The vapor barrier material is attached with an overlap of 15 cm. For strength, slats are used, nailed with small nails or attached with a stapler.
The frame is made from 5x5 cm bars, installing them vertically along the perimeter of the walls. The bars are also reinforced in the corners of the cabin and on the ceiling. The pitch between the frame elements is chosen based on the dimensions of the insulating slabs: the gap between adjacent bars should be several centimeters less than the thickness of the slab in order for the insulation to fit tightly.
Openings for electrical wiring and ventilation should be provided in the frame. A dry pipe is laid in the hole and stretched along the entire perimeter of the steam room. Pipes also need to be laid on top of the sauna ceiling. Considering that the ceiling height is about 210 cm, there should be enough space left.
In case of fire, you need to install pipes with holes from which water will flow. There should be two ventilation ducts: supply and exhaust. It is considered normal if six air exchanges occur per hour. It is necessary to make a valve in the ventilation so that in the event of a fire, hot air does not enter other rooms.
Main types of saunas
All saunas differ from a traditional bath in the level of humidity and the absence of water vapor (for the model with infrared radiation). The following types of steam rooms are distinguished:
- With electric oven. In the center of the room is a homemade or factory-made stove, inside of which there are specialized stones.
- Sauna with infrared emitter. Only production lamps from trusted supplier companies are used. Installations are located around the perimeter of the room in the recommended order. An infrared sauna can be done very successfully with your own hands.
There are many advantages of each of the presented models. Infrared radiation has a number of pronounced medical and biological effects that are successfully used in medicine and rehabilitation.
Recommendations for sauna design
A sauna project can be ordered, found in the public domain, or made independently.
First of all, determine how many people will be using the sauna at the same time. The calculation is extremely simple: per person there must be at least 5 m2 of the total area of the sauna. That is, if you are building a building for 6 visitors, its total area must be at least 30 m2.
Determine the optimal stove power for the sauna of the selected area.
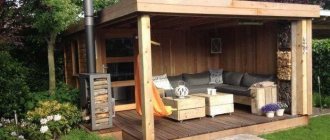
Sauna project with terrace
Plan the order of placement of the bath shelves - they should be located at a distance of at least 100 cm from the stove. The optimal distance between shelf installation levels is 450-500 mm.
Consider the procedure for organizing water supply and drainage, lighting and arrangement of additional premises (shower room, rest room, etc.).
Make sketches and drawings according to the plan.
Project of a sauna in a finished log house with a relaxation room, a billiard room and a guest bedroom
Sauna project with swimming pool
Building a sauna with your own hands
To work independently, you need to choose a sauna model, prepare equipment, and select a room for arrangement. The entire construction process consists of several successive stages:
- Preparation of the drawing.
- Preparation of materials and tools.
- Floor finishing.
- Wall decoration and shelf making.
- Installation of central equipment.
There are a number of parameters for which there are certain requirements:
- Safety rules must be strictly observed.
- All materials used are either fire-resistant or coated with antipyretics.
- There should be no slippery floors or walls in the sauna.
- For wiring, wires of sufficient cross-section with the ability to withstand voltage are used.
- Control panels and distribution panels must be placed outside the steam room itself.
- Lighting fixtures are covered with lamps made of fire-resistant material.
- The owner must be able to easily carry out wet cleaning with disinfectants. For this reason, it is necessary to provide coatings that are resistant to chemical agents.
- Heating devices (electric stove or wood boiler) must be covered with protective nets, gratings or wickerwork.
Special requirements must be placed on the premises: the condition of the walls, floors, coverings, communications, and wiring is assessed. If necessary, all repair work is carried out in advance before the interior decoration of the future sauna begins.
Wooden house and sauna
Why is this advisable?
Wooden furniture for baths and saunas is best suited.
Many people are skeptical about the idea of placing a sauna or bathhouse in a residential building, and in the case of a bathhouse, they are undoubtedly right. The fact is that the sauna involves the use of wet steam, which is obtained by pouring water on hot stones.
In addition, most bathhouses are wood-fired, which means you will need a massive stove with a foundation, wood storage, and a responsibly designed chimney system and ventilation. However, there is still a risk of carbon monoxide poisoning and a fire hazard.
The abundance of wood makes using a Russian bathhouse inside the house dangerous.
Therefore, there is a completely objective set of reasons why placing a bathhouse inside a residential building is undesirable:
- Large volumes of wet heated steam have a negative impact on the building structures of premises;
- The bathhouse poses a fire hazard, especially in the case of a wooden house;
- Burning with wood is fraught with the possibility of carbon monoxide accumulating to dangerous concentrations.
The dry microclimate of a sauna is well suited for wooden structures.
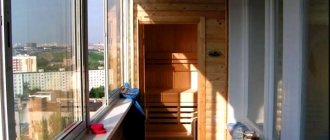
In the case of a sauna, the picture is completely different. The sauna room is often the driest place in the house, as it uses heated air or very dry steam.
In addition, modern stoves can operate on electricity or main gas, which significantly reduces safety requirements; moreover, such devices do not need a foundation or a serious chimney (for an electric stove it is not needed at all).
Most often, the sauna does not have taps or other sources of water, so it is not tied to communications and can be located anywhere, even in the basement. Due to the absence of water and wet steam, the floor in a sauna in a wooden house does not require special measures for waterproofing and finishing.
Wooden sauna baths are in perfect harmony with the interior.
Important! A sauna is almost ideal for placement inside a wooden house. In the homeland of the sauna - in Finland - most houses are built of wood.
Which materials are better
Wooden doors for baths and saunas are an excellent solution.
One of the important issues that must be resolved before constructing and finishing a room is the issue of the materials used. The most logical and acceptable raw material for a sauna in the house would be wood.
The steam room is characterized by conditions such as elevated temperature, fairly moderate humidity, and temperature changes.
Now let’s briefly list the properties of wood that make it an optimal material:
- Low thermal conductivity. Wood is a natural heat insulator and can retain heat, which increases the energy efficiency of the steam room;
- The absence of harmful components that can evaporate at elevated temperatures. Most plastics emit toxins in one way or another, especially when heated to 80 - 110 ˚C, which is quite realistic for a sauna;
- Low heat transfer coefficient upon contact. Wooden surfaces do not heat up and do not transfer heat as intensely as, for example, metal, which saves vacationers from burns when in contact with walls, floors and benches;
- Ability for active gas exchange and moisture adsorption. “Breathing” walls can absorb excess moisture and release it to the atmosphere later, thereby naturally regulating the humidity of the room;
- Healing properties. When heated, the oils and resins contained in wood fibers release beneficial substances, producing an aromatherapy effect.
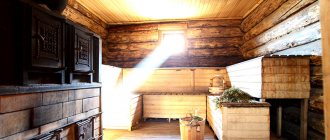
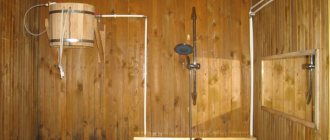
It is noticeable in the photo that almost all objects and surfaces are made of wood.
Important! Also, do not forget about the aesthetic role of wooden finishing, because this material has a unique beauty and harmonizes perfectly with the overall interior of the house.
These properties have led to the use of wood not only as a structural and finishing material, but also as a raw material for the production of furniture, bathtubs, accessories and utensils. For example, on sale there are wooden lamps for saunas and baths, as well as all kinds of grilles and latches, door handles, doors for baths and saunas made of wood.
Pay attention to the handrails, backrests and lamps.
Now let's talk about choosing specific breeds. The wood used for saunas and baths is quite specific, and in the table you will find the names and properties of the most suitable types:
| Wood type | Performance properties |
| Linden | High resistance to high humidity, low thermal conductivity, resistance to rot and parasites, beautiful design, pleasant color, does not crack or splinter |
| Aspen | High resistance to high humidity, excellent thermal insulation qualities, low density, does not crack from impacts and loads, does not rot, contains useful oils and resins, emits a pleasant odor |
| Cedar | An excellent raw material for finishing steam rooms, it contains a high amount of oils, but the resins do not flow when heated, but evaporate a large number of useful compounds. Has a long service life and wear resistance |
| Alder | It is distinguished by exceptional heat resistance and durability, and tolerates changes in humidity and wet environments well. Black alder is often used with light aspen or linden to create interior accents, color zoning and other decorative techniques when decorating walls. |
The price of lining from the listed species ranges from 500 to 1,500 rubles per square meter.
You can use different types of wood finishing in the interior.
Important! It is recommended to use larch as a structural material for the construction of floor beams, floor joists and boards, since this species is absolutely not afraid of high humidity and does not rot with constant contact with water.
Preparation of the drawing
A well-designed plan provides absolutely all parameters:
- Room dimensions.
- Location of communications, including electrical wiring, location of sockets, lighting fixtures.
- Design of shelves and their location.
The drawing indicates the finishing features of the floor and walls, the fasteners used and niches for infrared installations. If you do not have the proper artistic skills, you can use the services of a specialist, and find out the required safety parameters from the regulatory literature.
Insulation of ceilings and walls
Insulation must be laid between the frame bars. You can take the cheapest material - mineral wool. Despite its low cost, basalt-based mineral wool has a high thermal insulation ability. The walls are insulated first, and the ceiling is covered with heat-insulating material later, when ventilation is ready.
From the video you will learn how to finish and insulate the ceiling in a bathhouse
After installing the insulation, the walls need to be covered with special foil, turning its mirror surface inward. The joints of the foil are secured with metallized aluminum tape. Due to the reflectivity of this material, most of the heat will be retained in the room. The steam room will warm up quickly and maintain the temperature for a long time.
Materials and tools for work
For successful work, the master needs to prepare the following set of tools:
- Wooden slats.
- Natural stone-plast for finishing the floor.
- Cement, sand, gravel for pouring and mixing the solution.
- Fire-resistant brick for making a protective frame for an electric boiler.
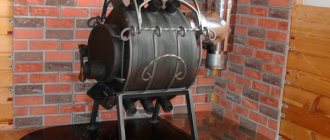
- An old metal container for self-construction of an electric stove or wood-burning boiler.
- Several heating elements (you can make a sauna stove with your own hands).
- Special stone for homemade stoves.
- For decorative finishing you will need paint with fire-resistant properties.
You will also need a grinder, welding, sets of fasteners, a trowel, a tape measure, and a construction pencil. Lighting fixtures, wires, distribution boards can be purchased at any building materials store.
Roof arrangement
A simple and budget option for a roofing structure is a pitched roof (for more details: “How to make a pitched roof on a bathhouse - construction options”). In the case where a sauna made of timber has a distance of no more than 4.5 meters between opposite walls, the installation of rafters is allowed without attaching additional supports.
If this parameter is greater, it is necessary to mount a mauerlat, which is a support beam that is fixed along the upper edge of the walls. If a sauna is being built in a wooden house, then the function of the mauerlat can be performed by the last of the laid crowns.
Finishing the floor in the sauna
Wooden floors are gradually becoming a thing of the past, giving way to traditional stone flooring. This type of finish is the safest and has good resistance to high temperatures. Also in practice, tiles can be used. Instructions on how to make a sauna with your own hands:
- The first step is to prepare the foundation (for individual rooms). For a room or decoration of an already finished room, only the alignment of the underlying base is used.
- After the foundation has hardened or been leveled, they begin laying stone or tiles. Today, craftsmen have the opportunity to use original designs with original design ideas in their work.
- Particular attention is paid to finishing corner joints, crevices, and cracks. The sauna room should be as airtight as possible so that the hot air is evenly distributed throughout the room.
It is necessary to ensure that during construction work there are no protrusions or chips left on the floor, which could lead to injury to sauna visitors.
Designing a wood-burning sauna
After understanding the above, you can begin to develop a project for a wood-burning bathhouse.
The project takes into account how many people the bathhouse is designed for and what tasks it should solve. It’s one thing to just take a steam bath or wash, and quite another to organize a full-fledged vacation in it with a pool, tea party and many guests. When planning a family steam room for 5-6 people, you can limit it to a small volume and take procedures in 2-3 sessions.
A large bathhouse is considered to be a building on two floors, with a steam room of 10-12 m2, a twenty-meter relaxation room, two swimming pools and showers, a billiard room on the second floor and a jacuzzi. To take care of such a bathhouse you will have to hire a person.
Today you can find a standard bathhouse design for every taste. If you take it as a basis, you can develop your own project for building a wood-burning bathhouse, taking into account your wishes.
Installation of central equipment
The final and most important stage of the work.
Infrared emitters are located around the perimeter (two on the back wall, two on the front corners, one along the bottom contour of the shelves). The electric oven is placed in the center of the steam room, enclosing the installation with a protective casing.
There are special requirements for the installation of a wood-burning boiler. An old metal container (for example, a frame from an old washing machine) is used as a boiler. The opening for storing firewood can be located either in the steam room itself or brought outside (to the next room).
Construction of a wood-burning sauna
In order to build a comfortable and safe bathhouse, it is necessary to use common sense at every stage of work, use high-quality materials, avoid unnecessary savings and comply with all rules and regulations. You can build a sauna inexpensively if you work independently, but professionally. We'll do this now.
Preparing the site for a wood-burning sauna
The division of the building site must be carried out according to the project, which indicates the location of the building. The work can be divided into several stages:
- Clear the area for the future foundation from debris, roots and stumps.
- Remove the plant layer of soil from it.
- Using pegs, a cord and a tape measure, determine the perimeter axes of the building on the ground.
- The correctness of its right angles is determined by cords stretched diagonally. They should be the same.
After completing this process, we begin excavation work.
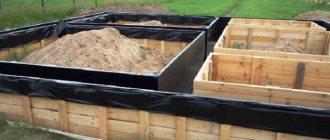
Construction of a foundation for a wood-burning sauna
For the construction of baths, columnar or strip foundations are used.
Columnar bases are made on dense and heavy soils for small bathhouses made of wood, and strip bases are made for large bathhouses made of stone or brick. The columnar foundation can be made from asbestos-cement pipes with a diameter of 100 mm and a length of 4 m. For a small bathhouse you will need 30-40 of them. The pipes are cut in half and installed in pre-prepared wells one and a half meters deep and 200 mm in diameter. The sinuses near the pipes are filled with sand, spilled with water and compacted with special care.
The strip concrete foundation is performed in the following sequence:
- A trench 0.5-0.8 m deep is dug along the perimeter and internal load-bearing walls of the future building.
- The bottom of the trench is covered layer by layer with sand and crushed stone, the thickness of such a cushion is 100-150 mm.
- Formwork panels are made from boards, which are assembled in a trench and secured with stakes and spacers.
- It contains a reinforcement frame made of metal rods with a diameter of 12 mm and mounting sleeves made of sections of plastic pipe 50-100 mm in diameter for laying utilities into the bathhouse.
- The formwork is filled with concrete to the design mark. Removing air bubbles from the mixture is achieved by using an electric deep vibrator.
- After polymerization of the concrete, the formwork is removed after a few days, and the surface of the foundation is covered with waterproofing in the form of bitumen mastic or two layers of roofing felt.
Construction of walls of a wood-burning sauna
The material most often used for a Russian wood-burning bath is logs or wooden beams.
Often foam blocks or bricks are used to build its walls. Which one to choose depends on the desires and capabilities of the owner. Of course, a wooden sauna is traditionally the best option. Baths made of timber are made using frame technology, which eliminates the presence of a powerful foundation. It is especially suitable for people who do not have solid experience in construction work, since all frame elements are sold ready-made. Therefore, the entire building is assembled on a foundation, almost like a children's construction set. However, the walls of such a bathhouse are erected in full accordance with the design, and the installation of its elements is controlled by the building level.
In your rush to work, do not forget about window and door openings, otherwise it will be difficult to get into the new bathhouse. The installation process of windows depends on their design and material. The window frame is fixed in the opening using anchor bolts. The resulting small gaps on the outside of the frame are sealed with polyurethane foam. The beautiful framing of the frame is completed by making the slopes of the window opening.
Door installation is done in the same way. Hinges are hung on the prepared door frame and door leaf and locks are cut into place. The finished door is decorated with decorative elements.
Construction of a roof for a wood-burning sauna
After installing the enclosing structures, we proceed to the installation of the roof. To do this, the following sequence of actions is required:
- We are installing the roof base. This structure is made of powerful timber and is laid along the perimeter of the walls.
- The rafters will rest on the mauerlat. They are assembled in the form of a compass with a cross beam. Assembly takes place below on the ground, and then the finished rafters are lifted onto the wall and connected into a single structure with the help of bars and boards.
- A sheathing of boards is installed on the slopes of the roof frame in the transverse direction, which are attached to the rafters with screws. It must leave free space for the passage of the chimney.
- The vapor barrier film is secured with a stapler to the bottom of the rafter legs.
- Insulation is placed in the sheathing, most often it is mineral wool.
- The insulation is covered with a waterproofing polyethylene film.
- To allow ventilation of the roof, an additional counter-lattice is installed on the rafter structure.
- The roofing material is laid: slate, profiled decking, metal tiles or ondulin.
Installation of flooring in a wood-burning sauna
Once the roof is ready, we move on to installing the floor for our wood-burning bathhouse. To do this you need to perform the following operations:
- Insulate the basement part of the foundation from the inside. We will use mineral wool as a heat-insulating material, which after installation should be covered with a waterproofing film.
- In the dressing room and steam room, lay wooden logs on the floor, wrapped with roofing felt underneath.
- Make a thermal insulation backfill for the floor with expanded clay, and place mineral wool slabs covered with a vapor barrier material on it.
- It is recommended to install an insulated concrete floor in the washing area and then cover it with tiles. In this room and in the steam room, floor drains are installed to discharge contaminated water into the sewer system or drainage pit.
- In the remaining rooms, a plank floor is laid on joists, which consists of edged boards tightly fitted to each other. Liquid glass is used as a means to prevent them from rotting.
DIY sauna photo
Leaky floor made of individual boards with chamfers
To prepare the soil foundation for the floor structure, it is necessary to remove the fertile layer, no matter how thick it is.
Leaking floor over concrete base. 1. Soil. 2. Expanded clay concrete. 3. Cement screed. 4. Gutter. 5. Brick column. 6. Waterproofing. 7. Lags. 8. Floorboard
Leaking floor on the ground with filtering capacity. 1. Soil. 2. Sand cushion. 3. Gravel. 4. Support pillar foundation. 5. Brick pillar. 6. Waterproofing. 7. Lags. 8. Floorboard
It is important at this stage to decide how and where the water will be drained outside the building. For this purpose, a tray (200x150h mm) is provided in the concrete base into which water flows. The bottom of the tray is made with a slope towards the drainage pit (30x30x25h). It is better to locate the pit closer to the location of the external water collector. From the pit, water flows through the drain pipe into the reservoir.
The slope of the surface for water drainage is 2–3 cm per meter in the direction of the tray. It is created either by leveling the ground under the floor or by using bedding (sand and gravel) under the concrete base. The general floor level in the steam room and washing room is made 30 mm lower than in adjacent rooms with normal humidity.
A sand and gravel cushion 10–15 cm thick is laid on the compacted soil. It is necessary to fill and compact the sand in layers of no more than 5 cm, wetting it with water. Next, a heat-insulating layer of expanded clay concrete is laid. The approximate consumption of raw materials per 1 m3 of concrete is:
- without sand:
- cement M300, 400 – 250 kg;
- expanded clay – 720 kg;
- water - 100-150 l.
- with sand:
- cement M300, 400 – 230 kg;
- expanded clay – 440 kg;
- sand – 195 kg;
- water – 100-130 l.
It is best to prepare a concrete solution in a concrete mixer or order
It is also acceptable to use other lightweight filler (schungizite, perlite, expanded vermiculite, crushed porous rocks, etc.). The thickness of the expanded clay concrete layer can be taken as 150 mm. Concrete is laid in strips no more than 2.5 m wide on a base moistened with water. To limit the stripes, slats are installed, they also serve as beacons for determining the thickness of the layer. The greater the thickness of the thermal insulation layer, the warmer the floor.
Be sure to maintain a slope towards the gutter or funnel for collecting and draining water
A cement-sand screed 40 mm thick is laid on a layer of expanded clay concrete. Mortar composition (M100) cement/sand: one to three. Before the solution sets, it is necessary to iron the surface with cement laitance. Cement is mixed with water to form liquid sour cream. The surface is covered with an even thin layer of the mixture. This is done to increase the water resistance of the concrete base.
Brick columns made of solid clay ordinary bricks (250x250 mm) in cement-sand mortar are installed under the logs. The distance between the posts is 0.8–1.0 m in the center. 2 layers of roofing material are laid on their surface. Next, the logs are laid. The floorboards of the leaking floor have chamfers at the edges to allow water to drain away. The gap between the boards is 5–6 mm.
Important! Sand-lime bricks, hollow stones, and silicate blocks should not be used in damp and wet rooms.
This flooring is made removable in order to be able to dry the floorboard to increase its service life. Boards can move when walking on them, they are often grabbed with nails, landing nests up to 5 mm deep are prepared for them in the logs, or spacers are placed on the boards along the edges.
We suggest you read: How often can you visit an infrared sauna?
The flooring of the steam room and soap room can be made from removable wooden panels. The boards are laid with a gap on transverse bars of 50x50 mm. The size of the shields is taken for reasons of ease of removal and drying.
The floor construction is the same: compacted soil, compacted sand and gravel mixture, insulation - expanded clay concrete 150 mm thick. Ceramic floor tiles are laid on a cement-sand mortar 10–15 mm thick. The floor has a slope that is directed towards the drain tray. Removable panels are installed on the tiles so that the lower bars are located along the water drain.
Furnace installation
In modern saunas, electric stoves are most often installed. You can buy them in a specialized store or assemble them yourself. But in fact, it must be installed and connected correctly.
The oven is selected based on the parameters of the steam room, that is, its volume. Calculations carried out by specialists from sauna equipment manufacturing companies show that for high-quality heating of one cubic meter it is necessary to spend 1.4 kW of energy. A simple arithmetic calculation shows that, for a steam room with a volume of 5 - 9 cubic meters. m, it is enough to install a stove with a power of 6 kW. Such a stove can operate on a 220 V network. Furnaces with higher power must be connected to a 380 V network.
In addition, there are certain restrictions on installing a stove in a steam room. So a 6 kW oven must have safety zones - at least 70 mm on the sides, 100 mm in front. To connect it, you will need to install a 35 A fuse.