What is liquid wallpaper, what is its feature?
Liquid wallpaper is a special mixture that is prepared from filler, glue, dye and other decorative additives (they can be mica or marble chips, glitter). Mixtures are also added that give the finished wallpaper plasticity. As a result, the result is a material for wall decoration that can be considered something between ordinary wallpaper and decorative plaster.
To understand the features of using liquid wallpaper, you should pay attention to the following factors:
- Wallpaper can be used to decorate even rooms that have uneven walls. They help to hide defects well even on walls with cracks, chips, and potholes.
- You don't need to spend a lot of time grouting and plastering the walls.
- Thanks to the individual components, mold and mildew cannot form on the wall.
- Dust is not attracted to the material, since the material has antistatic properties.
- Liquid wallpaper can be quickly restored, regardless of which area is damaged.
- Can be used in any room (except the bathroom) to decorate not only walls, but also ceilings. A big plus is also the sound and heat insulation of liquid wallpaper.
How to apply liquid wallpaper to the ceiling
The finishing application process should be approached in 3 steps:
- ceiling preparation stage;
- preparing the mixture;
- direct application of the prepared mixture.
Warning! It must be remembered that the wet mixture on the ceiling looks 1-2 tones darker and more intense than when dried.
Preparing the ceiling before applying liquid wallpaper
Preparing the ceiling for a new finish depends entirely on the previous version of the finish of this surface. In this regard, a number of specific preparatory measures are being carried out that require mandatory implementation. This can be either the complete removal of the previous layer of finishing, or its cosmetic repair and leveling.
Preparing the ceiling on a plastered concrete slab
If the ceiling is carefully plastered and leveled, then it should only be primed. Here you will need a primer from the “Betonkontakt” series with deep penetration. Using a construction roller, you need to apply 2-3 layers of primer mixture to the ceiling surface, with the obligatory drying of each of them.
The direction of the strokes in each subsequent layer should be changed. After the last layer of primer has completely dried, you can dilute the dry mixture and begin applying it.
Preparing a ceiling with rust stains, large irregularities and seams
Traces of rust may appear from metal fittings inside the floor block. Such marks cannot be ignored, as over time they will certainly appear on new wallpaper. To remove them, you need to apply acid (phosphoric, hydrochloric, acetic) to the ceiling with a brush. When the stains are completely dissolved, rinse with water. After drying, these places should be painted with moisture-resistant paint.
Small and large cracks should be sealed with fine-grained putty using a plastic or metal spatula. Since the ceiling is wetted during the application of liquid wallpaper, mixtures with cement or polymers should be used to seal defects.
After the surface has been cleaned and dried, it is covered with 2-3 layers of deep penetration primer with the obligatory drying of each layer. Now you can prepare the mixture and start gluing it.
Preparing the ceiling from gypsum plasterboard and wood board
Ceilings made of these materials, as well as multi-level systems, do not require special alignment for liquid wallpaper, since they are initially installed strictly at a vertical or horizontal level. The plasterboard surface needs to be primed once, but not with a too wet roller or brush, as the plasterboard gets wet from water and delaminates. Therefore, the surface of plasterboard or wood needs to be primed and dried well, and then proceed to diluting the wallpaper in water and applying it.
Preparing the ceiling with whitewash, acrylic paint, paper or liquid wallpaper
Ceilings with such coatings must be cleaned and washed. The whitewash needs to be moistened with a special solution or water, the whitewash layer must be removed with a spatula, and then washed off completely. Remove paper and liquid wallpaper in pieces, prying off the layers with a spatula. Clean the painted surface with a grinder or a hard metal spatula down to the very base of the floor slab. Then the cleaned ceiling should be primed 2 times and dried. Now it is ready for a new finish.
How to properly prepare the mixture
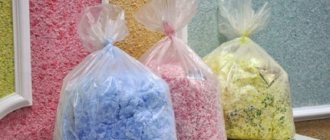
In construction supermarkets, liquid wallpaper is sold in plastic buckets, ready for use, or in plastic bags in a dry mixture that must be prepared correctly.
The dry mixture must be diluted with warm (but not hot) water and left to swell for the time indicated in the instructions. Typically it ranges from 15-20 minutes to 2-4 hours. If you plan to add color to the mixture (in the case of white wallpaper) or decorative additives, then this must be done immediately after adding water. Then mix all components thoroughly with your hands.
It is preferable to knead the mixture with your hands, since with such delicate mixing the fibers do not tear or deform, and the mixture receives a sufficient amount of air. The construction mixer should be used only at low speeds, otherwise the mixture will be oversaturated with air bubbles, and this will significantly complicate its application.
How to glue liquid wallpaper to the ceiling
Each master finisher has his own optimal option for working with this finish. Beginners and “amateurs” are advised to adhere to useful rules:
- For finishing, use a construction trowel, a roller and a wide grater.
- First, all particularly complex areas and shapes of the ceiling are finished.
- Wallpaper application always starts from the window.
- First of all, the mixture must be applied to the joints of the ceiling and walls.
- The mixture is applied in a piece, which is then stretched and leveled over the surface. The next piece is placed next to the aligned one and pulled out evenly and gradually.
- When applied, the construction float and trowel should be at an angle to the plane (approximately 15-20°). Do not put too much pressure on the tool, otherwise the surface will become uneven.
- To control the application of the finish, you can use a flashlight or a carrying lamp, which must be directed along the plane of the ceiling - this way all irregularities will be clearly visible.
The movement of the grater (roller) during leveling must be carried out in a certain direction.
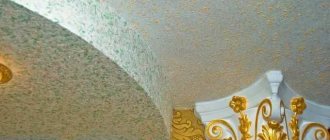
Advice! If you use a special texture roller when applying, you can achieve an interesting pattern. This technology is often used to create a “fur coat” effect.
Wallpaper is glued manually and mechanically. For manual application, use a construction spatula, roller, or grater. The mixture is applied with a spatula or by hand, and then leveled over the surface with a layer thickness of 1-5 mm. When applying wallpaper mechanically, a construction spray gun or pump is used. In this case, the mixture is applied to the surface in thin layers several times.
Test application of liquid wallpaper on the ceiling
In order to apply the finish evenly, you need to practice the technique of working with a spatula. With different directions and pressure, the drawing turns out special. Therefore, before starting the main work, you need to “test your hand” in a small area and decide on your technique.
Installation of ceiling decor, molding and plinth
Before applying wallpaper, all decorative elements must be mounted. This fact is a distinguishing feature between gluing paper and liquid wallpaper. Therefore, before starting work, baseboards, moldings and all decorative elements must be glued. In addition, if the ceiling is designed with a pattern, then before applying the finishing, a sketch must be outlined in pencil.
Direct application of liquid wallpaper
The prepared mixture must be applied to the ceiling using a trowel, a wide construction spatula, or simply with your hands. Then level the surface with a roller or grater so that the layer thickness is approximately 1.5-2 mm. When leveling, be sure to ensure that the wallpaper has an even layer and the desired texture.
Each new section of the ceiling should be done in a new place, close to the already leveled one, and when leveling the latter, bring both into a single layer. The entire surface should be treated in this way, section by section. It is advisable to apply the finish to the entire ceiling area of one room in one go, so that when it dries, the application boundary is not visible.
Drying and finishing the ceiling
The time for complete drying of liquid wallpaper is 20-70 hours. During this period, there should be no drafts or operating heating devices in the room. In this case, they will dry naturally and evenly. After complete drying, the wallpaper is covered with a layer of moisture-resistant varnish to preserve the color and protect the finish from external negative factors.
How to make a drawing from liquid wallpaper
Using liquid wallpaper on the ceiling you can reproduce any pattern or fresco. Of course, this painstaking work will take more time to finish, but it is worth the expense.
You can create a pattern from liquid wallpaper in two ways - using a stencil (can be purchased at a construction market) or your own sketch.
Everything is simple with a stencil. The main layer of the mixture must be applied to the ceiling in the usual way. Then, after drying this layer, use masking tape to attach the stencil to the ceiling. You need to apply an “artistic” layer of liquid mixture into it.
To make your own design on the ceiling, you first need to apply your own sketch to it. Then cover the main area in the usual way, going slightly beyond the drawing. Using a narrow spatula, move the wet layer to the exact border of the pattern and allow the wallpaper to dry completely.
When the first base layer has dried, apply a layer of the mixture within the boundaries of the sketch (without reaching them), as in a stencil, observing all the colors and texture. Next, very carefully use a narrow spatula to connect both layers, making this line the silhouette of a drawing or pattern.
DIY liquid wallpaper for the ceiling: video
Video with a master class on applying liquid wallpaper to the ceiling:
Leroy Merlin liquid wallpaper catalog with prices
Leroy Merlin stores give you the opportunity to choose any shade of liquid wallpaper. Today, retail outlets offer the following types of liquid wallpaper:
- Cotton - they look very attractive, soft and pleasant to the touch. Thanks to them you can create a feeling of comfort and coziness in the room.
- With silk fiber – fade resistant and durable. You can admire the material on the wall for a very long time without changing color.
- Cellulose wallpaper is an ideal option for rooms that are poorly heated, since this type of wallpaper has good thermal insulation. Cellulose wallpaper is the most affordable among all liquid wallpapers.
The cost of liquid wallpaper will be affected by the type of main storage device included in the composition. In the Leroy Merlin catalog you can find liquid wallpaper at prices starting from 833 rubles. per package. It is worth noting that with the same cost, the mixture has different weights, from 0.762 to 1.02 kg. You can view the full catalog of Leroy Merlin liquid wallpaper by following the link.
If we talk about the most expensive options, then they include decorative silk plaster. It has 3 shades: golden, green, beige. The material does not allow heat to pass through and is quick to apply and dry. When applied there are no seams or irregularities left. At Leroy Merlin you can buy not only liquid wallpaper, but also related materials for application.
If you want to choose something more budget-friendly, then you should pay attention to:
- A basic decorative coating that is used for interior wall decoration. This option is best used in the hallway or bedroom, living room. It is allowed to use special fillers in parallel. Even a non-construction specialist can apply such mixtures.
- White base coat – refers to environmental materials. It does not accumulate dust and does not crumble over time, can retain heat for a long time and can easily withstand temperature changes. If a section of the wall is damaged, it can be restored without any problems.
But you need to keep in mind that cheaper options are not considered waterproof. Because of this, it is better not to use them in the bathroom or kitchen.
Decorative liquid wallpaper weighing 1 kg will cost an average of 833 rubles.
If glass decorative balls are needed as an additional component, they will cost 660 rubles per 360 grams. The decorative additive can be purchased from 134 to 228 rubles (suggested weight - 0.5 kg, 0.1 kg).
Advantages of liquid wallpaper
This material appeared not so long ago and its properties are not so well known to ordinary consumers, so it is worth describing its advantages.
- The most modern materials are used in the production of liquid wallpaper. They perfectly withstand exposure to moisture, which is observed almost constantly in the bathroom, and do not lose their properties for a long time.
- Durability of use is also achieved due to the fact that if a small part of the wallpaper is damaged, you can quickly eliminate the shortcomings that have appeared and for this you do not need to buy a whole roll and re-glue half the wall. It will be enough just to remove the damaged part and make cosmetic repairs by applying a new layer of material. In this case, there is no need to select and join the pattern, since the coating is seamless.
- Liquid wallpaper in the bathroom (photos can be viewed on our website) prevents the appearance of mold, germs and bacteria. The fact is that the components of the product are natural substances that do not allow harmful microorganisms, as well as insects, to multiply on their surface.
- This material also contains antistatic substances. This means that dust will not accumulate on the walls. This property will be appreciated by those who have family members who suffer from allergies.
- Applying liquid wallpaper is very simple and easy. To do this, you do not need to have any unique skills and the procedure can be handled alone.
- Liquid wallpaper, due to its density, perfectly retains heat.
- Odors are practically not absorbed into this material.
- This wallpaper is soundproof.
- They do not fade or fade when exposed to sunlight. This is becoming an important property, as more and more apartments are equipped with bathrooms with one or even several windows.
- The variety of shades allows you to choose a product for any interior.
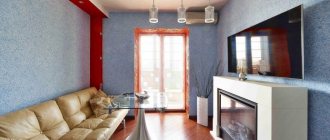
By the way, liquid wallpaper can be used in other rooms. On any wall they will look stylish and modern.
Liquid wallpaper for the bathroom
To summarize: the main advantages of liquid wallpaper are a long service life, ease of application, the ability to quickly replace damaged parts, environmental friendliness, resistance to dust, moisture, water and sunlight, elasticity, seamlessness, thermal insulation and sound insulation. This set of qualities makes it possible to make a choice in favor of this material for covering walls, abandoning the already boring tiles or ordinary paint.
Related article: How to hang wallpaper on foam plastic: surface preparation and gluing
Liquid wallpaper in the bathroom, reviews of the use of which can be studied on our website, are similar in properties to glass wallpaper. But even here they benefit from environmental friendliness, which their “colleagues” cannot boast of.
Many people believe that liquid wallpaper in the bathroom (see photos in the article gallery) is inconvenient because it needs to be covered with a layer of varnish when applied. This information is outdated, since such a procedure was required at the very beginning of the development of their production technology. Modern models do not require additional coatings.
Also outdated is the information that liquid wallpaper in the bathroom (reviews should be looked at for the last 2-3 years) swell and lose their attractive appearance. The very first models had this disadvantage, one of the components of which was cellulose, the properties of which did not allow it to withstand constant exposure to moisture. Modern manufacturers guarantee that their products can be glued in any room, regardless of the level of humidity in them.
DIY liquid wallpaper for the bathroom
Components of liquid wallpaper
In appearance, this material is largely reminiscent of paint or decorative plaster. It is applied almost the same way. But still there are differences that are quite significant.
Liquid wallpaper is sold not in rolls, but in bags. The appearance resembles a dry powder, with a large number of substances in the composition. For example, wallpaper from different manufacturers may include:
- cotton fibers;
- cellulose;
- dyes;
- adhesive base;
- mica;
- dry seaweed;
- wood chips, etc.
The last few components do not affect the properties of the wallpaper in any way, but only give it a specific aroma.
How to properly apply Leroy Merlin liquid wallpaper on a wall
Those who choose the type of wallpaper should take into account that liquid wallpaper is much easier to apply than regular wallpaper. Although the preparatory stage before gluing is no different.
After cleaning and priming the surface, apply the plaster using a trowel in an even layer. Before it hardens, you can remove the area you don’t like and replace it with a new one.
The material can be applied without special skills, although some features are still worth taking into account.
Is it possible to apply liquid wallpaper to the ceiling?
Since liquid wallpaper is a universal construction finish, it can be used on any type of ceiling with different bases and geometries. The finish looks great on smooth and flat surfaces, creating the effect of depth and embossing. Liquid wallpaper can be used to decorate multi-level ceilings, boxes and niches.
They go well with other types of decoration and are harmoniously combined in color and texture with traditional decor. Wallpaper can be used simultaneously on the ceiling and wall (zonally or in a general area), creating a visually smoothly flowing homogeneous surface from top to bottom or vice versa. Additionally, this finish can be used to cover complex oval shapes of pendant levels, highlighting key design accents.
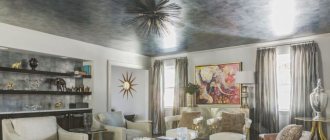
Liquid wallpaper in the interior
If you find an error, please select a piece of text and press Ctrl+Enter.