Advantages of IKEA furniture
IKEA's modern production facilities produce high-quality home furniture.
The main advantages of the company are quality, affordable price and compactness.
New bathroom furniture collections are constantly being developed:
- affordable price;
- product update every year;
- compliance with fashion trends;
- possibility of combining products from the same series.
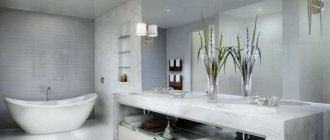
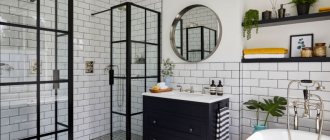
Various IKEA furniture
Cabinets (pencil cases) with mirror surfaces will decorate the room. IKEA bathroom furniture is made of high-quality plastic, glass, and has spectacular additions of metal and mirrors. You can store a lot of little things in the products.
A wide selection of furniture can be selected according to price, materials and original designs.
Furniture color scheme
The furniture is presented in various shades:
- acrylic products in white, pale blue or transparent tones;
- beige products;
- wenge colors;
- beige;
- dark range of goods.
Acrylic is a clean and environmentally friendly modern material. It is convenient for bathrooms and has excellent performance qualities. Easy to care for, the furniture is not afraid of frequent washing, mold or mildew never forms on it.
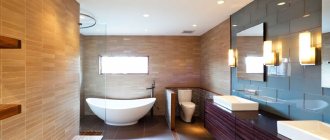
The IKEA store also has ready-made solutions for bathrooms, where you can try on the proposed design according to the size of your bathroom.
We offer photos of IKEA bathtubs to make the right choice and get acquainted with design solutions in different styles and colors.
Types of bath screens
Any screen intended to be placed under a bathtub must meet the following requirements:
- be comfortable;
- have sufficient reliability;
- have an aesthetic appearance.
At the same time, each person has his own ideas about durability and comfort. In this regard, there is no bathtub design that is universal and suitable for all bathrooms with different sizes and different designs. Next, we will analyze in detail what types of screens are currently used to decorate the space under the bathroom. After familiarizing yourself with them, everyone will surely be able to choose the right one for themselves.
How to rationally use bathroom space?
When purchasing everything for the bathroom at IKEA, all products are made of durable, moisture-resistant materials. Here it is easy to choose furniture, decor and textiles that will create an individual style.
You can choose corner cabinets, hang shelves and cabinets with mirrors instead of a large mirror. For a small shower, a small sink is more suitable.
To store things and small items, you can use compact carts on wheels.
Screen shape
You can make a bathtub screen yourself, buy it in a store, or have it made by a professional craftsman. All these options have their pros and cons and, in any case, first you will have to decide on the shape of the future screen.
Article on the topic: Rod (cornice) for curtains in the bathroom
Bath screens can be of three types:
- In the form of a blank wall, it does not imply any open niches; it completely covers the space under the bathroom.
- With a footwell at floor level - the indentation will give you the opportunity to stand close to the bathtub. This will make it much more convenient to clean the bathtub and bathe children in it.
- Tilted at an angle, it also allows you to get closer to the bathtub and, in addition, protects the bathroom floor from splashing water.
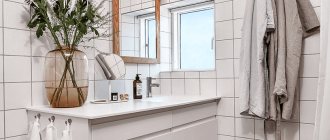
Bathroom accessories from IKEA
Comfortable, beautiful sanitary ware will decorate the bathroom, and hanging shelves take up less space.
A stool ladder is ideal for a small room. In addition to the function of a staircase, it can be used to store bath accessories.
It is convenient to place a shelf with a cutout for pipes under the sink.
Equipment purchased from IKEA will reduce utility costs. For example, IKEA faucets save up to 50% water (without reducing pressure).
To save on electricity, it is better to use energy-saving light bulbs with a long service life.
A plastic stool with rubberized legs and top is useful.
If there are small children in the house, the store offers a 2-step staircase with rubberized steps to prevent the child from falling.
The company offers a wide range of multi-colored IKEA bath mats and other accessories for home decor.
Installing a sliding screen with your own hands
Installing a sliding screen on a bathroom is not at all difficult. To do this, you do not need special skills and high professionalism, just a little effort, accuracy and patience.
Installation of a structure for a cast iron bathtub does not require additional work. You will only need to fix the legs so that the sliding screen structure takes the correct position. Acrylic bathtubs will require more care. They are lighter; by unscrewing the legs, you can slightly lift the container.
Frame for screen from profile
The frame for the screen is made from ordinary ceiling profiles. They are secured under the side of the bathroom with wooden blocks installed vertically.
Attention! Firmly tamp the bars between the bathtub and the floor.
Take aluminum corners and make holes in them for fastenings, using a drill for this. Ensure that the screen is held firmly and securely.
If the screen does not match the dimensions of the bathroom, make a more accurate calculation (subtract the thickness of the corners from the distance between the two walls). Remove the panels and cut the guides to the calculated length.
Plastic screen mounting option
Next, insert the legs into the screen and, having selected the required height, install the frame. Mark the places on the wall for attaching the corners and drill holes for the dowels along them. The length of the upper curtain of the screen should reach its middle, and the length of the inner curtain should extend beyond the top by approximately 5 cm. Then cut the curtains to the desired size with a grinder.
Coat the guide well with silicone, install the frame and securely fix the corners. Remove excess silicone immediately with a dry cloth before it hardens.
Advice. For greater ease of use, glue handles to both movable panels of the screen.
At this point, the entire installation process can be considered complete. As you can see, there is really nothing complicated about it. Select high-quality materials, be careful and careful, then you will definitely succeed.
Make your bathroom stylish, beautiful and functional, and the widest range of materials and textures of sliding screens will help you with this.
How to properly install a sliding screen under a bathtub: video
Sliding screen under the bath: photo
Varieties
A practical option for bathroom furniture are tall cabinets with legs. You can clean underneath them. The legs are adjustable to ensure greater stability of the structure. When forming a set, you can include wall cabinets: with a mirror or blank. The catalog presents very small cabinets and rather voluminous designs with a combination of open and closed shelves.
Despite the functionality, this is quite inexpensive bathroom furniture. The designs vary in filling and finishing. Customers can choose from tall pencil cases with one door and wide glazed cabinets. You can buy a structure specially designed for fixing above the washing machine. This solution will allow you to solve the problem of arranging the premises as efficiently as possible.
Albert rack is the best selling rack in Ikea:
- is relatively cheap
- You can remake it to your taste: repaint, saw.
- Thanks to its small size it fits into any room.
I have made a selection especially for you on how this rack can be used at home and in the country.
1. Plant stand.
Very often, the Albert shelving unit from Ikea is used as a stand for plants, especially in the spring, when seedlings are grown on it.
Sawed rack
Some people cut the rack in half and place it on the window sills, while others simply leave the rack intact near the window.
The rack is convenient for growing plants because you can easily hang an ultraviolet lamp on it for additional illumination of the plants.
2. Also, due to the low cost of the rack, it is actively used in the countryside and in greenhouses.
3. The shelf on the balcony fits
– due to its small size it is suitable even for the narrowest balconies.
4. A shelving unit is used in the country house.
Due to its low price, the rack is actively purchased for summer cottages as inexpensive furniture. If you need to put dishes in the kitchen or need to store things, the Alyuert shelving unit will help out.
Due to the fact that it is sold from simple untreated wood and is not even varnished, this rack can be repainted to your taste, covered with paper - do whatever you want and your imagination allows.
That’s why I use the Albert rack even in my apartment! Maximum space, minimum furniture - now this slogan is very relevant!
5. Living room.
The Alber shelving unit is quite capable of decorating a small living room in a modern style, and is also ideal for decorating a student’s room
6. Kitchen.
Shelving is used very actively in the kitchen.
The rack can be placed in the narrowest place of the room and it will fit perfectly, unlike a closet.
The design of the rack is so simple, it costs a penny - if you wish, you can saw off the excess and change the size.
Here is another option for using shelving in a narrow space in the kitchen. The kitchen itself is unusual and bright.
I liked this version of the kitchen. Isn’t it gorgeous?? Most likely, a kitchen-living room.
7. Hallway
It is convenient to store bags and shoes on the rack. I saw how such a rack was completely filled with shoes. The space between the shelves also allows you to store excess shoes in boxes.
8. Rack
fits perfectly
when decorating a dining area at work.
9. Workplace.
The rack is perfect for decorating a workspace for needlewomen. The girl herself made a table from furniture board, and placed shelves on the sides.
10. Bathroom.
The Albert shelf from Ikea can be placed in the bathroom. Convenient to store shampoos and towels on the rack.
11. Children's room.
You can also use a shelving unit from Ikea to decorate a children's room. Takes up little space, you can put boxes and toys on the shelves.
It is especially important to use shelving when there is little space, and as a rule, the nursery is made on the attic floor and the ceiling in the room is often sloping.
Here's a great idea for a multi-rack storage system.
12. Bedroom.
The rack can also be used in the bedroom: store your phone, cosmetics near the bed, glasses, books - the rack functions as a bedside table.
Sometimes the shelving unit is sawed in half so that it is just the height of the bedside table.
13. Storage room, garage.
Naturally, the rack is used in the pantry, with its help you can organize order.
Materials for making the screen
The material of choice for the bathroom screen is plastic. It is convenient to use monolithic types of polycarbonate (opaque, colored, etc.) or PVC panels. Less suitable are MDF and gypsum board, plywood or fiberboard. When choosing fences for the bathroom, you need to use the most moisture-resistant types.
Screen made of plasterboard.
Don't miss: Waterproofing tile joints. Sealing seams in the bathroom with your own hands
Laying ceramic tiles
Brick walls are installed as a base under the tiles or a rough gypsum board screen is assembled. The tiles are installed using standard moisture-resistant tile adhesive:
- you need to start from the open part of the bathtub or from its free corner, from above, so that the cut elements are under the sink, against the wall, near the floor, etc.;
- to maintain uniform seams, use dividing crosses, inserting them in the corners between the plates;
- when the glue sets, the crosses are removed and the seams are filled with special grouts with antiseptic and hydrophobic properties.
Expert opinion
Roman Vasiliev
Builder, repairman
In addition to tiles, the bath screen can be finished with mosaics, natural stone, porcelain stoneware, etc.
Features of using MDF panels
The material is not moisture resistant enough for use in the bathroom. Before installation, it is advisable to treat all sections with water-repellent impregnation so that the canvas does not deform when exposed to water. The outer side of the panel is laminated and is resistant to drops and splashes, as well as high humidity. For a bathroom, you need to choose MDF with a protected underside of the sheet (most often painted).
Installation begins with attaching the starting profile for walls made of plastic panels (U-shaped). It is fixed to the top bar or profile so that the top edge of the MDF can be driven into the recess. If you do not plan to install a plinth on the floor around the bathtub, you can fix the lower edge in the same profile, filling it with sealant or glue. Fastening to the frame elements is carried out from the inside, using short self-tapping screws for gypsum boards.
Finishing the screen with plasterboard
Making a screen or base for tiled cladding from gypsum plasterboard with your own hands is no more difficult than other architectural elements. The sheets are cut according to width and length measurements, and then mounted on the frame with short self-tapping screws. The head of the fastener must be recessed into the surface of the material.
Expert opinion
Roman Vasiliev
Builder, repairman
After installing all the sheets, the joints are glued with reinforcing tape and putty. The holes from the screw heads are also smoothed with putty. After installing the gypsum board, it is necessary to paint the surface or tile it, since the material does not have sufficient moisture resistance.
Cladding with plastic panels
Plastic panels are convenient not only for wall decoration, but also as a basis for a screen under a bathtub. When using this material, you can decorate rooms in a single color scheme and style. For installation, the same profiles are used as for fastening to the walls (starting and finishing), and the lathing is performed by placing 2 horizontal strips along the height of the bowl (distance about 30 cm)
The work is done like this:
- fasten the starting molding using a stapler;
- a corner or starting profile is placed on the outer panel, inserted into the guides at the top and bottom;
- carry out to the outer corner or close to the wall;
- fixed to the sheathing elements from the side of the wide mounting flange;
- insert the next panel into the recesses of the moldings (with the short flange towards the already installed part), connect tightly, closing the joint, fix the wide flange on the sheathing and repeat until the work is completed.
If the last panel in a row needs to be cut to width, measure out the required size, cut off the excess material, and cover the cut with molding.
Features of using wooden panels
Wooden screens can be assembled independently from lining, thin boards, etc. First, the panels are prepared and then mounted on the frame. Various manufacturing options:
- blinds (with inclined slats fixed in a frame);
- panel (shaped canvas in a frame);
- panel boards (made of tightly fitted boards);
- carved (from planks with notches), etc.
The choice of variety depends on the style of interior design.
Expert opinion
Roman Vasiliev
Builder, repairman
Any wooden screen must be impregnated with a water-repellent agent before installation. All surfaces must be coated with varnish or paint.
Installing a wood screen is easy:
- paneled fabric or blinds are used as hatch doors, etc., securing them on hinges;
- fixed frame-type parts are fixed directly to the frame parts using self-tapping screws (you can screw them in from the inside if the external finish should not be damaged);
- screens without frames can be assembled directly on the frame, adjusting the parts to each other and fixing each with self-tapping screws.
The protective lining of a clapboard bathtub can be done vertically, horizontally and obliquely. Wooden cladding gives a modern bathroom a resemblance to a sauna or Russian steam room.
From timber and plywood
The first screen option is quite budget-friendly. To make this model, complex professional tools are not needed. There is also no need to drill the floor or walls.
In the process of work you cannot do without:
- moisture-resistant plywood 10 mm thick. The size of the shields depends on the dimensions of the bathtub and the height of the side, as well as how much it is planned to raise the screen relative to the floor;
- wooden beam with a cross-section of 50x20 mm - the length of the products will also depend on the installation location;
- 4 hinged hinges for doors - the height of this fittings should be 50 mm;
- nails or self-tapping screws to connect parts into a single whole;
- 2 adjustable legs;
- 2 furniture handles and screws for fixing them;
- special varnish for covering wood or paint for painting the screen;
- hand hacksaw for wood;
- construction square;
- hammer;
- roulette;
- electric drills;
- brushes for applying varnish;
- screwdrivers;
- workbench type work surface. You can use several stools.
Manufacturing stages
- We take measurements and make design details. Three panels - a middle one - stationary and two side ones, acting as doors, bars to create a frame.
- We lay out the beams on the workbench - the top one on the wide edge and the bottom one on the end side. Three plywood panels are laid on top of the beams at intervals of 5 mm. The beam should protrude 5 cm along the edges of the laid out panels. In this place, you need to fasten vertical bars, which will act as additional stiffeners and as a surface for attaching the hinges.
- We fasten the stationary middle part with nails or self-tapping screws. The caps of the fasteners need to be slightly recessed into the plywood and then putty in these places.
- Next, we fix the side bars, which will become the final element of the screen frame.
- We turn the screen over in order to install hinged hinges on the side bars. We make marks, retreating 100 mm from the bottom and top, after which we drill holes with a drill of 2-2.5 mm.
- We mount the legs on the lower block. They must be adjustable.
- We mark and fix the handles. You can use furniture fittings, but options that can be recessed into the panel are better suited. You will not touch such handles, they cannot be damaged.
- We treat the surface with moisture-resistant varnish. This will protect the wood from moisture and direct splashes. Alternatively, you can paint the screen or cover it with self-adhesive film.
Expert opinion
Roman Vasiliev
Builder, repairman
Rout the edges of the plywood using a hand router, multi-cut files, or sandpaper. This will make the doors look much neater!
Made from plastic panels
One of the most affordable and comfortable in terms of complexity of execution is a screen made of plastic lining. The panels are attached to a wooden frame, to which adjustable legs are attached. You can limit yourself to installing lamellas in guides. But such a structure will not have sufficient rigidity, and if desired, it will be easy to move it with your foot, especially on a tiled floor.
Let's look at how to make your own screen from PVC panels. To add rigidity, use special guides and clips with which the lining will be attached. The guides must be attached to the wall. You will also need an L-bar. Install it along the top and bottom of the formed screen.
Attaching PVC panels to the guides and creating a structural frame from the starting strip.
To create a frameless plastic screen, use:
- PVC panels of the desired color and width. You can find out how many strips you will need only after measuring the installation site;
- 2 guides – equal in length to the future screen;
- clips for fixing lamellas;
- starting bar for all sides of the screen;
- glue “liquid nails”;
- tape measure, scissors, jigsaw for cutting plastic.
We make a screen from plastic panels
Progress:
- Taking screen sizes.
- We assemble the panels on guides into a single whole.
- We distribute the glue pointwise along the line and along the front side onto the top starting strip.
- We put the starting panels on the finished screen - side and horizontal.
- We install the assembled structure, gluing it from below to the drawn line, then press it to the front inner part of the side of the bowl.
From polystyrene plates
Surprisingly light and comfortable, but at the same time very durable material. Sold in the form of slabs of various sizes and thicknesses. The surface is covered with a mesh and treated with an adhesive composition, which ensures reliable adhesion to the cladding. Makes it possible to assemble screens of any arbitrary shape.
The manufacturing technology is as follows:
- we take measurements;
- cut out the slab of the required size using a hacksaw or knife;
- we coat the places of future joints with walls, floors and tiles with tile adhesive;
- We apply the slab to the floor and walls, and then level it. Screw in a few screws and use them as handles;
- Apply glue to all places where the slab meets the floor and walls, and after drying, proceed to covering the slab.
Made of brick
The base of the screen can be brickwork.
To build the wall you will need:
- bricks;
- cement mortar - to prepare it you need to mix cement with sand 1:6;
- Master OK;
- container for mixing the solution;
- drill with a construction mixer attachment.
Progress:
In the process of creating a partition, bricks must be placed on edge. Most often, masonry is done in 1/2 or 1/4 bricks. This will create a narrow wall that is strong enough to support the cladding without placing excessive stress on the floor. When forming the first row, we remove 2-3 bricks from the center of the structure to leave room for the future recess for the feet. Subsequently, you will also need to leave an opening for installing an inspection window.
After the solution has hardened, plaster the surface and level it. After this, stop work for 2-3 days - this will be enough for the masonry to shrink and the solution to finally set. If you do not take this pause, the tile may fall off.
Brick foundations require virtually no repairs and are not deformed. They retain their strength for many decades. But such a screen also has significant drawbacks - it blocks access to the pipes and makes it impossible to use the space under the bathroom.
Types of designs
When choosing a bookcase for your home, you should pay attention to its design features and overall shape. After all, models are created not only for the purpose of decorating the interior, but also to ensure convenience and comfort, therefore the manufacturer offers a large number of variations and directions.
A convenient bookcase will serve as a stand for a home greenhouse
Corner shelf is perfect for small spaces
- The square type or its rectangular analogue is a classic option that fits perfectly into virtually any room configuration.
- The corner wooden version will be elegantly placed in the corner of the room, without creating obstacles to human movement and without cluttering up free space.
- Oval furniture is larger in size, but this disadvantage is easily compensated by the smoothness and originality of all lines.
- Non-standard products with complex shapes are also offered, which are made to order or can be selected from the store assortment.
Rectangular shape of two-tier bookcase
Square glass shelves in Art Nouveau style
If you decide to buy a bookcase at IKEA, you can count on the fact that all these options will be presented in the assortment and you will be able to choose the option that suits your liking.
Classification by materials
There is also an extensive classification of products in accordance with the materials used in their manufacture: it can be wood, plastic, metal, glass. Each of them is unique and has its own strengths and weaknesses.
- Wood products are always natural and can give a pleasant feeling of use and create an interesting atmosphere. But such a solution will require a special processing method taking into account the level of humidity and temperature indicators. A wooden shelf from IKEA is a great option for those who value comfort and originality even in the smallest details.
Mobile wooden shelf for flowers
- Metal structures have a high level of reliability. They are ideal for high-tech design, but they are unlikely to provide warmth like wooden elements.
Original wrought iron shelf with curtains for the bathroom
- The most affordable are products made of plastic material. They are not afraid of moisture, which is sufficient, for example, in the kitchen and bathroom. But such availability also affects the strength indicator, so these devices are unlikely to last for a long time. The downside is that achieving an attractive look in this case is problematic.
A plastic shelf is one of the economical options for shelves for the bathroom
- A glass shelf is a visually attractive option, but it is relatively expensive and not very durable, so it is chosen by lovers of avant-garde and other sophisticated trends in different styles. But such products act as a sign of special taste and attentive attitude to interior designs.
Unusual decorative shelf made of glass
Screens made of MDF sheets and mirrors
MDF screens for bathtubs are most often used in classic room design, as they have a wood pattern. A wide range of colors and textures allows you to choose a product that will suit any interior. MDF shielding looks stylish and expensive, which often attracts buyers. However, when purchasing such a screen, you need to pay attention to two important points:
- products made from this material are only suitable for standard, rectangular bathtubs;
- MDF screens are made by compressing sawdust, so they are not resistant to moisture. In order to solve this problem, it is necessary to choose a moisture-resistant material that is equipped with a protective film.
Plumbing stores have a large selection of MDF screens of various designs - solid and sliding
The demand for mirrored models is quite simple to explain. Most modern bathrooms are small in size, and a mirror surface can visually increase the space of a room. Such panels also add play of light. They can be mounted at different angles, and also equipped with special lighting (for example, neon).
In any case, the mirror screen looks very impressive. However, such panels are not without their drawbacks, including fragility and difficult maintenance. Drops of water and stains on a mirror surface are much more noticeable than on any other surface, so you will have to wipe them quite often.
You can make a screen from MDF with your own hands, which will be exactly the same as the furniture in the bathroom
Purpose of whatnots
When thinking about what interior items to choose, we want to achieve not only the ideal beauty of the room, but also achieve maximum practicality and functionality, so that the furniture serves to solve several problems. Therefore, we will talk about something that will be spectacular in the interior and useful in the household.
- Flower stand IKEA. Who wouldn't want to artfully decorate a room with floral arrangements? By choosing such a solution, you can achieve excellent results. You can place on it all varieties and breeds of plants - leafy, flowering, and even trees. So that not only flowers, but also the piece of furniture itself decorates the space, you can purchase something that will not leave you indifferent and will allow you to achieve the optimal result in the design of the style: pay attention to the legs, forging, inlay. Of course, there are also expensive models that you will like.
A large number of flowers and seedlings can be compactly placed on a shelf
- Shelf for books. It can be placed in a classic-style bedroom, a study, a children's room, a living room or even a hallway. There will always be something to fill such furniture with so that it becomes an original composition of the interior. After all, you must admit that there is not always a place in the room for a massive wardrobe or chest of drawers that could accommodate more books, and a bookcase will be exactly the piece of furniture that will solve this problem and last for many, many years. So, the volume of your favorite writer that you read at night will be waiting for you at arm's length.
Part of the home library will look great in the living room on a bookcase
- Shoe rack. Shoes scattered around the hallway is a situation familiar to many. It’s good if it’s one pair of shoes, but what to do when there are a lot of them and everything for every taste? The optimal solution would be to choose a compact bookcase that will solve the problem of clutter and will noticeably please the eye.
The simplest version of a shoe rack made of wood painted white
- Shelf for services and souvenirs. The modern IKEA market offers a large number of options for decent and original placement of services and figurines, various awards and any other little things that are dear to the owners.
The creative shape of the metal shelf structure will be complemented by glass shelves with souvenirs
- The IKEA kitchen shelf is another original option that will allow you to achieve high-quality results in your kitchen space and serve as a reliable storage place for various utensils - newspapers, sets, plates and mugs, figurines and souvenirs. In general, its application can become universal; all that remains is to choose a practical solution.
Tabletop corner shelf for the kitchen
If you choose a product made with taste, you will live in comfort, and your friends will certainly appreciate your choice.
Advantages of IKEA bookcases
Cute original bookcases in retro style or modern models will certainly appeal to you, because their use implies many advantages:
- Attractive appearance. This design will fit into any style of the room, and all you have to do is install it correctly and enjoy a single ensemble designed to delight your heart and soul.
Original contrasting shelf for the bathroom
- Compactness and minimally used area of the room: the bookcase, despite the fact that it is often the main element of the entire ensemble, is almost invisible. Therefore, you can place it anywhere and feel comfortable in the room.
Compact and convenient shelf in the kitchen in the form of a cabinet with open shelves
- Ease of use. Firstly, this fact is supported by the versatility of the product, because you can put anything on it and not make a mistake. Secondly, if necessary, you can move the bookcase from one place to another to take the book you need, water the flowers, or clean up the house.
Convenient small-sized bookcase in the hallway, hidden behind a closet
- Affordable cost is another significant advantage of this product. You will have to spend a lot of money to purchase a chest of drawers or a wardrobe, but to purchase this design you will not have to throw away a lot of money and time, because in stores you will find products in different assortments and different price categories.
A bookcase in a modern interior will help replace a wardrobe
You can choose a metal IKEA shelf, a wooden structure, a plastic or glass option. The main thing is that it fits into the overall stylistic picture and is always pleasing to the eye.
Installation methods
The piece of furniture consists of fastened shelves, which are arranged in several tiers and are not equipped with doors. They must be positioned so that all the elements are at hand and do not interfere with normal life activities.
- One floor-mounted stand that also acts as a shelf mount. Such shelves are made in different size variations: the smallest one is placed on top, followed by a shelf of larger dimensions. Such a shelf can fit into any interior decoration, and the shelves can be made in a rotating format.
Metal flower rack with different shelf capacities
Advice! The most convenient model is the 4-legged design, since it can withstand the load of even the heaviest objects, including flower pots. In the kitchen, such furniture will provide the housewife with proper storage of spices and products.
Stable, practical metal shelf on four wheels
- Hanging shelves will fit perfectly into small houses where every centimeter of space is precious. If you select several models and place them on different sides of the walls or in corners, this will visually expand the space.
Hanging shelf with glass door
- You can also pay attention to such a design as the IKEA shoe rack - an excellent option for those who want to create maximum comfort, coziness in their hallway and achieve high-quality interior design through inexpensive and small details. This way you can place such an important and stylish accessory in your hallway.
An excellent option for shelves in the hallway for shoes
Your further convenience in using the furniture depends on how successfully the model is selected. In a home interior, such exquisite products will look original and attractive.
General tips for implementing the task
As a rule, manufacturers producing bathing bowls make products with high performance characteristics. The inner surface of the bathroom is covered with durable enamel. It has a boiling white color. Bath bowls must have legs. They ensure the stability of the position of the described product. A niche is formed under the legs that needs to be closed. The story about how to make a screen for your bathtub from tiles should begin with a description of the varieties of screen shapes for tiles. She may be:
- Deaf.
- Sliding.
- With niche for feet.
- With inspection hatch.
Blank tile screens for bathtubs are a product without any additional elements. Making such a screen for a bathtub from tiles with your own hands is as easy as shelling pears: first, a frame is assembled from a monolithic material (plasterboard, for example), then its surface is covered with tiles. Most often, the same tiles that were used for cladding walls or floors are used for these purposes. This option has its advantages and disadvantages: the monolithic structure looks quite impressive, but it completely blocks access to communications. If they break down, repair becomes impossible.
The principle of operation of the sliding structure is similar to the principle of operation of wardrobe doors. One of the doors slides along the guide, opening access to the existing engineering units. It is not very appropriate to install ceramics on a sliding frame. Tiling creates an additional load on the frame, therefore significantly reducing the service life of the described structure. That is why a sliding screen under a tiled bathtub is used extremely rarely.
There is a compromise solution that allows you to make a ceramic screen for the bathroom while still providing access to important communications. These are screens with a niche for feet. Its design is different in that a technical hole is formed in the center right next to the floor. It allows you to get close to the bathing bowl, lean over the side and at the same time avoid unnecessary strain on your back. Such a device greatly facilitates the processes of washing clothes and bathing children and animals. The foot niche can be located not only in the center, but along the entire length of the bowl, somewhere on the side of it. This option, experts say, can be a good compromise in the desire to completely cover the space under the bathtub, while still providing at least some access to pipes and drainage elements.
A screen with an inspection hatch is a modified type of blind structures and screens for bathtubs with a niche for feet. Its main difference is the presence of a technological opening (door or window) integrated into the body of the blind partition. The inspection hatch can be opened with a simple movement of the hand, while outwardly its presence can be well disguised as cladding. It can be used for a complete repair of all technical components located behind a hidden door. If desired, the inspection hatch can be left open to ventilate the space under the bathtub. And this is also very convenient.
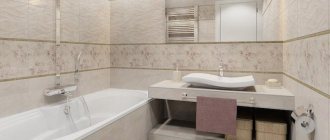
Ikea bathroom design
With furniture made by Ikea, the bathroom will take on a finished, elegant look.
Filling the bathroom primarily depends on the size of the room. The standard set includes:
- Wardrobe or pencil case.
- Hanging shelves.
- Cabinet under the washbasin.
- Nightstand.
Ikea bathroom cabinets will be a real find, as they will accommodate all the necessary accessories, hygiene products, and towels.
In addition, many models are equipped with mirrored doors, which is very convenient, since there is no need to purchase a separate mirror.
Ikea also provides a wide range of narrow bathroom cabinets, which are ideal for small spaces.
An Ikea bathroom shelf will be an excellent solution if the floor space does not allow you to install a cabinet, cabinet or pencil case.
Deep shelves will accommodate many necessary things, and the beautiful design will delight the eye for many years.
The catalog is replete with various models, ranging from plastic shelves of all shapes and sizes to shelves made of glass or natural wood.
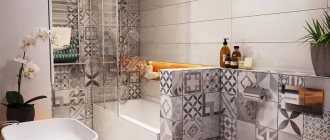
Ceramic screens for bathrooms
Ceramic shielding allows you to organically decorate your plumbing unit. The main advantage of organizing a ceramic protective panel is that it looks as presentable as possible. Ceramic tiles are the main finishing material when organizing plasterboard screens, as well as tongue-and-groove slabs. Ceramic tiles are resistant to moisture, easy to clean, and also resistant to mechanical stress.
Installing a screen under a tile bathtub is quite simple. To carry out installation, you do not need to have special construction knowledge and skills.
Usually the screen is tiled with the same tiles as the entire bathroom, so it fits perfectly into the interior of the room
Let's consider recommendations for laying ceramic tiles:
- first you need to take measurements (width and height of the opening under the bathroom);
- Ceramic tiles are laid from the upper left corner. A very important point is that installation must be done strictly horizontally;
- each individual tile element must be lubricated with tile adhesive;
- The alignment of a ceramic screen consisting of tiles is carried out using special crosses. Such crosses are inserted into the gaps between the tiles and form the same distance for all structural elements;
- Not only solid screens can be covered with tiles.
Bath curtain made of curtain fabric
There is no doubt that such a curtain is a non-standard solution. But it has several obvious advantages over rigid materials. The main advantage of a bath screen is ease of manufacture and installation. To organize such a curtain you will need curtain fabric (300x60 cm), thread, needle, as well as scissors and a hot gun.
People who have a hard bath panel installed constantly touch it with their feet. Bathtubs with such panels are inconvenient to clean. Using a curtain solves this problem.
Note! This non-standard solution is only suitable for rooms with good ventilation, since the curtain is not able to protect the pipes from moist air.
The main advantage of bath curtains made of curtain fabric is its ease of preparation and installation.