Floor installation using penoplex insulation
Insulation boards are not recommended for use as a solid base for finishing, so the answer to all previous questions is one - no.
For any base, another layer should be placed on top of the penoplex, which will distribute the force of gravity evenly over the entire floor area.
This layer can be concrete pouring or plywood flooring.
Be sure to lay another layer of material on top of the foam.
If you try to save money in this matter, the flooring will not last long. Both laminate and penoplex are subject to point squeezing.
That is, if a chair or cabinet stands on such a floor for a long time, the legs will leave a significant dent in the laminate and destroy the structure of the foam boards.
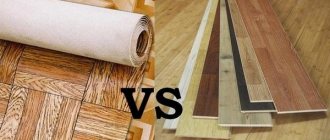
Penoplex and laminate underlay
As you know, when laying the coating, a substrate is used - cork or polyethylene foam. Is it possible to lay laminate flooring on penoplex without a backing? Many “craftsmen,” as practice shows, are tempted to lay laminate flooring on polystyrene foam without any screeds. It seems that the material is durable, why bother with the screed? Such a floor will only bring problems.
Penoplex is not designed for point loads; its strength makes itself felt under static pressure. The heat insulator, according to the rules, placed under the screed, can withstand enormous weight, and at the same time it is easy to make a hole in it, even with a pencil. And most pieces of furniture are the same point load.
An unsuccessfully placed cabinet, with its leg caught on the lock of the laminate board, can simply fall into the floor. The foam underlay under the laminate will not save you from destruction - it will be of little use, it is designed to protect from noise and moisture, and not to reinforce the base. In addition, such a coating will creak terribly.
When insulating and covering the floor, it is still better to abandon “folk inventions” and rely on existing technologies. But they claim that it is impossible to install laminate directly on penoplex. It’s better to follow all the instructions and end up with a warm and beautiful floor than to start a new renovation six months later, correcting your own mistakes.
Source
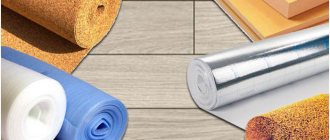
Insulation materials
You can insulate the floor under the laminate:
- expanded clay;
- penofol or mineral wool with foil;
- polystyrene foam;
- coniferous slabs;
- cork or bitumen-cork mats.
For the first option and mineral wool, you will first have to fill the logs, and then lay fiberboard or chipboard on top. Plus, expanded clay bedding can also be made under the screed. All other materials are laid directly under the laminate on top of a concrete or wooden floor.
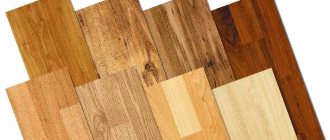
What types of underlays are there for laminate flooring?
Expanded clay
Among the main advantages of expanded clay are its low cost and ease of use. However, for high-quality thermal insulation, this insulation will have to be poured onto the floor in a layer of at least 10–15 cm. Typically, this option is used when installing a wet concrete screed on the ground. In other cases, it is better to choose something else with a smaller layer thickness.
Structure of a floor insulated with expanded clay
Foil and glass wool
Mineral wool is good for its high level of thermal insulation and non-flammability. However, to insulate the floor under the laminate, it will have to be taken with a foil layer in order to minimize the thickness of the underlayment, and laid between pre-installed joists. Plus you will still need to lay plywood or chipboard on top. The cost of laying such a rough covering is quite high, but in terms of service life it is inferior only to expanded clay.
Glass wool and foil also have soundproofing properties.
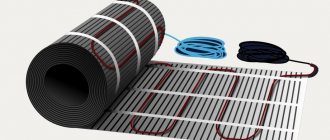
The foil reflects about 90-95% of thermal radiation back into the room. This is the ideal insulating underlay for laminate floors. And if you don’t want to tinker with mineral wool, then you should take penofol (foiled polyethylene foam). This is almost a complete analogue of the standard soundproofing underlay for laminate, only with the addition of a layer of aluminum foil.
Instructions for laying foil backing
Styrofoam
Foam plastic (EPS) is not afraid of moisture and has excellent strength characteristics, as well as heat and sound insulation. But this is a flammable and not very environmentally friendly material. However, with its help you can easily level a base with many small differences and defects, without resorting to pouring a screed on the existing concrete floor.
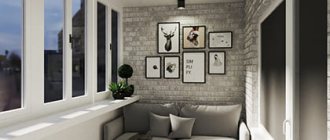
Polystyrene foam is good for insulating balconies and loggias
Coniferous slabs
The boards obtained by pressing pine needles and wood fibers are environmentally friendly, have good sound insulation and a service life of 10–15 years. Their main drawback is the fear of moisture. At the same time, many laminate manufacturers recommend laying a substrate up to 3 mm thick under it. And slabs made of pine needles are usually 4–6 mm or more. Thus, you can lose the warranty on the topcoat due to non-compliance with the manufacturer’s recommendations for the underlying material.
How to lay coniferous boards under laminate
Bitumen-cork underlays for the floor
The technical cork backing stands out among its analogues due to its high price, hypoallergenicity and environmental friendliness. This is a wear-resistant and durable material for floor insulation. But you shouldn’t wet it with water.
After a pipe burst in the house, the cork mats will have to be replaced. Drying them completely and quickly without the formation of fungus inside and/or destruction of the structure is problematic.
A bitumen-cork analogue (parcolag) in the form of kraft paper with a bitumen layer and cork granules is more resistant to moisture. But under heavy loads on the floor, such a mat begins to crumble and collapse.
advantages of cork backing
Penoplex - a warm base for the floor
There are many floor insulation technologies. This includes expanded clay, mineral wool, and, of course, penoplex. The latter is one of the best modern heat insulators, although, it should be noted, not the cheapest. To insulate the floor, a 20-30 mm slab is sufficient (on the first floors it can be increased to 50 mm), while the thickness of mineral wool, for example, is recommended to be twice as thick.
- The advantages of penoplex for floor insulation are as follows:
- Excellent moisture-proofing properties
- Good thermal insulation
- Mechanical strength
- Durability
- Easy installation
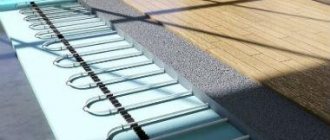
Before installing the laminate on Penoplex, you need to lay the insulation itself. This is quite easy to do. It all depends on what kind of leveling screed it will be - cement or made of sheet material (plywood, OSB, GVL). For one you will need as smooth a rough surface as possible, for the other you will have to lay down wooden logs as a base for the coating.
Under a cement screed on penoplex, on which the laminate will then be laid, it is better to choose slabs with grooves at the ends for tighter joints. If the system requires the presence of wooden logs, then the heat insulator can be taken without a curved edge.
Penoplex insulation is not a substrate for laminate! Do not confuse it with the backing made of extruded polystyrene foam. When laying laminate flooring on penoplex, a screed, dry or cement, must be installed.
Installation of penoplex under laminate with concrete screed
- Prepare penoplex laminate with screed as follows:
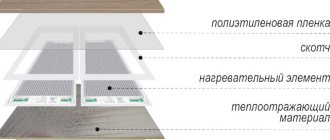
If you want to install a heated floor system under the laminate on penoplex, the screed is installed using the technology provided for heated floors. It is better to stay on a water heated floor. Electric systems typically heat up faster than water systems, and extreme temperature fluctuations are not desirable for our finish. Laying laminate flooring on penoplex and an electric heated floor system will be justified only if there are thermostats that provide a smooth increase and decrease in temperature.
Installation of penoplex under laminate with dry screed
Dry floor screed, which does not require long concrete work, can also be used. In this case, it is attached to wooden logs. First, insulation is laid between the joists. In principle, it can be anything. Afterwards the screed is installed. They use plywood (it is better that in this case the heat insulator lies flush with the joists and provides additional support surface), gypsum fiber boards (GVL) and other materials suitable for dry screed. It is necessary that the surface level be accurately adjusted - this is important for subsequent laying of the laminate on polystyrene foam and dry screed. The last step will be laying the substrate and actually installing the laminate.
Laying laminate on polystyrene boards
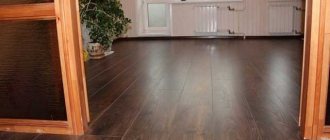
You can create a floor in a room extremely quickly and easily using laminate. The shape and configuration of the floor elements (lamellas) have been thought out for a long time and with high quality. So even an untrained person can install it. The ease of cutting and combining the material allows you to quickly and efficiently install flooring in rooms with complex layouts. You just have to strictly follow simple rules, and laying laminate flooring with your own hands will not take much time and effort. Laminate flooring should be laid in heated rooms without sudden temperature fluctuations or high humidity. For long-term operation, the room temperature must be maintained within 15-30 degrees, humidity from 40 to 70%. The basis for the laminate can be a flat wooden floor or a concrete base with maximum differences in height not exceeding 2 mm per meter, as well as strong slopes of more than 4 mm for every two meters. If there are significant unevennesses, then it is necessary to level the floor under the laminate by forming a floor screed, or a self-leveling floor system, thereby eliminating the problem, because laying laminate flooring on an uneven floor is unacceptable. This will lead to its rapid deterioration. It is strictly forbidden to install laminate flooring on top of an electric heated floor. If they are combined, the laminate elements will dry out and become deformed. Moreover, it is unacceptable to heat the laminate from below above 27 degrees. Hydraulic systems can be used as heated floors. They allow heat to be distributed evenly and do not overheat the laminate. The distance between the elements of the heated floor and the bottom edge of the laminate must be at least 3 cm. The installation technology is the same: there are only some features when connecting elements depending on the locks. The procedure will be as follows:
- The substrate is laid on the leveled base, and its joints are taped.
- Wedges or pieces of plywood 10-15 mm thick are installed around the perimeter of the room. The laminate boards will rest against them. In this way, a compensation gap is created around the entire perimeter of the room. It is needed to prevent the coating from swelling in the heat or high humidity.
- Along one of the walls - usually opposite from the entrance - the laying of the first row begins. The first row is placed with a spike against the wall (it can be cut off). The entire row rests on wedges that measure the gap. The outermost one also rests on the wedge with a side lock (it can also be cut off).
- All elements in a row fit together.
- The last board often needs to be cut: it does not fit in length. There should also be a wedge on this side, so the size is 10-15 mm smaller than the distance to the wall. We mark it for cutting as follows: turn the board “face down” so that the desired side tenon is on the right. We join this edge to the wedge and use a square to draw a line that continues the edge of the installed board. We cut off the required piece along the marked line and install it.
- If the first row started with a whole board, then the second row starts with a half, a third, etc. This is how all the rows are assembled. In this case, the developed installation scheme serves as a guide.
- The last row often needs to be cut to width. Nothing complicated, the main thing is not to confuse which side we cut from: leave the part with the thorn on it.
If the geometry of the room is correct, there are no difficulties.
If there are distortions, you will have to trim. Questions may arise when finishing the threshold: the board near the jambs is not cut straight, but along an arc, maintaining a gap of 10-15 mm. Why in an arc? This way there won’t be a hole under any door trim of any shape. The nuances of laying laminate flooring Almost nowhere can you find perfectly level rooms without all sorts of protrusions or outlets for heating pipes, communications, etc. In such places, it is necessary to cut out shaped elements from the elements of the laminated floor. To do this, use a jigsaw, a construction knife, a construction corner and a pencil. Next, we will consider options for how to lay laminate flooring with your own hands in places with pipes coming out or the presence of protrusions on the walls. Bypassing heating pipes As in the case of cutting lamellas, we turn it over along its length and apply it on top of those already laid. Using a corner, we mark on the lamella the lines for the width of the pipes. Next, we place the lamella on the side of the pipes and rest it through the peg against the wall. In this position, you can mark the second mark with a building level, that is, the distance from the pipes to the wall. We end up with places where the lines intersect, which determine the position of the holes for the pipes. It's best to drill the holes first. For this, special drills called ballerinas are used. The diameter of the holes is larger than the diameter of the pipes, and there can be two options: simply insert a lamella with a gap around the pipes or use special plastic inserts, which are sold in hardware stores for laminate flooring. In the second case, the holes are made according to the size of the inserts. The next step is to cut off part of the lamella crosswise, focusing on the middle of the hole. It turns out two pieces of lamella. One piece is inserted between the rest of the floor and the pipe, and the second is applied between the wall and the pipe. To reliably fasten the elements, glue is used, which should be applied only to their ends. After which they cling to each other. You can hide unattractive cutouts with decorative pipe trims. Bypassing wall protrusions To lay lamellas, the edge of which rests on an unevenness on the wall or its turn, you should cut the required shape directly along the lamella. This is easy to do with a jigsaw. A certain peculiarity may be the situation when the obstacle is a column or protrusion covered with plasterboard or plastic, as well as places under central heating radiators. In this situation, it is advisable to trim the bottom of the sheathing and place a laminate board under it right up to the base of the wall, maintaining a gap. Completing the installation of the laminate After the entire floor space has been filled and installation has been completed in all difficult places, you can remove all the wedges around the perimeter of the floor and trim the overly protruding edges of the underlay. You should leave only 1-2 cm of overlap on the wall as a shock-absorbing belt. Next, all that remains is to hang the baseboard, and the floor in the room will be ready kosmohard.info
Insulation of wooden floors
The situation is quite rare. The construction of the structure on logs allows the use of budget building materials for insulation, because the main and most valuable quality of penoplex is rigidity; in such a floor it does not matter at all.
The exception is the installation of insulation over a plank floor and the installation of floors on joists in a house on stilts. In the latter case, insulation is done according to the following scheme:
- the rough flooring is being laid from boards;
- film waterproofing is laid;
- Penoplex is laid with shifts along the seams;
- insulation boards are screwed around the perimeter of each sheet to the rough base;
- seam gaps are filled with foam;
- a vapor barrier is placed on the insulation;
- lay the sheet base over the finishing coating. For more information about floor insulation using joists, watch this video:
When laying insulation on an old plank floor, it is necessary to secure all the boards to the joists: the floors should not sag or creak. Rotten or damaged boards should be replaced. Wooden floors should be treated with at least 2 coats of primer. Penoplex is laid on the dried base. Further, all work is carried out by analogy with a house on a pile foundation.
Source: https://gurupola.ru/napolnye-pokrytiya/laminat/mozhno-li-klast-na-penopleks.html
Installation on a concrete base
When insulating a concrete base, it is necessary to check the quality of the floor and, if necessary, eliminate all irregularities and cracks.
If the quality of the surface is not satisfactory, then it should be cleaned of construction debris, dust and treated with a deep penetration primer.
If work is carried out on the ceiling of the first or basement floor in a house with a basement, it is better to cover the base with polyethylene film before laying the penoplex. The film strips are laid overlapping, the seams are secured with construction tape.
Next, the insulation sheets are laid. The slabs are mounted with the seam offset by at least 1/3 of the sheet side size. The surface of the penoplex is covered with a film, a reinforcing mesh is laid and a screed is poured under the finishing coating.
In this case, you can include a heated floor system in the coating device, which should be secured to the reinforcing mesh. For more information about laying penoplex on a concrete screed, see this video:
The top layer of film is covered with an extension of 15 cm onto the walls and taped with damper tape. This is done in order to create independence of the top insulated decorative layer from the concrete base.