General information
Preliminary leveling of horizontal and vertical surfaces of ceilings and walls is the main purpose of gypsum plaster. It is used to finish work surfaces in the final decorative finish.
Important,
that it can be applied in a thick layer and thanks to this it successfully copes with all irregularities and defects.
Gypsum-based plaster can mask obvious wall defects, including holes and serious damage. Gypsum plaster is used to treat ceilings and walls with high quality, which allows for further cladding, painting of walls or wallpapering.
Characteristics and place of use
Gypsum plaster is used primarily for finishing ceilings and walls of residential premises. Gypsum plasters can be used for interior work and other rooms with nominal humidity. These can be technical blocks, offices, or shopping centers.
- Plaster mixtures based on gypsum can be laid on the following bases:
- Made of brick.
- On clay walls.
- On top of concrete walls and cement plaster, subject to surface treatment with concrete contact.
- You can work on old, but durable gypsum plaster.
- Cellular foam concrete, aerated concrete.
In addition, gypsum mixtures can be in the form of:
- Starting material or finished solution.
- Finishing compositions with a fine grain fraction.
- Decorative compositions.
Composition of gypsum plaster
Answering the question of what gypsum plaster is made of, we can briefly say this. Gypsum powder is the basis of the entire composition. It is he who connects all the elements together. It is produced from a natural mineral. In this case, the powder is crushed and undergoes a long heat treatment process. It should be noted that the gypsum included in the composition can be of different fractions. The finer the grain, the better the surface will be processed.
Fine filler of natural or synthetic origin is added to the mixture. Polymer additives are often used.
It is important that the shape and size of the filler grains significantly influence the final result of the treated area.
Fillers reduce the consumption of gypsum plaster, adding strength to the work surface.
Polymers increase the elasticity of the material and increase adhesion to various substrates, which is important.
Gypsum plaster can withstand temperatures in the range of + 5.. + 300C. The recommended thickness of the working layer without taking into account the reinforcing mesh is 5 mm. The dry mixture is diluted in the following proportions: gypsum plaster one part, water 0.5 parts. The estimated material consumption per 1m2 is 8 kilograms.
The solution dries on average in one hour, and final drying will take at least 3 hours. In seven days the solution acquires 100% strength. And one more thing: the thermal conductivity of the mixture made on the basis of gypsum is 0.23 W/m*C.
Note!
Indicators may vary slightly. It all depends on the manufacturer and the components used.
In the retail chain you can purchase universal gypsum plaster in the form of a powder mixture. It is sold in paper bags of various weights.
To prepare the working solution, you will need water, which, with certain adjustments, can change the fat content of the composition. It all depends on the nature of the proposed work.
For example, thick plaster is used to seal cracks or rough work. For final leveling of walls on the prepared surface and for decorating the object, a liquid solution should be used. It is important that it spreads well on the wall.
Procedure for applying gypsum plaster
Despite the popularity of the product we are reviewing, many do not know how to properly apply gypsum plaster to a wall. But this is an important question. If the installation technology is violated, the desired (quality) result will ultimately not be achieved.
During the work process, it is necessary to take into account important nuances:
- Be sure to apply the finished mixture only to a previously prepared surface, which must be cleaned of dirt, dust and pre-treated with a primer. This will give high adhesion of the working composition to the surface and increase adhesion.
- Before applying the composition, you should determine the thickness of the working layer. If a thin layer is intended to be applied, the composition should be liquid. If you treat work areas with a thick layer, the composition should be more dense and not spread over the wall.
- Distribution of the finished mixture over the working surface is done with a spatula, leveling according to the rule.
Note!
The technology of gypsum plaster walls at the initial stage involves distribution and leveling in a horizontal position.
The second layer is distributed in a vertical position. The next layers can be applied after the previous layers have dried. To do this, you should take a technological break for 3 hours.
On a note!
Do not forget that the lifespan of the finished mixture is short. Therefore, experts recommend preparing a small amount of the mixture at a time.
Application technology
Let's look at how to plaster walls with gypsum plaster with your own hands. To do everything efficiently, you should adhere to a certain working algorithm.
Preparing the base
Gypsum mortar will give the walls evenness and smoothness if applied to a prepared base. Activities are carried out in a certain sequence:
- finish all types of “wet” finishes, because working with gypsum plaster involves applying it to a dry wall;
- electrical wiring is installed, communication lines are laid;
- all metal elements are treated with a protective compound so that the gypsum mixture does not cause corrosion;
- the walls are degreased, cleaned of dirt and various stains;
- treatment with a primer is performed;
- protruding corner areas are protected with special perforated corners;
- The joints are strengthened and sealed;
- All furniture and other items are removed from the room or covered with polyethylene material.
Preparation of the solution
Another important feature is how to make your own mortar for plastering walls. To do this, prepare water, a trowel, an electric drill and a mixing attachment, a mixing container and gypsum plaster material.
We begin to prepare gypsum plaster with our own hands, strictly following the composition. To do this, pour the dry powder into a container and begin adding water in portions, keeping in mind that for every three kilograms of powder no more than 1.8 liters of liquid is needed. If the plaster mixture sticks to the walls of the container, the process is prevented as follows:
- water is poured;
- pour in the required amount of gypsum powder.
To knead, use an electric drill, turning it on at low speed to obtain a mixture with a homogeneous consistency, without lumps. After this, the plaster mass settles a little, and repeated stirring is performed.
It is recommended to produce the next batch of plaster mixture within twenty minutes.
Works using beacons
For plastering walls, they are used quite often to make it easier to control the parameters of the thickness and evenness of the plaster layer.
The algorithm of actions is as follows:
- the surface is cleaned of dirt and remnants of the mortar mixture. Small debris is removed with a wide brush, the remains of the old plaster layer are knocked off with a hammer, oil stains are washed off with a solvent;
- the wall prepared for work is covered with a deep penetration primer;
- as soon as the surface dries, gypsum plaster is mixed;
- beacons are installed. They are fastened in such a way that the layer of plaster is minimal. Markings are made first, a small amount of mixture is poured in the right places, the beacons are recessed, checking their placement with a building level. The interval between beacons is maintained within thirty to fifty centimeters to make plastering easier.
The step of installing beacons can be taken into account the length of your rule.
How to apply the prepared solution correctly? Focusing on the beacons, a gypsum mixture is thrown onto the surface, stretched evenly as a rule, and the bald spots are filled with the removed excess.
The plaster mass must dry for some time, then the surface is leveled according to the rule and after thirty minutes a test trim is performed. If, instead of the top plaster layer, the entire layer of mortar usually stretches, it is necessary to give the surface additional time to dry, preventing overexposure of the plaster. After a couple of hours, the wall can be puttied. Here you should know how to properly wash a plaster surface. It is moistened with water and waited until the liquid is absorbed. When the characteristic sheen of moisture disappears from the surface, the wall is rubbed with a float. Water that wets the base will turn the top plaster layer into milk, which is distributed with a grater over the entire surface in order to fill in small irregularities.
All that remains is to smooth the plastered wall with a spatula with a wide blade or a trowel to obtain a glossy surface. On the second day, it is moistened again with water and polished with a spatula. As soon as the wall is dry, finishing work can begin.
In the room where walls and ceilings are plastered with gypsum plaster, the possibility of drafts is eliminated.
Without beacons
How to properly use gypsum mortar for plastering surfaces without using beacons?
The walls, as in the previous version of applying plaster, undergo preliminary preparation - they are cleaned of dirt, remnants of the masonry mixture and other elements, and primed.
According to the building regulations, walls are checked to identify irregularities that must be repaired; such areas are marked with a pencil.
The solution is being prepared. The volume of its portions should be selected taking into account the thickness of the layer to be applied. The gypsum solution is applied to the surface of the walls with a spatula, the blade width of which starts from forty-five centimeters. The plaster mixture is applied with a certain margin, protruding beyond the boundaries drawn with a pencil.
After processing a small area, it is smoothed with a rule to remove excess plaster mixture, after which finishing of the next fragment of the wall begins.
At this stage, the surface is not brought to perfect evenness; differences between areas can reach several millimeters. Applying the plaster mixture. the wall is left for about thirty minutes to dry, after which the uneven areas are usually removed, covering the transition areas with a mixture diluted to a liquid state.
Plastered walls dry within 24 hours, after which they are re-treated with a spatula or grater. You already know how to use such tools correctly. All that remains is to treat the surface with a primer and putty to fill in the smallest irregularities. After the surface has completely dried, it is allowed to paint or wallpaper it.
Preparing walls for plastering
How to apply gypsum plaster correctly, and what t0 mode to use? Speaking about the temperature of the room where the work is being carried out, experts recommend preparing walls for plastering at positive levels: 5-300C. Preparation includes cleaning the walls from dirt and dust. It is necessary to remove layers. This could be a layer of old plaster or other contaminants.
Note!
It is important to remove staples, nails and metal hooks during the wall preparation stage. Those that cannot be removed should be treated with anti-corrosion material.
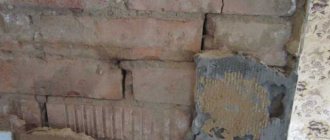
If the working surface is brickwork, cement-limestone plaster, gas and foam concrete (materials that absorb moisture abundantly), they should be carefully treated: coated with a primer. We must not forget about one more stage: preparing materials and tools.
You will need:
- A bucket, preferably plastic, with a capacity of 10-20 liters for mixing the solution.
- Spatulas and plaster trowels for applying the finished mortar.
- Beacons to create a flat surface.
- Spatulas for setting plaster.
- Plaster corner for forming and leveling external corners.
- Rule for leveling the mortar layer.
- A trowel that is used to level the finishing mixture.
- Steel trowel for compacting the applied mixture.
- Construction mixer for mixing a portion of mortar.
Work should be performed in special clothing related to personal protective equipment. Don't neglect protective gloves.
Basics of proper plastering of walls
Due to its low density, the thickness of the plaster mass can easily reach 5-6 cm even on wall surfaces with a negative slope, which is quite problematic for cement-sand mixtures. Correctly selected consistency of plaster and primed surface will allow you to make complex radii of roundings on the ceiling in the most difficult to reach places. Due to the rapid hardening of the plaster, the time for finishing walls with gypsum materials is significantly reduced. Sometimes the plaster composition is applied in just one layer.
Correctly preparing walls for plastering
It is always necessary to prepare the surface of the walls for applying plaster. The main task of preparation is to remove contaminants and dust deposits that prevent the normal adhesion of the gypsum mass to the concrete or brick base. Dust can be removed with a stiff brush followed by blowing with an air stream.
For particularly critical cases (masonry made of basalt or granite stone), special cleaning compounds are used to ensure that the surface is cleaned correctly and efficiently. The composition is sprayed onto the surface, after 10-15 minutes it is removed from the walls with your own hands along with all contaminants in the form of a thick polymer film.
After cleaning, the walls are primed with acrylic primer. It is correct to apply the primer yourself with a brush or long-haired roller, but the main thing is that the composition of the primer should not run off or harden on the wall with air bubbles. The primer dries to a tack, and gypsum plaster can be applied without the risk of it falling off the wall.
Applying gypsum-based plaster to walls
The main problem of any plastering work is always the fight against cracks and the need to correctly align the layer of plaster on the plane of the wall. Most often, the alignment problem is solved with the help of correctly installed landmarks.
These are metal or wooden profiles mounted on the sides of the surface to be treated at a distance slightly less than the length of the plasterer’s main tool - rules. They can be removable or stationary. For gypsum texture, the first option is more suitable. After plastering the selected area, the vertical profiles are moved to the next sector.
If the wall surface is subject to regular temperature changes, it would be correct to divide the gypsum composition into two parts. Part of the plaster mass should be made a little more liquid and 1/10 of the volume of fine quartz sand should be added. The modified part of the plaster mortar is applied to the wall first. This will help reduce shrinkage stresses at the contact point between the wall and the plaster.
You can apply gypsum plaster correctly with a spatula or trowel; many people throw the mixture onto the wall with some force to increase the adhesion of the mortar to the surface. But we must remember that the main thing is to correctly level and even squeeze out the gypsum mass of the plaster so that voids and streaks do not form. You can learn how to properly apply the material onto the base with your own hands from the video
After leveling the gypsum mass, the rule comes into play - a long aluminum or wooden lath 1-1.5 m long and 10-15 cm wide. The goal of the rule is to level the gypsum mass of the plaster as much as possible, to obtain a more or less flat surface. There is little time to complete the work correctly, so the rule is to start working immediately after completing the work with a spatula.
The rule is to equalize the thickness and geometry of the plaster layer, so they work with it, relying on the side planks - landmarks, trying not so much to cut off the excess mortar, but to press it into the wall. Sometimes the step-leveling technique helps, especially if the plaster material is already viscous or has begun to thicken. The most common alignment method, look at the video
Rubbing the surface is done with trowels and graters - small boards with a smooth working surface. By dipping the instrument into the strengthening solution, a thin film of liquid is obtained on the working surface of the instrument. With its help, the trowel easily glides over the plaster, leaving an almost smooth surface.
If the tool, even with the use of a solution, begins to leave grooves or scratches, most likely, the plaster composition has already begun local setting in the form of small grains. Air and intense evaporation of moisture from the surface cause the surface layers to dry out and thicken faster than the deeper layers. In this case, the correct thing to do is to stop further processing. All defects and problem areas are eliminated with putty after the solution has completely set.
It is often recommended to sprinkle the leveled and smoothed surface of the plaster with a dry gypsum mixture, similar to cement plasters. This should not be done if the layer of applied material is thicker than 10 mm; this can provoke the appearance of local dry areas and the development of a network of microcracks.
How to properly work with ultra-thin layers of plaster
The thicker the layer of plaster, the easier it is to level the layer and control the geometry of the plane of the applied composition. In some cases, especially in corners or on surfaces with a negative wall slope, it is necessary to use a reinforcing insert made of polypropylene mesh.
But it is much more difficult to work with thin layers of gypsum plaster. Due to its good adhesion on the surface of cement-sand plaster, gypsum compositions are often used to repair or correct old walls with cement plaster.
This method requires careful preparation of the coating and correct application of the rules. The main problem is the non-linear drying of thin layers of gypsum mass. The thinner the layer, the faster it loses its plasticity. Therefore, it is possible to level out defects with gypsum mixture if you work quickly and correctly dose the force of pressing the tool to the surface. Upon reaching a certain level of viscosity, even finishing compositions 1-2 mm thick begin to collapse.
It is especially difficult to work if the old plaster is full of cracks and chips. In this case, before gypsum plastering, it will often be correct to strengthen the main cement layer based on cement-lime mortar with further leveling for laying the gypsum mass.
You have to put up with thicker layers of plaster and bring their thickness with your own hands to the required value, resorting to mechanical processing.
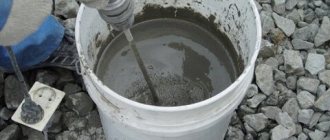
Preparation of plaster mixture
The dry plaster gypsum mixture must be poured into a previously prepared container at the rate of one kilogram of dry matter per 0.5-0.7 liters of water. After some simple calculations, you can find out that a 30-kilogram bag of dry mixture will require 15-21 liters of water.
The cement-sand mixture must be thoroughly mixed with water, bringing the composition to a homogeneous mass. There are two ways to prepare the solution:
- manual method;
- mechanical cooking option. You can use a hand-held electric drill with an attachment, or use a professional mixer.
On a note!
Do not use the mixture you have just prepared - let the solution sit for 5 minutes. Then you need to repeat the mixing process again.
It is recommended to use the prepared solution within one and a half hours. You cannot add other components to the finished mixture.
Selection of material and preparation of solution
Gypsum plaster is an excellent finishing material. It can be used in the renovation of various residential premises. Today, gypsum plaster for walls is represented by the following assortment:
- cheap gypsum mixtures. They contain polymers in small quantities. They are characterized by less adhesion to the finishing surface. Therefore, before application, the walls must be treated with a primer. The solution is also applied to drywall or aerated concrete;
- expensive mixtures. They contain much more polymer additives. Therefore, it is easier to work with them, and the result is better. Because of this, if possible, it is better to buy just such material;
- mixtures intended for application using special equipment. They are characterized by great plasticity;
- mixtures to which special fillers (perlite, foam chips) were added to improve heat and sound insulation characteristics.
Your choice must be made based on financial capabilities, needs and available equipment.
Before starting work, a solution is prepared from the purchased material. To obtain a high-quality mixture, you should perform the following steps:
- Clean water is poured into a deep container. For 1 kg of powder there should be 500–700 ml of water;
- the dry powder is poured into a bucket of water and the resulting solution is mixed with a drill or a construction mixer. You need to knead thoroughly;
- The stirred mixture is left for 5 minutes. Then it is mixed again.
Related article: If laminate flooring creaks after installation: reasons, solution
The resulting solution can be applied to the surface of the walls. It will begin to dry in 30 minutes. Therefore, there is no need to cook too much at once.
Surface leveling using beacons
When aligning walls along beacons, it is necessary to install guides. It is along these lines that alignment occurs in the future. Control of their placement in the horizontal plane is important. Experts recommend installing beacons so that the thickness of the applied mixture is minimal.
- Firstly, it reduces material consumption.
- Secondly, the mixture dries quickly, therefore, work progresses quickly.
You can use a beacon profile in your work. These (guiding beacons) are perforated slats made of galvanized metal that are not susceptible to corrosion. The length of the slats is 300 millimeters, and the width is within 6 mm.
Finishing without beacons
There is another way to plaster walls with gypsum plaster without using beacons. The process can be accompanied by the use of reinforcing mesh or without it.
Basically, this method is suitable for making a decorative layer and, if necessary, slightly leveling the surface. It is important to use the rules to determine the deviation of the plane.
To do this, you need to press it to the work surface. If there are depressions, they need to be filled with a small amount of solution and stretched over the working surface.
If there are obvious protrusions, they are cut off with a grinder or removed with a hammer drill and the problem area is treated using the method described above using a spatula or trowel. Check the rule again to find out how even the plaster layer is. If everything is fine (there are no gaps between the tool and the wall), you can move to another area.
Allow some time for the plaster to harden and putty again. As a result of the described actions, the wall will be ready for subsequent finishing. For example, wallpapering.
When preparing the surface, it is important not to miss cracks. They should be treated, puttied and a layer of primer applied.
Plastering on beacons
The leveling method using beacons is suitable for large surfaces and provides high quality coverage. Metal profiles sold specifically for these purposes, strings, wire or thin cables can be used as beacons.
Installation of beacons
The beacons need to be leveled, trying to do this in such a way that the finishing layer ends up being as thin as possible. Let's consider the installation of standard beacons made of perforated profiles, secured with mortar. If you choose this installation method, follow these steps:
- Determine the position of the beacons using a level and make markings on the walls. The outermost beacons should be 20 cm from adjacent walls, the distance between intermediate beacons should be less than the length of the rule.
- Mix a small amount of mortar and throw it in heaps along the outer marking line at a distance of 30–50 cm from each other.
- Submerge the bar in the solution, adjusting its position according to the level. Do the same with the second outermost beacon.
- For convenience, when placing intermediate beacons, you can use a long strip or thread stretched between the outer beacons.
It is advisable not to leave the profiles under a layer of plaster, but to remove them after the finished surface has completely dried, covering the formed grooves with fresh mortar. If the beacons are not removed, they may rust over time. Rust can come to the surface and ruin the finish. You don't have to worry about this unless tiles are laid on top of the plaster.
Application of the solution
Gypsum mortar is convenient because it can not only be thrown on, but also spread. When using beacons, it is most convenient to apply it with a trowel so that the mortar cakes can provide the required layer thickness. You can apply the plaster mixture to the wall using spatulas.
Important! The layer of gypsum plaster should not exceed 1 cm. If greater thickness is required, additional layers will have to be made.
There are different methods of applying gypsum plaster, let's look at one of them.
- Wet the wall with water.
- When throwing or laying plaster on the wall, fill with it the plane bounded by two beacons, the ceiling and the floor.
- Using the rule, distribute the solution over the area between the beacons. Move the rule from bottom to top, resting it on the beacons and moving it a little from side to side.
USEFUL INFORMATION: What is Contact Concrete: application, consumption per 1 m2 and primer characteristics
- Remove excess mortar from the rule with a narrow spatula and apply it to the places where voids have formed.
- After the mortar has set, walk over the surface with a rule to cut off excess plaster. It is necessary to wait the right time so that only the top layer is cut off and the entire mass does not follow the rule. You can’t wait too long either; the approximate waiting time is half an hour.
- If there are recesses or small flaws left on the surface, you need to wait for the layer to dry, mix a new solution, apply the plaster with a spatula to problem areas and level it using the rule.
- After the applied mixture has dried, the surface is moistened and rubbed with a grater in a circular motion.
- Additional smoothing can be done using a smoothing iron, a sponge grater or a wide spatula. You can achieve a glossy surface by moistening the surface with water a day after the plaster has dried and smoothing it with a spatula until the desired result is obtained.
High-quality plaster does not require puttying before wallpapering. Before painting, the wall must be prepared more thoroughly: sanded, coated with primer and applied finishing putty.