Home Buildings
Publication date: 09/05/2018
0
1678
- Features of floors in wet rooms
- Types of floors in the bathhouse
- Design options for different types of foundations
- Floor installation instructions
The floor in a frame bath differs from the floor in a timber or log bath. Making it in a frame structure is usually easier and even a novice builder can handle this work.
It’s easy to build a frame bath
Floor covering device
Scheme of the floor “pie” (from bottom to top):
- subfloor rolling – OSB-3 (thickness 6mm);
- waterproofing and wind protection – “Izospan A”
- insulation – ecowool
- OSB-3 shield (thickness 18 mm);
- insulation – EPPS, 5 cm;
- vapor barrier – “Izospan D”;
- reinforcing mesh;
- underfloor heating cables;
- screed;
- tile adhesive;
- tile.
Now let's talk more about each layer.
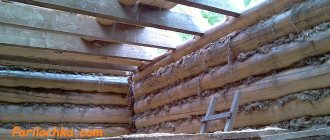
Step #1 - rolling the subfloor
OSB-3 sheets 6 mm thick were nailed to the bottom side of the joists. They have drainage holes drilled for ventilation. A hole was also cut for the drain outlet.
Installation of a subfloor from OSB-3 sheets
Step #2 - waterproofing the floor
Waterproofing and windproof film “Izospan A” was laid on the roll. All joints were taped with construction tape.
Waterproofing subfloor roll-up with Izospan A film
According to the plan, the supply ventilation hole in the bathhouse will pass under the stove. To organize it, a metal hood box was installed between the joists. A drain tee is also installed.
Installation of the supply ventilation duct
Step #3 - insulation with ecowool
The first layer of insulation is ecowool. But since niches were formed in the ceiling between the joists and the lower frame of the walls (where it is difficult to deliver ecowool), they were filled with Rockwool insulation.
“Rockwool” insulation is laid in niches under the wall trim
I beat the ecowool with an electric drill. During the process, the material increased approximately 2.5-3 times its original volume. The fluffed insulation was laid manually between the joists on the waterproofing. The surface was compacted and leveled with the rule flush with the joists. At this stage, the drainage organization is completed.
Laying ecowool between floor joists
Step #4 - OSB-3 sheathing
Next, the ecowool was covered with another layer of OSB-3. The sheets were cut into pieces so that their edges were located on the joists. Between the logs and the lower frame of the walls, wooden inserts are also fixed, serving as supports for OSB-3.
Embedded timber for OSB-3 support
Taking into account possible expansion (swelling), OSB-3 was laid with a small gap of 2-3 mm. They were secured with self-tapping screws to the joists.
Covering logs with OSB-3 sheets
Step #5 - insulation with EPS boards
The next step is additional insulation of the floor with a layer of EPS (extruded polystyrene foam). The slabs were laid in staggered order. To do this, entire slabs had to be cut with a construction knife (if you have a jigsaw, it’s better to use it).
Floor insulation with EPS sheets
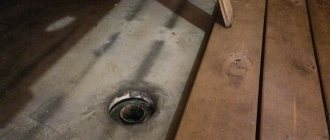
The drain has been waterproofed. “Izospan D” is glued around the drain with double-sided tape, and the joints between the pipe and the film are filled with sealant.
Waterproofing the drain using Izospan film and sealant
Space has been left for installing a concrete slab under the stove.
In the place where it is planned to pour a concrete slab under the furnace, EPS does not fit
Step #6 - Placement of Vapor Barrier
A vapor barrier film “Izospan D” was laid on top of the EPS, and stapled to the EPS. The film is laid with an overlap (by 5 cm), the joints are taped with construction tape. To prevent rotting of the lower framing of the frame, the film is placed on the walls (10-15 cm) and connected to the vapor barrier of the walls.
Organization of a vapor barrier layer from Izospan D film
We use wood
Leaking floor diagram.
The installation of a non-leaking (with drain) wooden floor in a frame bathhouse allows you to use the bathhouse all year round, because there is no ice cushion of frozen water underneath, cooling the floors. The logs for the drain version of the floor are not pre-laid level, but with a slight (10º) slope towards the future drain, and in the place of the drain there should be a pit (50x60x50 cm) filled with crushed stone or broken bricks with a pipe leading outside the bathhouse.
- wooden blocks 30x30 mm;
- sheets of moisture-resistant plywood (10-12 mm thick);
- mineral wool;
- hydro- and vapor barrier film;
- hardwood boards;
- construction tape;
- nails.
Scheme of a wooden non-leaking floor.
- The guide bars are nailed to the joists.
- Plywood sheets are laid on top as a subfloor, nailing them end-to-end to the bars.
- Next, overlap (5 cm), fixing it to the plywood with a stapler, lay a layer of insulating film, gluing the seams with tape.
- They put mineral wool insulation on the film, laying it tightly, without cracks, and chopping it off with a stapler.
- The insulation layer should be 15-18 mm thick.
- On mineral wool, similar to the first, another layer of film is made as a vapor barrier.
- Stuff the top “clean” layer of the floor (with nails having a length equal to twice the thickness of the board), fitting the boards tightly.
Due to the high temperature in the steam room, the board covering cannot be coated with paint or varnish; in this form it is pleasant for walking barefoot.
When installing a non-leakage floor, crushed stone is poured onto the ground in a layer of 25 cm, through which water will flow into the soil. If the soil does not absorb water well, then you can install a tray at the bottom of the bathhouse, through which the water will flow into the reservoir and then be discharged outside the building. The logs are laid horizontally on the foundation through the waterproofing, not reaching the walls (for ventilation) by 3 cm, having previously been treated with an antiseptic. Tools used:
- unedged boards with a smooth surface;
- nails (twice as long as the thickness of the boards);
- drying oil
They work in this order:
- The boards are cut to the size of the bathhouse room, leaving a ventilation gap of 2 cm.
- Begin laying from any wall, nailing the board to the joists, 2 cm from the wall.
- Then the remaining boards are nailed to the joists, leaving gaps of at least 3 mm between them.
- Drive nails from both sides along the edges (with a 15 mm indentation), from the center of the board at an angle of 40º, using at least two nails per lag.
Installation of a concrete slab under the furnace
The bathhouse will have a metal electric stove . To protect those steaming from burns and to transform the sharp heat coming from the metal walls into pleasant warmth, it is planned to line the stove with bricks. The total weight of a stove with a brick screen will be quite impressive. It is necessary to install a concrete slab that ensures the stability of the furnace equipment and, in function, replaces the foundation.
The dimensions of the foundation slab are 15 cm larger than the dimensions of the brick screen (around the stove) by 15 cm. First of all, reinforcement is created at the location of the slab. A mesh is laid on OSB-3 sheets, its parts are connected with wire into a single web.
Reinforcement of the slab under the stove
Plate thickness – 50 mm. At this height, along the perimeter of the slab, formwork made of boards was installed. Concrete with crushed stone of a fraction of 5-20 mm is poured inside. The slab was covered with film to maintain moisture and prevent cracking of the concrete. For the same purposes, every day the slab was moistened with water from a spray bottle until completely dry.
The concrete slab must stand for at least 2-3 weeks before installing a stove on it
A week later the formwork was removed.
Installation of a heated floor system
The presence of a heated floor promotes the rapid evaporation of moisture from the heated floor surface. This type of floor dries quickly and mold and mildew do not have time to form on it. And the constantly warm surface is very comfortable for bare feet! These reasons determined the choice of electric flooring for the steam room, washing room and rest room.
To facilitate cable installation, a 50x50 mm masonry mesh is laid on the surface of the vapor barrier. The mesh parts are connected with wire.
Installation of masonry mesh for vapor barrier
The cable was secured with 100 mm ties. A heated floor sensor is installed in the wall.
Laying underfloor heating cables on a grid
Installation of a heated floor sensor on the wall
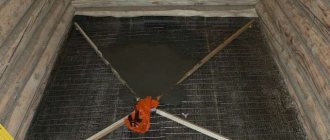
Before pouring the mortar, the masonry mesh was raised 1 cm from the floor. To do this, pieces were cut from the remains of foamed polyethylene (left over after insulating plumbing pipes) and placed under the mesh. You can use any other material that does not wrinkle, does not bend and holds its shape.
The thickness of the floor screed is 30 mm. In the steam room, relaxation room - without a slope, in the sink - with a slope of 5 mm/1 m towards the drain. To form a flat surface, beacons were used - a U-shaped profile 19x20mm. First, wood grouse were placed on the floor surface using a laser level, and beacons were laid on top of them.
Exposed beacons for screed installation
The screed was filled with a cement-sand mixture with a plasticizer (PVA glue) and fiber (reinforcing additive). Mixed in a concrete mixer. The solution turns out to be gray, dense, and almost as strong as metal.
The next day, the beacons were removed from the fresh screed and the wood grouse were unscrewed. The resulting holes are filled with mortar and rubbed flush with the hardened screed. Afterwards, the screed is moistened with water and covered with a film to prevent cracking. The film is removed after the screed has completely hardened. I did it after 5 days.
Screed device for subsequent tiling
Option using concrete
You can install concrete floors in the bathhouse, which, although labor-intensive to manufacture, compare favorably with their wooden counterparts in their long (up to 30 years) service life. In this case, a pit (drainage basin) is also preliminarily organized, with concrete walls and drainage through a pipe (200 mm) into a ditch.
- battery vibrator (concrete compaction);
- building level;
- shovels.
The work is carried out in stages:
- Lay a concrete layer of 5 cm, making a slight slope towards the drain, checking it with the building level, and leave it to harden for a day.
- Spread expanded clay (insulation) in a layer of 5-8 cm, laying a chain-link mesh on it as a reinforcing agent.
- Another layer of concrete is poured, compacting it, and to level the surface, a cement-sand mixture is applied, smoothing it with a board.
- After the cement mixture has hardened (after 5 days), the top can be covered with non-slip ceramic tiles. This option, when applied to a Russian bath, requires the use of a removable wooden grate on top to avoid foot burns, but is ideal for a sauna where the temperature does not exceed 90º. Then a two-layer coating of drying oil should be made on the boards.
To install floors in bathhouses, you can use any method that corresponds to the desired financial and labor costs. A bathhouse made using the correct technology, using universal materials, will be protected from moisture and steam, and from heat leakage, which will ensure its long service life. And you can take a steam bath in both winter and summer.
The basis of the covering is a double plank flooring, which is mounted on logs and does not have any gaps.
Work order:
- The soil is removed 30 cm relative to the bottom of the doorway and compacted;
- From the middle of the room to the border of the building, a trench is dug for the sewer pipe, at the end of which a siphon is installed vertically;
- Construction of the screed and its waterproofing, preferably with bitumen mastic;
Attention! To be able to service or replace the siphon, it must be located outside.
- Installing antiseptic-treated lags from 50x50 mm timber every 500 mm and filling the space between them with expanded clay;
- Installation of flooring from boards 100x25 mm;
- Connecting a gutter to the siphon along the entire length of the wall;
- Laying the logs in such a way that their cross-section decreases in the direction of drainage;
- Installation of finished flooring from tightly fitted boards;
- Making a series of through holes above the gutter to drain water.
The system works due to the slope of the upper plank flooring - moisture flows to the lower point of the floor and, collected in the drainage system, is removed into the sewer pipe.
Floor tiling
The hardened screed is covered with a concrete primer (I used Knauf “Betonkontakt”). For the floor covering, ceramic tiles with a rough surface and a low level of water absorption (2%) were chosen. This tile is recommended for use in wet areas with high traffic and the likelihood of damage.
The tiles are laid using moisture-resistant glue; in this case, Ceresit CM 11 was used. Using crosses, a 5 mm seam was formed between the tiles. The level of cladding was controlled by the building level.
At the last stage of cladding, the joints were grouted. I decided not to use regular colored grout, due to the fact that it would quickly turn dirty gray on the floor. Therefore, the seams were sealed with the same tile adhesive. It’s a good idea to use regular cement mortar for the same purposes. It turns out neatly, the mixture does not fall out of the seams, and retains its original appearance for a long time. And in terms of strength it is not inferior to the most expensive grouts.
Laying tiles on a screed in a frame bath
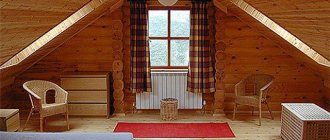
This is the floor I got in a frame bath. The main thing is that it is beautiful, warm, moisture does not stagnate on it, and no foreign odors are observed.
Installation of logs
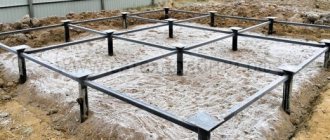
As a rule, a frame bathhouse is built on a columnar foundation or piles. To connect the load-bearing elements of the base into one whole, a wooden or metal grillage is used. For a bathhouse on stilts, grillages made of steel channels or I-beams are more suitable.
First of all, the installation of a floor in a bathhouse begins with the construction of its frame, that is, the laying of logs. If you decide to build a bathhouse on stilts with a metal grillage, then on top of it you need to fix a wooden beam with a section of 150x50 mm. It is easier to attach logs to it. The construction of the floor of a frame bath on a columnar foundation begins with laying a wooden grillage from beams with a cross-section of 150x50 mm. Not only are the logs attached to it, it is also the basis for the walls.
Depending on the dimensions of the bathhouse, intermediate beams in a wooden frame may be needed for laying the logs. In addition, additional support pillars will need to be installed under intermediate beams and long joists. They can be made from brick. The logs are attached to a wooden grillage and intermediate beams in increments of 40 cm.
Recommended reading: How to properly make a floor slope in a bathhouse
Important: all wooden structures are treated with antiseptics and fire retardants. It is better to make the logs under the steam room and washing room from moisture-resistant larch wood.
Stage 2: Foundation
Baths that are small in size are usually built without any foundation, since the building is light in weight. To extend the service life of the structure, as well as to avoid dampness in it, preparation of the base is extremely necessary. For a frame bathhouse, powerful concrete foundations are not used; you can limit yourself to cheaper, but no less reliable analogues.
Find out the basic rules of landscape design for landscaping a site in this material.
They are used for small baths (3x4 or 4x4), especially if the roof and walls are made of lightweight materials. A timber timber foundation is best suited for clay soils with moderate moisture.
The timber base consists of stakes driven into the ground, on top of which the first beams for the walls are laid. All wooden elements of the base must be treated with an antiseptic, which reduces the rate of destruction and reduces the risk of fungus development. It is advisable to choose timber made from coniferous trees, since due to its high resin content it is less susceptible to rotting.
Often this type of foundation is used for the construction of greenhouses and greenhouses.
Columnar
This is the best option for frame construction on a site where there is a lot of groundwater and the soil has a heterogeneous composition. Its construction is possible on its own. To do this, you only need a drill, pre-prepared plastic pipes, and a cement-sand mixture. Algorithm for creating a columnar base:
- It is necessary to level the area as much as possible. It is at this stage that you can order special equipment.
- Mark the location of future pillars. For this purpose, use a regular thread.
- Drill holes in the ground and make waterproofing inside them.
- Pour concrete and at the same time install pipes in each hole.
- Fix the pipes at a distance of 20-30 cm, wait for the cement to dry. At this time, reinforcement can be carried out.
- After hardening, the pipes must be filled with concrete to the end.
- On the resulting columns, form a grillage from treated timber.
We invite you to familiarize yourself with Fire protection of a stove in a wooden house
It takes no more than 3 weeks to work with a foundation of this type. During this time, you can purchase and prepare all the material for the walls and roof.
Installing timber on a pole
Block
Used for medium-sized baths, as well as when planning to use a heavy stove. In addition, a base made of blocks is suitable for structures where a cellar or basement is planned. The block foundation is easy to install, but at the same time it has high strength, reliability and a long service life. Foam concrete is usually used for blocks, but brick can also be used.
FBS foundation blocks
Pile-screw
The best foundation option for building a large bathhouse with a large number of additional rooms. Suitable for use on almost any type of soil with a low level of freezing. To create it you will need special equipment, and to carry out all the work you need at least 4 people. Installation of a pile-screw foundation proceeds according to the following scheme:
- Marking places for future installation of piles.
- Drilling holes of the required depth. The level is determined by the results of soil analysis.
- Installation of piles, screwing them into the ground. The technology is determined by the budget and the possibility of using specialized equipment.
- Collection and fixation of the harness.
Types of piles for different types of foundation
You can use a wooden or metal beam as a strapping. Working with wood is easier because it makes the process of installing walls easier later on.
Tape
The most reliable type of foundation, but its use is only possible on stable soils with a small amount of groundwater. The strip base is the most expensive, since a large amount of high-quality concrete mixture is required. Construction algorithm:
- After preliminary marking, you need to dig a trench. Typically its width is up to 40 cm and depth up to 50 cm.
- It must be filled with sand to ground level and compacted thoroughly. For this purpose, sand should be poured in layers, pouring water over it to shrink.
- Installation of formwork up to 50 cm high. The width is determined by the area of the house, usually 50-60 cm. The base of the formwork must be reinforced with metal pipes or rods.
- Pouring concrete is carried out in several approaches, so that each previous layer has time to dry a little.
- A waterproofing layer must be laid on top of the base. Roofing material is best suited for this purpose.
What is taken into account when using a strip foundation
Bathroom floor design
After the logs are installed, you can begin constructing the floor of the frame bath. If you decide to build a sauna with your own hands, keep in mind that the constructive floor cake must include the following layers:
- subfloor made of 0.6 cm thick oriented strand boards;
- waterproofing and wind protection coating (we will use Izospan “A”, but you can choose other materials);
- a layer of thermal insulation (for floor insulation we use ecowool, you can use mineral wool);
- a protective layer of oriented strand board 1.8 cm thick;
- to effectively insulate the floor of a frame bath, the cake contains two layers of insulation (now for this purpose we will use extruded polystyrene foam 50 mm thick);
- then follows a layer of vapor barrier (Izospan “D”);
- after this, a reinforcing fiberglass mesh is laid;
- then a floor heating system is installed;
- cement-sand screed with reinforcement;
- ceramic tiles laid with special glue.
If you are building a frame bathhouse on stilts or a columnar foundation with your own hands, you should take a closer look at the features of each layer of the structural floor pie.
Advice: keep in mind that it is necessary to properly insulate not only the floor of the frame bath, but also its walls, as well as the ceilings.
Stage 5: Rafter system
As floor beams and rafters for a frame bath, you should use timber with a cross-section of at least 15x5 cm, pre-treated with an antiseptic. They must be placed on edge, and then fastened together with long screws and metal plates. When installing in a vertical position, it is important to secure the common screed with a ridge beam of the same cross-section.
We invite you to familiarize yourself with decorating a bathhouse with clapboard inside (61 photos): how to sheathe it correctly
The beams are always released outside at a distance of 40 cm, which allows you to subsequently lay the roofing material correctly. Roof lathing is made from boards up to 25 cm thick, laid directly from the roof ridge.
When building a small frame bathhouse, the rafter system can be assembled on the ground, which is much more convenient if several people are working. As a roofing material, soft or metal tiles laid on a layer of thermal insulation and a wind-moisture-proof membrane are suitable.
Floor construction
It doesn’t matter what kind of frame bath you build, on stilts or a columnar foundation, the floor insulation procedure follows the same sequence. Before you start building the floor, it is worth installing the frame walls of the bathhouse. There is no need to insulate the walls yet, but it is better to install a moisture and wind barrier. The construction of the subfloor proceeds in the following sequence:
- We nail moisture-resistant OSB 0.6 cm thick to the bottom surface of the log. Under the washing room and steam room, small holes should be drilled in the slab for ventilation. Don't forget to make a hole to install the drain pipe under the washing room. As a result, you will get a design that resembles the letter “W”.
- The next stage of building the floor of a frame bathhouse with your own hands will be laying Izospan waterproofing. It will also serve as a windbreak. We lay the waterproofing on top of the joists so that it sag into the gaps between them and evenly covers the OSB sheathing. The joints of the waterproofing film are taped. The waterproofing is fixed to the joists by stuffing wooden slats with a cross-section of 50x30 mm on top of them.
- If you plan to make a stove in the bathhouse, then install a supply vent in the place where it is supposed to be located in the floor between the joists. For these purposes, you can use a steel pipe or an old ventilation duct.
- When the waterproofing is laid, you can insulate the bathhouse floor with your own hands. We do it using ecowool, laying slabs between the logs. The surface of the heat-insulating material should be flush with the top edge of the joist. At the stage of laying the insulation, do not forget to lay the drain pipe in the washing room.
Laying vapor barrier film and insulation
Advice: if there are recesses under the walls of the structure, then insulation must be installed there as well. However, it is difficult to lay ecowool slabs there, so you can lay soft Rockwool insulation under the walls.
- Next, the floor is sewn over the logs with moisture-resistant oriented strand boards. In this case, it is important to ensure that the joining of the slabs falls on the logs. To fix the OSB between the joists and the bottom frame under the walls, it is worth attaching wooden blocks. We lay OSB with a gap of 0.2-0.3 cm between adjacent sheets. We attach them to the logs using self-tapping screws.
- When the waterproofing and the first layer of insulation are laid, you can make the second layer of insulation with your own hands. To do this, we lay sheets of extruded polystyrene foam 5 cm thick in a spaced pattern. In the place where the stove will be installed, laying thermal insulation material is not necessary.
- We waterproof the drain hole in the floor. To do this, we attach Izospan “D” film around the drain with double-sided tape. We install waterproofing using sealant, which is poured between the film and the pipe.
- A vapor barrier layer must be provided in the floor of a bathhouse on stilts and a columnar foundation. Its installation can be made using the Izospan “D” vapor barrier film. To do this, we attach it to sheets of polystyrene foam using a stapler. We lay the film with an overlap of 50 mm, sealing the joints with tape. To prevent rotting of the bottom trim, we place the film on the walls to a height of 100-150 mm and connect it to the vapor barrier material of the walls.
Bathroom wall cladding
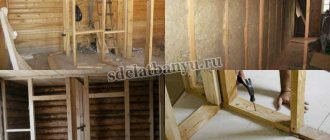
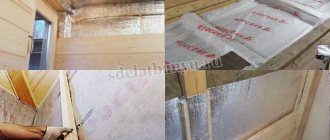
For the outer cladding of the walls of the bathhouse, I chose Izoplaat slabs. They have good vapor permeability, and the material is natural. Plus, these slabs strengthen the rigidity of bathhouse walls. I took “Izoplaat” 25 mm thick, cut it with a jigsaw and fastened it to the frame with nails.
Green slabs - Isoplaate, vapor permeable. Roof - Pural Matt metal tiles
I stretched the Izospan film over the Izoplaat slabs. This material is also waterproof and windproof, but still allows steam to pass through. I secured the material with a stapler, making horizontal and vertical overlaps of approximately 10 cm.
I insulated the inside of the bathhouse with basalt wool. The slabs had to be cut in places because they did not fit into the space between the posts. Additionally, I didn’t secure the cotton wool with anything; it lay down quite tightly.
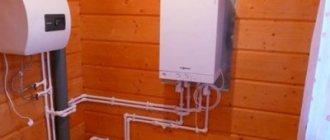
Already at this stage, my assistants began to make plumbing from polypropylene. This is clearly visible in the photo. I chose this hidden type of pipe installation for aesthetic reasons. In the future, all of them will be hidden under the finishing cladding.
Distributing water with polyethylene pipes for welding
The outer decorative lining of the bathhouse was made of clapboard. This material was not chosen by chance. Firstly, a bathhouse lined with wood has a presentable appearance, and secondly, wooden lining allows the walls to “breathe” and condensation does not accumulate either in the insulation or in the frame itself.
To provide the necessary air layer, I stuffed thin wooden slats 3 cm wide and only half a centimeter thick directly onto the vapor barrier.
Thermal insulation materials
Ebb tides for the base
By the way, it was after I filled the slats and before the installation of the lining began that I began installing the ebb for the base. I took green metal strips. The width I chose was only 50 mm - this is quite enough for a bathhouse. To secure the ebb tides evenly, I first pulled the thread, checked the line with a level, and then proceeded with installation from the far corner of the bathhouse.
I took the first plank and marked a line across the profile with a pencil in the center. I stepped back 5 cm from this line to the right and left, put points and connected them so that a triangle was formed. This triangle was cut out with metal scissors, after which I bent the strip, attached it to the wall of the house and tightened special self-tapping screws with washers. To make it clearer, I am attaching a diagram that I found on the Internet.
Installation diagram for ebb sills
The rest of the profiles around the perimeter were attached in the same way - simply screwing in the screws and checking the horizontalness at the same time. All joints were coated with frost-resistant sealant. When I installed all the planks, I additionally strengthened the base ebbs with polyurethane foam - I applied it in a small amount under the planks.
Installation of lining
I decided to install the lining using clamps. Of course, you can simply nail the boards, but this is quite ugly.
My son and I simply pressed the first board against the wall, leveled it and secured it with self-tapping screws, screwing them along the edges of the plank. Then, clamps were inserted into the grooves of the first board of the lining on top (they were inserted next to the battens of the sheathing, stuffed on top of the vapor barrier) and nails were driven into the existing holes. The second board was inserted into the groove of the previous one.
I simply nailed the last triangle under the roof itself.
The walls are sheathed.
When I finished with the walls, I built a small canopy over the front door. Later, I brought it to mind, turning it into a gable, covering it with metal tiles and installing a street lamp under the canopy.
Windows are a different story. They must be installed following technology and avoiding distortions. In a bathhouse, windows should not only be a source of light and provide ventilation, but also retain heat well.
Inserted a window
I ordered the windows themselves in advance from one company, but installed everything myself. To begin with, I took vapor barrier and waterproofing tape. The first one was secured around the perimeter of the window frame from the inside, the second – from the outside, that is, from the street side. Later I will glue the edges of these tapes to Izospan.
I installed the frame and tapped plastic spacer wedges to create a two-centimeter gap for the foam. The windows included mounting anchor plates with holes into which I screwed long self-tapping screws. Afterwards I foamed the gaps and checked everything with a level again.
By the way, when installing the sash, I only filmed from one window – the largest. I installed small windows without removing the frames.
Video of an installed window, thermal insulation and a piece of rough ceiling.
I ordered a metal door so that ill-wishers would not get into my bathhouse in winter.
First, I took the door off its hinges to try the frame in the opening. All measurements were accurate and the box fit perfectly. I secured the box with self-tapping screws through the eyes, having previously placed wedges under it for leveling. I filled the gaps between the frame of the house and the door frame with mounting foam, when it dried, I hung the door leaf.
The walls, as can be seen in the photo report, are covered with clapboard or tiled. First things first.
Laying tiles
The sink walls are tiled
We sheathed the walls on top of the insulation with moisture-resistant gypsum fiber board. Self-tapping screws were used for fastening. They were screwed in in increments of 25 cm and retreating slightly from the edge. The sheets were cut so that the joints fell on the frame beams.
In the steam room, it was decided to make a plinth from tiles, so I had to purchase two sheets of moisture-resistant drywall, carefully cut them into strips and screw them around the perimeter of the walls. By the way, the drywall was already attached to the fixed foil (vapor barrier).
In the shower, the first row was laid with floor tiles. I had to cut it a little so that the top row of tiles on the wall consisted of whole tiles.
I applied glue to the wall with a spatula, applied it and tapped the tiles with a mallet. I inserted crosses between adjacent tiles so that the seams were the same. I checked the flatness and horizontality with a long water level. The second and subsequent rows were laid with tiles of a different color.
Holes had to be drilled in some tiles for further installation of pipes and electrical appliances. I made markings with a pencil, checked the accuracy of the position of the hole with a ruler and square, after which the drill went into action. First I drilled the hole with a spear drill. To prevent the tile from splitting, a piece of masking tape was glued on top.
Immediately during the laying process, excess glue was removed with a rag until the composition dried. The grout seams turned out smooth and neat.
A day after finishing the walls with tiles, I started working on the seams. To begin with, I pulled out all the crosses. I used two colors of grout – white and dark brown. For the bath I selected a two-component epoxy composition. It's not the cheapest, but it's ideal for wet areas. I mixed the grout components in one bucket and did not add water.
We invite you to read: What is the best material to build a bathhouse from at the dacha?
Before applying the epoxy grout, I lightly wet the wall with a spray bottle. I collected the mass onto a spatula and then spread it over the seams, making movements from left to right perpendicular to the seam. The spatula was held at an angle of approximately 30 degrees. I leveled the grout 30 minutes after its application using a rubber spatula. Well, finally, when the seams were dry, I washed the walls with soap and water.
Lining - installation
The walls in the steam room were not sheathed with GVL. We stretched the foil vapor barrier and secured it with a stapler and tape. By the way, I also taped well the joint between the ventilation air duct and the foil. On top of the foil I carefully stuffed slats - lathing.
Lining
I would like to draw the readers' attention to the horizontal position of the wooden planks of the lining. I specially positioned them so as to avoid capillary rise of moisture along the wooden wall and to achieve good air circulation necessary for drying the material after bath procedures. It would be very unpleasant if the constant dampness caused the lining to wilt or if it rotted after a couple of years.
At first I wanted to just nail the boards, but then the choice again fell on clamps. They are not visible under the lining, and the nails can rust from high humidity, leaving black stains on the walls.
I treated all the planks with Neomid impregnation to prevent the wood from rotting. And to attach the first and last strips, I purchased copper-plated finishing nails.
Installation started from the ceiling. I stepped back 3 cm, applied the bar, and nailed the nail into the center. I drove another nail on both sides of the board, and then checked the level with a level. I assembled the lining so that the tenon was on top and the groove was on the bottom. This is important, because if you sheathe the wall differently, moisture will accumulate in the grooves, the wood will swell and move.
From below, I inserted clamps into the groove of the first board, each of them was nailed to the sheathing with three nails. I inserted the second forcing panel with a tenon into the groove. I lightly tapped it with a hammer from bottom to top so that there were no gaps left, after which I inserted the clamps and nailed them. So I collected it all the way to the floor. I cut the last bottom plank lengthwise so that there was a gap of 2 cm between the floor and the wood.
Heated floor installation
The best option for insulating the floor of a bathhouse on stilts or a columnar foundation would be to install a heated structure. This will help evaporate moisture from the floor after the procedure, quickly dry the surface and provide additional protection against fungus and mold. If you plan to do the work yourself, it is better to install heated floors using factory electrical systems. Such a floor should be installed in the steam room, relaxation room and washing room.
Recommended reading: How to make a floor in a bathhouse with a drain
We work in this order:
- To facilitate the installation of electrical heating systems, a fiberglass reinforcing mesh with a cell size of 50x50 mm is laid on the vapor barrier material. We lay the mesh with a slight overlap and tie it together.
- We lay out the electric cable for heating on the floor in a “snail” or “snake”. We fix it to the grid.
- Then we install a warm floor sensor in the wall.
- We connect and connect all components of the system.
- After checking that the device is working properly, you can begin pouring the screed.
Stage 6: Cladding
Cladding work is an important part of creating the exterior of the future bathhouse. Despite the fact that the structure, lined with OSB boards, is completely ready for use, the appearance is still far from perfect. Today there are many materials for cladding rooms. Let's look at the most popular of them.
Lining
This is what the lining looks like
For baths, decorative or imitation lining is usually used. This is the cheapest and most accessible material, characterized by average strength and reliability characteristics.
It is recommended to place the boards horizontally, having previously laid a layer of waterproofing, for which you can use glassine. The sheets must be fastened with an overlap to prevent moisture from getting under the cracks. Often the seams are additionally taped on the inside - this increases protection from precipitation. After attaching the lining, it is coated with decorative varnish or paint to avoid cracks and rotting.
Find out how to arrange an artificial pond in your garden in this article.
Thermal panels
This is a modern material, representing a three-layer construction with insulation; usually mineral wool or polystyrene foam is used for this purpose. The outer surface can have different textures, colors and shapes. It is usually made of artificial stone, clinker or porcelain stoneware; glazed tiles are often used.
The panels have mutual grooves, so they not only form a monolithic pattern, but also provide reliable protection for the building from humidity, sun and other unfavorable climatic conditions. They are resistant to mold and microbial activity. Typically, the outer layers are made of porcelain stoneware, a highly durable material suitable for use in the interiors and exteriors of buildings.
Facing brick
Inexpensive but high-quality material with which you can decorate a bathhouse in any area. Facing bricks are made from high-grade clay, which ensures good strength and resistance to damage and temperature changes. Depending on the manufacturing technology, it can be ceramic, silicate or clinker.
If you follow the installation rules, as well as adding an additional layer of insulation, you can increase the thermal insulation properties of the building. The material is easy to use; no auxiliary tools are required for work.
Vinyl siding
One of the lightest and most common materials for cladding residential and commercial premises. Externally it looks like an ordinary board for cladding buildings, but does not lose its appearance for 20 years. Withstands temperature changes, washes well with plain water, and is not affected by fungus and mold. There is a wide variety of vinyl siding colors, so the bathhouse will complement the main building on the site. Easy to install, low cost.
Beautiful zoning of the territory near a private house is described here.
Bathroom floor screed
We make the screed from cement-sand mortar or ready-made dry mortar. Fiber fibers or construction reinforcing mesh can be used as reinforcement. The height of the screed is 3.0 cm. In the rest room and steam room we make the screed without a slope, and in the washing room we make the floor slope 10 degrees towards the drain hole. We work in this order:
- After laying out the reinforcing mesh on the floor, we install guide beacons (profiles for drywall). We place them on mortar piles and level them.
- Prepare the solution. We add plasticizers and fiber to the traditional cement-sand mixture.
- We lay the screed on the floor and level it according to the beacons using the rule.
- The next day we remove the beacons and fill the voids with solution. We rub the surface.
- During the first week, we spray the screed with water and cover it with film to protect it from cracking.
- After the screed has completely hardened, it can be primed and ceramic tiles can be laid. To lay the flooring we use a special moisture-resistant adhesive.
general information
One of these structures is a frame bathhouse, the construction of which does not take much time .
Such a structure does not require a particularly strong foundation - to build it, it will be enough to build a strip foundation, pour columns, or use the pile-screw method.
The technology for creating a foundation depends on the condition and moisture of the soil at the construction site. And also, depending on the future operating conditions of the structure, its reliable insulation should be ensured in order to ensure a long service life. Moreover, one of the most important stages in the construction of such a bathhouse is the installation of the floor .
Stage 1: Design
Frame construction is suitable both for the construction of small steam rooms on the site, and for the creation of real country houses for relaxation.
The choice of design and area depends only on the size of the site, personal budget and needs. Before starting the main work, you should decide on the location of the bathhouse. To do this, it is important to take into account the location of utilities, the topography and layout of the site, the presence of a reservoir and other water bodies nearby. In addition, it is advisable to conduct a geological analysis of the soil, since the type of future bathhouse foundation depends on this.
Upon completion of the preparatory work, you should have a detailed plan of the area, a drawing of the building with all the necessary elements, and an approximate estimate for materials for construction. If you are not confident that you can draw up a competent project yourself, it is better to turn to professionals - this will allow you to avoid serious mistakes and miscalculations in the future.
Features of floors in wet rooms
Taking into account constant humidity, water ingress, temperature changes, the entire structure of the floor and floor covering in particular must be moisture resistant and resist rotting.
At the same time, it should be warm and comfortable.
The installation of a floor in a frame bath begins with the installation of the frame - laying the logs. In cases where the support of the bathhouse is piles with a grillage made of metal or concrete columns, then a wooden beam of large section 150 * 150 is attached on top of them, followed by attaching a log to it, and which will serve as the basis for the walls. Waterproofing materials are laid in places where wooden parts meet metal and concrete.
As a rule, frame baths are designed according to individual sizes. And sometimes it is necessary to have additional intermediate beams in the frame. In this case, additional support pillars are installed under long logs and additional beams to reduce the load on the elements .
Attention! When constructing wooden structures, it is important to remember that the elements must be treated with antiseptics and fire retardants.
After the support beams and logs have been installed, you can proceed directly to organizing the floor in the frame bath.
Often the overall floor structure is referred to as a pie , which includes layers of rough and finish coatings with additional elements in between.
The subfloor in a frame bath is made of OSB boards 6 mm thick, nailed to the bottom of the logs. Subsequently, layers of hydro- and thermal insulation will be installed on this floor layer. A hole is left here for the drain pipe.
The finishing floor when installing a frame bath is the installation of the floor covering itself in the form of a finishing layer - most often ceramic tiles laid on a screed.
Floors in a bathhouse, unlike ordinary floors in a frame house, have their own characteristics - in addition to reliability and durability, they must ensure water drainage .
That is, the floors in the bathhouse are a unique element of the sewer system. They should also be warm if the bathhouse is used all year round, and easy to clean and ventilate.
In the construction of bath floors, there are two methods of organization:
- leaking floors;
- leak-proof wooden floors.
Leaky wooden floors are most often intended for summer use. They are simpler to construct, but preparation for their installation begins when the foundation is being erected or the piles are being driven in. To do this, a pit up to 700 mm deep is dug in the center of the underground perimeter and a concrete slope is formed towards it from the edges of the underground. This will allow the falling water to flow into the pit, from where it will be drained through a pipe into the prepared cesspool.
Leaking
The design pie in leaky floors is presented as follows:
- Bottom beams mounted on piles or concrete columns.
- Bottom crown beams attached to frame beams.
- Floor boards, screwed to the floor beams in increments of 5-7 mm, with a thickness of at least 20 mm.
A leaky floor in frame baths is usually installed when the dimensions of the structure are small . Such a bathhouse serves as an ordinary summer shower, only of a more reliable design. A floor constructed in this way allows water to pass through well and does not retain water, and is well ventilated. In sunny weather, staying in the bathhouse is a real pleasure. However, in bad weather, the blowing wind can cause discomfort.
Leak-proof
The leak-proof floor in a frame bath is a multi-layer structure designed for year-round use .
It is more difficult to install, but is more reliable and durable. In the organization of such a floor, a rough and finishing floor is arranged. The design pie looks like this:
- Subfloor made of OSB boards 6 mm thick.
- Waterproofing and windproofing.
- A layer of thermal insulation (most often ecowool or mineral wool).
- Protective layer made of OSB 18 mm thick.
- Two layers of insulation (most often polystyrene foam).
- Vapor barrier layer.
- Reinforcing fiberglass mesh.
- Heated floor system.
- Concrete screed with reinforcement.
- Finish floor covering.
One of the main advantages of organizing such a floor is its reliability and comfort in use. In such a bath it is convenient to steam and take a shower both in summer and in cold winter. It is always warm and dry in any climatic conditions.
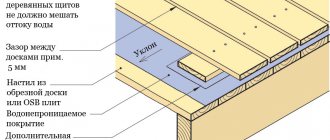
What should good pouring floors look like?
A special feature of the poured bath floor is the presence of gaps between the boards. The gap is left within 5-6 mm. It is not advisable to make smaller cracks, as over time they will quickly become clogged with dirt and soap. Large gaps are also not needed. Through them, heat will leave the bathhouse, and cold air will enter the room.
The quality of the poured floor depends on the arrangement of the underground. The bathhouse has low water consumption. To simplify the organization of drains, many owners install drainage under the floor. The option is economically good if the bathhouse is located on loose soil. Water flowing through the cracks of the pouring floor falls onto the drainage cushion of sand and crushed stone, and then it is absorbed into the ground.
The disadvantage of the drainage drain is the accumulation of soap and dirt residues under the floor. Even with the most intense absorption of water, dampness still remains under the floor for a long time. In such conditions, pathogenic bacteria multiply. The bathhouse becomes a breeding ground for infection.
High-quality poured flooring is made from wood species that have excellent moisture resistance. It is optimal to give preference to larch. The board and all wooden structural elements must be treated with protective impregnations. Be sure to maintain a gap size of 5-6 mm. It is optimal to make the underground waterproofed from the ground, and drain the waste water outside the bathhouse.
Design options for different types of foundations
Depending on the type of foundation for a frame bath, we will consider installing the floor on the following basis:
- pile or columnar;
- tape;
- slab
Pile or columnar
The most convenient and easy to install is the floor in a frame bathhouse on stilts. He is not afraid of either dampness or frost.
Such a foundation can be easily corrected in case of subsidence (it is enough to jack up the corner and place a pad on the pillar or pile).
The cross-sectional design of all floor elements is the same as that used to organize leaky and non-leaky floors in a frame bathhouse.
It serves as the basis for a frame bathhouse, which is distinguished by its large dimensions and, as a rule, includes several rooms.
The construction of the floor in such buildings is also capital, most often it is a concrete floor. When organizing a floor covering, the cross-section of the structural pie has the following form:
- A sand cushion laid on compacted soil.
- Waterproofing layer.
- Insulation (extruded penoplex).
- Reinforcing mesh.
- Heated floor system.
- Screed.
- Clean floor covering.
When installing such a floor, even before pouring the foundation, you should decide in which direction the water should be drained and the sewer pipe should be laid.
When building frame baths, slab foundations are quite rare, especially in cold latitudes, for a number of reasons:
- The bulkiness of the structure.
- Difficulty in laying communications and draining water.
- Difficulty in heating during the cold season.
- Significant financial costs when pouring the foundation.
Nevertheless, the floor cake with this basis has the following structure:
- Sand pillow.
- Expanded clay layer.
- Reinforced concrete slab.
- Waterproofing layer.
- Insulation.
- Warm floor.
- Screed layer.
- Finish floor covering.