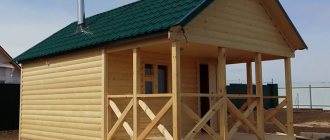
The method of drainage from the bathhouse must be thought out before its construction, at the project development stage. Even for a small building, it is important to determine in advance how the drainage and disposal of water will be organized - into the soil or into the sewerage system. It is important that the drain is organized correctly and functions without problems. How to make a floor in a bathhouse with a drain? Today's material is about this.
Construction of a pouring floor on a concrete base
Basic drainage scheme
A fairly complex floor arrangement allows you to avoid the destructive influence of water on the floor base. How to make a floor slope to drain water from a bathhouse with your own hands? Before you begin the process of pouring floors with a drain system, it is worth familiarizing yourself with some technical nuances. According to many experts, installing a floor base with a hydraulic apparatus is advisable exclusively in the washing department. There are several reasons for this:
- Pouring concrete floors in a steam room leads to strong dust formation at a time of increased dryness of the atmosphere;
- Concrete surfaces tend to get very hot, unlike wood. Therefore, the presence of concrete in the steam room cannot be called appropriate;
- Cement screed has low ductility, so during thermal expansion or compression it will crack very quickly.
What should the base structure be like for the water drainage system to work like a clock? In order to evaluate the advantages of one or another method of laying a hydraulic apparatus, we will consider the process of assembling and draining water from the bathhouse. Sloped floors in most cases “work” using the following technology:
- The slope at the base allows you to collect all the liquid at one point in the room;
- A ladder is installed in the corner of the water assembly, through which “waste” water is removed from the room;
- From the drain, the liquid through the background pipe enters the sewer system or a crushed stone filter, which is installed under the bathhouse.
To make a really high-quality system for draining water from a bathhouse with your own hands, you need to take into account many points:
- foundation type;
- type of ladder;
- “seasonality” of the bath;
- floor type (concrete, wood).
A fairly complex arrangement of floors allows one to avoid the destructive influence of water on the floor base. If you make the base with a slope, the liquid will be quickly evacuated from the room during water procedures, which will prevent damage to the concrete screed or wooden boards.
Types of floors
In the bathhouse, the floors can be made of concrete, wood or brick. The latter type of flooring is used very rarely.
The fact is that while brick has a high heat capacity, it also has low heat transfer. In other words, it heats up so much that you can get severe burns. Therefore, brick is used to construct the base for concrete or wooden floors.
a) concrete floor
Concrete floor in the bathhouse
This flooring is designed for long-term use. Its service life is at least 50 years.
Concrete floor is a cold floor. It requires large financial investments, labor costs and time.
b) wooden floors
Wooden floor
Wooden floor in the steam room
The best and cleanest material for bath floors is wood.
There are two types of wooden floors that are installed in a bathhouse:
- leaky;
- leak-proof.
We will discuss the design of each of them below.
Installation of a wooden floor with a drain due to a slope
Floor requirements
If you plan to use the steam room throughout the year, the base must be insulated.
In order to correctly carry out the hydraulic technical part of the work when constructing a frame bath, you need to pay attention to many technical nuances. The service life of the floor base depends on the quality of the drainage system. Therefore, special attention is paid to this stage of construction work.
The construction of sloped floors can be different, so when laying a hydraulic system with your own hands, it is worth considering several construction technologies. If you do not have any experience in carrying out installation work, you should give preference to the simplest but most reliable water drainage system. But before you begin the process of arranging the base, it is worth considering the following requirements for floors in the bathhouse:
How to properly slope the floor in a bathhouse
- The surface of the floors must be hard and non-slip;
- If you plan to use the steam room throughout the year, the base must be insulated;
- Floors must be quickly dried and cleaned of dirt;
- To prevent the development of pathogenic microflora in the bathhouse, it is imperative to install a water drainage system.
Preparation in the washing room
Water in the washroom ends up on the floor when bathing using hand-held containers or in the shower. The washing room is often equipped with several shower stalls. Before drainage, water must be collected in one place. This is the main condition for it to be withdrawn. The second requirement is the absence of stagnation of water in the drainage system itself.
You should avoid systems where the container is filled and the drain pipe is located at the top. In such cases, the water will stagnate, which in warm climates leads to an odor in the bathhouse. Options with storage tanks in the bathhouse itself are unacceptable, but those with storage tanks taken outside of it are often used.
Any drainage device in a bathhouse has either a funnel-shaped recess or an inclined plate with a chute. There is an option to combine these two methods, when the gutter is installed not at the edge of the screed, but in the center.
The collecting system in this design has the form of two slopes. The main method of obtaining such a surface is concrete casting. It can be either on prepared soil (on bedding), or on a slab on stilts, on a foundation slab, or even on a frame floor.
At the stage of laying the foundation, a warm, moisture-resistant bedding made of expanded clay or crushed stone is constructed in the inner perimeter. Crushed stone is not a heat-insulating material, but is quite suitable for this purpose.
A sewer pipe opening into the center is laid into the backfill. A screed is poured onto the backfill to drain the water.
Sloped screeds are easier to cast than funnel-shaped screeds. Their disadvantage is that they require a larger gap between the finished floor and the drainage screed. This scheme is recommended for baths with a columnar or strip foundation on the ground.
If the foundation is made of a concrete slab or pile, then a scheme with a funnel will be optimal. A poured concrete floor in a bathhouse with a drain is made in much the same way as a regular screed, only instead of leveling the surface, it needs to be sloped.
Water drainage methods
Diagram of a filtration system for draining a bath.
The design features of the base and methods of arranging the hydraulic apparatus directly depend on what types of materials the floor will be constructed from. As a rule, wood, cement screed or combinations of materials are used to finish the base. For any type of construction, a system for draining water masses from the bathhouse is prepared in advance.
The design of the drain mechanism can be different and depends on many factors:
- For a bathhouse for three to four people, it is advisable to make a cesspool under the foundation of the structure. The walls of such a pit are edged with brick and covered with sand. As the tank fills with water, the liquid is pumped out of it using a cleaning machine;
- If you are building a bathhouse for a large number of people with your own hands, it is better to make a drain pipe connected to the central sewer system or a separate well;
- To purify wastewater from dirt, it is advisable to install an underground filtration system. It is equipped with a special sump, distribution well and waste pipe;
- A simpler option for water purification would be to install a filter well. Filter material (crushed stone, brick fragments, expanded clay) is poured under the bathhouse. In the process of irrigation with water, the mineral bed is covered with silt, which purifies the wastewater before entering the ground.
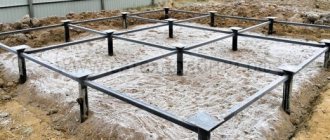
How to build on a pile and monolithic concrete foundation
Bathhouse designs with a foundation in the form of a solid concrete slab are not uncommon. They can be seen especially often in regions where there is a local concrete factory and all houses are built from them. The main difficulty is the inability to lay a pipe in the center for drainage.
On a slab foundation (the so-called “ski” foundation), the drainage of water in the bathhouse is ensured by casting another screed with a slope and a gutter. Convenient configuration with two or three slopes.
Information. It is necessary to ensure very good waterproofing between the main concrete foundation slab and the drain screed. Layers of waterproofing are spread over the slab before casting the funnel. All seams are taped. How this is done is described in detail in other articles on our site.
You can go the other way and make a regular drain on a slab foundation with a pipe in the center. A slab of small thickness can be drilled in the middle, but drilling concrete, especially large-diameter holes for drainage, is an expensive task. Sometimes foundations are made of two slabs. In this case, the drain pipe is concreted into the joint between the slabs.
On a pile foundation, the drainage in the washing bath is organized according to the same scheme as on a monolithic concrete slab. Screw pile foundations are now popular. After all the piles are installed, they are tied together with a welded steel grillage on top.
The piles are arranged on a grid. Concrete on a reinforcing mesh is poured into the resulting cells of the grillage and I-beam. Sometimes the floor is made from MDF boards. This option is not recommended due to its vulnerability to moisture.
The thickness of the concrete screed turns out to be small and it becomes difficult to give it a funnel-shaped recess. Then, before draining the water in the bathhouse, the floor level is raised by 10 cm.
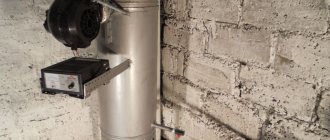
Selection of sewer pipes
Choosing the diameter of the pipe depending on the level of the slope
A correctly made slope at the base of the drain does not yet guarantee the rapid evacuation of water masses from the room. In this matter, the choice of sewer pipes is not the least important. Since the bathhouse uses a non-pressure liquid discharge system, it is advisable to use the following pipes to install the hydraulic apparatus:
- The minimum diameter of the pipe should be 50-60 mm, and the thickness of its walls should be at least 3-4 mm;
- It is advisable to assemble the external pipeline from PVC materials, since they are more frost-resistant;
- During the installation process, pipes are laid in the soil at a level that is below the freezing point.
The article presents some of the stages of installing a sewer pipeline with your own hands. To ensure the system is tight, all structural elements are assembled using high-quality seals. Any holes in the water supply will lead to airing and retention of water masses in the system.
Drain pipe wiring
Pipes must be laid sparingly in length and without making unnecessary bends. It must be remembered that a simple structural device not only saves on construction, but also convenient operation and maintenance. The drain will not become clogged. Unfortunately, this is not always observed. In many pictures you can see floors with a drain, where water stagnates in the trench and gutter.
The best way to lay a pipe in the floor is to lay a straight section at an angle.
The pipe runs from the funnel to the outer surface of the foundation.
There is also the option of connecting the drain to other sewer pipes under the floor.
The entrance in the center of the floor funnel or under an inclined gutter near the wall is shaped like a cup.
This cup is located completely under the front plane of the floor and at its lowest point.
The cup in the floor is covered with a fine grate. It must be protected especially carefully if there is no exposed wooden flooring on the floor. For a bathhouse this configuration is rare, but for a sauna it is the most common.
Attention! A pipe embedded in the floor cannot be removed. Use only a reliable straight section. There is no need to brick up tees and bends. If something happens, it will be impossible to repair them.
In a bathhouse, as a rule, several plumbing fixtures are used, so proper pipe wiring is very important. This is discussed in a separate article on our website.
Ladder arrangement
Options for installing drainage drains in a bathhouse
What is a drain? The drain is a plumbing device that plays the role of a water intake. It is equipped with a siphon or water seal, which prevents the spread of unpleasant odors from sewer pipes. The drain performs one important function - it quickly redirects wastewater into the sewer system.
When laying a sewer system with your own hands, the drain must be installed in compliance with certain rules:
- The drain must be located at the very bottom of the floor base, otherwise complete evacuation of water from the bath will be difficult;
- For rooms with high levels of humidity, it is advisable to choose drains or polymer materials, since they are not subject to corrosion;
- In order for the ladder to “work” correctly, during its installation it is advisable to raise the pipe 10 cm from the bottom.
If necessary, you can assemble the sewer with your own hands and without organizing a water seal. To do this you need:
How to make a leaky floor in a bathhouse secured to joists?
- Raise the base of the structure by 3 bricks and install a drain pipe connected to the drainage well;
- From the inside, attach an elbow with a diameter of at least 5 cm to the pipeline, with its upper part located 4 cm below the level of the base;
- Fill the base with a cement mixture, and then make a finishing screed with grooves through which water would easily flow into the drain;
- At the final stage of the work, a rubber ball is placed on the drain elbow, which acts as a shutter valve that prevents the spread of odor from the sewer.
Bath drain: device options
There are three options for drainage in the bathhouse:
- Drip floor. This design is usually installed in a steam room - water is removed through the gaps between the wooden floor slats, and then flows either into a drain hole in a concrete base connected to a sewer pipe or drainage well, or directly into the ground. In this case, it is more rational to install a traditional tiled floor in the washing room with a slope towards the drain hole.
- Non-drip floor. Water from the bathhouse enters a water collection tank with a further drainage system through a drain hole in the structure of a solid wooden or concrete floor.
- The combined design can only be used in small buildings.
Expert opinion: Masalsky A.V.
Editor of the “construction” category on the Stroyday.ru portal. Specialist in engineering systems and drainage.
You must choose one of the listed methods based on the type of foundation, thermal insulation system and the presence of a water seal. In a small steam room and washing room, it is optimal to equip a double floor structure. Especially if the structure is built on a columnar foundation or piles. If the bathhouse is not free-standing, but is made in the form of an extension to the house, then a non-drip floor with a drain ladder is installed. In this case, the water is removed through a sewer system common to the house.
Advantages of poured flooring and arrangement methods
A leaky floor is a traditional design for a bathhouse with a wooden floor. The top flooring is laid so that there are 1cm wide gaps between the boards. Water does not stay on the floor and flows down through the gaps. Under the flooring, moisture can go into a sump or directly into the ground.
Floor boards
Advantages of a poured floor:
- Fast and efficient water removal.
- Simple room cleaning.
- The water does not stagnate on the floor, but goes completely down.
- Long-term operation of the floor structure is ensured.
- The presence of gaps ensures air circulation, which dries the subfloor.
Note! High-quality and quick drying of a steam room with wooden floors is ensured by a ventilation system - forced exhaust or through a vent system. The supply vent is mounted 10 cm from the floor near the stove, and the exhaust vent is mounted diagonally on the opposite wall under the ceiling to avoid drafts.
There are three ways to install a pouring floor.
Option 1
A simple, but rather labor-intensive way to arrange a drain. Its arrangement begins at the stage of installation of the load-bearing base - strip or columnar. The height of the foundation is 50-55 cm. Vents are installed in the strip foundation along the perimeter at a height of 25 - 30 cm from the ground. Before pouring the solution into the formwork, a pipe of the required diameter is fixed in the required place.
The drainage system is installed in the underground. In the center it is necessary to dig a recess of 60–70 cm for the pipe or 150 cm if the water goes into the ground. The second option can only be used in areas with sandy soil. A slope is formed from above towards the pit. The foundation must be properly waterproofed. It is better to use coating waterproofing for these purposes, which allows you to create a monolithic moisture-resistant coating.
Design of a pouring floor with a sump
When installing a strip foundation, the soil in the underground is concreted or thoroughly compacted and covered with crushed stone. If the foundation is columnar, then drainage is arranged around the supports.
Option 2
If the bathhouse is intended to be used only in the summer, then the entire underground space is filled with drainage in the form of a cushion of sand and crushed stone on top. As water flows through the deck boards, it will seep through the crushed stone, filter through the sand, and be released naturally into the soil. The drainage hole is deepened by 45-50 cm, the height of the backfill should be 35-40 cm.
Drip floor with drainage hole in the subfloor
The sand and gravel bed is sometimes replaced with a sealed pan mounted on a slope. Water from it flows into a ditch laid nearby or a drainage hole. To make a pallet, you can use several layers of roofing material. To glue them together, heated bitumen mastic is used.
Table. Popular bitumen compositions
| Illustration | Description | Average cost as of March 2020, rubles/volume |
| ECOMAST | The ready-to-use bitumen-polymer composition is intended for waterproofing treatment of surfaces made of concrete, wood, foundations, and structures before being buried in the ground. Can be used for gluing/gluing waterproofing materials (roofing felt). | 650 / 5 l |
| FARBITEX | Waterproofing bitumen composition with an anti-corrosion effect for treating surfaces and structures made of wood, reinforced concrete, concrete, before penetration into the ground and in constant contact with water (foundations, piles). | 194/2 kg |
| Novbytkhim | Bitumen-rubber waterproofing composition for treating wooden, concrete surfaces, foundations. | 199/ 1 kg |
| IZOWAX | A universal water-based waterproofing bitumen composition creates a waterproof monolithic layer on concrete, brick, plastered, wooden surfaces | 1400 / 20 kg |
| Waterproofing bitumen mastic for foundations made of reinforced concrete, concrete, metal, wood. | 360/ 3 kg |
ECOMAST bitumen-polymer composition
Option 3
A universal method for baths with year-round use. This floor design requires insulation. The process itself requires more effort and financial costs. The arrangement of the drainage system begins at the stage of installing the foundation. In its underground part, a drain pipe is laid at a slope towards the cesspool. It should be located 10-15 cm below the freezing point.
Insulated floor pie
The inside of the cesspool is lined with bricks and mounted from concrete rings with drainage holes or car tires. The volume of the pit is selected depending on the frequency of operation of the bath. To prevent water from freezing in the pipe, it is covered with expanded clay before burying it in the ground. Then the pipe is buried and the soil is thoroughly compacted.
Drainage well from used wheels
In the place where water will flow from the drain hole located on the floor in the bathhouse (in the underground), a recess measuring 25 x 25 cm and 30–40 cm deep is dug. The height of the walls of the pit depends on the location of the rough concrete floor structure. The drain pipe is brought in and embedded in one of the walls of the pit, then covered with soil.
A heated floor structure with a slope is formed around the storage tank. The floor pie consists of a gravel mixture and insulation (expanded polystyrene boards 3-5 cm thick) laid at an angle towards the pit.
Rolled bitumen waterproofing with a sticky layer
Using roofing felt, the joint between the wall and the floor in the subfloor along the perimeter is waterproofed. To do this, a part of the canvas 20 cm wide is laid on the floor, and 50 cm is placed on the wall. To ensure the strength of the subfloor structure, a reinforcing mesh with a cell of 10 x 10 cm is laid on top. A 5 cm thick screed is poured on top. When forming all these layers, it is taken into account that the slope towards the pit must be maintained. Ceramic tiles are subsequently laid on top of the screed, so it is important to make its surface perfectly flat.
Screed with a slope in the bathhouse
The surface of the finished screed is treated with waterproofing mastic, liquid glass or rubber, and porcelain stoneware or tiles with a non-slip surface are laid. A water seal is installed inside the pit, and a metal mesh is installed on top. To make it comfortable to walk on the floor, portable wooden pouring grates are placed on it, which can be taken out of the room for drying and during cleaning.
Non-drip floor
The design of a non-shedding wooden floor consists of a finished floor and a subfloor. The upper structure has a slope towards the drain hole. Insulation is placed in the space between the two floorings. A pipe connected to the sewer goes down through the layered floor structure.
Insulated non-leaking floor
The finishing flooring is assembled from tongue-and-groove boards with a tongue-and-groove fixation system. The board must be made of moisture-resistant wood (larch, pine). The boards are tightly laid due to the groove and tongue, so there are no even minimal gaps and the water flows exclusively into the drain hole.
Table. Installation instructions
| Illustration | Description |
| When installing a drainage system at the stage of laying the foundation, take into account that the drain pipe branch pipe should be located 5 cm below the finished floor. The ladder grate is located at the same level with the plane of the finished floor. |
| Waterproof the subfloor using roofing felt. The canvas is laid on the ground and placed 45–50 cm onto the foundation wall. Crowns and transverse support beams are mounted on top of the foundation. |
| A rough flooring is installed on top of the floor beams. The distance between the boards should be 5-7 cm. A hole of the required diameter is cut under the drain ladder at the site of its future installation. The slope is formed using bars hewn at an angle of 5° in the direction of the drain hole. Along the perimeter of the room, bars with a cross-section of 5–10 cm are fixed. These are fragments of the sheathing. A vapor barrier is laid on top. It is fixed to the rough flooring and sheathing. |
| Insulation is carried out using sheets of extruded polystyrene foam. It is placed tightly between the bars. The gaps are foaming. The insulation is waterproofed using thick polyethylene film. It is laid with an overlap of 30-40 cm and glued with moisture-resistant tape at the joints. |
| A hole is made in each layer of the floor pie for a drain pipe. The waterproofing material is fixed around the pipe with waterproof tape so that there are no gaps. Then the finished floor boards are installed. The tongue-and-groove fixation system allows the lamellas to be positioned tightly to each other. Before laying, the boards are treated with antiseptics. In order for wood to absorb less moisture, water flow should occur along the direction of the fibers. |
Concrete floor drain
Concrete floor tiled is practical, durable, easy to maintain, durable, but cold. Therefore, either pourable portable wood flooring is laid on top, or a heated floor system is installed in the screed.
You can install a heated floor in a bathhouse from a stove yourself. Find detailed instructions in a special article.
The drainage system is installed before pouring the screed. The slope towards the drain hole is formed either at the stage of pouring the solution, or during laying the tiles.
Installation of a drain ladder
Relative to the surface of the screed, the drain ladder must rise to a height equal to the thickness of the tiles in order to be located with them after laying in the same plane. Before covering the floor, the drain cover is sealed with masking tape so as not to get dirty or scratched.
Marking
Using a level, you need to check that the plane of the drain is strictly horizontal - this will ensure proper removal of water from the floor surface. Markings are applied to the floor. The ladder is installed at the corner where four tiles meet, so marking lines must be drawn through the vertices of the diamond. When applying markings, the future slope is taken into account. To imitate it, a dense craton is placed under the tile to the required height.
Trimming tiles at the location of the drain
The tiles are pre-laid taking into account the thickness of the joints between the tiles so that the slope is directed towards the drain. Markings are applied to the corners and trimming is performed.
Preparation for installation
The tiles are laid to simulate a slope. Markings are applied along the edges along the walls - you need to focus on it when creating a slope.
Laying tiles
The tiles are laid following the markings on the wall. The adhesive solution is applied to the floor and tiles. The lining is applied to the floor and pressed down slightly, adjusting the position. The excess is removed and the slope relative to the drain hole is checked. After 24 hours, the seams are rubbed down.
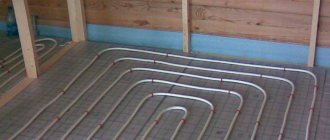
Installation of leaking floors
Diagram of a leaky floor with a drain
Leaky floors are the simplest option for arranging a floor base in a bathhouse with your own hands. In such a system, it is not necessary to slope the floor, since water easily seeps through the boards and ends up in a drainage hole or well. Leaky floors, unlike solid ones, have one advantage - the absence of sewer pipes.
It should be noted that such a base device is suitable for a frame bath, which is used exclusively in the warm season. If the structure is planned to be used all year round, it is advisable to pour a concrete screed before laying the boards. However, in this case, it is better to make the flooring made of boards removable so that they can be dried if necessary.
When installing a leaky wooden floor, you need to consider the following points:
- To organize the flooring, you need to take well-processed planed boards without a locking system;
- The boards are secured to the floor beams using nails that are driven in at a slight angle;
- The gaps between adjacent boards should be the same and be 5-6 cm.
Despite the fact that there is no slope in the floor, water escapes very easily through the holes between the boards. As a rule, tanks are installed under such a bathhouse to collect water, from where it is discharged through a drain pipe into the sewer system.
In order to prevent the appearance of mold in the bathhouse, during the process of finishing the base, attention is paid to the following points:
- It is best to assemble a wooden floor from coniferous wood boards, since they are less hygroscopic;
- To ensure normal drying of the floor, holes need to be drilled in the foundation for better movement of air masses;
- There must be an air gap of at least 0.5 m between the base and the ground.
Laying tiles
In bathhouses, bathrooms and kitchens, previously familiar tiles are now being abandoned. The tile has only a few types of colors. It is being replaced by porcelain stoneware. Porcelain stoneware, thanks to semi-dry pressing technology, can have complex patterns and almost any color on its surface.
Porcelain tiles have a large area (the length of the side is always greater than that of tiles). When laying, the screed should be very even, without voids between the tiles and the screed. Only in this case will the floor be reliable and durable. In this regard, it is better to entrust the installation to a specialist. Professional installation of tiles for baths and saunas is very important. A separate article on our website is devoted to this.
Information. The choice of floor tiles is based on design considerations, as well as price. There are a huge number of types of porcelain tiles at an affordable price.
Pouring a concrete floor
Installing beacons and creating a screed with a slope towards the drain.
How to pour concrete floors correctly? It is worth considering that non-leaking floors must have a slope. Otherwise, the water will not go down the drain without “help.” What should be the structure of the concrete base in the bathhouse? To properly pour the cement mortar and make the desired slope in the floor, you should adhere to the following recommendations:
- In the case of arranging the foundation on a strip or pile foundation, first of all, floor joists are laid;
- The subfloor is subsequently attached to the joists. Skull blocks are nailed to the bottom of the joists, onto which boards are thrown;
- Heat-insulating materials (foam plastic, polystyrene, mineral wool) are placed in the sections between the joists;
- Then a sewage system with a siphon is installed in the washing department;
- After installing the hydraulic component of the floor, the wooden sheathing is sheathed with DSP sheets;
- The slope of the base for normal water drainage should be approximately 30 mm per m2;
- Cement mortar is poured onto the prepared subfloor;
- After the screed has hardened, a drain ladder is installed and a finishing coating (wood, tile) is laid.
Floor on joists with drain in frame bath
To begin with, we will describe the technology for organizing water drainage in a frame bathhouse on a strip foundation using profiled sheets. Here, a 50x50 mm block was screwed onto metal logs made from a pipe with a cross-section of 40x20 mm. A subfloor made of 25 mm thick boards was installed on the block below.
Prev
Next
Prev
Next
Prev
Next
Vents must be provided in the foundation strip to ensure constant ventilation of the underground space.
Prev
Next
The structure of the subfloor and beams is treated with an antiseptic, after which mineral wool slabs are placed on it and covered with a dense layer of waterproofing.
Prev
Next
Prev
Next
Then galvanized sheets of corrugated sheets are laid and the joints with the grillage are treated with polyurethane foam for sealing.
Prev
Next
Prev
Next
As you can see, the surface made of corrugated sheets runs along a common slope at an angle through the underground of the steam room and washing room and ends at the wall of the washing room. Here the water will flow into the drainage gutter, which is also installed at an angle and leads to a drain hole connected to the sewer pipe.
Prev
Next
Then the finished floor boards are attached to the upper logs with a small distance of 3-5 mm from each other so that the water flows onto the surface prepared underneath them for drainage.
Prev
Next
This design has its own difficulties in organization, so it cannot always be used. However, the technology can be used as a basis for making a similar wooden floor in your bathhouse.
Finishing screed
To properly fill the floor in a bathhouse with concrete, two screeds are made. After the rough and insulating layers, the finishing coating is poured. The solution is prepared in the same way as for a rough screed; the layer is made up to 10 centimeters, remembering the need for a floor slope towards the water drainage.
Reinforcement
To strengthen the screed, a reinforcing mesh of steel rods with a cross section of 5 millimeters is used. In some cases, it is possible to replace the steel mesh with fiberglass, which is explained by the absence of serious loads on the floor of the bathhouse. The screed is made 7-10 centimeters thick, the reinforcement frame should be located in the middle, and be filled with a layer of concrete of at least 3 centimeters on all sides.
Preparation of the solution
When choosing a brand of concrete for the foundation for a bathhouse (finishing layer of the floor), preference is given to M400 or M500. The proportions are the same as when preparing the mixture for rough filling. It is better to prepare the mixture in a concrete mixer.
You can use a mixture of cement and sand in a ratio of 1:3 for pouring, or ready-made dry mixtures created for use in rooms with high humidity levels.
Work progress
The installation of a concrete floor in a bathhouse (finishing layer) begins with a pit. First, a finishing screed is made on the bottom, then wooden formwork is created and the walls are poured at the level of the thermal insulation layer. Here, be sure to ensure that the mixture does not get inside the drainage pipe (it must be covered with a lid or a rag).
Next, the mixture must be distributed evenly over the entire surface of the floor in a layer up to 7 centimeters thick, lay out the reinforcing frame, and fill it with a solution of the required thickness (at least 3-4 centimeters).
Drying and removing imperfections
The final screed takes 2-3 days to dry, with the layer always being moistened during the process. If cracks begin to appear as the concrete dries, it is most likely due to the rapid evaporation of moisture. In this case, the coating can be repaired - carefully open the cracks, fill with a special repair composition of sand and cement mixed in equal volumes.
Shower floor of washing room
The foundation grillage must be above the ground.
When starting to install bathhouse floors located on a pile-screw grillage, you should know that:
- The grillage is located 0.2 - 0.4 m above ground level.
- A false plinth should be installed between the grillage and the ground covering along the perimeter of the bathhouse. To equip it, you can use flat slate, which is lined with tiles, or line it with cement-bonded particle boards; if desired, it can be lined with silicate or facing bricks.
- The flooring is mounted on wooden beams or joists. The ease of installation allows you to install the floors yourself without the help of others.
- The underground of the washing room is actually a large tray into which water can be drained from the entire area of the room. Therefore, it must be equipped accordingly.
The best solution for installing floors would be to install them from wood. Recommended for use are deciduous species: linden and aspen, and coniferous species: pine, larch, cedar. They have an advantage over tiled floors, as they are healthy, environmentally friendly, and practical. In a steam room, they quickly fail, but replacing such floors is not difficult.
In order for the floor in the washing bath to perform its functions for a long time, it must provide rapid removal of moisture, have good ventilation for quick drying, and also prevent drafts.
The table below shows the pros and cons of wood floors:
Such floors are quite simple, have a low cost, since they are used in the construction of bathhouses in dachas, which are used during the warm season.
They are not subject to insulation; their installation is allowed with gaps through which moisture is removed. Since the bathhouse is built on screw piles, a crushed stone cushion can be installed between the floor in the sink and the ground surface, which will absorb moisture.
Bath floor installation
If the soil is oversaturated with moisture, then there will be enough space to place a tray to collect water from the bathhouse, drain it into a sewer pit or to a personal plot. In addition, you can make a drain from the bathhouse directly to the cesspool or through a drain ladder to the sewer system.
The pouring floor can be made with a removable covering. In this case, after using the bathhouse, remove it and dry it. If it is made in a non-removable version, replacement occurs after it fails.