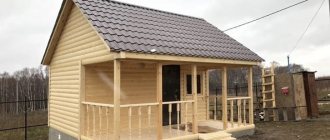
What lumber would be preferable to make bath shelves from?
We will try to answer this question without substituting or replacing the answer with reasoning about how bath “furniture” should be properly arranged. The fact is that we have already devoted an entire article to a story about what size – in height and width – there should be shelves for a Russian and a Finnish bathhouse, describing in detail all the differences associated with the characteristics of national bathhouses. Therefore, for those for whom it is now more important to decide not on the dimensions of the boards, but on the dimensions of the product itself , we recommend following the link.
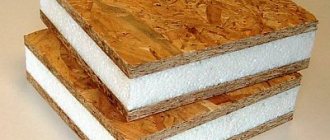
What is a tongue and groove board?
A tongue and groove floorboard is lumber made on a milling machine in a factory. A notch is cut along the edge along one long side, and a protrusion of the appropriate size is made on the other. When joined into a single covering, the tenons are completely buried in the grooves of adjacent floorboards, which makes the resulting joints practically invisible and eliminates the formation of through gaps in the floor.
The tongue and groove board is distinguished by:
- Tenon and groove at the ends.
- Polished front surface.
- One or more longitudinal recesses on the bottom side for ventilation.
- Use in the manufacture of well-dried lumber.
In fact, this is an ordinary floorboard that has been subjected to additional processing. The tongue-and-groove end locks strengthen the overall final covering, and factory sanding of the top face eliminates the most labor-intensive part of the work of laying a plank floor. Plus, the recess at the bottom guarantees continuous air exchange in the space under the wooden finish, thereby reducing the risk of damage to the wood.
Structure of a tongue and groove board
Advantages and disadvantages
Among the strengths of tongue and groove floor boards:
- high speed of coating installation;
- no through gaps;
- the ability to restore a wooden floor by sanding;
- aesthetic appearance of the floor finish;
- reducing the risk of floorboards being damaged by fungus and mold;
- increased strength of the tongue and groove connection.
As part of the renovation, it is permissible to scrape and sand a classic parquet floor a maximum of 3-4 times. The number of possible restorations is very limited; each scraping of parquet removes 3–4 mm of wood from the surface of the dies. And if deep scratches appear, the laminate will have to be replaced altogether.
A tongue and groove floor board is a solid wood up to 50 mm thick. You can safely sand it at least 5-10 times. The main thing is not to cut the top layer down to the tenons, which will lead to a loss of strength of the end locks.
Among the disadvantages of a board with tongue and groove, only its higher price should be mentioned compared to a conventional edged analogue and the low water resistance characteristic of all wood. But if you compare the material in question in terms of cost with laminate, then the first option will give a strong head start to the second. A laminated finish per square meter will cost 5–7 times more than a sanded board, even taking into account the cost of painting the latter. And to increase the resistance of the floor to moisture, there are varnishes and impregnations for wood.
The tongue and groove floor looks very presentable
Choosing a wood species
Which board is best for a bathhouse floor?
On a note! When choosing a wood type, the following basic properties are taken into account: moisture resistance or degree of hygroscopicity, which is largely determined by the density of the structure; mechanical strength; tendency to deform when drying; presence of harmful resins.
The latter characteristic is especially important in a steam room, where under the influence of superheated steam at a sufficiently high temperature, resinous substances are released from the wood and inhaled by humans. In this regard, some coniferous trees containing large amounts of resins pose a danger to the body.
What board should I use for the floor in the bathhouse? The most commonly used tree species are:
1. Larch. It belongs to the coniferous species and has high strength and density. Essential oils contained in wood can have a healing effect, especially for disorders of the cardiovascular or immune system. The structure contains a natural antiseptic that combats microorganisms that cause rotting. Resinous substances are actively released at first, but later they stop evaporating. One of the main disadvantages is the high cost of the material.
2. Oak. This breed has unique strength, resistance to high temperatures and moisture, but it is used, as a rule, in the form of a finishing material. Oak flooring boards are not widely used due to their increased specific gravity, difficulty in processing, and tendency to crack due to temperature changes.
3. Cedar. It has a peculiar fibrous structure, which provides an important property: very low deformation and no cracking. There is practically no rotting of such wood, and the appearance is admirable. The advantages include increased heat capacity, which ensures long-term heat retention. The use of cedar boards is limited only by the high cost.
4. Pine. Main positive properties: low cost, ease of processing. Proper drying of wood eliminates the risk of cracking and deformation. Main disadvantage: low resistance to rotting. Fungi and various microorganisms actively develop in pine products. When deciding which board to lay the floor in a bathhouse, pine floorboards are most often rejected. At the same time, pine is widely used as joists, intermediate and supporting elements of wooden floors.
5. Linden. The classic Russian bathhouse was always based on this type of wood. It has healing properties, and the texture creates a unique decor. As a floor board, its use is limited by such negative aspects as low heat capacity (a fairly cold surface) and a high tendency to rot, which requires careful processing.
6. Aspen. It is in many ways similar to linden. It has a relatively low cost and is easy to process. The main disadvantage: it begins to darken when exposed to high temperatures.
Summarizing the arguments presented in favor of a particular type of wood, it should be noted that the question of what boards are needed for the floor in a bathhouse is decided by financial capabilities and in which bathhouse room the flooring is being built.
On a note! Larch looks the most attractive, but when saving money, pine boards are still more often used.
Varieties
Based on the appearance and condition of the wood, tongue and groove boards are divided into three grades:
- Extra.
- A (“first”).
- B (“second”).
Lumber of the “extra” grade is distinguished by the complete absence of knots and other defects. For class “A” small inclusions and stains are acceptable. Usually this option is offered in stores as the most popular product.
Floorboards marked “B” are the cheapest, but they are characterized by the presence of visible irregularities and knots. There is also a third grade “C”. However, such polished boards are practically not produced, since, due to its aesthetic characteristics, it is absolutely unsuitable for flooring as a finish.
Tongue board classes
Dimensions
Manufacturers most often offer tongue and groove floorboards in sizes with a thickness of 28–45 mm. But you can also get products up to 50 mm on order. The width of sanded tongue and groove floorboards varies between 80–200 mm. And its length can reach 6 meters, but usually four-meter versions are found in stores.
Thickness of tongue and groove board
Materials
For the manufacture of tongue and groove boards the following are used:
- Spruce and pine.
- Larch.
- Aspen and linden.
- Ash and oak.
The first option is distinguished by its affordable price and soft wood. These won't be the most durable floorboards, but they will be cheap and the easiest to process and saw. Products made from larch are characterized by a dense wood structure, which increases the strength and durability of the lumber, but at the same time complicates its processing with your own hands.
Aspen and linden boards are characterized by increased resistance to moisture. It is recommended to take them for installation in baths and steam rooms, as well as on verandas. And for rooms with high floor loads, oak and ash are most suitable.
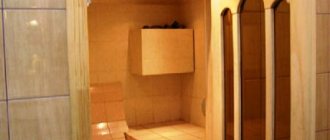
Grooved board in the interior
Determining the location and execution of the drawing
The curtains are placed along the longest wall in the steam room, which has no windows, doors, vents or ventilation holes.
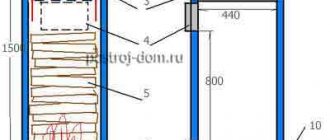
It is necessary to take measurements of the steam room and make a drawing on which you need to indicate the stove, heating boiler, location of windows and vents. Following the recommendations of experts, the location of the shelves is indicated. To make a bath canopy with your own hands, the drawings should be made in two projections.
The drawing should also indicate the dimensions and places where the benches are attached to the walls and floor. It is recommended to fasten the upper rows to the walls, and the lower canopy to the floor. The entire structure should be as compact as possible.
Next, based on the drawing, the required amount of wood is calculated with a margin of 5%.
Before you build a canopy in a bathhouse, you need to choose a project, since then nothing can be corrected. You need to figure out how to make a bench for a bathhouse with your own hands right away. It is quite expensive to redo all the work.
When creating bathhouse curtains with your own hands, you should pay attention to the following points:
- The width of the canopy can be 40-60 cm. The benches should not be made too narrow or wide; the size of the canopies in the steam room should be such that it is comfortable for a person to lie stretched out to his full height; the hands should also be placed on the shelf.
- The bottom shelf should be at a distance of 45 cm from the floor. There should be 55-65 cm between shelves.
- The top shelf is located 120-130 cm from the ceiling.
- It is best that the height of the second shelf from the floor is 110 cm.
- Shelves should not be installed close to the stove, even if it has a protective fence. Otherwise, you may accidentally get burned or get heatstroke.
- The location of the bath shelves also depends on the circulation of steam: you should not install benches under it.
How to choose for the floor?
When selecting a floorboard with tongue and groove, you should carefully inspect each product, or it is better to simply measure everything with a caliper. The thickness and width of the tenons should exactly match or be slightly smaller than the size of the grooves. To avoid mistakes, you can take a couple of offered floorboards directly from the warehouse and join them together - there should be no visible recesses or gaps in the joint.
You also need to compare the edge with a tenon and the edge with a groove in terms of thickness. If one of them turns out to be smaller than the other, then after laying in the joints, adjacent floorboards will be at different levels. Then you will have to scrape them additionally, which will greatly increase the labor intensity of the work.
The lumber should be dry with a moisture content of 8–12%. Such boards are dried in special chambers. Wetter options for natural drying (20–25%) will begin to shrink and deform on the joists after installation, which often leads to the appearance of cracks in the coating.
Preparing a Wooden Floor
Technological features
Bath floor: which boards to use is only the first question. The next task is to choose its design. In practice, 2 options are used:
- Leaking variety. In it, the boards are laid with a gap through which free flow of water from the floor surface is ensured. This lattice system is considered traditional for a Russian bath. The drainage in such a design is produced directly into the ground under the bathhouse or collected underground by a drainage system and then discharged into special collectors outside the building.
- Leak-proof design. In this case, the boards fit tightly to each other, and additional waterproofing is provided to prevent water from seeping through the flooring. For such a system, tongue and groove boards are most suitable. The water drains through special drain holes, and the floor itself is made with a slope in the direction of these holes.
Thus, the question of how to lay the floor in a bathhouse from boards is decided taking into account the choice of design. In other words, the boards can be installed with a gap of 2-5 mm or fitted closely, sealing the joints.
Structurally, both options differ precisely in the way the boards are placed. The structure of the wooden floor itself is similar. Its installation is carried out in the following order:
- Leveling and compacting the soil. Backfill the cushion with sand and crushed stone with a compaction 10-12 cm thick.
- Laying roofing felt waterproofing.
- Installation of logs from wooden beams measuring at least 40x40 cm. The installation step is 40-65 cm, depending on the size of the room. Installation is carried out with the formation of a slope towards the drain holes.
- Laying or backfilling thermal insulation between joists. Expanded clay is usually used for this purpose, but mineral wool also works well. Do not use foam that can release harmful substances when heated. Then another layer of waterproofing and a vapor barrier with a foil layer are laid (for the steam room).
- After completing the formation of the base of the floor, rough flooring from boards can be applied, which increases the strength of the structure. However, this element is optional. In principle, the finishing board covering can also be attached directly to the joists.
The floor in a bathhouse made of boards has long been considered a traditional design. If all work is carried out correctly and protective measures are taken, it can serve for a long time even in extreme steam room conditions. It is important to choose the right type of wood and carry out the necessary preparatory work.
Laying for now
Installation of a wooden floor made of tongue and groove boards is carried out as follows:
- The logs are set and leveled horizontally in increments of 40–50 cm.
- The first board is nailed with a distance of 10–15 mm from the wall and a groove to it to prevent damage to the tenon when tapping (joining) the floorboards.
- The next five to six boards are laid without fixing. They are then held together using a hammer and wedges before being nailed down.
- The procedure is repeated with the next few floorboards.
- The board of the last row is cut so that there is a ventilation gap of 10–15 mm near the wall.
- Finally, the floor is sanded, if necessary, and then the baseboards are nailed.
There is nothing special about the installation of this finish. It’s easier to lay only the varnished coating; step-by-step instructions on how to lay laminate flooring with your own hands consist of three or four points.
When laying boards, you can fix them on the joists using screws and nails. It is permissible to screw (drive) fasteners from above or into the end of the floorboard. The second option is more aesthetically pleasing, but will create repair problems later.
Step-by-step instructions for laying the floor
Types of moldings
What to build the shelves from? To answer this question, you need to imagine for a second all possible designs. In essence, there are not so many options: either you will have a frame covered with boards, or it will be a massive board supported on the wall. They do this and that.
A frame with a solid board is possible, but technically not justified, and a plank (more about it below) supported on a wall will not withstand the load.
The first option means that it is the frame that bears the main load The cladding can be thin; it is often made of planken.
Thin board on frame
In the second option, a board is taken that is thick so that it can support the weight of several sitting people on two (if long - three) points of support (brackets, for example).
Solid board
ATTENTION! Frame structures are ideal for a sauna, and the second option is for a Russian bath.
Let's take a closer look at the materials themselves.
Bar
Under this name, you can find lumber on sale with a square or rectangular cross-section, with a side whose length will in any case be less than 10 cm . (From 10 cm or more, a line of material called “timber” begins).
The bars are used to make racks (vertical structural elements), as well as lintels and other horizontal frame elements.
The simplest shelf on bars
Regimental plaque
The simplest definition of a board is lumber, the width of which is at least twice the thickness, and the thickness cannot be more than 100 mm.
As you can see, both structural beams and thin slats fall into this definition. We’ll talk about the specific dimensions of the board for the shelf in the bathhouse a little lower, but it is already clear that it will be either a thin sheathing board - planken, or thick and massive.
Planken
Planken is a material used for wall cladding. This is a board with rounded edges (which is very convenient for our purposes), the dimensions of which vary from 70 to 140 mm in width and from 15 to 20 mm in thickness. That is, the thickest plank is thinner than an inch board. (The latter, by the way, is also used by some owners for lining shelves.)
The main advantage of planken as a board for shelves in a bathhouse is that it is already processed. But if the owner has a sander, then rounding the edges of an ordinary edged board will not be difficult.
IMPORTANT! Planken cannot be used in the form of long sections without support; you need crossbars made of timber in increments of 50 cm - this will prevent the board from bending under load.