When we talk about a bathhouse, we imagine a traditional log house. But this is an expensive pleasure. Is it possible to fulfill your desire to have a bathhouse and at the same time save money? Yes. You can by choosing a frame bath. Let's talk about frame technologies. This technology comes from Canada. The appearance on the market of modern insulating materials has made it possible to master it in colder latitudes. Prefabricated frame objects have gained particular popularity. A separate article is devoted to the comparison of timber and frame buildings.
Panel bath project
Draw up a project for the future building. A few simple drawings and sketches indicating the main dimensions, layout features and the order of arrangement of utilities will be enough. If you don’t have the skills and don’t want to learn, entrust the drafting to a specialist, or find drawings that suit your requirements in an open source.
Panel bath project
Determine the optimal bath area. The steam room itself must have such an area that each visitor has access to at least 1-1.5 m2 of free space. Determine the dimensions of the rest room, dressing room and other premises at your discretion.
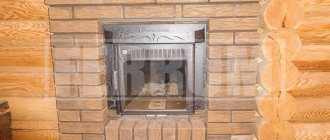
Note in the project the order of supplying electricity, water supply, ventilation and sewerage. Select a suitable stove (heater, metal stove, or more modern electric and other options) and indicate in the project the location of its installation.
Bathhouse layout
Where to build a bathhouse?
Choose a convenient place to place the bath. If possible, it should be installed at a short distance from the house - it’s simply more convenient.
Where to build a bathhouse
Also, at the stage of choosing a location, it is necessary to take into account such parameters as the level of groundwater, the structure and type of soil, communication routes, etc.
The site for the construction of a panel bath must be level. First get rid of the fertile soil layer and large tree roots.
Devices for work
Before starting any work, pay due attention to preparing the necessary supplies. It is better to spend time collecting them before construction begins than to be distracted later.
You will need the following equipment:
- Circular Saw;
- jigsaw;
- level;
- hammer;
- square;
- electric screwdriver;
- nail puller;
- mites;
- hacksaw;
- yardstick;
- axe;
- all kinds of fasteners;
- insulating materials;
- construction panels;
- timber for arranging the frame.
Installing load-bearing supports
When the base piping stage is completed, you can begin the procedure for constructing load-bearing supports. It is necessary to place them in the corners of the room at those points where internal partitions will be installed. The same material is used for this purpose, but its thickness in this case will be 10 centimeters. For fastening to the harness, either metal corners or cuttings are used. Sometimes, when building baths, the frame is secured with dowels. In this case, you will only need to put support posts on the outlets. Until the top trim is completed, the racks will only be fixed at the bottom.
Frame: ready-made or homemade?
In order to save time and effort, it is recommended to order panel bath frame elements from specialized workshops.
You can also assemble the base yourself by first sawing a durable beam into several pieces of the required size. The frame is assembled from two horizontal bars and the same number of main vertical supports. It is customary to place the outer supports in increments of 62.5 or 81.5 cm. Additionally, it is recommended to install intermediate vertical jumpers. The frame frames will take on vertical loads and the lintels will help to cope with them successfully.
Panel bath frame
To cover the frame, special panels made of chipboard, solid wood or plywood are used. It is important that the lining material is as reliable and high quality as possible - the service life and ease of use of your future bathhouse directly depend on this.
Place openings for doors and windows in any convenient places and in accordance with the plan.
Assemble the required number of frame elements in accordance with your existing project and begin the main construction work. Start with the foundation.
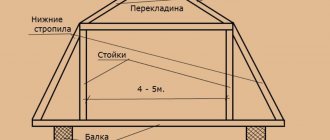
Construction of a frame for a country bath
The frame is the basis for the construction of a bathhouse in the country.
It consists of upper and lower frames, racks and crossbars. The preparation of its elements with the appropriate dimensions is carried out before installation. During assembly, they are connected with metal corners, screws and supports. A beam with a section of 100x100 mm is used for the bottom trim. The connection of its elements is carried out using a quarter cut. Tension screws secure all joints. There is no need to attach the bottom trim to the tire foundation, but an insulating spacer between them will be required. It is made of two layers of roofing felt. The entire strapping beam is treated with an antiseptic.
For the frame posts, a board with a section of 100x50 mm is used. It is inserted into metal supports, which are pre-attached with screws to the bottom trim of the frame. The screw heads must be turnkey. Installation of frame racks begins from the corner. The corner post, after its installation plumb and level, is secured with braces.
After this procedure, the second corner post is installed in the same way. Both racks are connected by one board, which serves as a guide for mounting intermediate vertical elements. It is recommended to make corner posts from two boards. This will increase the strength of the frame and create convenience for its subsequent finishing.
After checking their verticality, the intermediate posts are connected by crossbars in their upper and middle parts. Since the size of the insulation boards for a bathhouse is 100x60 cm, the racks must be installed in increments of 65 cm. The upper crossbar is installed at a distance of a meter from the middle element. This method of installing the frame will ensure dense installation of the insulation without trimming.
The window can be installed on two cross bars mounted on racks. Installation of racks at the entrance to the bathhouse is carried out taking into account the size of the door frame.
The top trim is made from 100x50 mm boards after checking the wall diagonals. Corner joints are made by cutting trim boards at 45 degrees. Their immobility is ensured by the overlay of L-shaped plates. The harness is attached to the upper crossbars with screws. The purpose of the top trim is to distribute the load from the roof and ceiling of the bathhouse between the frame posts.
Its construction is completed by the installation of ceiling beams. They are necessary for assembling the roof and installing the ceiling. The beams are made of 100x50 mm boards installed on edge and fixed above the posts with metal corners. A 50x50 mm block is added to the end of each beam to secure the clapboard sheathing to the ceiling.
Without a ceiling and walls, the finished frame may not seem rigid enough, but that's okay. Covering its walls and ceiling with boards will give the entire structure multiple connections; the panel bathhouse at the dacha will become massive and durable.
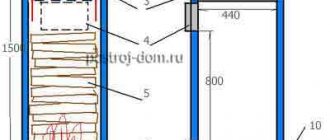
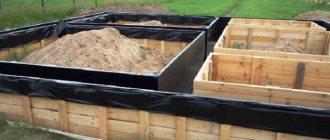
Panel bath foundation
The baths in question are relatively light in weight, which makes it possible to avoid the use of heavily buried concrete foundations. An ordinary strip foundation is optimal.
Strip foundation for a bathhouse
First step. Dig a hole about 100 cm deep in accordance with the size of the future bathhouse.
Second step. Level the bottom of the trench and fill it with a layer of crushed stone. The thickness of the crushed stone layer is up to 30-35% of the total depth of the pit, sand is about 15-20 cm. Compact the backfilled material.
Third step. Install board formwork around the perimeter of the pit. The height of the formwork boards should rise above the pit by at least 40 cm.
Fourth step. Collect and lay a reinforcing mesh with cells of 10-15 cm on the backfill.
Fifth step. Prepare the concrete. A more preferable option is to order the production of the mixture from a specialized company. To make concrete, you need to use cement of a grade not lower than M500. Otherwise, the recipe is standard: for one part of cement, about 3 parts of sifted sand, 4-5 parts of crushed stone and water.
Sixth step. Pour the solution into the trench. It is best to complete the filling in 1 day. If you don’t have time, still prepare as much concrete as you will spend in a day, because... the next day it will no longer be possible to fill it. If you cannot fill the hole in one layer, lay the concrete in strictly horizontal layers. Vertical layers will crack almost immediately.
How to make a strip foundation with your own hands
Poke the filler with the reinforcement in several places to release excess air. Leave the fill to dry for 1-1.5 months. Lay roofing material waterproofing on the finished foundation.
Foundation options
Foundation
Since the structure of the panel bath is light in weight, it is possible to install a column-type foundation. If the bathhouse is small, it is allowed to install a foundation at the corners of the structure, at the ends of the internal partitions and at the point of their intersection.
Note! How many pillars will need to be built depends on the dimensions and weight of the bathhouse.
When constructing a columnar foundation for a panel bathhouse, the best move would be to use asbestos-cement pipes with a diameter of 0.2 m, which are filled with concrete during construction. In this case, the following work is performed:
- to construct such a foundation, you need to dig holes in the ground slightly larger than the diameter of the pipes, up to 1.5 m deep;
- a “cushion” of reinforced concrete is created at the bottom of the pit, after which an asbestos-cement pipe is installed in the middle and the evenness of the installation is checked with a level. Then the gaps are filled with soil;
- the pipe is filled with concrete and left until completely hardened.
Note! If the foundation is made on heaving soils, a prepared grid of reinforcement is first lowered into the pipe.
A columnar foundation can also be made using removable formwork. This method is no less economical and easy to implement than the first. The formwork in this case is removable and the material for its manufacture will be roofing iron:
- sheet roofing iron is taken and rolled into a pipe. Then 2 handles from a rod of a suitable cross-section are attached by welding;
- a hole is dug with a reserve diameter for homemade pipe formwork;
- the pipe product is inserted into the dug hole and leveled;
- the gaps between the formwork and the edges of the pit are filled with ordinary sand;
- a reinforced grid is lowered into the pipe opening;
- the formwork is filled with a mixture of concrete in an amount commensurate with the volume of three buckets;
- using welded handles, the pipe is pulled upward by 0.35 m;
Note! To make it easier to remove the pipe a certain distance, you can rock it little by little, remembering that next time the formwork will have to be leveled again using a tool.
- then the pipe is filled again with three buckets of concrete, the formwork is pulled up;
- the process is repeated so many times until the foundation grows to a certain level.
After the foundation reaches above ground level, you first need to wait some time for the mortar to set, and only then remove the formwork. It is at this stage of work that the embedded parts for piping in the future are installed. To do this, threaded pins are inserted into the still loose concrete. After installing the columnar foundation, it is left in a calm state for 14 days. At this time, concrete pillars should be covered with roofing felt or a damp bag. If the weather is hot outside, the foundation will need to be watered frequently.
Construction of walls
Start building walls.
First step. Lay a support beam around the perimeter of the future bathhouse and under the wall locations. Use wooden dowels to connect the support bars. First, holes with a diameter slightly smaller than the diameter of the fasteners are prepared for the dowels so that the dowels fit into the holes with some tension.
Lay out the base from two horizontal rows of timber. In the timber of the top row, prepare cuts for attaching vertical posts. The depth of the cut is half the timber. Select the width in accordance with the width of the vertical posts.
Second step. Insert vertical posts into the prepared holes and secure them with spacers. Install the racks in the corners and along the perimeter of future walls with an average step of 1 m. The specific step usually has to be selected individually in accordance with the parameters of the future bathhouse and the timber itself.
Install all planned racks.
Construction of frame-panel baths
Third step. Tie the upper ends of the racks with a support beam. At the same time, it will serve as a Mauerlat, i.e. foundations for the roof structure. First, prepare holes in the support beam according to the size of the vertical posts, place the Mauerlat on these holes and additionally secure it using fasteners that are convenient for you, for example, jibs.
Fourth step. Attach horizontal jumpers to the vertical posts. Do not forget to leave openings for window systems and doors in the right places.
Base trim
A softwood beam with a cross-section of at least 20 centimeters is usually perfectly used as a plinth beam. The finished timber should be laid out around the perimeter on the foundation pillars. The material is then joined into the corner pieces using a special technique called log flooring. To do this, it is necessary to create a special recess for the groove in the upper part of one of the bars, and in the other - the same recess at the bottom. After all corner connections have been made, you should carefully check the correctness of the strapping. The likelihood of errors especially increases in cases where panel baths are made independently. For this reason, it is necessary to carefully observe the angles, using for this purpose a special tool called a level. To level the position of the pillars, a special cement mortar is used. You can also use a waterproofing layer wrap. After this, the beam can be attached to the foundation with anchors.
External wall cladding
External wall cladding
For the external cladding of the bath in question, special shields are used. Options for materials for manufacturing such shields were given earlier.
All work on sheathing panels comes down to their secure fastening to the elements of the structure frame using dowels or other convenient fasteners. Do this and move on to insulating and finishing decorative work.
External wall cladding
Installing the top trim
The next stage in the construction of such a structure as a frame-panel bathhouse will be the installation of special safety racks. They must be installed according to the same principle as the main supports. The top trim is attached using corners. After this, you need to install the ceiling supports. Beams can have different configurations. Complex structures with an attic, as a rule, require the use of more complex structures with the installation of additional reinforcing elements.
We offer a video with recommendations for the construction of a frame-sheet bathhouse.
External insulation works
A panel bath needs high-quality heat, hydro and vapor insulation. To accommodate all the insulators you will have to build additional sheathing.
First step. Nail the sheathing bars to the walls at a pitch slightly smaller than the width of the selected insulation.
Second step. Place a waterproofing film on the sheathing and secure it with a construction stapler and staples.
Third step. Fill the sheathing cells with the selected insulation. The best option is mineral wool and materials based on it. For the rest, focus on your preferences and available budget.
Minvata
Fourth step. Cover the insulation with a membrane vapor barrier material. Attach it to the frame using a construction stapler as well.
External decorative finishing
For the exterior decoration of a panel bath, you can use a wide variety of materials. For example, lining and block house are perfect. Siding is also an excellent option. Sheathing with these materials is carried out in the same order: you simply attach the panels to the sheathing with pre-laid insulating layers.
External decorative finishing
Additionally, it is recommended to treat all wood materials with antifungal and fire-retardant impregnations.
When installing external cladding elements, be careful and careful. Start attaching the sheets from the corner of the bathhouse.
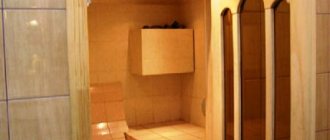
Interior work
Inside you will have to sweat a lot more. Start with the flooring.
Floor
First step. Make a concrete screed. This will get rid of any unevenness in the base. You can first pour a layer of expanded clay under the future screed for additional insulation of the floor.
Second step. Lay ceramic floor tiles on top of the screed.
Tile floor
Third step. Grind the seams and perform other activities typical for laying tiles.
It is recommended to use tiles for the simple reason that they withstand contact with moisture much better compared to the same plank flooring.
Walls
First step. Build a sheathing on the wall. Everything is done in the same way as for exterior finishing.
Second step. Cover the sheathing with waterproofing material.
Third step. Place insulation in the cells of the sheathing on top of the waterproofing.
Fourth step. Cover the insulation with a vapor barrier.
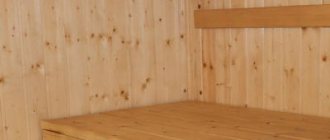
Fifth step. Cover the walls with the finishing material of your choice. The best option is high-quality lining.
Wall decoration
Ceiling
First step. Secure the ceiling support beams.
Second step. Assemble a simple sheathing.
Third step. Place layers of hydro-, heat- and vapor barrier on the sheathing.
Fourth step. Cover the ceiling with the finishing material of your choice.
Ceiling
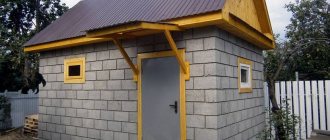
Roof
For such a building there are no special restrictions when choosing the shape of the roof. The main thing, right, is to calculate the load. Typically, in northern regions with snowy winters, a gable roof with an angle of at least thirty degrees. This makes it possible to prevent snow accumulation and reduce the load on the load-bearing beams.
Given the rather weak foundation, you need to think about ensuring that the roof of the bathhouse is not heavy. This means there is no need to cover it with tiles. It is better to use rolled materials or iron for roofing.
The ceiling racks are lined with boards and steam insulation and insulation are laid on top. Construction is finished. All that remains is to put on the stove, lay the floor and you can enjoy the steam bath.
Roof arrangement
The roof of the bathhouse will have the simplest design.
Roof arrangement
Roof arrangement
First step. Assemble the elements of the rafter system. It's best to do this at the bottom.
Second step. Install the elements of the rafter system on the Mauerlat, fixed on top of the support bars in the previous stages of work.
Third step. Nail the sheathing to the rafters. It is more convenient if it is continuous.
Fourth step. Cover the sheathing with a vapor barrier.
Fifth step. Place insulation on the vapor barrier.
Roof arrangement
Sixth step. Cover the insulation with waterproofing material.
Seventh step. Place perpendicular counter batten slats onto the sheathing.
Eighth step. Install the selected roofing material. Metal tiles or Euro slate are perfect for arranging the roof of a panel bathhouse. For the rest, focus on your preferences and available budget.
Bitumen corrugated sheet (euro slate)
Finally, you just have to do the following:
- lay water supply and sewerage pipes;
- organize lighting and overall power supply for the bathhouse;
- arrange a washing room, dressing room and rest room to your taste;
- install benches in the steam room;
- install doors and window units;
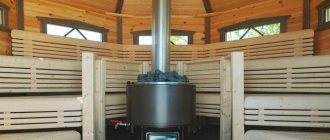
- install the stove with related accessories.
The procedure for installing the stove will vary depending on what kind of heating unit you decide to equip your panel bathhouse with.
Thus, you can build a panel bathhouse with your own hands without involving third-party specialists. By understanding the basic provisions of the instructions and doing everything in accordance with the instructions, you can significantly save on the services of third-party craftsmen and build a steam room with your own hands that can fully perform all the tasks assigned to it and will last for decades.
Good luck!
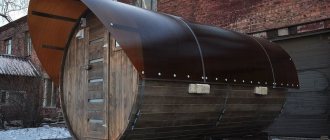
Advantages and disadvantages of frame baths, reviews from owners
Before building a frame bathhouse with your own hands, many people ask themselves: what material to use for its construction? After all, many associate baths with structures made of logs or bricks. But such buildings are quite expensive for their owners, and the time required to warm up, for example, a chopped bathhouse is about 6 hours.
External and internal finishing of a frame bath is most often performed using carriage boards
Advantages of frame technology
The construction of a frame bathhouse solves several problems at once, as these are: a simple construction method, the availability of the materials used and the fast speed of construction. The advantages of frame technology include the following:
- the most affordable construction cost;
- use of lightweight types of foundation;
- low thermal conductivity of the structure contributes to rapid heating;
- the possibility of carrying out communications inside the walls, which has a positive effect on the aesthetic component of the bathhouse structure;
- the absence of shrinkage makes it possible to operate the bathhouse immediately after its construction and finishing;
- use of environmentally friendly materials;
- there is no need to use special construction equipment;
- No special construction skills are required when constructing a frame bathhouse yourself. Videos posted online demonstrate this perfectly;
- the absence of wet construction cycles makes it possible to carry out construction regardless of air temperature and water availability;
- many ways to decorate a building.
When constructing frame baths, environmentally friendly materials are usually used
All these advantages contribute to the increasing popularity of frame baths. Reviews from owners who used this technology during construction indicate that such structures are economical and, if constructed correctly, can create excellent conditions for comfortable use.
Weaknesses of frame baths, reviews from owners
To weigh the pros and cons of the frame bath construction technology, you can ask for reviews from the owners. There is a lot of information on Internet forums from those who already have such a bathhouse and have been using it for some time. Some leave negative reviews: frame baths, in their opinion, tend to quickly lose their appearance due to the formation of fungus on the walls. This occurs due to the rapid cooling of the room, no matter how well it is insulated.
This drawback can be eliminated by using only high-quality insulation materials for thermal insulation. It is necessary to approach the choice of thermal insulation material with all seriousness. After all, cheap polystyrene foam or mineral wool will not adequately perform their functions. The use of economy class foam can cause a structure fire due to the easy flammability of the insulation.
To construct the frame of the bathhouse, timber of various sections is used, as well as boards that have undergone antiseptic treatment
One of the negative aspects described in the reviews is the shrinkage of the bath. Many testify that over time (approximately 1.5-2 years), the frame structure shrinks, the value of which reaches 8-10 cm. This, in turn, can cause deformation of the internal and external finishing of the building.
Helpful advice! To minimize the effects of shrinkage of a frame bath, lumber that has been kiln-dried should be used during construction.
Summarizing the above, we can conclude that the main disadvantages are the significant costs of insulating the walls of a frame bath, the need for thorough antiseptic treatment and low fire resistance. However, given the huge list of advantages, the construction of frame baths is not inferior in popularity to structures made of logs or bricks.
You can get acquainted with some of the assembly nuances and reviews from the owners by watching a video of building a frame bathhouse with your own hands.