Selection and technology of building a foundation for a bathhouse.
A modern bathhouse is a lightweight structure made of logs or timber that can stand on any type of foundation.
When choosing a foundation, you need to take into account the characteristics of the soil on the site and economic feasibility - extremely reliable foundations made of a monolithic slab or reinforced concrete piles for a small bathhouse with an area of up to 6x6 m will simply be unnecessary. Installation of a log bathhouse on the foundation.
Bathhouse on a strip foundation.
In this article we will look at the optimal types of foundations for a bathhouse, give recommendations on their calculation and DIY technology. Strip, columnar, screw and slab foundations, as well as cheap tire foundations, will be examined in detail.
Comparison of installation costs with other types of foundations
A turnkey log house on screw piles will definitely cost less than the same structure on a reinforced concrete foundation. You can order the production of piles according to an individual project, taking into account the characteristics of the terrain, or you can buy a ready-made, standard set, including connecting elements. In any case, the foundation of a log house based on screw piles is a simple and convenient solution. And given the possibility of self-installation of such a structure, which requires minimal equipment, of which the most technologically advanced would be a welding machine, such work becomes equal to the cost of the products, no more!
Pile foundation
Our website presents a number of log house projects, for example: Or you can see all prices for log houses. You can calculate the house or bathhouse you need with maximum accuracy using our log house cost calculator. To order and buy a log house, call:
- Vologda
- Moscow,
Comments
No comments yet.
Choosing a foundation for a bathhouse.
When choosing which foundation is best for a bathhouse, you need to consider three factors:
- weight and size characteristics of the structure;
- geological conditions on the site - presence of a slope, type of soil and its bearing capacity, freezing depth and groundwater level;
- budget allocated for construction.
In most cases, the best option would be a strip foundation for a bathhouse . The different depths of the strip foundation allow you to build in any soil conditions - on stable soil it is rational to construct a shallow strip (deepened by 30-80 cm), in heaving soil - deep strips (the support base is 20-30 cm below the depth of soil freezing).
However, the arrangement of a buried foundation is accompanied by serious costs for materials, and in order to save money, it is better to give preference to screw or columnar foundations.
The screw foundation for a log bathhouse consists of steel piles tied with a grillage, the blades of which open the surface layer of soil and rest on solid deep soil. The advantages of this option are low cost, quick installation time (installing a foundation for a bathhouse takes 2-3 days) and reliability.
Foundation for a log bathhouse.
Shallow strip foundation for a bathhouse.
A good analogue for the construction of light buildings (log house, frame panels - area from 3x3 to 6x6 m) is a bathhouse on a columnar foundation. To install a log bathhouse on poles, the soil on the site must not be prone to horizontal shifts, otherwise there is a high risk of the supports overturning. The pillars can be monolithic (concreted asbestos pipes) or prefabricated (from FBS blocks).
In complex soils - mobile, heaving and low-density - a foundation slab is needed. This is a monolithic structure made of reinforced concrete 30-50 cm thick, the dimensions of which correspond to the area of the building. The slab is a reliable and durable foundation for a frame bathhouse or log house, but its cost is higher than other analogues.
A simple foundation for a bathhouse, suitable for light frame buildings measuring 3x3 and 3x4 m - a base made of car tires. It is possible to erect a building on such a foundation in stable soil that is not prone to heaving. A bathhouse without a foundation can only be built on rocky soils.
Collection of characteristics and calculation of the foundation.
Before building a foundation for a bathhouse with your own hands, you need to calculate the foundation and find out whether it will withstand the building in specific soil conditions. You need to determine the type of soil on the site (sandy, clayey, sandy loam) and, using standard tables, find out the value of its resistance per 1 cm 2.
Next, you need to calculate the loads that will be transmitted by the foundation to the soil. Load calculations are performed using the following algorithm:
- Calculation of the mass of a building - the weight of the roof, floors and walls is separately calculated and summed up by multiplying their area by the specific weight of the building material (tabular data).
- Calculation of snow loads - multiply the roof area by the weight of m 2 of snow cover in your region.
- Calculation of operational loads (furniture, stove, wall cladding) - multiply the area of the basement floor by the average load of 100 kg.
- Calculation of total loads - we summarize the obtained data and add a safety margin by multiplying the amount by 1.2.
It remains to determine the supporting area of the foundation, multiplying its perimeter by its width, and calculate the load per 1 cm 2 of soil.
For example: the standard width of the tape for log walls is 30 cm, for a bathhouse with an area of 6 × 6 m (perimeter 24 m), its supporting area will be - 240 * 30 = 7200 cm 2. for a 3 × 3 building - 3600 cm 2. for 3x4 bath - 4200 cm 2. and so on. Now you need to divide the total loads by the supporting area and compare the resulting value with the resistance of 1 cm 2 of soil; if the result exceeds the bearing capacity, you will need to increase the area where the foundation rests on the ground by adding the width of the tape or the diameter of the pillars.
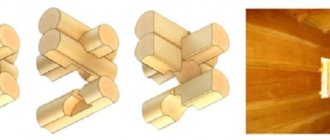
Assembly on wooden dowels
The crowns are secured to each other with special wooden wedges - dowels. The word is translated from German as “nail”. It’s not difficult to make dowels - 25x25 mm slats, 3/4 of the thickness of your beam, are cut out of a regular board, and the corners are removed using a simple ax or plane, turning the slats into a kind of wooden nail. The holes for the dowel are drilled through with a 24 drill, and for the third part of the previous row of beams they are simply driven into the beam, thereby fastening the crowns. It should also be taken into account that under no circumstances should the dowels stick out from the timber. They must be driven in with bolts and “drowned.” They should not be a hindrance during further settlement of the log house.
Don't forget about door and window openings. Cutting them out of a finished wall is extremely problematic and is fraught with weakening of the structure, so their presence should be foreseen in advance and stocked with ready-made window and door blocks with already cut grooves. These blocks are installed on a crown of a certain height. Subsequent beams must have sawn tenons, with which they are attached to the sides of window and door blocks. The laying of tow and its impregnation should be carried out in parallel with the laying of the next row of beams. Otherwise, it will not be easy to plug it into the holes, and we may end up with unexpected “ventilation”.
If there is no opportunity or means to order window and door blocks in a carpentry shop, where they are made using woodworking equipment and machines with a groove of the size you need, try working with standard window and door blocks using the “add-on-cut” method. To do this, if the thickness of their vertical bars allows, using parquet, a chisel and a hammer, you can make a groove of a certain width and depth, or you can get one by stuffing two parallel strips of a suitable cross-section from the end of the blocks.
Do-it-yourself foundation construction technology.
When considering the question of how to make a foundation for a bathhouse, we focus on the fact that the floor slab of the bathhouse must be equipped with a drain, which is installed at the stage of pouring the foundation.
In the wall of the strip foundation it is necessary to provide a hole for the drainage pipe, and the floor of the bathhouse itself - a concrete screed or a joist floor, should be made with a slope towards the central part, in which a drain hole covered with a metal mesh is placed. The water is discharged through a pipe into a storage well located outside the bathhouse at a distance of 2-3 meters.
Strip foundation.
Foundation for a bathhouse made of logs.
A shallow strip foundation is the optimal solution for building a log bathhouse with an area of 4×6 to 6×6 m. The supporting part of the MLF is placed at a depth of 30-50 cm, and 20-30 cm of strip is also formed above the ground level, which is used as a base.
Let's look at how to properly pour the foundation for a bathhouse:
Which foundation is better for a log bathhouse?
Strip foundation diagram.
- The foundation is marked - its design contours are transferred to the site using reinforcement pegs and twine.
- Using shovels, a trench is dug to the depth of the tape plus 20 cm under the compacting bedding;
- A layer of sand 10 cm thick is formed at the bottom of the trench, and on top of it is a layer of crushed stone of similar thickness. The bedding is carefully compacted by compaction.
- Outside the trench, formwork is installed from boards 1-2 cm thick, which will form the ground part of the tape. The structure is strengthened with stakes and spacers. The trench and formwork walls are covered with waterproofing material.
- The foundation is reinforced with a double-circuit frame made of reinforcement with a diameter of 12-16 mm. The upper and lower belts of the foundation are connected by vertical jumpers in increments of 40 cm. Proper reinforcement of the corners of the tape - the frame should not be connected by a cross joint, but by rods curved at right angles.
- After the reinforcement is completed and the assembled frame is installed in the formwork, the shallow foundation is concreted with concrete grade M200-M300.
The formwork is dismantled 2 weeks after pouring, after which the floor can be laid out and the walls of the log house can be raised. The floor will need to be insulated to prevent heat loss from the bath through the ceiling. If you are making a joist floor, insulation (mineral wool, polystyrene foam or EPS) is laid between the joists and covered with facing boards.
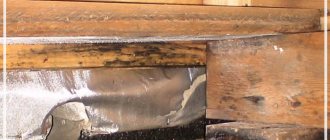
Waterproofing the insulation is important - it needs to be covered on both sides with a PVC membrane that prevents the material from rotting under the influence of high air humidity. Waterproofing is also laid along the upper contour of the tape on which the basement of the bathhouse is placed.
Construction of a strip foundation (video).
Columnar foundation.
It is rational to make a columnar foundation for a bathhouse with your own hands from concreted asbestos pipes, deepened below the freezing level of the soil - in this case, the log house will be protected from heaving. The pillars are tied with a grillage made of timber or channel.
Let's look at how to pour a foundation for a bathhouse:
- The contours of the foundation are marked on the site and the installation points of the supports are indicated.
- Using hand-held drilling tools, wells are developed for the installation of pillars (the optimal diameter of asbestos pipes is 25-30 cm, the depth of the foundation is 2 m).
- The pipes are installed in the well, they are reinforced with 4 reinforcement bars of 10th diameter (the rods are stuck into the ground).
- M300 concrete is poured into the pipes, until the mixture has hardened, a steel pin (a rod 40-50 cm long with a threaded thread) is inserted into the central part of the column to secure the grillage. The stud should protrude to the thickness of the grillage and penetrate into the concrete by at least 20 cm.
- The post is tied with a grillage made of timber with a cross-section of 15×20 cm. The beam is cut to size, groove joints are cut out in the joining parts, after which the strapping is laid on the supports. At the points of connection with the posts, a through hole is drilled in the timber for the pin and a seat for the fixing nut (using a feather drill).
How to put a log bathhouse on the foundation.
Foundation made of tires for a bathhouse.
Before laying the grillage, the pillars must be waterproofed - roofing material or glass insulation is placed on their end part under the timber.
Tire foundation.
The technology for arranging a budget foundation made of tires for a small log house or a light frame bathhouse is extremely simple to implement—neither reinforcement nor waterproofing is required. To work, you need 10-15 tires from a passenger car ( diameter 60-70 cm ).
The distribution of tires is as follows - one at a time in the corners of the log house and evenly, in increments of 1 m, along the perimeter of its walls. Initially, you need to make a pit for the entire area of the bathhouse with a depth of 15-20 cm, fill it with crushed stone, level it and compact the bedding tightly.
Next, mark the contours of the log house and use pegs to indicate the placement of the tires. Having centered the tires on the pegs, cover their bottom with geotextile and fill with crushed stone, not reaching 5 cm to the top. The crushed stone is compacted and the remaining space is filled with cement-sand mortar.
To prevent the tires from being destroyed during operation due to the scorching sun, they need to be covered with glass insulation, after which you can begin laying the bottom frame timber and raising the walls.
Knitting the corners of the first crown
The first step is to install the lowest crown of the frame, called the frame, on the foundation blocks. Before installation you will have to perform a number of simple manipulations.
- First, you need to measure the timber - its length must be strictly equal to 6 meters.
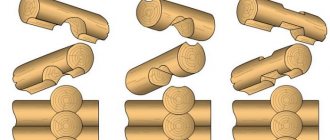
- Secondly, you should saw down the ends of the timber according to the tongue-and-groove pattern (see figure below).
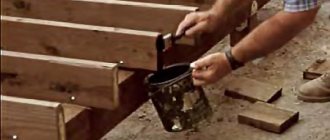
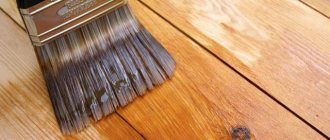
- Thirdly, the timber should be impregnated or at least painted with special chemicals that prevent the formation of fungus as a result of high humidity. It’s easier, cheaper and not at all shameful to use banal waste from your car’s carburetor for this purpose, or stock up on 2-3 cans of it in advance. The oily liquid saturates wood well and has water-repellent properties. Don't let the smell bother you - it is not persistent and disappears after a few days.
The lower crown laid on the blocks should be nailed. After this, the dimensions of all four sides and both diagonals of the resulting base are measured. The difference in size is allowed to be minimal - up to one centimeter. The next step is installing the floor joists. Before this, grooves for these same floor joists are cut into half the wood in the framed crown. The accuracy of measurements of cut parameters must be very high. In order not to weaken the lower crown of the log house, you can make cuts in the timber of the second crown. However, with this arrangement, intermediate supports under the floor joists should be installed 15 centimeters higher, leaving the height of the supports under the joists near the walls the same.
It should be said that in this case, in fact, an additional crown is added to the frame of the house, which will make the house taller, but the height of the floor above the ground also increases, which means the floor will be drier and warmer.
Read more about types of timber connections
Each laid crown must be checked for horizontalness of the structure using a water level. It wouldn't hurt to measure the corners. In order not to spend money on purchasing this level, you can make it from a pair of used 20 cc syringes and tubes from medical systems using colored water. If, as a result of measurements, there is a crook, it can be canceled with spacers made from plywood scraps of various thicknesses.
Ideally, the log house should be laid when the weather is clear and without precipitation.
Which foundation is better for a log bathhouse?
The foundation of a log bathhouse with your own hands.
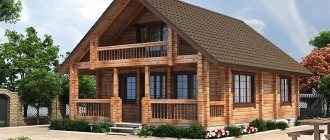
To build a bathhouse on a site outside the city, various materials can be used. First of all, this is a log house, rounded logs and other natural building materials. Saunas made of logs and logs are in demand, first of all, because they have excellent thermal conductivity characteristics.
Before you start installing a bathhouse, you should decide which foundation is best. In order not to make a mistake with your choice, you should not only accurately determine the location of the upcoming construction, but also carefully examine the soil on which the work will be carried out.
Which waterproofing to choose?
Despite all the advantages, the last three methods of waterproofing in the case of wooden houses are almost never used. Such houses are built by private individuals who prefer traditional methods that do not require the use of complex equipment.
Therefore, coating and roll waterproofing are most often chosen. Ideally, they should be combined. For example, roofing felt should be fused onto the wall, and the seams formed between the sheets should be coated with bitumen mastic. The same applies to membranes with an adhesive layer. And it makes sense to install a continuous waterproofing fill made of hot asphalt mass (10–15 centimeters thick) or emulsion paste when there is strong hydrostatic pressure of groundwater outside. In extreme cases, rigid waterproofing can protect the basement and foundation of a wooden house.
Of course, all this work is best planned and carried out at the foundation construction stage. Otherwise, you will have to tear it off, or perform injection treatment from the inside.
There is one more point that needs to be taken into account in the case of wooden houses. Horizontal waterproofing is performed twice - once before laying the foundation, and the second time after its construction. In this case, the lower part of the first crown, adjacent to the foundation, is wrapped in rolled materials.
Columnar foundation.
Heaving soil.
A columnar foundation for a bathhouse is pillars buried in the soil below the fertile layer. Installation of these pillars is carried out at the intersection of partitions with the internal walls of the bathhouse, in corner parts and on straight sections of the base in increments of 1-2 meters. The sufficiently large depth of installation of the pillars makes the columnar foundation the optimal solution for the construction of a log bathhouse on soils with high heaving rates, as well as in climatic zones where the depth of soil freezing is especially high. To fill the foundation of such a plan, materials such as concrete, red hardened brick, stone, asbestos pipes filled with concrete, and wood pillars treated with antiseptics are most often used.
How important is waterproofing wooden houses?
Much has been written about how susceptible reinforced concrete is to water. But wooden houses do not have steel supporting reinforcement, which can rust and decompose. Doesn't this mean that wooden houses do not need serious protection from water?
How much they need it! And the reason is that concrete that has taken on water cracks when it freezes. And the tree swells without any frost. After drying, it changes geometry and cracks. In cold weather it tears more than concrete, because... the tree represents a natural water supply. Besides, it rots, and mold just loves it. Therefore, it is not less, but more than concrete, in need of protection from sedimentary, ground and capillary water.
Pile foundation.
The pile foundation is perfect for a log house for a bathhouse. This option turns out to be much better than all the others if you plan to do all the work on laying the foundation without involving specialists yourself. Especially often, the installation of a pile foundation is carried out on weak, unstable, and also heaving soils. For this type of foundation, wooden, concrete, and steel types of piles are used.
There is a fairly significant difference between steel and all other types of piles. Steel piles are usually produced in a screw design. Unlike the others, they are not driven in, but screwed into the ground.
How to make a foundation for a bathhouse from a log house.
In some cases, piles can be used as an element of a strip foundation for a log bathhouse . the depth of which requires increasing.
The main advantages of a properly laid pile foundation include:
- the relatively low price of such a foundation for a log bathhouse;
- quick installation of a foundation for a log bath;
- shallow depth, allowing all work to be carried out without the involvement of professionals.
Effective ways to seal cracks
There are several methods for sealing gaps between the base and the crown, which are considered the most effective and act as waterproofing for the lower level of the beams.
The first method is to eliminate holes using small pieces or bars that fit the size of the cracks.
You just need to prepare the material and place the triangular bars in the right places between the crown and the base. And then the insulation is done with moss or tow. The second option for insulation involves removing the gap using construction foam. In this case, insulation occurs due to a layer of material applied to the hole. But after the foam has dried, it should be hidden with decorative trim.
Strip foundation.
The installation of a strip foundation is justified if the bathhouse building has a very large area (in order to evenly distribute pressure on the ground). Among the different types of foundations, the strip foundation is the most expensive. But it is practically irreplaceable if it is necessary to install a bathhouse on unstable soils.
There are four main types of strip foundations:
- monolithic;
- made;
- buried below the soil freezing level;
- shallow.
Which specific strip foundation should be installed for the construction of a bathhouse made of timber is decided individually.
Protective ebb
Low tide
In some cases, it makes sense to mount additional flashings above the lower crown, minimizing the flow of moisture into the first inter-crown seams.
On the front facades of houses, such a solution is not always acceptable for aesthetic reasons, but on the rear walls, which are often shaded or stand adjacent to outbuildings, such protection will not be superfluous.
Please note that it is advisable to make such ebbs from the most protected material, since it will have to work in conditions of constant humidity.
Slab foundation.
What kind of foundation is needed for a log bathhouse?
Since building a bathhouse from a log house requires a high-quality and reliable foundation, the question of which option is better to choose is often decided in favor of a slab foundation. First of all, it is needed when constructing buildings on problematic soils. In this case, it is important to choose the right slab, which will serve as a kind of stabilizer for the building and reliably protect it from subsidence. At the same time, any material can be used to build a bathhouse: log house, logs, etc.
It should be borne in mind that in order to make a slab foundation for a bathhouse from materials such as logs or logs, it will take quite a lot of time.
The process is quite expensive from a material point of view, and therefore they decide to lay a slab foundation only if any other options turn out to be unacceptable.
Installation of window blocks
When installing window blocks, you should align their outer surfaces with the wall, which, of course, will be wider than the window block. This discrepancy is eliminated by installing so-called extensions on the top of the blocks, and installing a window sill on the bottom. Usually the window sill is made independently from a well-planed 40 mm board. Its width can be from 15 cm or more. Above the window and door block, before installing the next crown, it is necessary to check the presence of a 6-8 centimeter gap for subsequent settlement of the frame. It is filled with impregnated tow, but in no case with construction foam, which, once hardened, will interfere with the settling process and can cause deformation of the window or door block. The presence of a large layer of tow can be hidden by installing wooden trim around the perimeter of the window or door.
To begin the process of settling the log house, when installing each subsequent crown, it is necessary to resort to the help of an ordinary sledgehammer, tapping the timber along its entire length. After this, periodic measurements of the diagonals, levels, and verticality of the laid crowns will protect your structure from tilting, and the owners from unnecessary, costly alterations. If minor deviations are detected, you can resort to using supports, braces, and gussets, which, having played their role, are subsequently removed.
Selection of jacks and preparatory work for their installation
To carry out the work, it is important to choose the right jacks for lifting the bathhouse body. The estimated parameters of the mechanisms are the load capacity and the stroke of maximum movement
In practical operations, 2 main types of devices can be used - screw and hydraulic jacks. The best hydraulic systems are those that have great power and are reliable in operation. For small wooden baths, you can use cheaper screw varieties.
That is why a solid foundation is built at the site where the equipment is installed.
The installation site is prepared as follows:
- A total of 8 points are outlined (2 on each side), spaced 45-50 cm from the corner of the building.
- In these places, holes are dug with the following dimensions: length (along the log) - 90-100 cm, width - 70-75 cm, depth - 50-60 cm. The bottom of the holes is carefully compacted and covered with a layer of crushed stone, on which a solid wooden base is installed beams or metal sheet.
- Preparation of logs if it is necessary to replace rotten crowns. The diameter of the new logs must exactly match the dimensions of the elements requiring removal. They must first be impregnated with an antifungal composition and fully prepared for installation.
About the need to raise the bath
The essence of the process of raising a wooden structure using jacks is to provide access to the foundation being repaired while maintaining the integrity of the building.
Using one or more powerful jacks, you can carefully lift the structure, the basis of which is:
- wooden beams of square section;
- prefabricated panel structure;
- cylindrical logs.
The basis for making a decision to raise the bath is the visual manifestation of the following signs:
- significant deviation of the building from its normal position with the frame skewed;
- formation of cracks on finishing materials outside and inside the premises;
- subsidence of the entire building along the perimeter of the bathhouse or its individual parts;
- immersion into the soil of parts of the foundation bearing the load from the mass of the structure;
- significant destruction of the foundation with cracking and spalling.
Often, the construction of a small bathhouse is carried out without a foundation, and its base is simply placed on compacted soil and a sand-crushed stone cushion
Raising the bathhouse with the help of modern technical means allows the following types of construction activities to be carried out:
- work to carry out major repairs of the destroyed foundation;
- partial restoration of fragments of the base;
- restoration and replacement of collapsing supporting elements along the contour of the building;
- eliminating distortions of the building frame while ensuring the verticality of the structure;
- antiseptic treatment, as well as protective impregnation of wooden structures;
- elimination of deviations and errors that the builders made during construction.
Before starting construction activities, it is necessary to deliver everything necessary to the construction site in advance, since it is problematic to keep the structure in a raised state for a long time.
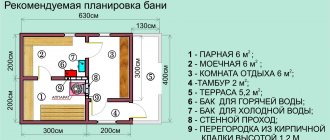
Planning the interior of the bath
When the frame is assembled and settled, you need to begin interior decoration and installation of windows and doors. You need to plan all the elements in advance, since the costs for them may be slightly less than the main ones. In addition, you need to think about how the bathhouse will be laid out and install internal partitions.
Windows and doors of the bathhouse
Do-it-yourself wooden door to the steam room.
The doors in the bathhouse and steam room are installed wooden, since this material will not violate the overall environmental friendliness. To prevent them from collapsing from moisture, they are treated with antiseptics and water-repellent compounds. The size of the bath door should be 5-10 mm smaller than the opening on all sides. This way, when it swells from humidity, it won’t jam.
A door size suitable for a steam room is: width 60 cm and height 170 cm. If you make it larger, the steam will quickly leave the steam room and it will cool down. Install the doors so that they open outward. That is, from the steam room the door should open to the washing room, from there to the rest room, from the rest room to the dressing room. It is not worth installing on the contrary, this is contrary to fire safety techniques. You can make the doors to the steam room yourself. For this you need to use wood from non-resinous varieties (linden, aspen), with a thickness of at least 60 mm.
The windows need to be small in size, maximum 400x600 mm, so less heat will escape into the bathhouse. It should be installed at least 1 m from the floors. The frame must be double. Double-glazed windows can be used for the rest room and dressing room. If you install the glass yourself, then you need to use a sealed water-repellent and heat-resistant material for lubrication.
Wiring
Electrical wiring in the bathhouse must be carefully insulated in special corrugations.
It is better to entrust the electrical system in the bathhouse to professionals. The wiring must be insulated, and all luminescence must be protected from moisture and splashes.
You can make protective nets from linden lining, which will become an additional element of the interior. If it is difficult to make protection with your own hands, you can purchase ready-made bath lamps.
The fire hazard level of a Russian bath is second, so the incoming cable is passed through asbestos material. And the overhead line is placed in additional insulation. Switches must not be installed in the flushing and steam compartments.
Planning of interior spaces and partitions
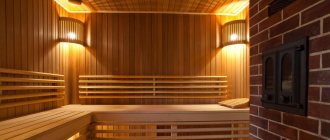
A small steam room lined from the inside with aspen clapboard.
The smallest bathhouse project should include: a steam room and a dressing room. Modern baths are complemented by a washing area and a relaxation room. But it’s better to make a dressing room between the seating area and the front door. This will be an additional obstacle to heat escape. Equip the room with hangers and a bench. This will be a dressing room for outerwear. There may be no windows in the dressing room at all, and if they are planned, then no more than in the steam room.
It takes longer to install the stove and fill the heater; you can read about which stones are suitable for a sauna here.
Pipe and ventilation system
An iron pipe in a bathhouse is easy to install, but has a short service life.
The firebox of the heater must exit into a special pipe, which must have a draft equal to three times the exchange of air for 60 minutes of the firebox. Due to its small size, it is recommended to open the dressing room during the heating of the bath, so there will be better air exchange into the room. This will increase the thrust and the fuel will burn better.
The ventilation system is made of a common steam room, a relaxation room and a washing compartment, so moisture will not accumulate in the wooden building and the bathhouse will last longer. In the steam room, an vent measuring at least 130x130 mm is installed under the ceiling. After the bath procedures, the steam room door is left open and the pipe valve is opened all the way, so that the stove, which has not yet cooled down, will quickly draw out excess moisture. In summer, 1–2 hours are enough for this, in winter no more than 30 minutes.
Planning a bathhouse is important in the same way as installing walls, roofing and stoves. If you don’t think through all the details down to the smallest detail, then during the construction process ideas may appear that will be difficult, and in some cases even impossible, to bring to life.
Plan your own bathhouse in advance and you won’t have such problems.