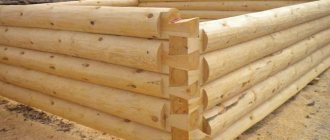
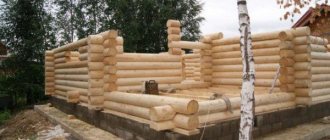
Wooden houses have been built in Rus' since ancient times and have not lost their popularity in our time. This is due to the unique properties of wood, a natural, environmentally friendly natural material. Almost all the masterpieces of Russian wooden architecture were built by our ancestors without a single nail, chopping into a bowl. The name of the method is due to the type of connection of logs into a single structure. A semicircular recess in the form of a bowl was cut out in the lower log, into which the upper log was tightly placed at a right angle. The result was a durable, beautiful, warm structure that was not drafty in the corners.
How to cut a log house into a bowl? Below we will try to answer this thematic question?
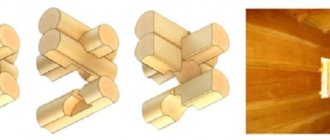
When building from solid logs, several cutting methods are used. They depend on the purpose of the structure being built. When constructing houses for permanent residence and baths, carpenters use cutting into a bowl or into a paw. Experienced experts recommend that when constructing a permanent structure, use the cutting method, in which the excavation is made in such a way that the bowl rests on the log, and not vice versa - the log into the bowl. This kind of felling is also called “in the okhlop” or “Siberian”. Whereas, the reverse excavation is “into the oblo” or “Russian” cutting. The Siberian cutting method better protects the log house from moisture penetration. Its use, compared to Russian cutting, requires a smaller number of technological operations. When making log houses using Siberian technology, logs are released outwards up to 60 cm, obtaining a warm corner.
What wood is best to use for the construction of a log house?
In order to successfully cut a frame into a bowl, a good tool and the appropriate skill of a builder-carpenter are not enough. It is necessary to decide on the best material for this, which will resist infection by fungus and attacks by bark beetles.
Types of cuttings "in the hole".
Carpenters recognize pine as an almost ideal type of wood for this. It is valued for its smooth, almost knot-free trunk, characterized by a high degree of hardness. At the same time, this circumstance does not at all interfere with the convenient processing that pine is characterized by. On the other hand, as an integral element of the wall of a building, it impresses with its reliability and durability, good resistance to rotting and the absence of cracking as a result of drying.
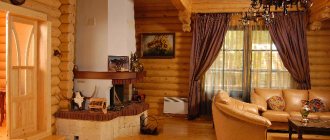
Related article: Interior of a hallway in a private house: how to make a candy out of a hallway (39 photos)
To cut a log house confidently and quickly enough, it is recommended to select logs of approximately the same length and diameter. At the same time, according to the experience of using this technology, the most practical diameter is considered to be 22-24 cm.
As for the time of harvesting logs for a future log house, experts advise doing this in the winter. It is at this time that the tree trunk contains the least amount of sap. Therefore, during subsequent drying of the winter wood, it will be minimally warped and destructive cracks will appear in the trunk.
Tools required for making a log house
The process of making a log house involves carrying out work on marking the logs and the felling itself. Without special tools, it is impossible to perform quality work.
Therefore, after consulting with professionals, purchase:
- carpenter's axe;
- chainsaw (or an electric saw);
- chisel;
carpenter's line (you can make it yourself).
Rules for lifting a structure
What to do when it’s time to overhaul a bathhouse with distortions and sagging corners? In this case, the bath structure rises above the surface completely or partially. The video shows clearly and in detail how we raise the bathhouse.
The most optimal option for carrying out such an event is the use of high-power jacks. The lift allows access to the foundation and lower crowns of the frame. The lifting procedure is quite complex and requires special care, because... incorrect actions can lead to destruction of the ligaments and the material itself.
Advice! Before lifting the bathhouse on jacks, it is necessary to assess the load on the mechanisms, which will allow you to correctly select the power of the device.
Jacks are installed, as a rule, in the corners of the structure, and 1 device accounts for ¼ of the entire mass of the structure. Most often, mechanisms with a capacity of at least 4.5-5 tons are used.
Before work begins, a lifting scheme is worked out, which is determined by the purpose of the operation and the type of damage to the structure. Typically, at least 2 jacks are used for work. The exception is cases when only 1 corner of the bathhouse sank. To eliminate deformation, only the sagging corner is raised to the required height. For all other work, jacks are used in pairs, lifting the entire wall, which will preserve the integrity of the corner alignment of the logs.
The operation itself should be carried out smoothly, gradually. Precautions must be observed. When the structure is fully raised, work is carried out in cycles:
- slight rise on one side;
- leveling from the opposite side with supports placed under the raised wall;
- repetition of the cycle.
The lifting height for 1 cycle should not exceed 5-7 cm to prevent structural destruction and the formation of cracks.
The total height of vertical movement can reach 35-50 cm. Damage is avoided by securely fixing the raised sections of the frame.
The lifting operation must be carried out taking into account further work. In other words, a major foundation repair involves dismantling the previous structure, installing formwork, pouring a new system, i.e. carrying out a complex of works under an overhanging log house. This circumstance requires compliance with all safety requirements, eliminating the risk of subsidence of the bathhouse frame.
How to mark logs for cutting into a bowl?
To prepare for cutting out bowls, they use a special tool - a carpenter's line, which is similar to a compass, only of a rigid design.
The span between the extreme points of the line is set in accordance with the diameter of the logs used and is equal to half of the lower or upper log.
The marking process consists of marking the contours of future cutting. When marking, follow several rules:
- install the logs the way they will be laid when assembling the log house (cross to cross);
- place the pointed ends of the bar on the parts to be connected;
- draw lines for the wood notch on both logs at the same time.
How is the preparation carried out?
The entire operation of raising the bath consists of several stages. First of all, preparatory activities are carried out. Work begins with the dismantling of the external cladding of the basement section of the building. After removing the outer covering, the condition of the logs in the lower crowns can be accurately assessed. The issue of the need to replace or repair them is decided, and the installation points for the jacks are outlined. Zones of active decay and the presence of cracks due to soil movement are especially highlighted.
The next necessary step is to dig a trench around the entire perimeter of the foundation. Inspection of the condition of the entire foundation finally forms the overhaul scheme. If the foundation has significantly collapsed, then in this area it will have to be completely removed and concrete poured again. To reduce the load on the mechanisms, all equipment, furniture, and shelves are removed from the bathhouse. Door panels and glazing from windows are temporarily removed. It is advisable to disassemble the floor covering (even better, the subfloor), but this event is carried out at the discretion of the work contractor.
How to efficiently and quickly cut down?
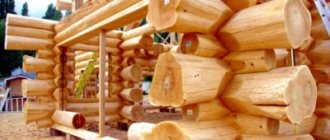
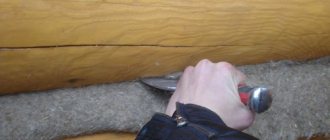
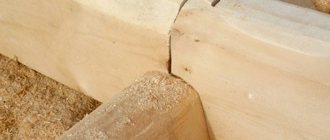
The term “cutting” has been preserved historically, although modern craftsmen, when building houses from logs, more often use a chainsaw instead of an ax. Highly professional carpenters also perform the lines for the notches with a saw. After marking the cutting areas, cut down or saw out the bowl in such a way that when assembling the log house, the log will lie down, embedded exactly halfway into the adjacent bottom row.
To ensure a tight fit of the crowns to each other, lengthen the selected bowl by choosing a longitudinal oval with a groove. Select the size of the additional notch depending on the local weather. The colder the winter, the wider it should be. To ensure a tight fit, equalize the depth and volume of the wood cut for the oval.
Check the correctness and accuracy of the work performed by test laying the logs. The precisely processed surface of the upper log should fit tightly onto the lower log with its entire plane. The laid part should not have any gaps or cracks. If they form, mark again and adjust the cutting until the logs fit snugly.
Photo: a lot of interesting things on this topic can be gleaned from old books written with the participation of experienced carpentry masters.
To seal the connections, use an additional cutting element - a tenon. If you are cutting a warm building, take into account the location of the annual rings, since the looser southern parts of the rings should be inside the log house. To maintain the level of the rows in the horizontal direction, do not miss an important point. In log houses, the butt of the log is alternated with its narrower part. To align the crowns, cut down alternately - first in the wide part of the log, then in the narrow one.
Main types of log material
The severity of the problems described above can largely be reduced at the stage of procurement of materials. The question of how to make a log house with your own hands is preceded by the question of what to make it from.
The options are as follows:
- log house made of natural logs;
- timber frame;
- log house made of factory-processed logs (rounded).
In turn, when deciding how to make a log house from timber, you have to make a choice between ordinary construction timber (1), profiled timber (2) and laminated timber (3).
Beam: construction (1), profiled (2), laminated veneer (3).
From the point of view of convenience and manufacturability of work, timber is noticeably superior to ordinary (natural) logs. A rounded log is fundamentally no different from timber, except, perhaps, for higher expressiveness and originality of building design.
I recommend: How and with what to remove paint from a car lamp?
The disadvantage of treated construction wood will be a noticeably higher cost, to some extent offset by higher quality and reduced labor costs during operation. And, in addition, the absence of that very spirit of “naturalness” of the log house.
It must be remembered that a log house usually only has external walls and (not always) partitions. To fully answer the question of how to make a log house, you will need a number of additional materials, in particular:
- timber for logs;
- boards for floors, cladding of gables, ceilings, ceilings, etc.;
- timber and boards for roof structures;
- window and door fillings (blocks);
- roofing material.
Final Tips
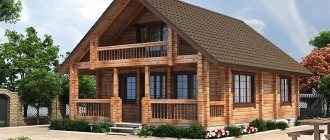
Having mastered the craft of a carpenter, you will save significantly on construction. Start learning the basics by making a log gazebo for the garden. Then, build a small bathhouse on your site. The experience gained will allow you to master the construction of a house. A technologically precisely manufactured log house will be warm and will give the building durability and reliability and provide exceptional environmental friendliness, especially if you use cedar lining for internal cladding.
On other pages of our website you can see a lot of interesting things about log houses and log baths.
Nuances of work
To cut down a log house and make it resistant to bad weather, the logs are oriented with thin annual rings towards the street, and with thick rings - inside the future house.
To facilitate this process, the building can be built in parts. The crossbars (as these parts are called) are usually tied on the ground, aligned upward to the size of human height. Then each of them is disassembled and reinstalled on the base frame.
The optimal choice for a foundation for a wooden frame would be a pile option. It is lightweight and quite easy to install.
In the absence of the necessary experience, it is recommended to start the production of log cabins with the construction of something small and not very significant, for example, a garden gazebo or a small bathhouse. This will give you experience and develop the skills necessary to build a full-fledged house.
Having gradually learned the intricacies of construction, the master will be able to create something not only suitable for habitation, but also causing enthusiastic responses with its exquisite appearance.
Advantages and disadvantages of a log house
Now it is fashionable to talk about the special energy of wood, beneficial effects on humans, etc. But, even if we discard the esotericism and turn to modern science, we can see that the characteristics of moisture absorption, air microfiltration parameters and other properties of wood correspond to the needs of the human body many times better the most advanced materials.
A house made of wood is talked about as “living”, preserving the health of its owners. With certain reservations this is true, but the flip side of such properties is the need for counter-care. A “classic” log house made of natural wood requires much more care and supervision than a brick or concrete one.
To begin with, wood is a material with a high degree of fire hazard. At the same time, various types of fire-prevention impregnations and coatings either noticeably worsen the notorious environmental component and (or) aesthetics of wood, or lead to a noticeable increase in cost. In addition, most fire retardants have a limited service life, usually not exceeding 10-15 years. Then the processing must be repeated.
The tree is also significantly susceptible to biogenic influences:
- rotting caused by various kinds of fungi and algae;
- damage by insects - wood borers (various types of larvae, beetles and worms);
- damage by rodents (mice, rats).
Measures to combat these scourges are as ambiguous as treatment with fire retardants.
Treatment of wood with fire retardants
Cutting walls from logs
In log houses, the load-bearing structure is a wooden wall, consisting of logs or “crown” beams stacked longitudinally on top of each other. The crown is a rectangular structure consisting of logs or beams laid perpendicularly along the perimeter, fastened together at the corners with a locking connection. The crowns from the bottom trim to the window opening are called window sill crowns. After them, window crowns are laid, and then above-window crowns.
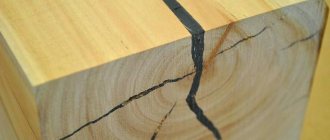
When selecting logs for a log house, you must comply with the condition that the trunks are straight with a slope of no more than 1 cm per linear meter of length. The diameter of the logs should, if possible, be the same with a difference in the top cut of no more than 3 cm. And, most importantly, the thickness of the logs should allow one to obtain the width of the longitudinal grooves required by the climatic conditions of the region. The width of the groove should be approximately 2/3 of the diameter of the log and at a temperature of 20°C should be at least 10 cm. If the temperature in a given climate zone is lower, then the width of the grooves is increased: at - 30°C - by at least 12 cm, at 10 °C - by 14-16 cm or more. Typically, logs with a diameter of 18-26 cm with an average humidity of 80-90% are selected for a log house. Logs of such humidity are easier to process and they are less deformed when naturally dried in assembled form. It is necessary to take into account the fact that when the wood moisture content decreases to 15% (operational humidity in the conditions of central Russia), the wood decreases in size in the longitudinal direction by approximately 0.1%, and in the transverse direction by 3-6%. As a result, shrinkage cracks may occur. In order to reduce this negative phenomenon, an artificial “crack” is cut from the underside of the logs to the core of the log.
About the need to raise the bath
The essence of the process of raising a wooden structure using jacks is to provide access to the foundation being repaired while maintaining the integrity of the building.
Using one or more powerful jacks, you can carefully lift the structure, the basis of which is:
- wooden beams of square section;
- prefabricated panel structure;
- cylindrical logs.
The basis for making a decision to raise the bath is the visual manifestation of the following signs:
- significant deviation of the building from its normal position with the frame skewed;
- formation of cracks on finishing materials outside and inside the premises;
- subsidence of the entire building along the perimeter of the bathhouse or its individual parts;
- immersion into the soil of parts of the foundation bearing the load from the mass of the structure;
- significant destruction of the foundation with cracking and spalling.
Often, the construction of a small bathhouse is carried out without a foundation, and its base is simply placed on compacted soil and a sand-crushed stone cushion
Raising the bathhouse with the help of modern technical means allows the following types of construction activities to be carried out:
- work to carry out major repairs of the destroyed foundation;
- partial restoration of fragments of the base;
- restoration and replacement of collapsing supporting elements along the contour of the building;
- eliminating distortions of the building frame while ensuring the verticality of the structure;
- antiseptic treatment, as well as protective impregnation of wooden structures;
- elimination of deviations and errors that the builders made during construction.
Before starting construction activities, it is necessary to deliver everything necessary to the construction site in advance, since it is problematic to keep the structure in a raised state for a long time.
Types of wood for logs and quality characteristics
For the log house of a residential building or household. the buildings do not use aspen and linden, at the same time, as a material for making a log bathhouse, their wood is very good.
They don’t make log houses from birch - it is easily attacked by insects and various fungi, and is fiddly and inconvenient to work with.
Good (but expensive) cedar, larch, oak. Larch is more difficult to process, but a frame made from it is not subject to rotting and is more resistant to fire. Log houses made of oak, beech and hornbeam can last for centuries, but, like larch, the high price of wood from these species is aggravated by the difficulty of processing.
Stages of assembling a log house
The felling of log walls is carried out in two stages. At the first stage, the walls are cut down near the installation site (on a temporary foundation), installing them “dry” (without caulking the seams). When assembled, the log house must stand for at least 6-9 months, and only after that the log house is dismantled and installed on a permanent foundation with the seams laid with tow, moss and other sealing materials. The felling is divided into two stages because freshly cut logs in the log house shrink more. But even pre-assembly “dry” does not guarantee against further shrinkage, therefore, as the structure is used and shrinks further, it is caulked again. This usually happens one to one and a half years after the final felling of the house.
After shrinkage, all elements of the log house are marked, disassembled and installed on foundations with caulked seams.
The preparation of wall logs begins with the construction of at least one flat plane along the entire length of the log. To do this, it is best to place the log on blocks and tilt it with brackets. At the ends, vertical marks are made along the level in such a way that the thickness of all logs from the plane of the resulting edge (to the opposite) is approximately the same. This will improve the quality of work and reduce the time of cutting walls. Having connected with an even line, the ends of the marks placed on opposite ends of the log begin to process the plane with an ax. A straight line along the entire length of the log can be drawn using a cord rubbed with chalk or coal. The cord is applied to the ends of the marks and, pulling it in the middle part, is sharply released. By hitting a log with a cord rubbed with chalk, a straight line is obtained, indicating the edge of the future plane. Using an ax, without going beyond the line, they make notches along the entire length of the log in increments of 100-200 mm and begin to process the plane, leaving an allowance for its final leveling. After this, the log is turned 180° and the same plane is processed on the reverse side. Having obtained a relatively flat plane, the log is turned with the treated surface up and planed along the entire length with sherhebel. It goes without saying that the quality of sharpening the tool must be good. Otherwise, the labor intensity of the work will increase, and the quality will deteriorate significantly. Having prepared all the logs in this way, they are laid out on four sides of the foundation so that the desired log can always be selected. It would not be amiss to recall that the length of the logs should take into account the connection of the corners and, accordingly, should be greater than the length of the log house wall.
The cutting of walls begins with the installation of a frame crown. The first (flat) crown is made of thicker logs, hewn into two edges: one on the inside, the other on the side with which the log will be placed on the foundation. A waterproofing consisting of two layers of roofing felt or roofing felt must be laid between the flashing logs and the foundation. In addition, for possible future replacement of the rotten log of the flashing end, it is laid on a wooden pad 50-60 mm thick and 150 mm wide, impregnated with an antiseptic compound or hot bitumen. An even layer of tow, moss, mineral felt or other material chosen to seal the joints between the logs is laid out on the lining. The lower sides of the crown are cut evenly, and sometimes planed, to ensure a tight fit of the log to the gasket.
The edge width must be at least 15 cm so that the log rests tightly and stably on the foundation. The first crown is laid strictly according to the level. When installing the flashing, you should choose a method for angular connection of logs and, if a partition is adjacent to the outer wall, then you need to provide cuttings for it.