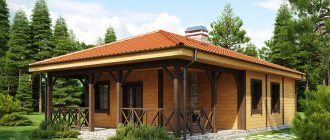
Log bathhouse in paw
“A paw is the end of a log that has been processed into five edges..., or a wife when you need to take time off for an overnight fishing trip” (author)
Hello to all blog visitors!
A log house in the paw is also called a “clean corner” and “a log house with corners without residues.” People quite aptly give images of technology in the corners of a house or a bathhouse chopped with an ax. It is the corners that are the most difficult process, requiring careful adjustment.
Even small deviations of the cutting in the paw create consequences, the most serious of which are the blowing of the corners and the violation of their verticality (i.e. the bathhouse will be lopsided). We will leave detailed questions about how to cut a log house to people who are professionally trained, and the topic of today’s conversation is insulating the corners of a log house in the paw.
Features of interior decoration of wooden houses
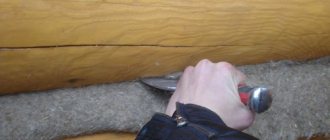
Insulation of corners must begin with caulking. Caulking means driving insulation material into the inter-crown grooves; for this you will need a hammer and a special chisel with a width of at least 5 cm and a thickness of no more than 5 mm. For caulking corners, several types of materials can be used, both traditional and recently available on the market.
- Moss. Perhaps the oldest material for insulating wooden houses, unlike tow, birds do not pull it out and it has antiseptic properties, it does not rot and fungi do not form in it. In addition, moss is very durable; there have been cases that when dismantling wooden houses that were cut down at least 70 years ago, the moss between the crowns did not rot or turn black, and it could be used to re-insulate a new house. Moss is able to absorb moisture and dry quickly; it does not contain any components hazardous to health. In addition, moss does not cost much, and if desired, you can even collect it in the forest yourself.
- Linen or jute. High-quality flax or jute, like moss, dries quickly when absorbing moisture and prevents harmful fungi from spreading. It is easy to use, comes most often in the form of strips, unlike moss, it does not crumble, and is excellent for assembling and insulating log houses.
- Lnovatin. Modern domestic thermal insulation material. It is made from short flax fibers, flax fiber tows and jute. Just like jute, it comes in the form of strips of different widths and thicknesses. Quickly releases moisture, is not susceptible to rotting and fungus, and is not affected by moths.
To caulk corners, you should never use insulation made from mineral wool, basalt wool, or fiberglass, since insulation materials made from these materials absorb moisture well and are not able to quickly release it and dry. If these materials are used, moisture will begin to accumulate in the corners, fungus will develop and the log house will begin to rot in the inter-crown grooves.
https://www.youtube.com/watch?v=jfBPFXR1q8s
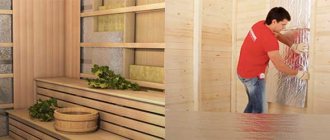
For better insulation of the log house, the corners are additionally insulated and sewn up outside and inside the log house. Before starting external insulation, the corner of the log house is leveled using a chainsaw. After this, the corner is treated with protective antiseptics to protect against fungus and mold, as well as for fire protection. After this, four vertical guide posts are mounted on the corner of the log house; to avoid hanging corners, the guides must be mounted on sliding fasteners.
Galvanized metal profiles or dry wooden blocks treated with antiseptics are used as guides. After this, linen or jute insulation is placed in the cavity between the guides along the entire length of the corner, after which a windproof membrane is mounted on the corner, all joints of the windbreak and the frame are carefully glued using double-sided adhesive tape.
After insulation, the outer corners are sewn up. Most often, imitation timber and logs, as well as dry planed boards, are used to fill corners; less often, unplaned boards, metal or vinyl siding are used.
Our company carries out the following types of work on finishing corners in log houses and bathhouses:
- Caulking of corners in log houses cut into bowls and paws, in log houses made of timber
- Insulation of corners
- Sealing and painting of external and internal corners in log houses with boards, clapboards, imitation timber and logs
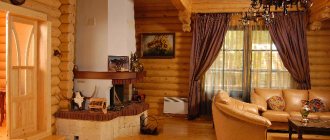
Building houses from wood will always be popular. This is due to the unique properties of the material, both operational and aesthetic. But when carrying out construction work with your own hands, you need to take into account many nuances that will affect the durability of the walls and the entire building. One of the issues that needs to be resolved will be the interior decoration of a wooden house.
Finishing features
Do-it-yourself finishing of a wooden house from the inside should be done only after careful study of the technology and methods. It is better to cover the walls with materials that allow air to pass through well.
You can also use materials that are completely sealed, but in this case the walls of the house will stop breathing. The same rule should be taken into account when exterior finishing and insulation. If the wall cladding material does not allow air to pass through, a greenhouse effect is created in the room.
In this case, to ensure a normal microclimate, a forced ventilation device will be required. Such activities require additional financial investments.
Also, the interior decoration of a wooden building with your own hands should be made from relatively light materials. In this case, finishing work from the inside will not have a strong impact on the walls and foundations (the load on them will not increase significantly).
When to start
Finishing of a wooden frame can be done only after its active shrinkage has been completed. If we are talking about an old house, then proceed without fear. If the walls were built recently, it is necessary to take into account the material from which they are built:
- laminated veneer lumber - after 3-4 months;
- ordinary timber and logs - at least after 1 year.
Geometry of the house before and after shrinkage
The exact rate of completion of shrinkage depends on the climatic characteristics of the area. Air humidity and average temperature have a strong influence. It is allowed to begin finishing the internal walls made of timber and logs only after they have been caulked. Do-it-yourself work is carried out in two stages:
- The first caulking of the walls must be carried out a few weeks after the walls are assembled;
- the second is done after 6-8 months.
To caulk the walls, you will need to prepare sealing and heat-insulating material. Jute or tow is used as it. Sometimes moss can be used. Work must be carried out simultaneously from the outside and from the inside. They start caulking from the bottom. Having insulated the crown on one side, you must immediately move to the other side. Otherwise, the walls may warp.
After completion of the insulation work, the building is raised a few centimeters. Over time, the inter-crown material will become denser and the height will become the same. It is precisely due to the tight fit of jute or tow to the logs (beams) that drafts are prevented and thermal insulation performance is increased.
Caulking at home using a special cord
Read more about this in a special article about caulking wooden walls.
After the second caulking, it is necessary to periodically measure the height of the walls. If the measurement results do not change within a couple of months, the shrinkage process has stopped. In this case, you can start finishing it yourself.
Before starting work, you need to decide whether it makes sense to line the walls from the inside. If they are folded neatly and the inter-crown insulation does not protrude from the joints, sheathing is not required. It would be cheaper and better to use paint and varnish products.
If the walls are uneven and the caulking seam is unattractive, you should think about finishing. Regardless of what materials are used, it is necessary to protect the wood from fungus and mold. For this purpose, antiseptic compounds are used.
Protective impregnations for wood
Fire retardants are used as additional impregnation; they will increase the material’s resistance to fire.
Finish options
Do-it-yourself finishing of a wooden house can be done in the following ways:
- clapboard (various shapes);
- wall panels;
- plasterboard.
For all materials, you will need to make a frame along the surface of the walls. It is best to make it from wood. It is also possible to mount without a frame. But in this case, it is necessary to carefully level the base and eliminate all protruding elements. It is worth sheathing on the frame for the following reasons:
- there is no need to level the base;
- providing clearance for air circulation and drying of walls;
- the ability to lay thermal insulation material;
- You can hide the wiring.
The disadvantages of this method include the likelihood that insects or rodents will settle in the gap between the wall and the sheathing. In this case, it will be quite difficult to get rid of unwanted guests.
Cladding a house made of wood with your own hands should be done with a small gap between the ceiling. It is necessary to level out various deformations and shrinkages. The width is assumed to be 2-4 cm. It is easy to close the space with a ceiling plinth.
We suggest you read: Is it possible to go to the bathhouse with a runny nose?
Cladding
Wall decoration in this case has the most varied appearance.
Application of lining with decorative impregnation
You can use material of different widths, from different types of wood. There are also types of lining depending on the transverse profile:
- standard;
- blockhouse;
- softline;
- landhouse;
- American;
- and so on..
Types of lining
Attaching the finish to the wall surface with your own hands is done in several ways:
- on nails in the face (now used less and less due to aesthetic reasons);
- on nails or screws at an angle;
- on clasps.
The last two methods are quite labor-intensive. The fasteners are nailed so that there is no damage to the front surface of the lining. Instead of nails and screws, a construction stapler with staples is also used. In this case, staples with long legs and a narrow back are required. Elements for fastening are made of stainless steel.
Ways to fasten the lining
The lining is made of wood, so just like a wall, it can shrink. It is better to buy chamber-drying material, but if this is not possible, the following points must be taken into account:
- Over time, natural drying planks dry out and gaps appear between the finishing elements;
- you can leave the surface as it is;
- for aesthetic reasons, you can remove the lining and re-nail it;
- during the initial fastening, it is necessary to take into account that the cladding will have to be removed; it is important to choose what will be more convenient to work with: nails or self-tapping screws.
When removing material from the base, you must be careful to prevent damage to the walls.
We recommend that you read the detailed article about finishing a house with clapboard.
How to properly close the corners of a log house when insulating the log house in a bowl or in a paw? Improper execution of this stage of work will lead to a lack of living comfort (drafts, heat loss, dampness, etc.).
The process is carried out immediately after the log house is ready or at the time of construction. The “bowl” type retains heat better compared to the “claw” type, which is more susceptible to cold and dampness.
How to seal cracks with caulk
Caulking effectively insulates the house and closes the resulting cracks, reliably blocking the access of cold to the room. Moss and tow are traditional materials for insulating a wooden house and for sealing cracks, which are environmentally friendly and safe. They will not disturb the naturalness of the wood and the aesthetics of the structure.
Before use, take wet moss and dry it completely, and then soak it in water half an hour before starting work. Then the water is drained, the moss is squeezed out and rolled into rolls. The rollers are placed in the crown joints, crevices and cracks, compacted with a hammer or mallet and left to dry for three days. After drying, excess material is trimmed.
Instead of moss, you can use tow or jute fiber, which is placed in joints and cracks. Tow, if desired, is filled with plaster or cement or left in its pure form. The quality of the caulk can be checked with a nail, knife or sharp awl. The product is stuck between logs or beams. It shouldn't go right through! Read more about caulking a wooden house here.
Corner of the house. Corners of a wooden house
Grinding the corners of the frame outside and inside is always carried out before starting other work in order to prevent freezing of the wood, interaction with moisture and rotting. During the treatment, the remaining bark is removed and the cracks are filled. The equipment used is a machine with petal attachments and a grinder.
The process begins from the edges, moving towards the joints. Personal protective equipment is required due to the large amount of dust. After completing the work, the log house is left for a day to dry. A simple finishing of the internal corners of the log house consists of installing a pair of vertical edged polished boards. They must be tightly closed to avoid a gap, resulting in an even vertical angle.
What the appearance of a wooden house will be, first of all, depends on its decoration.
Many owners of wooden buildings prefer to sheathe the house with a variety of finishing materials, which at the same time decorate, insulate and protect wooden walls from adverse factors.
However, the cladding of a log house has some difficulties, the reason for which is the corner joints of the log house. The corners interfere with the installation of the sheathing, without which it is impossible to frame the house.
Finishing the corners of a wooden house outside and inside the room causes the greatest difficulty when carrying out finishing work. How to properly finish corner joints, and how to sheathe corners without damaging the wooden structure? We will talk about this in the article.
The finishing of the corners of the log house, as well as the entire house, begins after the initial shrinkage process, about a year after construction.
Directly finishing the corners inside and outside a wooden house can be done after performing the following work:
- grinding;
- protective treatment;
- insulation.
Grinding
Sanding a log house is designed to strip the logs of bark, remove small cracks, remove blue stains and prepare the house for protective treatment, which should be done on the ends and joints of the log house immediately after sanding.
Grinding corners is usually done manually with a chisel, since no tool is capable of sanding corner joints as well as can be done by hand.
Protective treatment of wood is carried out no later than 24 hours after sanding. It is necessary to carefully treat the internal and external corners of the house with means that protect the wood from moisture, compounds that prevent rotting processes, as well as fire retardants.
If the treatment is carried out with a product that combines all types of protection, one layer is applied. If three different compositions are purchased, it is necessary to treat the wood in the following sequence: moisture protective, biological agent and fire retardant. Each layer is applied with your own tool and only after the previous one has completely dried.
Insulation
Corner joints are the most unprotected place in a log house, through which cold penetrates into the house. To avoid heat loss, the corners must be carefully caulked.
Typically, the corners of a log house, as well as the entire house, are caulked with natural materials: tow, jute, linen. Instead of caulking, you can use a modern insulation method - sealing the seams with sealant.
If in the future it is planned to cover the outside of a house made of timber with clapboard, siding or other material, you can adopt the following insulation method: the corner is completely covered with foil, the shiny side out, the foil can also be secured with a furniture stapler.
The appearance of the corners is not very presentable, but this does not matter, because the top of the house will be covered with decorative cladding, which will completely hide the insulation.
Other possible options for insulating external corners:
- basalt insulation;
- fiberglass;
- polystyrene foam;
- foamed polyethylene.
Externally, corners cannot be insulated using polyurethane foam, which accumulates moisture and contributes to dampening of the wood.
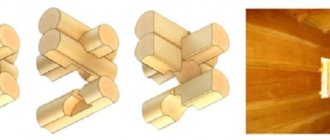
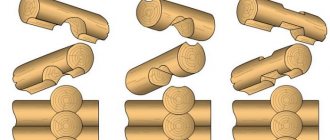
Regardless of what kind of lumber, timber or logs the house is made of, there are two main ways to connect corners:
- “into the bowl”, after the junction there is a certain piece of log;
- “in the paw”, beams or logs are cut without leaving any residue.
When using this method of cutting corners, a very beautiful form of joint is obtained, which can be decorated in an original way, for example, by painting different elements of the log with contrasting colors.
With a corner connection without any residue, insulation becomes of particular importance, since in this option, the corner remains unprotected and, in the absence of good insulation, allows the cold to pass through.
Typically, this method of cutting a log house is used if the cladding of the log house is planned in the future. Closed corners, chopped without leaving any residue, become warmer and more airtight.
However, if you cladding a log house that has not undergone complete shrinkage, the cladding may become deformed. At the same time, corners should not be left open for a long time. The ends of logs can crack under the influence of precipitation and sunlight.
A board nailed in this way will not interfere with the natural shrinkage of the house. If over time the length of the slot turns out to be insufficient, you can unscrew the screw and screw it again to the top point.
After the shrinkage processes are completed, the corners can be sheathed with clapboard or siding. Cladding corner joints chopped into a paw does not cause any particular difficulty, since the corner is cut without leaving any residue, it will not interfere with making the sheathing in the usual way.
In another way, this angle is called “warm”, and this is no coincidence. With this type of cutting, the corners allow less cold to pass through, making the house warmer.
But from the outside of the building, the logs protrude outward; often the ends are of unequal length, which does not allow the frame to be installed correctly.
We suggest you read: Is it possible to fill a wooden floor in a house?
The question arises: how to sheathe the corners of a log house in this case?
In some sources you can find advice: gradually cut down the protruding structural elements, and fasten them with staples to strengthen them. However, as a result of sawing off the ends, which are elements of the supporting structure and give strength to the house, the building may lose stability and weaken.
If pins were not installed during construction, then for a weakened structure, even the slightest effort is fraught with destruction. Therefore, you should think carefully before making such a decision.
The cladding of a log house must be done in such a way as to keep all corners intact. When installing the sheathing, it is necessary that the distance from the wall of the house corresponds to the length of the protruding elements.
If the ends are of different lengths, they are filed so that they form an even line. It is quite possible that in this case the frame will recede greatly from the wall, then the dimensions will have to be equalized using thick bars with a section of 50x50 mm.
You can use an alternative option, which involves mounting the frame separately for the wall and separately for the corner.
In this case, the corner frame is an independent structural element and is made in four planes.
The presence of additional corner elements will increase the consumption of material, but in its finished form such a structure looks very impressive.
Finishing the internal, as well as external corners of the log house, begins with the obligatory grinding and caulking of the joints. Often, especially if the corners are cut “into a bowl,” they look very beautiful, and you don’t want to hide them under the trim, but on the contrary, you want to emphasize their beauty.
To highlight the smooth outlines of the lines, it is enough to place a jute or linen rope on top of the caulk. Internal corners connected in a claw fashion do not look as impressive, but they can also be beautifully decorated with decorative rope. For the same purpose, you can use contrasting paints, covering the joints and ends of the logs with them.
If there are wide gaps at the corner joints of the logs that are unlikely to be closed with rope, you can decorate the corner using two edged polished boards. They need to be tightly connected to each other so that there are no gaps and an even vertical angle is obtained.
You can also cover the corner joint with a single board installed vertically at a 45-degree angle to both walls. But such finishing is used much less frequently.
As for finishing the internal corners of a log house, it is not particularly difficult. A house made of timber has flat walls with even corners, which can be sheathed with any material: clapboard, block house, imitation timber.
The corner connections of a log house are the most difficult areas and always cause difficulties when processed by non-professional craftsmen. Not only the appearance of the house, but also how comfortable its residents will feel depends on the quality of their finishing.
If you want your wooden house to be warm, cozy and beautiful, trust its finishing. There are no impossible tasks for our specialists; we can easily cope with the most complex finishing and implement any interior solutions.
Our company employs not only experienced craftsmen, but also qualified designers who will offer you various design options for decorating your home.
You can contact us by phone or send us a message. You will find all our coordinates in the “Contacts” section.
What the appearance of a wooden house will be, first of all, depends on its decoration. Many owners of wooden buildings prefer to sheathe the house with a variety of finishing materials, which at the same time decorate, insulate and protect wooden walls from adverse factors.
However, the cladding of a log house has some difficulties, the reason for which is the corner joints of the log house. The corners interfere with the installation of the sheathing, without which it is impossible to frame the house. Finishing the corners of a wooden house outside and inside the room causes the greatest difficulty when carrying out finishing work.
When to start
How to seal seams using acrylic sealants?
The “warm joint” method of sealing cracks and joints is also growing in popularity; sealants based on acrylic resin are used for it. These insulation materials withstand the effects of all factors that cause harm to a wooden house. The advantage of acrylic sealants is their elasticity, which allows the material to compress and expand depending on the situation. Due to the flexibility of the sealant, insulation of a wooden house is carried out only once, because the service life of the material is very long. The beautiful color of the sealant (beige or cream) will harmonize perfectly with the wood of the log house. To work on sealing cracks and seams you will need to purchase and prepare:
- acrylic sealant;
- stapler with staples;
- mounting gun;
- polyurethane sealing cord;
- scissors;
- roulette;
- putty knife;
- water spray;
- clean soft cloth.
If you plan to insulate the seams of the logs of a wooden house, which were previously caulked with moss or tow, then you will first need to remove all the old caulking. Next, you will need to lay a polyurethane cord in each horizontal and vertical seam to a depth of 5 mm in its center. It is needed in order to reduce the consumption of sealant and make its application more accurate. The cord is laid along the seam line and secured between the logs using staplers every 12-15 cm. After this, the seams are sealed with a mounting gun filled with acrylic sealant. Acrylic is carefully applied to the seam along its entire length. The seam can then be smoothed using a spatula. For convenience, the seam is moistened with water from a spray bottle. If sealant gets on the top and bottom of the logs, it can be easily removed from them with a damp cloth. The result is a neat and beautiful seam. Sealing the seams with rolled tow, rope cord or acrylic sealants will guarantee that a wooden house will delight its owners with warmth, reliability and a beautiful appearance.
The second stage of insulating the corners of the log house in the paw
“A paw is the end of a log that has been processed into five edges..., or a wife when you need to take time off for an overnight fishing trip” (author)
Hello to all blog visitors!
A log house in the paw is also called a “clean corner” and “a log house with corners without residues.” People quite aptly give images of technology in the corners of a house or a bathhouse chopped with an ax. It is the corners that are the most difficult process, requiring careful adjustment.
Even small deviations of the cutting in the paw create consequences, the most serious of which are the blowing of the corners and the violation of their verticality (i.e. the bathhouse will be lopsided). We will leave detailed questions about how to cut a log house to people who are professionally trained, and the topic of today’s conversation is insulating the corners of a log house in the paw.
Pros:
- A simpler process (than other methods) of cutting grooves;
- The ability to use timber along the entire length (that’s why they say “log house without residues”).
Minuses:
- The corners of a log house always require additional insulation;
- The structure is considered not as stable as, for example, when cutting into a bowl.
However, it is distinguished by a more harmonious shape, due to the absence of the ends of the logs protruding at the corners. For this reason, it is called a “clean corner”.
“It is desirable that the logs for construction be of the same caliber and the thicker the better - there will be fewer connecting grooves. And besides, a paw with a small cross-section freezes faster.”
If a worker who undertakes to build a log house does not handle the hatchet skillfully, gaps on the paw are inevitable and the assembly of the corners itself will have negative consequences. After some time, the tree will dry out, the house will shrink and warp, or even...
The only budget option is to notice in time, insert wedges (cut from wood of the same species) and caulk the cracked areas. This does not guarantee a beautiful exterior, but it will help resist drafts and dampness.
“For accuracy, cut the paw according to the template; if during assembly, something went crooked and with obvious “inconsistencies” - replace the elements. It's stupid to hope for chance. If you don’t react right away, you’ll end up with cracks and distortions, for which you’ll pay with money and nerves.”
Cutting corners with a chainsaw
“Modern technology” of chopping with the paw. Very often, today's “masters” cut their paws with a chainsaw. And here there is a negative point that not many people know about. The saw cuts off the densest “old” wood on four sides.
What remains is the core, which is always looser and therefore less durable. In addition, a good carpenter’s ax in the hands of experienced craftsmen “crushes” the rings of wood during cutting, while a chainsaw makes the cut smooth, while opening the pores of the wood.
The result is that the log sections going into the paw lock are open to the atmosphere and are subject to faster rotting. Conclusion: when choosing an ax or a saw, choose an ax. But it’s much more difficult to do the job with this “flying” tool; it will take a long time to get used to it... A chainsaw is without a doubt easier and faster.
Let's move on to the topic of how to insulate a log house, or more precisely, its corners. Without delving into the physics of the processes, I’ll say right away that proper insulation is always done from the outside, that is, from the outside. Moreover, it doesn’t matter what the house is built from (wood, brick, types of concrete, etc.). Any experienced heating engineer will confirm this. Let's move on to reviewing the materials.
Traditional - jute or linen, tow, moss. What to choose? Canvas based on jute or flax in the form of a twisted ribbon began to be used relatively recently. It is easy to install, and its twisted structure ensures strength. In addition, the seam looks aesthetically pleasing.
Choose wisely
Jute or linen fabric. When purchasing, look for insulation made from primary natural fibers of jute and flax. “Which fabric is considered natural? The one that is obtained after primary processing of plants and without third-party additives.”
We invite you to familiarize yourself with the Bathhouse made of bricks, interior decoration
We noticed that the fibers are very short or contain thread trimmings of a different color - a product made from recycled materials (usually recycled sack containers or rags). Don’t be shy to ask for a certificate, which should indicate the raw materials, the presence of impurities and additives, and most importantly, their proportions (in %).
For information: all jute and linen fabrics are produced using the same technology, which, by and large, has not changed for the last hundred years. Equipment and costs are also comparable.
Therefore, a reduction in the price of finished products is possible due to low-quality raw materials (for example, recycled) or due to a decrease in the total mass of raw materials (this means lower density, strength and durability).
“When there are several options for purchasing jute or linen, do not try to buy cheaper. A low price is usually a sign of unnaturalness or low quality.”
Moss. Moss insulation is perhaps the oldest. The ancestors noticed that, unlike tow, birds do not pluck it for nests. In addition, it is a natural antiseptic, “not friendly” with fungus, does not rot, and rodents and insects do not revere it. But there are three "Don'ts".
- Not all moss is applicable. Preference is given to long-fiber flax (red flax, cuckoo flax, sphagnum).
- Not all builders know how to lay correctly. It is better to attract those who work with him constantly.
- Fragility. Moss dries out over time, turning into dust of little use.
The ideal option is for experienced builders to bring the “necessary” moss and carry out the installation as needed.
“Don’t forget, after a year it needs to be caulked again. And if other builders come, make sure that they tamp down the moss, and not just pull out the excess that sticks out.”
By the way, it is better not to use moss to insulate the corners of a bathhouse - it easily ignites from high temperatures. Fire-resistant impregnations are not recommended for moss - they reduce its physical qualities. But if you look from the other side, from time immemorial in Rus' bathhouses have been built and insulated this way.
Be sure to impregnate the remaining popular folk insulation materials, namely jute and linen and tow, with fire retardant compounds.
To complete the description of popular natural materials, I will name their main advantages:
- The ability to absorb moisture and dry quickly, depending on the humidity outside and inside the house, i.e. they “breathe” rather than seal;
- Do not form static electrical charges;
- They do not contain any components hazardous to health.
I’ll say right away that materials with a closed porous structure (foam plastic, polystyrene foam, penoplex, etc.), sprayed polyurethane foams (including polyurethane foam), synthetic sealants (acrylic, silicone, etc.)
), foamed polyurethane foams (such as foam rubber) are completely unsuitable for insulating the corners of a log house. Why? Because they are absolute vapor barriers.
Moisture emanating from a house or bathhouse, accumulating in the thickness of the insulation, causes the seam itself to freeze.
Or another case. There is a so-called “warm seam” offered by some sellers as a reliable option.
However, if we follow the technology of its installation, we will end up with hermetically sealed seams and the absence of natural ventilation.
Inside the heat-insulating tape, moisture vapor from inside the house collects, which means you can expect condensation to appear at the joints and accelerated rotting of the corners. This method is good for insulating double-glazed windows in a concrete house, but not for the corner of a log house.
But practical Finns use a special type of tow, made like double-sided tape. Tow can “play” with compression and expansion in the range from 5 to 15 mm. It allows vapor to pass through, but does not absorb moisture. And there is no need to re-caulk.
There are also well-proven new products made on the basis of jute (ThermoJUTE) and flax (ThermoFLEN). These are specially developed products for insulating wooden buildings and the reviews about them are quite good.
One of the radical ways. The corner is completely covered with foil insulation (foil facing out), or nailed with a furniture stapler. The top is covered with wooden paneling for decoration. Helps. But it looks alien and there is no vapor barrier.
Perhaps that's all. I hope the information will be of benefit to someone.
An anecdote from everyday life: “A wife is washing dishes, seeing a leaking faucet in the kitchen, calls her husband. - Pashka, come here, change the gasket for me! The husband mutters fiercely - well, you’re completely lazy..."
Good luck and dry corners to your log houses! Bye! Bye!
Wisdom Quote: He who laughs is not angry, because to laugh means to forgive.
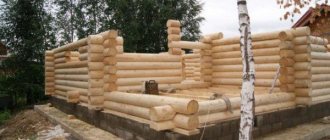
A log house is a constantly changing structure. The greatest changes occur in the first year after construction - the wall shrinks by about 8%.
But in the future, uneven drying or periodic expansion of the wood leads to the formation of gaps between the logs, changes in the height and other dimensions of the wall.
Such a structure must be insulated reliably, for a long time. How to do it?
If there are through gaps in the wall, which is typical for a log house, then there is no point in talking about heat preservation in a wooden house. Air permeability should not exceed standard values. You can reduce it in two ways:
- Caulk the cracks. Sealing material is placed between the logs, both during construction and after cracks appear.
- By placing a continuous air barrier made of insulating material on the wall. We will consider how best to insulate further.
To eliminate cracks in a wooden frame and seal the crowns, natural materials are usually used. They go well with wood and have been known to builders for a long time.
- Jute.
- Linen.
- Hemp (Industrial hemp).
What usually grows in areas where wooden houses are built is also not outdated:
- sphangum moss;
- cuckoo flax;
The shape of insulating sealing materials for a log house can vary as follows:
- Fibrous - for caulking cracks that appear over time.
- Tape - for laying between logs during construction.
When building a log house, strips of sealant are laid on top of an already installed log along its entire length.
Moreover, the width of the material should be such that it protrudes slightly on both sides of the log.
Then the edges of the material are wrapped and hammered between the logs both outside and inside, thereby achieving better compaction of all irregularities.
During subsequent caulking, the fibrous material should be evenly distributed along the area intended for compaction. Local packing of a large amount of material can lead to distortion of the structure and the appearance of cracks in other places. A special tool is used - a caulk. The material is driven in on both sides of the wall.
Protection of log seams
How and why a longitudinal groove is cut out
All logs of the log house must have longitudinal grooves corresponding to the ridges of the bottom of the logs that will be laid on top. These grooves are needed to preserve heat in the log house, and to prevent the log house from being blown by the wind. According to GOST, longitudinal grooves must have a width no less than 0.5 of the log diameter.
The choice of the width of the longitudinal groove depends on the minimum air temperatures and is assigned:
- At - 40⁰С from 140 mm or more
- At - 30⁰С from 120 mm or more
- At - 20⁰С from 100 mm or more
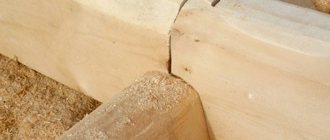
The triangle groove shape is easy to manufacture, but does not provide a tight and durable joint. It is almost impossible to densely fill a triangular cavity with tow or jute, and during operation condensation accumulates there, insects, mold and mildew grow there. Open wood capillaries take water from the insulation when it soaks. Due to excess moisture, logs have low resistance to rotting. The thermal protection of such a log house is unimportant. Another disadvantage is constructive. The greatest load on the log falls precisely on the top of the groove triangle, in the place where the section is weakened, the groove can crack and open, and cracks will appear along the inter-crown joints.
The only advantage of the “triangular cut” is speed. It is only suitable for log houses that will not be heated, for various warehouses and outbuildings. For a residential log house, such a longitudinal groove is not suitable; it is considered rough and cold.
The better the groove follows the shape of the ridge of the log laid in the bottom row, the more difficult it is to fit, and the warmer and denser it is.
What happens if you don't close the corners
If you ignore the stage of insulating the corners of the log house, in addition to the lack of comfort during your stay, there is guaranteed to be a distortion of the shape of the structure, which will become askew over time, dampness and elements of rotting wood will appear. What happens if you don't close the corners from the outside? External insulation allows you to more effectively maintain comfort in the house compared to internal insulation, and therefore is more important.
If you cut a corner of logs or beams without sufficient experience, then there is a high probability of defects appearing after construction, in particular large gaps during shrinkage. The situation is corrected with the help of wedges. They are cut from the same type of wood as the log house. Errors in sealing corners will also lead to serious problems.
For external insulation, you cannot use polyurethane foam, which will accumulate moisture over time and cause dampness in the wood. When choosing sealants, you should not use silicone or acrylic types due to the high likelihood of peeling or cracking. You should pay close attention to the internal and especially external corners, since they become the paths for cold penetration if the insulation is improper.
Insulation of a wooden house using Warm seam technology
Types of cracks
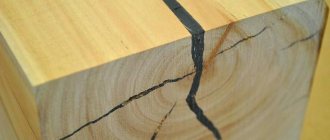
Longitudinal cracks and cracks form on a beam or log, since the tree has a fibrous structure. But in rare cases, longitudinal defects also form due to overload or wood rotting. With this problem, the affected areas need to be replaced. Longitudinal cracks can be eliminated independently using easy methods.
Longitudinal cracks in structure and direction are of the following types:
- Straight lines coincide with the axis of a log or timber;
- Spiral or uneven are not aligned with the axis;
- Segmental - uneven defects with a fiber transition.
You can seal gaps and cracks using polyurethane foam, tow and moss, putty or sealant, or homemade compounds, regardless of the type of defect. Note that it is better not to use polyurethane foam and silicone for a wooden house, since synthetic products violate the environmental friendliness and safety of wood. After such treatment, the log or timber will not be able to “breathe”. In addition, such compositions often emit a harmful, toxic odor. Let's take a closer look at how and how to seal cracks in a wooden house.