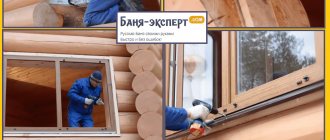
Building a house with your own hands is not only a difficult task, but at the same time it instills pride in the result of your work when you receive guests in it. To make a log house from solid wood, you need to have some experience, which many do not have.
For these people, a material was invented that has all the properties of wood, but is more convenient for construction work: timber. From it, the process of building a house becomes accessible to almost everyone if they have the desire and effort.
Construction of a log house
Key stages of construction from profiled timber logs
Do-it-yourself construction of log cabins is a very complex and labor-intensive process that cannot be accomplished without special skills. The first stage of work where difficulties are encountered is the choice of material. The profiled bursa must have a cross-section of at least 200 mm. But if you are building a 7*7 log house, which will be used only in the summer, you can take material with a smaller cross-section.
Do not forget that when assembling it yourself, you should take into account shrinkage, which will be from 10 to 15 cm. We will divide the process of assembling a log house from 7*7 profiled timber into five parts.
Process:
- Drawing up a diagram, design.
- Pouring the foundation.
- Assembly.
- Roofing.
- Internal and external works.
Main processes
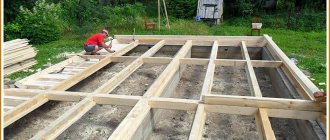
Before you start assembling, draw up a project for your future home. After this, you should start pouring the foundation. For construction you will need wood. The type of foundation should be chosen based on several criteria, one of which is the height of the groundwater. Since the foundation is the basis of everything, make sure that it is reliable and strong. Assembling a log house from profiled timber with your own hands is a labor-intensive process and not at all easy, since you will spend a lot of effort and time. They begin to build a house made of timber by laying a row that will be located on a leveled foundation. For a 7*7 log house, use only timber that has been treated with an antiseptic. After the first row has been laid, you can begin installing the floor joists, which are laid only edgewise.
More logs can be attached to the foundation and installed to the walls of the log house. For best results, leave them indoors for a few days to get used to the temperature. You should also place one joist on two opposite walls. Next, we stretch a nylon thread between them. Its purpose is to indicate where the remaining logs will be located.
But that's not all. When assembling a log house from profiled timber, you should note how and where the walls of the log house will go. We retreat 2 cm from them, after which we place the first row of boards along the line. One board should be prepared for each of the logs. If it turns out that there are gaps between the wall and the floor, you can disguise them with baseboards or staples. A rough floor should be covered with thermal insulation on both sides, and for this we need timber with a cross section of 25*100 mm.
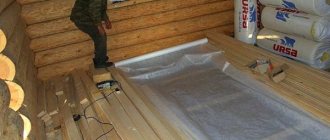
The floor should be laid without displacement. To do this, we first place the first layer on which there will be wood flooring. In this case, it would be wise to use polyethylene as a waterproofing material. At the final stage of installation, lay out the material that will complete the floor.
We build walls
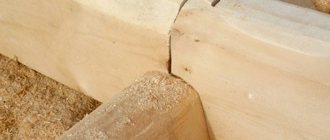
Creating and constructing walls is a very important process that should be carried out with utmost care. We lay out the rows of timber very carefully. Each subsequent one must be fastened with the previous dowel. Thanks to this action, the beam will not move to the side. To install the dowels, you will need to drill holes that will be 40 mm in diameter. This is an ideal indicator for the dowels to easily fit into the hole.
Important: If you set out to build a house for year-round use, do not forget about the sealant. To do this, you will need to cut out a protrusion in one of the beams, and cut out a groove with similar dimensions in the other. Layers of timber can be alternated with grooves and tenons. This structure will make the overall structure more reliable and stronger. You cannot make mistakes in installation, as you will have to disassemble everything and start over.
If the size of a log house made of profiled timber is larger than 7*7, at least one partition should be installed on the first floor. This will be a kind of support for the flooring on the second floor. Finally, when building the walls, you will need to cut out the window openings. Determine the location for the windows and cut out the openings. When drying the material, it is important that they are well ventilated. After shrinking the frame made of profiled timber, you can begin installing windows.
Last work when assembling the log house
This is the final stage of assembly. You only need to insulate the building and do the finishing, as well as roofing work. Once everything is done, construction will be officially considered complete. Mineral wool/glass wool can be used as insulation. Drywall or lining is perfect for interior decoration, but the first option will be much better.
Ready-made timber frame - order or make it yourself?
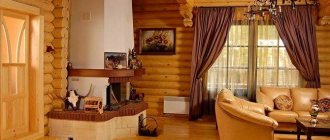
A log house made of profiled timber is an excellent structure with a huge list of advantages. In order for it not to lose its wonderful qualities, it is recommended to order or buy a ready-made building, since when building it yourself, many errors and problems arise, due to which the final version of the home will not be comfortable.
When assembling it yourself, many questions will certainly arise, the answer to which not even every specialist will give. Many people, due to lack of experience, make serious mistakes, and this is a consequence of the error and a violation of the integrity of the structure as a whole. In this case, the good old saying works: “The miser pays twice,” since you have to redo everything, hire a specialist and purchase additional material. To avoid such mistakes, it is common sense to order or buy a ready-made log house from a reputable company.
Laying the first crown of the log house
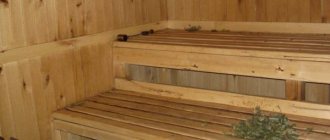
The quality and stability of the entire log bathhouse depends on how well you install the first crown. And you should prepare for this work thoroughly, calculating each step in advance.
Before laying the first, initial piping crown, a layer of waterproofing should be laid on top of the bathhouse foundation. Before doing this, check the surface of the foundation using a level: it must be exactly horizontal. If there is a difference of more than 1 centimeter, level it using concrete mortar.
After this, place the roofing material evenly in several layers coated with each other with mastic. Experts call the following installation technology optimal: 2 layers of roofing felt, laying board, another layer of roofing felt. Connect the beams of the first crown together into half a tree, and in order to prevent possible subsequent shifts of the beams, arrange a hidden tenon.
Next, use steel staples to fasten the casing crown. The staples are driven in from the outside of the beam, and after the construction of the bathhouse frame is completed, they can be removed.
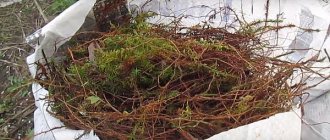
The next step is insulating the trim crown. For this, a layer of flax-jute fiber laid on top of the timber is optimal. The next crown is laid on the insulation layer, and so on, alternating timber and thermal insulation. This will help avoid airflow in possible cracks, and will also play an important role in the subsequent hydro- and vapor barrier of the bathhouse from the inside.
The timber must be selected and prepared in advance so as not to be distracted by small details and shortcomings during the construction process. To install the first crown, you should choose high-quality material, since the integrity of the structure during operation depends on it:
- the timber must be perfectly flat;
- there should be no knots or chips on the surface;
- the main condition is the maximum density of the timber rings; to make such material, the middle part of the tree is taken;
- timber with traces of blue on the surface of the wood is categorically unacceptable not only for the first crown, but also for the entire log house.
The finished timber produced at the factory is usually already processed and completely ready for use, but additional processing will not hurt, especially for the construction of a bathhouse. Thoroughly coat the timber with mastic, which is pre-mixed with the waste. Impregnation based on this composition is perfectly absorbed into wood. The ends of the timber do not need to be processed; they should remain bare and release moisture during drying and shrinkage of the structure.
It is how carefully you process the timber that determines how long the lower crown, and therefore all the walls of your bathhouse, will serve faithfully.
As mentioned above, flax-jute fabric is the most optimal material for providing insulation between the crowns. Now you can buy it at any construction supermarket. This insulation is available in rolls of different widths, depending on the size of the selected log or beam, which greatly simplifies the choice, and it is also very easy to cut into strips according to the selected length. This material is made from natural fibers of jute and flax, the composition is maintained in strict proportions.
During the production process, a fabric of high density and uniform thickness is obtained, in which the fibers are fastened together using special barbed needles.
By laying flax-jute fabric between the beams as insulation during the construction of walls, you will save yourself from the need for additional caulking, and after the shrinkage of the timber is completed, the walls will take the form of a solid monolith. Such a fabric will not unravel due to the loads imparted by the crowns, will provide uniform insulation along the length of the seam, and is resistant to moisture, wind and dust, temperature changes and other climatic disturbances.
Figure 2. Scheme of arranging the foundation with ventilation.
The first step from which the construction of timber begins is laying the foundation. Before carrying out work, a soil analysis is carried out at the construction site, which boils down to geological research related to searching for the level of groundwater and determining the soil composition.
For each type of terrain with a certain soil composition, special types of foundations are provided that will serve for decades, and the presence of groundwater will not have a destructive effect on them. Before laying the foundation for a log house, it is necessary to dig a trench for the future structure.
Reinforcement using reinforcing bars can be done both in the upper part of the foundation and in the lower part. This will give the highest strength to the entire future structure of the log house. Reinforcement is carried out using concrete; if you do it yourself in a concrete mixer, it will not cost as much as if you buy ready-made concrete at a hardware store.
The best option would be to use a concrete mixer installed on the site. This will allow you to independently prepare a concrete solution for reinforcing the foundation, but the quality of the composition will not be as high as that of ready-made concrete. Reinforcement is placed at the bottom of the trench with sand and stones, and then this space is filled with concrete.
Figure 3. Diagram of the reinforcement cage for the foundation.
When using a concrete mixer, it should not be covered in the place where its motor is located, since it requires constantly circulating air to cool it after and during operation. Before the construction of a log house from timber begins, after the foundation is completely installed, it should take from a week to a month for the structure to fully stand.
We invite you to familiarize yourself with: Stove for sauna tents
For a certain type of soil, for example, swampy, it will be necessary to make a spatial frame. Only after this the formwork is created and a concrete solution is poured into it. If the foundation is laid in warm weather, then its surface must be lined with sawdust or other material, for example, moss or roofing felt.
The initial size of the shields is usually taken to be the distance between the center lines of the base. The shields are assembled directly on the ground using special pads. The assembly diagram of the panels for the plinth is shown in Fig. 1. The smooth side of the panels should face the inside of the base.
The foundation base should have special windows for ventilation, which are located at a distance of 15-20 cm from the ground surface. They are located on opposite sides of the base structure, each opposite the other. To create them, you can use asbestos-cement pipes adjacent to the ends of the shields, as shown in Fig. 2. This position of the pipes will prevent the ventilation holes from being filled with concrete mortar.
Figure 4. Methods for connecting timber.
The reinforcement frame of the plinth is located in the upper part, this is shown in Fig. 3, after this the concrete screed is poured. Reinforcing bars should be laid in an overlapping manner, tying them with wire.
Using this method, you can obtain a rigid structure that is firmly connected to the foundation of the future building. When starting to pour the concrete solution into the formwork, you should mark the pouring line at the top on the boards. When the base of the log house is ready, they begin to lay the first crown.
To ensure proper installation of the top trim, two layers of roofing material are laid on the plinth, taking into account the entire perimeter of the structure. To do this, a strip of roofing material is bent lengthwise and then laid on the base. To make the strapping, use smooth beams that are free of cracks, various jumps, and rot.
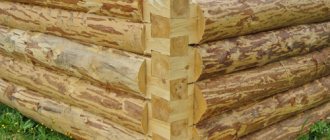
To protect the gaps between the beams from water ingress, chamfer the upper edges, the size of which will be 10x10 mm. The corners of the log house should be connected using the tongue-and-groove method. It is possible to connect the timber with dowels and a main tenon, as shown in Fig. 4 in the form of a diagram. The corners of the initial crown can be connected using the half-tree method, and subsequent rows are fastened with dowels using root tenons. The main tools and materials for construction are:
- beam;
- saw;
- hammer;
- dowels;
- nails.
Figure 5. Different methods of fastening beams and logs.
There may be gaps between the crowns of the beams, so they should be lined with heat-insulating material using caulk. As a heat insulator, they use felt or tow, cut into strips, the width of which is 20 mm less than the width of the timber.
For better drainage of water from the seams running horizontally between the beams, chamfer with a width of 20 to 30 mm is removed. It is possible to reduce the degree of conductivity between the beams by using grooves and stuffing slats in the shape of a triangle.
Using dowels that have a rectangular or round shape, you can join the beams in a vertical position, as shown in Fig. 5. To disinfect all the bars that belong to the first crown, this is done by lubricating each of the bars on all sides. The ends of the beams are left without treatment with the composition.
You should cut curved beams with your own hands by creating small sections of them that fit into window openings and door openings. The oil-treated beams are laid on the base, fastening them with staples. The construction of cobblestone walls can be similar to the process of constructing log walls.
Cobblestone walls have seams that are located in the horizontal direction, which is the main difference between log cabins and log buildings.
Ordering and purchasing - advantages and disadvantages
It is much easier to order a kit or buy a log house from a specialized company than to build a house yourself. This is due to the following reasons:
The specialists you will pay have extensive experience and will cope with the task 100%.- If you don’t know exactly which log house is right for you, you can choose one of the ready-made options. If you have clearly defined what you want, this will be taken into account when developing the project.
- Companies choose only high-quality materials, or order from those companies that have positive reviews. When choosing materials without outside help, you may make a mistake, and all your expenses will be in vain.
- Experienced builders will do everything on time. In addition, development companies provide a guarantee on all built houses.
- Since builders are constantly improving their skills, they use the latest equipment and developments, which significantly improves the quality of construction.
Well, the main advantage of ordering a log house from profiled timber is savings. Indeed, it will be much cheaper for you to buy a ready-made structure or place an order.
If you want to do the construction yourself, it will cost you more for several reasons:
- The material will be purchased from specialized companies. But these same companies purchase timber at a cost several times lower than what they sell.
- Material consumption. Do-it-yourself construction has never been without mistakes. A groove that you cut incorrectly or something else will lead to the purchase of new material. Experienced specialists are unlikely to make such mistakes.
- It is impossible to assemble a log house alone or together, so you will have to hire a team. The handymen who will help you will also have to pay.
Such costs usually exceed the payment for ordering the same log from the company.
Problem 1: Long walls
The problem is that the length of the profiled solid timber is limited by the height and tapering diameter of the trees. As a result, difficulties arise when building walls that are much longer. The obvious way out of this situation is to join the ends of the beam. However, if the two parts of the crown are simply joined together, you will end up with a gap that will expand in the future and let cold into the house.
Solution . Elementary. Today, for the construction of long walls of a wooden house, not joining, but splicing timber is used. It is performed by analogy with corner joints. That is, a root tenon is cut at the end of one beam, and a counter groove is cut at the other. The connection becomes compacted and, as a result, becomes airtight.
Additional advantages when ordering a log house made of profiled timber
The advantages mentioned above are not the last on the list. When ordering or purchasing a ready-made log house, you will save effort and time. Even if you manage to save on materials (which is unlikely), it will take you a lot of time to assemble, and you will also have to wait for the log house made of profiled timber to shrink. Contacting the company is an excellent option if you want to get a house in the shortest possible time and want it to meet all quality parameters.
You will also not be able to do the construction yourself in the winter. But this is not an obstacle for companies that, even in winter, assemble gables, walls and partitions in production workshops. Afterwards, they leave it to shrink and manage to complete both the interior and exterior decoration by the beginning of spring.
Construction from laminated timber has the following advantages:
- The material used is winter wood, and it has a dense structure.
- A log house built in winter has the advantage of freezing moisture from the walls.
- This will ventilate it much better, which will ensure good shrinkage.
Problem 3: Drying at home
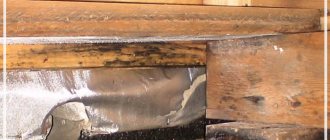
The problem is especially relevant when a wooden house is built from timber with natural moisture for shrinkage. While this shrinkage is taking place, the house must be properly dried. Otherwise, mold may grow in it, shrinkage will occur incorrectly and incompletely, and after moving in and the first heating season, the walls will begin to twist. This problem will entail the others described below.
Solution . To avoid these problems, there are two options. The first is to build from kiln-dried timber on a turnkey basis. The second is to properly dry the house in parallel with the process of the most intense shrinkage. To do this, it is not necessary to use any heating or air-injecting equipment. So, the savings from purchasing cheaper natural moisture timber will literally fly into the atmosphere. All you need to do is to ensure normal natural air circulation in all rooms.
Price
The price for constructing a log house will depend on many factors, which include the quantity and quality of the timber, as well as its cross-section and complexity of construction.
Prices are approximate.
| Manufacturer | 150m2 in rub. | 300 m2 in rub |
| Brus House 53 | 1,290,000 | 3,356,000 |
| WILLOW | 1,060,000 | 3,190,000 |
| SVOD_STROY | 1,155,000 | 3,070,000 |
| BUILD kit-C | 1,240,000 | 3,270,000 |
| THREE builders | 970,000 | 2,500,000 |
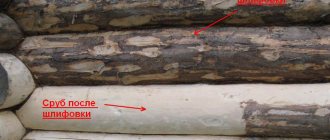
Problem 5. Longitudinal cracks in timber
They appear due to the fact that the wood dries unevenly, and stress is created in it. When they reach their breaking point, cracks form. The wetter the timber was at the time of construction, the more cracks there will be. Much also depends on how well the log house was assembled, how it was dried and shrinked.
Solution . The first method is to cut compensation cuts along the lower or upper edges of the beam. As a result, after installing the frame, these cuts will not be visible from the outside. The stresses in the wood will not be so intense, and if cracks appear, they will appear primarily at the places where they were cut, where they are not visible. The second way to solve the problem with cracks is to seal them using putty, sealant and other means.
Results
Do not forget that you should order kits only from well-known and time-tested companies. Do not forget that different companies have different prices for construction. So, an order from a popular company will be much more expensive than from a less popular company, but the quality of the work will be the same.
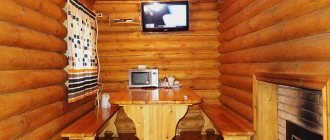
Don’t forget that when choosing a log house, you should carefully inspect it and notice all the details. Before purchasing, study all the characteristics and evaluate the quality. The finished product can be placed and finishing work can begin immediately.
A log house made of profiled timber is good housing for both seasonal and year-round use. All houses made from this material are very beautiful and attract everyone's attention.
Problem 4. Gaps between the rims
When using profiled timber with the correct geometry and following installation technology, this problem is not critical. However, it is still inevitable. The reason is the same shrinkage of the log house, which cannot be ruled out. As a result, gaps may form between the crowns, which during the operation of the home turn into cold bridges.
Solution . Repeated caulking allows you to completely eliminate this problem. To accomplish this, either traditional sealing materials or sealant are used. Re-caulking should begin after the period of most intense shrinkage has ended. That is, a year after the construction of the house.