We design premises
Dimensions of 4x6 allow you to get a little creative when planning bath rooms and their location. In solving this problem, several factors are always taken into account. The first is the number of people simultaneously taking bath procedures. The second is the purpose of the room. Since not everyone likes intense heat and waving a broom that burns the body, the emphasis can be placed on the fact that the washing compartment will be slightly larger in size, and a small steam room will be enough to warm up.
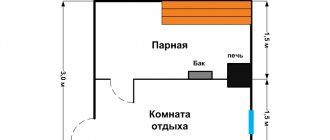
The best option would be a steam room where 2-3 people can stay at the same time. In this case, you can make a spacious washing compartment with a small pool. There will also be enough space left for the dressing room in the 4x6 bathhouse project. The allocated area will accommodate benches with a table. If possible, provide a separate room for the location of the entrance panel for supplying electrical wiring to the bathhouse.
Steam room - the heart of the sauna
The price of arranging a steam room depends on personal preferences
The steam room is the main room in the bathhouse; the entire effect of the procedure depends on its correct design. It has special requirements, which are fully satisfied by a room of 4-5 square meters. meters. The instructions for construction and interior decoration must be strictly followed, otherwise visiting the bathhouse can even become dangerous.
Rules for arranging a steam room:
- Square shape - allows you to fit everything you need for a bath procedure;
- Two people must fit freely, and there must be no obstacles for swinging a broom;
- The threshold is not less than 20 cm;
- The door frame is 150 cm, regardless of the height of the owners. This is necessary to save heat;
- Shelf width from 40 cm;
- The distance from the ceiling to the shelf is at least 1 meter;
- Inside the steam room, the wood is not covered with varnish or paint.
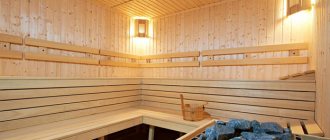
The log steam room is lined with hardwood clapboard; insulating foil can be placed underneath to preserve heat. Boards are used as the floor, under which there is a drainage system - a septic tank. The ceiling height in all rooms is at least 2.1 meters.
Freedom in planning
In this regard, you don’t have to think about centimeters and distribute all the necessary elements of the bathhouse in accordance with regulatory requirements. First, consider the locations of ventilation ducts, water supply and sewerage. The foundation for the bathhouse will be laid first, and all entrances and exits must be located in it.
The internal spaces allow you not to save on square footage, and in addition to the main bath rooms, you can design the location of the vestibule and dressing room. The place to relax will always be warm due to heat transfer from the bathhouse and due to the impossibility of access to cold air from the street. The washing compartment is traditionally located between the dressing room and the steam room. In this case, you can experiment with the arrangement of rooms.
Usually the steam room is located on the far wall from the dressing room. You can also make one wall adjoin the rest room. In such options, the heating device is made remote and controlled from the rest room. In this version of the layout, you need to think in advance about choosing a stove for the bath.
Before starting construction according to a finished plan, consult about its correctness. Still, a bathhouse with dimensions of 6x4 is a permanent structure, and perhaps you will do something wrong. It is advisable to consult about electrical connections and communications.
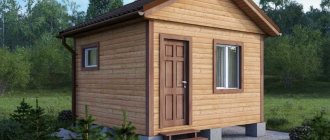
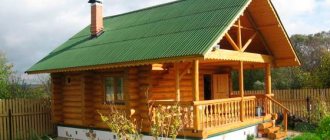
Advantages of a timber bath
Timber is an excellent material for construction
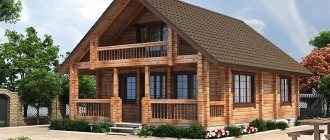
Traditionally, baths were built from logs, but today more and more preference is given to timber as a cheaper material. It has all the properties of natural wood, while the building will be erected in the shortest possible time and at minimal cost.
What are the main advantages of timber:
- Relatively light weight, does not require a powerful foundation. Columnar or ribbon will do;
- It’s easy to assemble with your own hands - you can buy a ready-made project that does not require months of shrinkage. It is erected directly on the site, like a constructor;
- The roof is made of slate, ondulin or metal tiles. Rafters made of timber with a cross section of 150*100 mm are the key to strength and comfort;
- Thanks to the design, it has increased strength;
- Interior finishing can be done almost immediately after the completion of the main construction work.
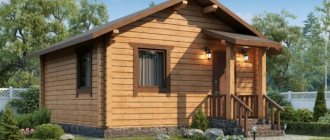
If preference was given to a bathhouse made of profiled timber, then external finishing and caulking will no longer be required. This type of material has an attractive appearance and good adhesion of parts. Cold air will not penetrate inside, even if there is a strong north wind outside.
With age, the middle of the trunk, from which the timber is made, is impregnated with resins, becoming denser and stronger. Due to this, such high technical characteristics appear.
Implementation of the project
Having planned all the work, you need to purchase material, but first prepare a place for building a bathhouse. This is necessary for storage, and the foundation must be installed on a clean site. We will consider the option of building a bathhouse from timber. Therefore, the place must also be dry, so that during storage (albeit not for a long time), mold deposits do not send their tentacles into the structure of the wood.
You need to purchase everything in one batch. To do this, calculate in advance how much material is needed, the number of window blocks, according to the project, roofing material and everything else that will be required in the work.
Foundation for the construction of a bathhouse
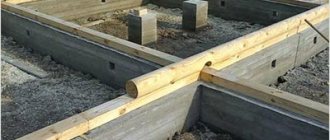
The dimensions and total weight of the 4x6 bath indicate that a permanent foundation is needed. In this case, there is no alternative to a strip foundation. But still, projects with a columnar base are often found. This is acceptable, but it is necessary to mount the supports more often. According to the regulations, they are installed every two meters, and to increase strength, you can reduce the distance. Just don’t place the pillars closer than 1 meter from each other. This can lead to soil collapse and loss of bearing capacity of the foundation.
An option with screw piles is also allowed, but only on the condition that the roof structure will not exert additional load. In this option, the supports can be screwed in every 50–70 cm. This arrangement will give the pile foundation high strength.
At the stage of laying the foundation, all communication channels are carried out. A bathhouse of 4x6 meters will be capital, and building a room of this size for seasonal use is simply stupid. Therefore, when laying the foundation, all lines are drawn. Sleeves for pipelines and sewerage are mounted in a tape or fixed between pile supports. After assembling the log house, all supply lines will need to be insulated. But this work is carried out only after the roof for the bathhouse has been erected.
At this stage, the location of the sauna stove is also modeled. If you decide to use devices that run on electric heating elements for heating, then you don’t need to do anything. They are installed upon completion of construction. The stove-stove is laid on a pre-prepared base. The foundation must be made in advance. The stove is installed after the walls are erected.
Auxiliary rooms located separately inside
In the modern world, a bathhouse is not only a room where you can take water procedures. Often, it is in the bathhouse that you can sit with friends or just relax after a hard day at work. But then you need to take care of arranging additional premises.
Restroom
For a 6x4 bathhouse, you can provide a separate room for relaxation without combining it with the dressing room. This room is quite spacious, so it will occupy ½ of the area of the entire bathhouse. If ventilation allows, then you can install upholstered furniture that will not be afraid of temperature changes and high humidity.
The rest room is equipped with comfortable benches, a large table, and sun loungers.
There are designs for a 6x4 bathhouse, on the basis of which you can equip a kitchen area and a billiard table in the recreation room. But installing a special sauna stove with a fireplace module will give this room a homely feel.
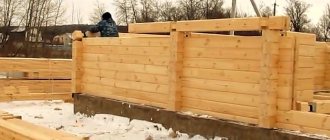
Log masonry
Regardless of what type of base was used, before laying the first crown, the surface is treated with waterproofing compounds. These can be special mastics or rolled materials such as roofing felt or roofing felt. The first crowns of logs also need to be soaked.
Before laying, the material is first adjusted to the dimensions of the base. To do this, the beam is laid out on the surface of the foundation, the connecting points are marked, the “paw” is cut out, and only then can fastening begin. Having laid the material horizontally and connected the corners, they are fixed with a nail connection. After this, all sides are trimmed and the horizontal structure of the structure is checked. A bathhouse made of logs is simpler in terms of fitting the first crowns, but cutting out the joints is more difficult.
Because more often 4x6 baths are made with five walls, laying the partition will have to start from the first crown. First, the installation location is marked. This must be done as accurately as possible so that the finished wall does not protrude in any plane. Seats are marked on both edges. Then, according to the same pattern in which the corners of the beam were connected, a joint is cut into a “paw” on opposite rims. It must be recalled that at the place where the partition passes, it is also necessary to pour a foundation, because it will be a full-fledged wall. It is allowed to combine a strip base and pile supports for internal partitions.
The first crown will be the starting point for laying the log house. The final result will depend on the accuracy of its placement. After fixing all connections, the evenness of the corners and the horizontal fit of the beam are checked. Further work proceeds according to the planned scheme. Each subsequent crown is laid on the previous one, previously laid with jute fiber. This is necessary to insulate the walls of the bathhouse. Having erected a log house under the roof, rafters are installed and roofing work is carried out. Look at the photo report of the construction of a 4 by 6 bathhouse.
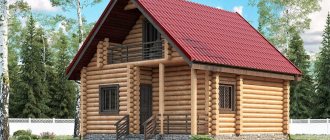
Installation of a roof for a 4x6 bath
You can choose between a single-slope structure and a roof with two slopes. The difference is in aesthetics. The second option looks more impressive. In addition, in a design with two slopes, you can arrange an attic space for storing bath accessories. Provided that the space will be used as a rest room at the design stage, it is necessary to install the strip base. No post supports or screw piles will support the weight of a building with an attic floor.
Finishing work
This process includes not only the lining of the bathhouse (external and internal) but also the installation of door and window blocks. Places are cut out in the wall with an electric saw. Opinions differ on the choice of designs. Some people claim that plastic frames are the best, others say that nothing better than wooden blocks has yet been invented. The choice of windows for the bath is yours. Only when installing it is necessary to follow the rules that there should be no gaps between the block and the window frame. All imperfections are covered with jute fiber or sealed with construction foam.
Final works
Upon completion of construction, finishing work is carried out. The internal space of the bathhouse, 4x6 meters, is quite large, so you will need a lot of effort and resources.
When laying insulation, be sure to cover it with a vapor barrier layer so that moisture does not penetrate into the wood structure. In the steam room, it is necessary to additionally secure a foil material on top of the film to prevent the passage of hot air inside. And the last piece of advice is to correctly calculate the power of the sauna stove. For avid steamers, you will need a device with high output. For those who do not like to “force” themselves with a broom, you can purchase a stove with smaller steam output volumes.
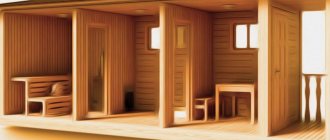
Internal layout in the bathhouse: options
Even a 6x4 bathhouse must be divided into separate zones by internal partitions when planning. This way you can get high-quality heating of the steam room, which will not leave the steam. The dimensions of the bathhouse allow you to arrange a rest room in it and not move it outside the building.
Dressing room as a separate room
This room is considered mandatory. It is small in size and not heated.
The task of the dressing room is to prevent cold air from entering the building.
If you build a modest bathhouse, the dressing room will be presented in the form of a small nook that will have two doors. One leads to the street, and the second leads inside the bathhouse, directly to the washing room. Sometimes the vestibule can be equipped with hooks and a bench on which you can leave your wardrobe. There are also projects according to which you can create a combined vestibule with a rest room. Then the door from the street will immediately lead inside the bathhouse.
If the dimensions of the site allow, then it is worth combining the vestibule with a terrace or veranda; then in the summer the rest room can be equipped in the fresh air, and the internal space can be used for its intended purpose - to steam and wash. But the information from this article will help you understand what types of bathhouse projects are made from rounded logs.
Shower or sink
The steam room is always separated from the room where the water splashes. This is extremely important, because it is more difficult to achieve high-quality heating and vapor tightness for a large room. In addition, with high humidity levels it is quite difficult to tolerate high air temperatures. Since a 6x4 bathhouse is being built, the internal space will allow it to be divided into a shower or a place for washing and a steam room.
Taking into account the needs of the owner, the size of a particular room is selected. If the construction of a bathhouse is necessary for meetings with friends, then 0.5 m2 can be allocated for a shower. But all the remaining space will be reserved for the steam room.
Bath shower size 6x4
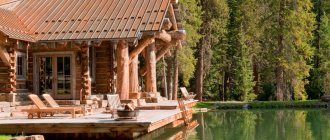
If the construction of a bathhouse is necessary for a family, and also serves not only for relaxation, but also for washing and other household needs, then the washing room should be of a larger area. It will also be interesting to see what a chopped bathhouse looks like.
Steam room or steam room
The heart of any sauna remains the steam room. When arranging it, you must ensure that it is located as far as possible from the street door. It is not equipped with window openings and is small in size.
If the dimensions of the house itself can be taken arbitrarily, then to determine the size of the steam room it is necessary to take into account some points:
- Materials used for cladding and construction.
- Features of the ventilation system arrangement.
- The number of people who will use the steam room.
- Powerful oven.
- Fire safety requirements.
If several people will use a 6x4 bathhouse, then the steam room can take on fairly small dimensions. If space allows, you can equip the steam room with shelves so that a person can take a horizontal position. In the case of a cascade arrangement of shelves, the steam room will look much more spacious than with the classic method.
Video: layout of a bathhouse according to a 6x4 project with drawings and diagrams
The video shows the layout of a 6x4 bath: