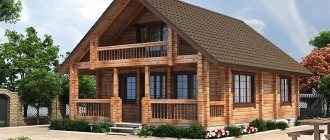
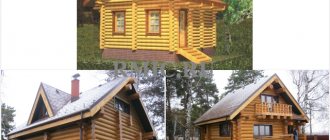
The 4x4 bathhouse project is an excellent solution for a small plot of land. The compact building does not take up much space, and all the necessary premises can be successfully located in it.
Of course, everyone wants to have not just a bathhouse, but a whole recreation complex; a bathhouse with a barbecue has a number of advantages; however, not every site can accommodate a large structure. But this is not a reason to abandon the sauna altogether; the compact 4x4 version will fit even in a small area and give you the opportunity to relax in the sauna.
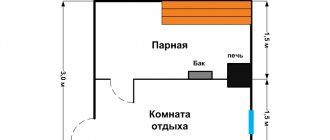
Bathhouse layout 4x4m
The layout of a 4x4 m bathhouse, as a rule, begins with the designation of rooms: washing room, steam room and dressing room.
You should also remember, when creating a project for a 4x4 m bathhouse, which will be made of logs, that the internal space of the logs will be slightly smaller. To calculate everything correctly, you need to subtract the thickness of the log from the inside of the logs (if it is cut into a paw), and if the log house is made “into a bowl,” then you need to add another 25 cm to this thickness.
If, for example, you take a log 4 m long and 240 mm thick, which was cut down “into the thicket”, then its internal size will be no more than three meters. Therefore, this fact must be taken into account in advance , because the building becomes significantly smaller inside.
You can, of course, make a bathhouse with an internal size of 4x4m, but for this you will need to place an order with the manufacturer. They themselves will calculate the size of the log and cut it as needed.
The layout of a 4x4 m bath is determined by the following parameters:
- the space from the inside should be divided exactly into two parts. In the first part there will be a large relaxation room, and in the second, which should also be divided in half, there will be a steam room and a small relaxation room;
- The stove for this bath layout must be installed in the washing room. is also fashionable to consider installing a stove near the wall of the rest room ; it will be very convenient to throw firewood into it while relaxing. In principle, it can be installed anywhere, all at the discretion of the owner;
- in order to be able to use the bathhouse in winter, it is necessary to attach a vestibule to the bathhouse;
- if you are too lazy to light the stove yourself, then you can install it in the vestibule and involve service personnel in the kindling. Then you can rest easy and not worry about the stove going out.
The layout of a 4x4 m bath may vary depending on the following additions:
- You can place the entrance to the building from the street and to the rest room from either side. The door installation must be carried out according to the location of the bathhouse on the site;
- If you have decided on this, then you can plan other entrances, to the washing room or the rest room. The doors of the rooms should be installed close to each other to make it more convenient to move between rooms;
- There is no special procedure for planning a washing room and steam room; they can be alternated one after another, no matter which room comes first. The only thing that needs to be taken into account is that the washing room should be located closer to the drain hole to make it easier to remove the drain pipe;
- It is also very important that the furniture and equipment for the bath are arranged correctly. The ceiling in the steam room, for example, should not be very low, because the fumes coming out of the firebox can burn a person lying on the top shelf;
- The size of the rooms is usually determined at the request of the owner. For example, it is better to make a steam room larger than a washing room. After all, in the washing room you only need to take a shower, but in the steam room there can be several people, and everyone will want to lie down on the bench at full height.
The construction of a 4x4 m bathhouse includes the arrangement of the following additional structures:
- porch;
- terrace.
These structures are not an element of the layout of our building; they are additional. They can be built later as a frame extension.
The construction of a 4x4 bathhouse and the planning of its premises do not pose any complex tasks, but you still need to take into account all the nuances of this construction , so that later there is no need to redo anything.
Furnace location
Any instructions for designing a bathhouse must contain information about the location of the heating structure. Specific information is reflected in SNiP 41-01-2003, which clearly states that such structures should be protected with thermally resistant materials, especially when it comes to wood. Regarding efficiency issues, the stove must be installed so that it heats several rooms at once.
Heat flows from the stove in different directions.
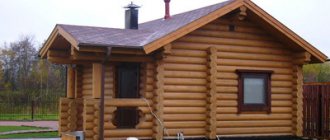
How can you decorate the outer walls of a 4x4 bath?
Typically, external walls are treated by mechanical action or, to put it simply, sanded. After that, to give the walls a wonderful look, they are treated with a special solution that can resist insects, protects against instantaneous ignition, and also gives the logs a wonderful look, emphasizing their structure.
After sanding the logs, they are caulked. This is done in order to seal the gaps that appear between the logs.
At this stage, the exterior decoration of the walls of our 4x4 bathhouse is completed. If everything is done correctly, then the wood, sanded and treated with a special compound, will serve for many more years and will delight the owners with its magnificent appearance.
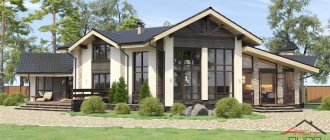
If the owners want to give this building a modern and beautiful look, then the outer walls can be covered with horizontal siding . One of the options would be to decorate the walls with panels for facades, block houses or bricks.
If you want to save on wall decoration, you can do it using a more budget-friendly material - vinyl siding. It looks great, protects from snow and rain and withstands solar radiation well.
There is another option for finishing the external walls of a 4x4 bath. It is performed using natural stone or torn brick. This finish will look simply amazing, but, however, it is quite expensive.
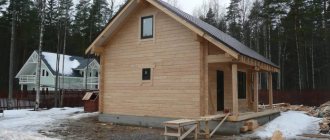
4x4 log sauna: materials and construction process
In Kazan and Tatarstan, in recent years it has become fashionable to build bathhouses from wood: the natural material is gaining ground over brick and expanded clay concrete. After all, a log sauna is not only a place for washing or visiting a steam room. It is also about improving the health of the body and being close to nature.
IMPORTANT! The bathhouse can be built from linden, pine or aspen. The choice of material is made based on the personal wishes of the customer, while the cost of the work does not change significantly.
Build quickly, efficiently and profitably. All work (from laying the foundation to organizing proper ventilation of the room) is carried out at a high level, which guarantees an ideal result. Specialists can offer the client two options:
- operational “turnkey” construction, when the customer receives a ready-to-use building within 7-10 days;
- a long, but more rational construction of a bathhouse “for shrinkage”, in which the wood is given time to shrink, and the building becomes stronger and more reliable.
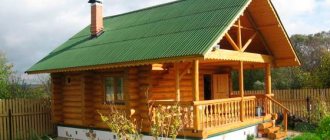
What 4x4 log saunas will look like: photos in catalogs will allow you to get a clear idea of the future object and decide on the optimal location for it on a specific site. The company’s specialists are ready to work in Kazan and throughout Tatarstan, which makes the services of craftsmen available to all potential customers.
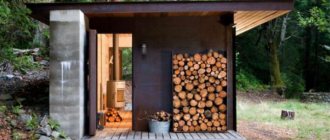
The main advantages of 4x4 baths
The most important advantage is the environmental friendliness of the material from which the baths are built. If the design of a 4x4 bathhouse includes its construction from coniferous trees, then such wood also has medicinal properties.
If the project plans to hire a special team to build a bathhouse, then using tongue-and-groove technology they will build you a beautiful structure that will last for decades.
If the design of a 4x4 bathhouse involves its construction from timber, then this material will cost you much less than, for example, from brick or planed profiled timber.
Construction of a 4x4 m bathhouse does not require large financial costs and will not take up much space on your site. You will only happily relax in it and gain health.
Additional services
- Replacing timber 150x100 mm with timber 150x150 mm RUB 22,000.
- Replacing timber 150x100 mm with timber 150x200 mm 40,000 rub.
- Wood-burning stove Ermak from RUB 32,000. (more details)
- Increase the height of the bathhouse by one crown (+15 cm) RUB 9,000.
- Construction of partitions from timber (150x100 mm) RUB 9,000.
- Coating of joists and subfloor (as a gift: promotion until October 31) 400 RUR/m²
- Replacing a 27 mm floorboard with a tongue and groove board 36 mm thick 280 RUR/m²
- Metal entrance door (China) 7,000 rub.
- Bath insulation up to 100 mm 250 RUR/m²
- Warm corner (as a gift: promotion until October 31) RUB 24,000.
- Assembling a bathhouse on wooden dowels RUB 24,000.
- Cladding the stove with bricks (as a gift: promotion until October 31) RUB 8,000.
- Construction shed 3x2 m. 16,000 rub. (more details)
- Roofing (metal tiles) 590 RUR/m²
- Finishing the gables of a block house RUB 1,200/m²
- Generator rental (customer’s gasoline) RUB 9,000.
What rooms can a bathhouse consist of?
So, you decided to build a bathhouse using a log house measuring 4x4 meters. What rooms should it be divided into? Most owners of such log cabins settle on three rooms that they consider the most important: a dressing room, a washing room and a steam room. A variant of the 5x5 bathhouse layout where the firebox is located in the dressing room, in the far corner, through the wall separating the dressing room from the steam room. This can truly be considered the most successful option.
You get a fairly spacious dressing room 4 meters long and 1.5 to 2 meters wide. Of course, you can place benches and a hanger here to leave clothes before entering the washroom. Often in the middle of the dressing room there is a not too wide, but elongated table and one or two benches.
Thanks to this, after going to the bathhouse you can relax in a fairly large group (up to 6-10 people). Many bathhouse owners highly value this communication - especially relaxed and comfortable.
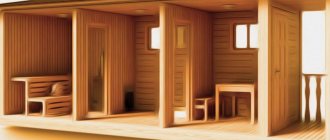
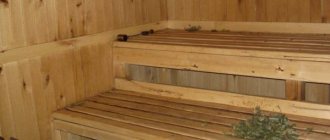
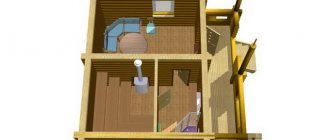
An example of the interior design of a wooden bathhouse
From the dressing room the door should lead to the washing room. This will prevent excessive heating of the dressing room and heat loss. At the same time, it will always be warm enough in the washing room itself. The washing room can have a width of 2-2.5 meters and a length of 1.5 to 2 meters. True connoisseurs of baths prefer to allocate a little less space for the washing room in order to gain an extra square meter for the steam room. After all, most of the pleasure you can get in a bathhouse comes from the steam room.
The layout of the steam room must be carefully verified. Seriously think about what shape and size of shelves will suit you. Some people prefer a regular shelf, while others prefer a corner shelf. The first option allows you to get more free space in the steam room, while the second allows more people to visit the bathhouse.
Layout of a 4x4 sauna located in the basement of the house
The width of the steam room is usually 2-2.5 meters, and the length is from 2 to 2.5 meters. Of course, part of the area needs to be allocated for the stove and heater. It should be located in a corner, but not close to the wall.
This reduces the risk of fire on wooden walls or cladding, but also saves the usable area of the bathhouse.
It is better to make the shelves at least 0.7-1 meters wide, so that you can not only sit on it comfortably, but also lie down while hovering.
How to choose the appropriate log size
Choosing the size of a log house is always a search for a compromise that would suit you in all respects. Therefore, when choosing the appropriate log size, you need to consider the following factors.
- Exactly how much area of the plot are you willing to allocate for development? Very often, owners of small plots of about 6 acres are forced to take this issue very seriously.
- Construction cost. It is quite clear that the larger the dimensions of the log house, the greater the amount will have to be allocated for it.
Layout option for a 4x4 bathhouse with a veranda
So a log house measuring 4x6 meters can cost 10-12 thousand more than a log house measuring 4x5 meters. For many people, these savings will be quite noticeable. - The time required to heat the bathhouse. Every person understands that the larger the area of the bathhouse, the more time and fuel will have to be spent in order for the temperature in it to rise to the desired level.
- The number of people who will visit the bathhouse. This is a very important parameter. If one or two people will go to the bathhouse, then a small bathhouse measuring 3x3 meters is quite enough. But if you have a fairly large family or guests regularly come to you to enjoy the pleasure that only a real bathhouse can give, then it is better to think about a more spacious log house so that your bathhouse can easily accommodate everyone.
- Bathhouse layout. Think seriously in advance about exactly how many rooms you need and what area they should have.
An example of the layout of a large bathhouse with a swimming pool
For some people, a tiny bathhouse is enough, consisting of a small dressing room where the firebox is located, as well as a steam room combined with a washing room and toilet. Others dream of a spacious dressing room, where you can install a table and benches, as well as a separate steam room and washing room. You can also build a bathhouse with an attic. Only after deciding what is the best option for you should you move on to choosing a log house.
As you can see, choosing a log house can be associated with many difficulties and calculations. However, in most cases, baths measuring 4x4 meters fully satisfy all requirements, being a good compromise. On the one hand, it is relatively inexpensive and does not take up too much space on the site.
On the other hand, a bathhouse of this size can be heated quite quickly. And if the layout is calculated correctly, the bathhouse can easily accommodate all the rooms necessary for a comfortable stay. It would be useful to study the last point in more detail.
Project of a bathhouse with an artificial pond
Laying profiled beams
Installation begins with the placement of thin 11-mm slats, pre-impregnated with an antiseptic, on the previously created base. The distance between them should be about 30 mm. This trick will protect the logs from rotting. The gaps between the laid slats can be filled with polyurethane foam. Over time, the structure of the log house will certainly shrink, so the beams do not have to be laid very tightly.
Laying slats on the grillage
Laying slats
Important! The wood of the first row is treated most carefully, using numerous antiseptics or machine oil, especially paying attention to the place that will come into contact with the base.
As a rule, the bottom beam is never secured. All subsequent rows will put pressure on it; for excellent stability, such natural gravity will be quite enough. If you ever have to replace the bottom row, it will be easy to do without dismantling the structure of the entire bathhouse.
Laying the first row of timber
First row of timber
To lay the first row, experienced craftsmen recommend purchasing beams of a larger diameter. For example, if construction is carried out from 150 x 150 mm timber, then for the first row it is better to use 200 x 200 mm logs. After laying, they are chamfered from their upper ribs, this ensures that water drains from the walls.
The evenness of all walls depends on how well and competently the first row is laid, so the work process should be accompanied by a thorough level check.
The second row is placed on the first row.
Second row of timber
To do this, the crowns are aligned and fastened with metal pins with a diameter of 10 mm and a length of 20-25 cm (4 pieces are needed per corner) or wooden dowels. The pins are fixed into pre-made holes, the diameter of which is adjusted to the diameter of the cut reinforcement. The drill should go through the entire top beam and go down half the length of the beam lying below. Next, the beam located on top is removed, a pin is driven in, and then the upper beam is finally laid on the fasteners.
Scheme for installing pins and laying insulation
In this way, the logs of all the walls are attached, right up to the top. There is no need to fasten the beams of the last row, because when the ceiling beams are fixed, they will need to be removed.
An example of building a bathhouse from timber
Construction of timber walls
Bathroom ceiling
Calculation of floor beams
Laying logs can be done in some other ways. The most modern fastening method is the “Force” spring unit. Externally, this fastening resembles a screw with a spring. The bars connected using “Force” will have no gaps, and no cracks or deformations will occur. This method is considered the most expensive, but when building “for centuries” it is definitely worth thinking about.
Spring assembly
Node installation diagram
Installation of the unit in the beam
Sometimes beams are secured with nails without heads. To prevent the nails from rusting and damaging the wood, they are sunk deep.
For fastening, wooden dowels are also used, with a length of no more than 25 cm and a diameter of 18x18 mm. For them, 21 mm holes are cut with a drill.
When laying the walls, a strip of flax is laid between the beams, which is secured with a stapler. Instead of flax, you can use moss, jute or hemp.
Intercrown insulation
As work progresses, partitions made of 100 mm x 100 mm timber are installed between the rooms.
Partitions made of timber
Prices for spring assembly
spring assembly
Video - Internal partition of a wooden house. Half dovetail cut-in
The jambs and windows for a small bathhouse should be made to slide along the grooves. However, they think about where they will be installed in advance. The openings are cut out after the bath has settled. The period of intense shrinkage lasts six months, so special preparations are made for it. Boards 50 mm thick are placed on the top row and covered with roofing material such as slate or roofing felt. In this form, the log house should “survive” the winter.
The most important feature of the installation of doors and window structures in buildings made of wood is that such a structure, unlike a brick house, is very unstable throughout its entire operational life. Therefore, the so-called casing is installed in the window openings; it makes the window structures “independent” of the walls. The simplest option is a 50x50 cm beam, which is inserted into a vertical groove.
Video - Features of preparing openings in a timber house before installing windows/doors
Video - Installing windows in a wooden house
When installing doors, a casing is used.
On the side of the locker room or in another planned place, a brick stove with a firebox is laid out.
The nuances of constructing a frame bath
Before we talk about the nuances, it is worth noting that frame baths have one disadvantage that cannot be ignored. Moisture from rain and snow penetrates the beams like a sieve and can cause irreparable damage. Based on this, there are a number of nuances during construction.
- When building a frame bath, the use of thermal insulation becomes mandatory. Firstly, this will prevent heat loss, and secondly, it will create some kind of tightness. You can insulate with mineral wool or fiberglass.
- It will also be necessary to carry out a vapor barrier. This will prevent the formation of condensation and keep the wood in excellent condition for a long time. The choice can be made on any material, be it film, roofing felt or glassine.
- If the soil on the site is dense, you can use simplified foundation options such as pile foundations.
Features of the washing machine
The temperature in the sink is usually higher than in the dressing room, but lower than in the steam room. There are benches for massage treatments here. If space allows, a small shower stall is installed in the sink.
Shower tray in washroom
The floors in this room should not be slippery; they are often made of wood. If tiles are laid on the floor, then choose not a glossy one, but one with a rough surface.
Attention! To ensure safety, the door from the steam room to the washing room should open easily and quickly. Under no circumstances should there be any locks or latches on it. The opening is designed only outward, towards the exit from the bathhouse.
Wooden floor in the bath Wooden ladders for the bath
Tile floor in washroom
Doors for steam room
Bath door manufacturing option
The handle for the bath door can only be wooden. Metal fittings are not used
Drawings, projects and technology for building a frame bath
Building a frame bath is a very simple task. Usually no one makes any drawings and builds the frame using step-by-step instructions. The roof will need a gable roof with equal slopes. The Internet is full of programs for calculating the roofing system; this task is easy to cope with, since the program calculates both the size of the slopes and the amount of material.
Do-it-yourself 4x4 frame sauna step by step instructions
For construction we will need:
- Formwork 30 centimeters wide, 50 centimeters high;
- Metal rods for strapping
- Ruberoid
- Concrete mortar
- Sand
- Beam with a section of 10x10
- Gravel
And much more, but more on that in detailed step-by-step instructions. You need to start by digging a trench 50 centimeters deep and about 40 wide. Next you need to pour the foundation. We embed steel pins into the foundation to attach the timber to it. When the concrete has dried, we begin to make the strapping. Intermediate slats are lined up along the walls. Then you can lay out the floor; it is better to line the outside of the bathhouse with clapboard. When the floors are ready, we build a hood and install a roof. Don't forget about the insulation. It will make the bathhouse warm. Thus, construction will take several days, but it will delight you for years.
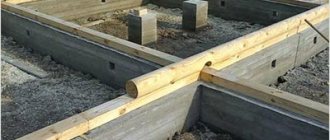
Foundation structure
Both columnar and strip foundations are laid under a 4x4 m bathhouse. A wooden structure is relatively light in weight, so columnar foundations are suitable for use. Their design is even more logical if the depth of soil freezing is more than one meter.
Foundation with grillage
| Work order | Illustration |
| A bathhouse project is being drawn up. Load calculations are carried out, the type of soil, its freezing depth, and the proximity of groundwater are specified. According to the project, markings are made on the area (the area is pre-prepared, namely, a fertile layer of soil up to 15-20 cm thick is removed). | Project |
| The boundaries of the internal and external walls are marked, the location of the pillars is noted. Marking is carried out using a rangefinder, a bubble and hydraulic level, and a plumb line for setting cast-offs. | Marking in progress |
| A trench is dug according to the markings. The walls of the trench must be strictly vertical; in sandy soils, it is recommended to use temporary formwork to prevent soil from falling to the bottom of the trench. Holes for pillars are drilled to a depth of one and a half meters or more, taking into account the freezing point. | Trench for grillage and drilled holes for pillars |
| The frame is knitted with soft wire from steel rods 10 mm thick. Reinforcement is carried out in wells and tape, and these elements are connected to each other. The dimensions of the reinforcement frame are smaller than the future foundation, that is, the rods are spaced from the outer walls of the foundation by 5 cm from the bottom and sides, 10 cm from the top point of the poured grillage. | Reinforcement cage |
| The formwork is assembled from edged boards. They are connected by transverse strips, forming shields, after which I install them inside the trench. The shields are secured with supports from the outside and the opposite shields are connected through and through with pins. Vents are immediately placed into the formwork - plastic pipelines installed in the grillage to ventilate the underground of the future bathhouse. | 4 - breath In the photo there is a vent, reinforced frame and formwork |
| Pouring concrete is combined with compaction, for which internal vibrators are used. | Pouring and sealing |
Note. The walls of the wells must be protected with roofing felt or asbestos-cement pipes; these elements are inserted into the trenches before pouring concrete. To make the formwork easier to remove, it is worth covering it with polyethylene at the installation stage. The same polyethylene will protect the foundation from excessive moisture loss. The formwork can be dismantled after 2-3 weeks.
Between the first layer of timber and the base, waterproofing is made of two layers of roofing felt. To do this, a layer of hot bitumen is applied, onto which the roofing material will be attached. Then the procedure is repeated one more time.
Grillage waterproofing
Floors
The floor in the dressing room and the ceiling in the steam room can be made from 40 mm tongue and groove boards. Floor joists are made of timber, leaving a distance of 50 cm between them.
How to install logs
Attaching the log
At the bottom, thin bars are nailed across the beams.
Skull bars
Then waterproofing, a layer of insulation and a layer of vapor barrier are placed between the joists.
Vapor barrier
To create a ventilation gap, 40 x 100 mm bars are laid and secured on top of the vapor barrier. The finished wooden floor is laid on top of these bars. The surface of the bathhouse is treated with a blowtorch so that the wood does not rot.
Bath floor
Prices for vapor barrier material
vapor barrier material