- Posted by Svetlana
- Date: July 29, 2014
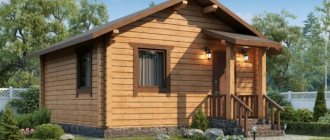
So, you have already built the foundation for your bathhouse, and you have chosen timber as the material for the walls. An excellent option, quite durable, environmentally friendly and easy to use! If you are new to construction, then timber is the best choice.
However, even such a simple and versatile material requires some knowledge and skills that are necessary when constructing walls. Especially for a structure such as a bathhouse, the arrangement of which requires certain additional steps.
Before you start building a bathhouse from a material such as timber, you should calculate the correct size of lumber for the walls, find out how to connect beams and splice them along their length, choose insulation for laying between the crowns and much more. Let's look at these questions one by one.
- 2 Laying the first crown of the log house
- 3 Choose the right timber for the first crown
- 4 Methods for interlocking beam connections in a log house
- 5 Insulation used for laying between the crowns
- 6 Dowel for timber
- 7 Videos on the topic
- 8 Completion of work on the construction of timber walls
Legal side of the issue
Everyone knows that in order to build a house it is necessary to obtain permission and go through a cloud of approvals, although many neglect this stage in the hope of registration under the “dacha amnesty”. As for the bathhouse, this structure, according to the Town Planning Code of the Russian Federation (Article 51, Part 17), is not a capital structure and does not require legalization. However, during construction all sanitary and fire standards must be observed. However, if we are talking about a bathhouse, which will also be a guest or main house, then it is better to stock up on the entire package of documents. If you planned only “to wash”, but in the process it turned out “to live” and did not receive permission, then until March 2020 there will still be an opportunity to register the building with the Unified State Register of Real Estate and register the property without penalties.
Furnace fittings
Stove fittings (components) are made of high-strength and fire-resistant materials (cast iron and steel). Cast iron products are quite reliable. They do not rust, do not deform and are very durable.
The furnace (blower) door, grate, gate valve are installed in the furnace during laying.
To avoid mistakes at this stage of bathhouse construction, all of the above elements must be checked when purchasing:
- All cast iron fittings are checked for sound (when tapped, a clear ringing sound should be produced).
- All parts and mechanisms must work smoothly.
- The doors should open well (not jam) and fit accurately into the grooves of the frames
- The valves must move without any extraneous noise or excessive force.
Material selection
Having decided that the bathhouse will be made of timber, you need to choose which one. On the one hand, this is not a house for permanent residence and there will be no special requirements for the construction. That is, you can try to save money and assemble it from simple timber without a profile. But, on the other hand, the geometry of the material leaves much to be desired; “helicopters” are not the limit. After shrinkage and drying, you will have to caulk the cracks or insulate and sheathe them with casing. And the assembly will not be like a construction set, but like in a “Do it yourself” kit, that is, all connections will be made by hand with painstaking selection and adjustment.
As for laminated veneer lumber, in addition to the prohibitive price, it is worth considering the presence of a fairly large amount of glue in each element. And the bathhouse heats up to 100⁰C, and the humidity can go off scale when ardent steamers give in to this very park; it is unknown what and how will be released into the air instead of the pine aroma.
Profiled timber is distinguished by its ideal geometry and high surface quality, and thanks to the profile, even after the timber box shrinks due to natural moisture, it is possible to do without caulking, not to mention cladding. Before milling, the timber undergoes thorough culling, so that the material is smooth and the “propellers” will not bend the walls under any circumstances. The most important thing is naturalness and safety and no glue.
With the fact that the timber is profiled, we have decided on a small cheat sheet to simplify the choice.
- Harvesting period – logs for high-quality timber are harvested during the winter season from December to March.
- Appearance – there should be no cracks, blue spots, signs of rot, rot or wormholes. But smooth edges, excellent geometry and a smooth surface are required.
- The variety is a bathhouse, not a barn or a chicken coop; for its construction, the “Extra” varieties are optimal, if you can afford it, or “A”. The overpayment is not as significant as the difference between them and grades “B” and “C”.
As for humidity, a properly assembled structure made of profiled timber with natural humidity will not lose its characteristics, but it must be given time to shrink. If you want to steam as quickly as possible, it makes sense to overpay for a chamber-drying beam.
Shrinkage
During the construction of a bathhouse, ordinary timber takes on its final dimensions at least six months later, often later. Therefore, there is no need to rush into finishing the building and starting operation. It is necessary to wait until the final shrinkage of the structure and then complete construction. Unfortunately, haste in this case is found everywhere. To reduce the waiting time for shrinkage, you can use laminated veneer lumber, which undergoes heat treatment in workshops, so its degree of dimensional change is minimal.
Structural design
A bathhouse is not a house, but the construction project is a real help and, if desired, you can do it yourself or choose a suitable profile set for the place where it is made. In the first case, it can be either a hand sketch or visualization in a graphics editor. As for the dimensions, it depends on the number of future steamers - on average, about 4 m² are allocated per person. That is, for a family of parents and two children, even with simultaneous washing, an area of 16-20 m² will be enough. Small dimensions will allow you to do without splicing the timber, which will simplify the assembly process.
The simplest layout of a bathhouse includes a steam room, a sink and a dressing room; if not only functionality is important, but also amenities, a relaxation room and a terrace or veranda are added. Depending on preferences, the sink can be modern, with a shower stall, or a simple one with benches and basins. When determining the location, the distance from communications and the standard distances between buildings and to the fence are taken into account.
At the design stage, it is necessary to decide on the stove equipment - bulky brick stoves are gradually moving away, giving way to a variety of heaters.
- Open type - a firebox with a square or oval-shaped mesh basket into which the stone mass is poured.
- Closed type - firebox with an impenetrable box with stone filling.
- Combined - there is both an open mesh and a closed box; such stoves are in demand to use both the bath mode with wet steam and the dry sauna mode with elevated temperatures.
Heaters can be wood-burning, electric or gas; as a rule, they are metal structures (cast iron, steel). Installation is possible both directly in the steam room and in the wall between the steam room and the sink or the steam room and the dressing room. Heaters do not require a separate foundation, as they are characterized by high efficiency and are capable of heating large rooms with relatively compact dimensions. As for the chimney, modern multi-layer structures (sandwich) are protected from overheating by a thermal insulation layer and pipe wiring through the ceiling and roof is significantly simplified. Even with independent design, you can take into account all the nuances of the location of the stove and chimney, not to mention a professional approach.
Section of timber
The bathhouse is not a residential building for which thermal resistance standards apply, but it is also inappropriate to heat the street taking into account energy prices. Since profiled timber is produced with a wide range of sections, starting from 140 mm, it is not a problem to choose the optimal thickness. For the middle strip, a section of 150×150 mm is sufficient so that external insulation is not necessary. If the climate is warmer, the cross-section can be reduced; if it is colder, it is worth increasing to 180 mm or even 200 mm.
Safety regulations
- The door in the sauna should only open outward; it must not be equipped with locks or latches (for example, a magnetic lock without a tongue)
- According to SP 60.13330.2016, fire safety clearances from combustible structures when installing a heater are determined by the stove manufacturer. Typically the recommended distance is 500 mm. Finnish manufacturers allow them to be reduced by using thermally insulating non-flammable screens.
- Electrical wiring in the steam room is allowed only with heat-resistant cable (PRKA, PVKV, RKGM, SIHF-J 2X, Helutherm). For an electric heater, you will need to pull a separate power cable. All circuits must be grounded and protected by an automatic circuit breaker and an RCD with a leakage current of 15-30 mA.
The glass door is beautiful, but will require an increase in heater power by about 1 kW. Photo: Akma
Foundation structure
Even under bathhouses combined with residential premises, basement or basement levels are rare, which is why strip foundations are quite rare, not to mention slab foundations. Most often, baths are placed on two types of foundations.
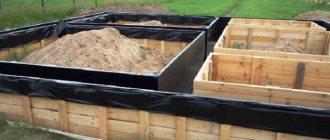
- Pillars - made of reinforced concrete, brick or blocks, at a distance of 1.5-2 meters from each other, at corners and load-bearing walls. Suitable for flat terrain and permeable soils with minimal heaving.
- Piles - driven or concrete with expansion, the distance is similar to the pillars, the diameter of screw and driven piles is at least 108 mm. Piles are justified in relief and heaving areas. The supports are combined into the system with timber strapping.
The first step is to clear the area and carry out markings, then either piles are driven/twisted, or holes are drilled and filled with concrete with reinforcement (metal or composite reinforcement). Concreting is carried out on a preparation made of sand or a bed of crushed stone. When laying pillars, a recessed base is concreted into the formwork under them, and the ground part is laid out from large blocks. Regardless of the type of supports, the distance to the harness from the ground must be at least 30 cm, the depth depends on the level of soil freezing. Between the supports and the trim, waterproofing must be laid in several layers. The strapping beam is carefully treated with an antiseptic, connected in half a tree and with anchors.
Errors in the bath ventilation system
In 1903, engineer Krzhishtalovich wrote rules for bathhouse ventilation. According to them, air utilization was carried out from below the room. This is due to the fact that all the exhaust air, sweat, and toxins settle to the floor. The fresh air that is breathed while sitting on the shelves should come from above (preferably heated).
How many people have thought about the proper organization of the ventilation system? It is possible that for many people the air flow into the steam room comes from above. It happens when there is no ventilation at all. All deviations from the norms lead to a decrease in the percentage of oxygen (17% and below) and the person begins to inhale poorly purified air.
There is no need to feel discomfort in the bathhouse. Any ailment is a reason to think about the correct organization of air exchange in the bathhouse. Be responsible about the design of the stove and the material from which it is made. If the furnace intensively burns oxygen, then from a lack of oxygen you will feel unwell (even to the point of fainting).
Installation of crowns
The advantage of ordering a ready-made set of profiled timber is the simplicity and accuracy of assembly; when finishing it yourself, you will have to carefully measure the joints and make a selection using hand or electric tools. This will require not only more time and effort, but also a certain set of devices. The first crown is placed on the harness with level control; any distortion at this stage is fraught with the need for rework. Depending on the project, the corners are connected by a notch with a remainder (bowls), or without a remainder, by a groove connection of various shapes with alternating joints. A cut with a remainder looks better, and the corners are warmer, but it is more complicated and is usually practiced in ready-made kits.
After assembling the first crown, floor joists are cut into it, laid on the edge in such a way as to partially rest on the frame. Between the lags, a skull block is stuffed from the inside so that insulation can be laid, followed by a temporary flooring made of rough boards, which simplifies the construction of the box.
The remaining crowns are assembled in the same way, with fixation on wooden pins.
- Length – 1.5 times the thickness of the timber.
- Diameter – 15-20 mm.
- Hole diameter – 10-15 mm.
- Location – with a shift of 15-20 cm.
Timber for baths often comes with a simple profile, inside of which insulating tape (jute, thermolen, Holofiber) is laid in each row and cuts. Unlike non-profiled timber, the profile, even when shrinking, does not form through cracks and does not require caulking; inter-crown insulation is sufficient. Before a couple of rows reach the end of the frame, they install ceiling beams - they are cut into half a tree without any residue or they are secured end-to-end with perforated steel brackets. Next, the remaining two rows are laid, after which the rough ceiling is tiled. If the bath is left until it shrinks completely, at this stage the box is covered with impermeable material to protect it from precipitation.
Roof installation
Baths are usually made with gable roofs, less often with pitched roofs; the load on the walls is transferred through the mauerlat to which the rafters are attached. The angle of inclination and length of overhangs varies over a wide range and is most often selected based on the visual effect, since a relatively small coverage area can withstand almost any wind and snow load. After assembling the rafters, the sheathing is made of boards, the waterproofing is laid, the counter-lattice is installed and the roofing is laid. Due to the danger of sparks flying out of the chimney, it is not recommended to lay flammable materials in bathhouses; the best option is slate or metal (profile, rebate, metal tile).
Thermal insulation material must be laid or filled between the floor joists, most often stone wool slabs. Since the ceilings in the bathhouse are lined with foil materials from the inside, which simultaneously serve as a vapor barrier, it is not necessary to lay a vapor barrier under the insulation. In the area where the chimney passes through the ceiling and roof, special barrier boxes are installed. This is a prerequisite even for multi-layer chimneys.
Moss for log houses
Brown moss growing in swamps (popular name - cuckoo flax) is a natural material that has unique thermal insulation and antiseptic properties. Only highly qualified specialists can work with moss. Kukushkin flax is slightly moistened, after which the bulk material is placed between the beams and pressed with the upper crown. Moisture from the moss impregnates the wood with an antiseptic composition, which in turn contributes to the durability of the house by preventing the appearance of insects or bacteria in the timber. Sphagnum moss has approximately the same properties.
Openings and façade works
Window and door openings are made in two ways:
- during the assembly process - in factory house kits;
- after assembly, cut openings in the walls using an electric or gasoline tool (in homemade structures).
The specificity of bath procedures does not imply the presence of a window in the steam room; windows in wooden frames are installed in the sink or rest room; the design of the windows must provide for ventilation. The doors from the steam room to the sink are also wooden or made of tempered glass, without metal elements, and from the sink to the dressing room a sealed insulated structure is installed that prevents heat loss.
External grinding of the walls is carried out after shrinkage; after assembly, the walls are treated with antiseptics and ultraviolet protection. The ends must be sealed with sealant. After shrinkage is complete, the walls are sanded and, if necessary, the seams are sealed with a specialized sealant. The color scheme and optical effect of the protective and decorative paint or oil coating are selected in a common style with the rest of the buildings on the site. If the bathhouse is a pilot structure, you should not choose pretentious shades of the walls or roof; a neutral finish is always more advantageous. And the decorative effect can be increased through beautiful platbands for openings, corner elements, hemming of overhangs and lighting.
Optimal contents of the heater
The stones filling the heater are a very important component for bathing procedures. Currently, the choice of fillers is very large. There are certain recommendations that should be followed when selecting:
- Before regular use, stones must be tested. To do this, you need to heat the heater to the required temperature (depending on the stone used).
- Then hot water is added (cold water can cause the stones to crack).
- The quality of the heater's filling can be judged from the way the steam comes out. You can check by inhaling air through a damp cloth and determining the amount of precipitated fractions.
- The check must be done at least 2 - 3 times. If the sediment does not decrease, the stones should be replaced.
If you like certain bath aromas (jasmine, lemon, orange), then you should not add the corresponding essential oils to the heater (heated up to 500 °C) to fill the room. This will lead to the fact that in the steam room there will be an unhealthy spirit of carcinogens burned on the stones. The best option is to spray the oils moderately on the walls.
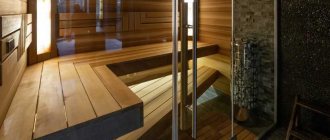
Interior decoration
There are recommendations for laying a single-layer floor without insulation, but a bathhouse with such a structure can only be used in the warm season. If we are talking about year-round bathing procedures, the floors should be insulated both in the steam room and in the wash room. The easiest way is if a shower tray is installed in the sink and the water flows down the drain into the sewer, and does not spill over the entire floor covering. In other situations, the finished floor in the washing room should be impenetrable and with a slope of several degrees towards the drain, and the insulation and joists should be reliably protected from moisture by a waterproofing barrier. The best option for installing a floor in a sink is a screed, but this is only possible with a strip base.
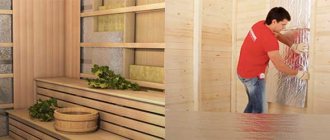
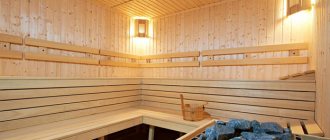
Since most often the profiled timber is made of coniferous trees, which release resinous substances when heated, the inside of the walls and ceiling are sheathed with linden or aspen lining on the sheathing. The walls are preliminarily covered with foil insulation with overlapping joints and gluing the seams with special tape.
The floor in the steam rooms is predominantly made of tongue and groove boards, forming a continuous flooring. Protective impregnations for wood must be natural-based and environmentally friendly. In the heater area, the walls, floor and ceiling are covered with heat-resistant panels, for example, made of natural stone or large-format ceramic tiles. The heater is installed at a distance of 10-15 cm from the wall if the fire door opens into the steam room.
In the sink, the walls made of timber do not need to be finished; it is enough to sand them and cover them with impregnation, oil, wax or universal glaze with moisture-repellent properties. The ceiling is also covered with foil insulation and hemmed with clapboard or imitation timber.
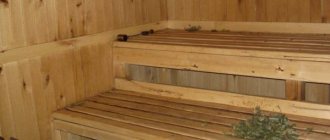
Bath shelves
Simultaneously with the finishing of the walls, wall-mounted or floor benches - shelves are made, since it is recommended to steam while lying down, they should be at least 220 cm long. Usually there are two levels of sunbeds, the upper one for those who like it hot, the lower one, for those who prefer to steam longer with less intense heating . In this case, the height of the upper lounger is selected in such a way that there is about a meter left from the top of the person sitting on it to the ceiling. The lower deck should be located at a height of more than 30 cm from the finished floor level. The width of the benches varies depending on the size of the steam room, but should be at least 90 cm. Since the baths are mostly compact, the shelves occupy the entire perimeter of the walls except for the heater area and the doorway. There are simple, stationary beds in the form of steps, and complex ones - with retractable or folding shelves.
The frame of the sun loungers is assembled from a support beam, fixed to the walls, and support posts; less often, suspended shelves are made, attached only to the support beam. On average, the upper level of the bench requires a beam with a cross-section of 50×100 or 50×120 mm and 4-6 racks with a cross-section of 100×50 or 100×100 mm, depending on the length. The support beam is fixed to the wall with long self-tapping screws, the support posts are assembled halfway across the tree. The timber for the frame can simply be planed.
For sheathing of shelves, only high-quality wood is used, preferably valuable species, without knots, resin pockets or biological damage. The thickness of the board is 3-6cm; the boards are carefully sanded before laying. The sheathing is secured to the supports with wooden wedges (dowels) in drilled holes. It is unacceptable to use metal fasteners for sheathing, since even recessed heads can rise to the surface over time and cause burns. The boards can be filled both longitudinally and transversely, depending on the design style, but with any layout there is a gap between them for free circulation of hot air.
After assembly, the shelves must be coated with a protective composition, otherwise constant contact with moisture and high temperatures will negatively affect the appearance of the wood. There is no need to re-sand the deck chairs; just a good brushing with fine abrasive before assembly is enough. As in the case of walls, only natural, harmless products are allowed to treat sun loungers, for example, linseed oil, wax or oil emulsions. After drying, they form a water-repellent protective film and do not emit aggressive substances even in conditions of high temperature and humidity.
Electricity in the bathhouse
If the presence of water supply and sewerage is not at all necessary for comfortable bath procedures, you can get by with a local drain and a container, then there are no modern baths without electricity. The wiring is laid either on the ceiling, under the sheathing, or in the walls, depending on the location of the light sources. Regardless of the location of the cables, laying in special protective corrugations and the presence of automatic shutdown devices (RCDs) are required. Lighting devices must be specialized, designed for high temperatures and high humidity. To prevent the light from irritating the eyes, which are subject to increased strain in steam rooms, it is made soft and diffused, for which wooden lattice shades made of linden, aspen or valuable species are used.
A bathhouse made of profiled timber is not only a durable and functional structure that will serve the whole family for decades, but also one of the elements of landscape design. And the construction process, with proper preparation and high-quality materials, will go without a hitch.
Mistakes when heating a bathhouse
Using coniferous wood for heating is a mistake. Such firewood produces a lot of soot, which settles on the walls of the stove, gives a bitter taste and poisons the air in the steam room. Also, excess soot is not safe from a fire safety point of view. However, despite these recommendations, many have used pine for fires and will continue to do so.
For good heat in the bathhouse you need oak firewood (and the oak must be middle-aged). However, a more traditional raw material is birch (alder) logs. They light up easily and quickly, hold the heat for a long time and create a soft atmosphere. Alder firewood invigorates, provides clean energy, and has healing properties. Linden trees heal wounds and heal the skin.
It is better to prepare firewood in the summer, when it is easier to identify high-quality, non-rotten wood. Also, this can be done in winter. In cold weather, you can determine the optimal log by tapping (if the sound is dull and short, the trunk is rotten; if the sound is loud and long, it is good raw material).