Having even a small plot of land, it is difficult to do without a greenhouse. Grow seedlings, get an early harvest, protect them from possible frost, from heat, make the plants in the flowerbed bloom earlier - all this can be done with the help of this device. Moreover, making a greenhouse with your own hands is not difficult. There are very simple designs, there are more complex ones, but the manufacture of any of them does not require special education.
The frame for a greenhouse can be made of wood (boards), metal (angle, profile pipe or fittings) or PVC pipes (round or square). The greenhouse is covered with the same materials as the greenhouse : film, spunbond (also called agrofibre or non-woven covering material), polycarbonate and glass. Since the size of greenhouses is smaller (plants in greenhouses are maintained from the outside), the requirements for them are not so stringent: even strong winds are not afraid of them.
Greenhouse sizes
Since in a greenhouse the plants are served from the outside, its width is chosen so that it is comfortable for you to process plants planted closer to the middle. You determine this experimentally: sit down and try to reach some area with your hand. Measure the distance. You get the width of the greenhouse with a one-sided approach. This is if the greenhouse is located in such a way that it is impossible to get to it from the other side (near a wall, for example). If you can approach from both sides, you double this result.
It is important to be comfortable at work
The distance is different for each person: height and physical condition affect. You should not chase savings by making it wider than necessary. You will have to spend a lot of time weeding, loosening, fertilizing, and other work. A couple of hours in an uncomfortable position, and there is no strength left. Therefore, it is better to make the greenhouse a little narrower, but to make it convenient to work: while enjoying your work, you spend less effort.
And the length of the greenhouse is chosen based on the layout of the site. It's arbitrary.
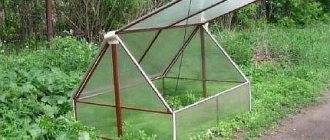
A simple greenhouse made of arcs under film or spunbond
This greenhouse is made of several boards, knocked down to the required dimensions, arcs of PVC pipes, which are attached to a wooden base. The tops of these arcs are connected at the top by a beam or the same pipe. If it is a timber, it needs to be well processed, rounding the edges so that the film does not tear.
A simple greenhouse made of boards and PVC arches
How to secure the arches
How to attach arcs of PVC pipes to a greenhouse frame. They are most often secured using metal perforated tape. Take a small piece of it about 5-6 centimeters, screws and a screwdriver. And they are secured on both sides. To be on the safe side, you can do it twice.
This fastening can be repeated twice
In exactly the same way, you can fasten them from the inside to hold them tighter by adding bars.
The greenhouse arcs are fixed inside the frame
Another option: drive in pieces of reinforcement near the frame, place pipes on them and only then secure them with clamps to the frame boards. This option is more reliable.
Read how to make high beds (for increased yield) here.
How to attach the film
You can attach the film to PVC pipes using double-sided tape. But only if inexpensive polyethylene film was used: it is impossible to tear it off without damaging it, and polyethylene lasts no more than a year. So for a seasonal greenhouse this is a “cheap and cheerful” option. The second method is special clips for fixing films and anything that can replace them - a piece of an old hose cut lengthwise, a clamp for pipes that are used for installing pipelines, office binders, etc.
How else can you fix the film on the meadows of a greenhouse or greenhouse?
It also makes sense to secure a block on both sides along the edges of the film. To do this, the film is cut to a length greater than necessary, a block is wrapped in the excess and the film is secured to it. Now you have a piece of film with bars attached to its short sides. Leave one on one side, throw the second on the other. Now you don’t need to press the film to the ground with stones: the block holds it well. It is also convenient to open the greenhouse for ventilation; wrap the film and place it on top.
A block wrapped around the edges of the film makes the work easier
You can use small nails to attach the film, but place washers under the caps. It is faster to work with a construction stapler with staples. To prevent the film from tearing at the attachment points, it is padded with something. You can use thick braid or just a strip of fabric, and hammer fasteners into it.
Methods of attaching the film to the bar and to the arcs
More powerful option
If there is a need to make a greenhouse with PVC arches more reliable, wooden posts are nailed to the board base in the center of the short side. A board is attached to them on the edge, in which holes are pre-drilled with a diameter larger than the outer diameter of the pipes.
This greenhouse can be used not only for growing peppers or eggplants. Having grown the side posts if necessary, you can tie up cucumbers or tomatoes
During installation, the pipe is threaded through the hole. You can fasten it on the sides as suggested above, or you can do it another way: first install pins in the bars and put the pipe on them.
How to secure a longitudinal beam in racks
The simplest greenhouse
The good thing about PVC pipes is that they are easy to bend. Also because they weigh little. An ideal option for a lightweight, portable greenhouse, especially if combined with spunbond. This material can be sewn. Take a piece with a density of 30 kg/m2 and make drawstrings in it in increments of 50-60 cm. For the drawstring, stitch across a strip of the same material about 10 cm wide (it is stitched on both sides). Insert pipes cut into the required lengths inside.
This is what you should get: a covering material with arches threaded through the drawstrings
Now all this can be installed on the bed: stick pegs in two rows on one side and the other of the bed, and place a pipe on them. You immediately get a ready-made greenhouse. And what’s more convenient: you open and close the plants simply by collecting or straightening the spunbond on the arc. This is a very convenient temporary greenhouse: as soon as it is not needed, it can be removed and folded in a couple of minutes.
Greenhouse - it couldn't be simpler
Read about drip irrigation systems for gardens, greenhouses and hotbeds here.
How to build a greenhouse with your own hands from wood
Depending on the design, greenhouses can be single-pitched, gable, hipped, arched, wall-mounted, pit-built, or be part of the house. In addition, they can be stationary (the structure cannot be disassembled) or portable.
Additionally, they are divided by type of coating (film and glazed) and heating method (heated by the sun or equipment).
When choosing a form, you should take into account the location of the building relative to parts of the world, other buildings on the territory, as well as the purpose and shading. The optimal location is one in which the southern part of the horizon is visible from the entrance. To do this, imagine that you are standing with your back to the entrance. If positioned correctly, the sun will pass from east to west in a clockwise direction. The transparent wall should be oriented to the south, since in this case the maximum amount of light will get inside.
Note: The location of the greenhouse on the cardinal points is important only if the walls (all or several) are made of opaque material. If it is completely covered with film or glass, these indicators do not play a decisive role.
If the building is shaded by trees or neighboring buildings (for example, in a small area), its northern side is made of opaque material that will prevent hypothermia inside the building. To improve the reflection of heat and light, the roof is made transparent, and one of the walls is covered with white paint or a reflective screen.
Each type of greenhouse has certain characteristics, advantages and disadvantages (Figure 4):
- Single and double slopes are among the most popular. They are rectangular and can be placed in any part of the site, and the internal space is used almost completely. If a structure of this type is built on a foundation and equipped with heating devices, crops can be grown all year round. The only drawback of single- and double-slope types is the rather complex construction and the need to purchase a large amount of materials.
- Arched ones are easier to build, but they are not intended for long-term use due to the insufficiently strong frame. However, the streamlined shape makes it resistant to gusts of wind, and the condensation that collects inside drips onto the ground and not onto the plants. In addition, it is difficult to grow garden plants in an arched greenhouse (special shelves are equipped for them). Additional costs will be incurred by ventilation equipment, since standard side ventilation is not suitable for this type.
- Wall-mounted greenhouses and buildings that turn into residential buildings are primarily used as winter gardens. They are more economically beneficial, since the heat in them is maintained by heating the house. The disadvantage is that to grow full-fledged plants, additional lighting equipment will be required.
- Pit pits come in single- and double-slope types. Their main feature is that the side walls are made of brick and immersed in the ground. Thanks to this, heating costs are significantly saved.
Figure 4. Main types of greenhouses: 1 - single-slope, 2 - gable, 3 - arched, 4 - wall-mounted
If the greenhouse will be used not only for growing crops, but also as a decoration for a personal plot, it can be made polygonal. But in this case, construction costs increase significantly.
What is needed for this
Building a greenhouse with your own hands from wood is quite simple, because it requires a minimum of knowledge, tools and materials (Figure 5).
A frame is built from wood, which is then covered with glass or film. The main condition is to properly prepare and process the wood. The beams that will be used to build the frame are cleaned of dust and dirt, washed with clean water and dried. After this, they need to be sanded and treated with an antiseptic solution to prevent early rotting.
Figure 5. Construction of a greenhouse made of wood with your own hands
The beams are fastened together with nails or self-tapping screws, and after the structure is completely ready, it needs to be painted, painting not only the wood, but also the metal parts.
Where is the best place to place it?
When planning the placement of a greenhouse on a site, you need to take into account the prevailing winds and the movement of the sun. In order for the plants inside the structure to be illuminated as much as possible by the sun, it is better to place it from east to west.
If your region often experiences strong winds, it is advisable to install the structure near other buildings or large trees. At the same time, too much shading of the structure should not be allowed.
Foundation
When marking the area for the foundation, use a level, since the ground must be absolutely level. Otherwise, it will be difficult to install the frame, and if its parts can be adjusted and mounted, the structure will be subject to overload and the frame may become deformed.
Note: According to the rules, the room must have a slight slope for water drainage, but even when constructing small structures this rule may not be followed.
After marking, you can begin building the foundation. It must be very durable, since it not only supports the weight of the greenhouse itself, but also protects the plants from cold air and pests. As a rule, ready-made collapsible structures include materials for building a foundation (beams or pipes). But they are not strong enough and do not protect against frost and rodents. Therefore, it is recommended to lay it out of concrete or brick. The width must be at least 10 cm, and it should be placed below the freezing level of the soil.
You can also use special blocks to build the foundation. They are hollow inside, so after installation the inside is filled with concrete. They also use curb stone laid on a layer of concrete. Options for foundation construction are shown in Figure 6.
Figure 6. Options and order of foundation construction
If the foundation is high (for example, located at a height of 30 cm from ground level), it will be inconvenient to bring or bring fertilizers and water inside. In this case, decking is installed at the entrance or the door is lowered to ground level, using the free space to equip shelves on which seedlings can later be grown.
Additionally, it is covered with waterproofing material to retain heat inside. During construction, care should also be taken to equip a container for draining excess water. It is better to bury such a container in the ground so that it does not take up internal space. The drain must be tightly closed to prevent condensation and irrigation water from entering it. Practical recommendations for marking and building a foundation are in the video.
Construction stages
Several methods are used to build the basement:
- Sheets of heat-insulating material are laid on the inside, a binding wire is laid and the surface is filled with concrete;
- Cast blocks with gravel are placed on the base. This material retains heat well and has a high load-bearing capacity. But if the wall is expected to be high, it is additionally reinforced with reinforcement;
- Wooden materials impregnated under pressure with protective compounds are laid. In the future, the tree is additionally insulated.
The choice of material and method for building a basement depends not only on your financial capabilities, but also on the type of soil and type of foundation. In addition, certain types of plinths require additional processing. For example, a concrete base does not need to be painted, but if it is built from concrete or sand blocks, the surface must be plastered and covered with moisture-resistant paint (Figure 7).
As a rule, the kit of finished products includes a frame that only needs to be mounted. But if you are building with your own hands, the frame is most often made of wood or metal.
Figure 7. Base construction technology
For this, planed lumber or metal profiles are used. When choosing materials for the frame, you should pay attention to several important details:
- Lumber intended for construction is treated with a special green compound, so the frame will have to be additionally painted. Such wood is quite expensive, but its service life is longer than regular wood. It is important that the impregnation composition is poisonous, so the roots or leaves of plants should not be allowed to come into contact with the tree.
- Pillars, ceilings and other vertical elements can be made from boards (50 x 100 or 50 x 125 mm). To install beams, timber is used, the size of which depends on the length of the building.
The construction of the frame begins with roofing felt or rubberized material being laid on the base. On lumber intended for horizontal fastening, mark and drill holes for bolts and place them around the perimeter of the plinth. After this, we outline the places for attaching the vertical beams. A detailed frame installation diagram is shown in Figure 8.
Having attached the horizontal elements to the base, check them at level, cut the vertical beams into pieces of the required size.
Note: It is not recommended to cut vertical beams in advance, since they may cause errors when installed on a plinth.
The next step is to attach the vertical posts to the top beams. Having marked the position of each board or beam, fix it with an obliquely driven nail. The optimal distance between the vertical posts is considered to be 30 or 60 cm, since in this case it is easy to glaze.
Figure 8. Frame installation diagram for gable greenhouses
At the final stage, the vertical posts are attached to the lower and upper beams with nails, and to strengthen the structure, it is recommended to tie the joints with steel staples, wire or tape with an anti-corrosion coating. After this, the cladding boards and gutters are attached. During the work, all cut points and holes for fastenings must be treated with an antiseptic. You will learn detailed recommendations for installing the frame from the video.
Triangular greenhouse made of boards
This greenhouse is good for seedlings, but you can make it for peppers and eggplants. A stand is nailed in the middle of the base. There are two inclined boards attached to it. The cross section results in a triangle. If you need a long greenhouse, the same structure is installed approximately every meter. All tops are connected with a long bar or pipe. This greenhouse has a simple and convenient design.
Cucumbers are grown with it only until they begin to curl. Under the cucumbers, the covering material is removed, posts are nailed (screwed) to the sides, and twine is pulled between them.
Triangular greenhouse made of boards
Here's how to remake such a greenhouse for cucumbers
Greenhouse “Breadbox” and “Butterfly” - photo
This design is called a “bread box” because it looks exactly like a plastic bread container. Its lid also rises upward, hiding behind the second half. If you look at the photo, you will understand everything.
You can weld such a greenhouse-breadbox with your own hands from a profile pipe
There are two types of such products: opening on one or both sides. If it is shallow, you can work with a lid that opens on one side. If the width is more than a meter, it will be easier to work if there is access from both sides. This design with two opening sides has its own name: “Snail”.
A film or spunbond is stretched over the manufactured frame, but polycarbonate is more popular for this design.
The second design differs in the type of door opening. Its vault is also made on arches, but opens on hinges upward (see picture).
Butterfly greenhouse: when open, the lids resemble wings
They can be installed directly on the ground or on a prepared foundation made of bricks or timber. In some cases, the lids do not open immediately from the ground, but there is a small side of 15-20 cm.
Read how to make a beautiful vegetable garden (decorative and functional) here.
Simple DIY greenhouse
The simplest design of a greenhouse is considered to be made from arcs, boards and film. You can make this borage with your own hands. A base is assembled from boards of a given length and width, and arcs are attached to it. The upper points of the arcs are connected to each other by a bar.
Greenhouse option for tomatoes
What will you need?
To build a small greenhouse we will need:
- Two arcs (in our case, a children's hula hoop was used, cut into two parts);
- Four wooden blocks for the base (two short ones the width of the hula hoop, two long ones that determine the length of the greenhouse);
- A strip for connecting the arcs of the structure (equal to the length of the base);
- Two bars for film;
- Film;
- Fastening brackets;
- Nails and hammer (screws and screwdriver).
Photo of what a greenhouse looks like from the inside
From scrap materials
Turning unnecessary things into useful products - our people have no equal in this. They make greenhouses from things you would never even think of.
For example, you can easily make a greenhouse with your own hands from old window frames. When replacing windows, do not rush to throw them away. They can be used to make an excellent greenhouse. Moreover, the designs may be different. The simplest is a body made of boards, to which a window frame (with glass, of course) is attached on top as a lid.
A simple frame greenhouse: a wooden frame to which an old window frame is hinged
To ensure that the plants receive maximum light, one side of the frame is made higher (which faces south or east). There are different frames, any of them can be used for these purposes. As proof, here is a photo gallery of greenhouses made from frames that were made with their own hands by zealous owners.
Two frames made up of a house: the plants are covered from drafts, and the sides can be covered with film
Is the frame assembled? Why take it apart? Just make a body to fit its dimensions
You can also install two side by side. Get a long bed
You can also make an accordion so that the frames don’t stick out too much
They make greenhouses out of barrels. Cover with an old umbrella made of transparent film or cut-off plastic water cans.
Greenhouse from an old barrel
Way to grow cucumbers
A homemade greenhouse can be made from a plastic or foam box. Although “do” is a strong word. All you need to do is stretch the film.
Everything ingenious is simple
Do you have a plastic box? Can be adapted for seedlings
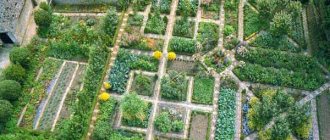
Types of greenhouses for beds
Mini-greenhouses for garden beds are very easy to build yourself. To do this, it is enough to select a covering material - film, agrofibre, polycarbonate or glass, prepare supports and correctly orient the entire structure.
Ground shelters for insulation
Beds under agrofibre warm up faster
One of the annoying problems of a gardener is the discrepancy between the timing of soil heating and the timing of sowing crops. This can be easily corrected with the help of ground shelters. This is done like this: after the snow has melted on the site, the beds are covered with greenhouse film or agrofibre.
The soil under the shelter warms up 10-14 days earlier, and the temperature under the film is 10°C higher than the surrounding temperature, which allows you to plant seedlings earlier, sow greens or vegetable seeds when the weather has not yet settled.
The simplest tunnel shelter on arches
Tunnel shelter on arches
This small “Snowdrop” type greenhouse can be easily built from available materials - agrofibre, PVC film or polyisopropylene. Suitable for growing seedlings, forcing greenery and for early planting of plants in the ground. Arches are used as supports, which can be made from thick steel wire, galvanized profile, metal-plastic pipe or long rods.
How to make a home mini-greenhouse with your own hands:
- Prepare a site for construction. If necessary, place compost or manure under the bed, and sprinkle 30-40 cm of fertile soil on top. It is better to make the width of the bed 0.6-1 m, length - 2.5-3 m, orientation - from north to south. You can fence the garden bed around the perimeter with boards to prevent the earth from sliding.
- Depending on the length of the ridge, prepare 6 or 7 sections of pipes about 2 m long and 12-14 pegs (50 cm) for driving into the ground and securing the arches. If there are no pegs, then it is better to take the pipes half a meter longer in order to securely fix them in the ground.
- Bend the pipes into arcs up to a meter high. You can make a special template on the board or use a large iron barrel of suitable diameter.
- Drive pegs every 50 cm along the long sides of the future greenhouse. Secure arches to them (or stick arches into the ground 25-30 cm below soil level).
- Install a connecting strip on the arches or simply tie the arches together with cord or wire.
- Secure film or agrofibre. You can use clips or just tie them.
- On the north side, collect the hanging end of the covering material, tighten and secure it, on the south side you can leave it free.
- Fix the film on the soil around the perimeter. It is better to take stones for this rather than cover them with soil, since periodically you will need to lift the film to access the plants.
Approximate installation diagram of a tunnel-type arched greenhouse
Box with transparent lid
The cassette mini-greenhouse is ideal for growing seedlings and early radishes. A box 40-50 cm high is made from boards; the width and height of the frame are chosen according to the size of the upper shelter. For early sowing of seeds into the soil, it is recommended to select soil in a box to a depth of 40 cm and fill the hole with biofuel. The fertile layer is 20 cm of ordinary soil. For pallets with peat tablets, it is better to make the frame small - 0.5 m * 1 m.
Cassette greenhouse with peat tablets
For the lid, you can take old window frames or cover the top with film (or better yet, agrofibre). You can also use thick glass or triplex, but in this case you need to ensure that the edge is sealed or carefully sanded. After seedlings, you can grow young greens under cover - onions, herbs, watercress.
It is better to orient such a structure from south to north.
Wooden mini-greenhouse under glass
A modification of the cassette greenhouse is a box with a transparent lid. Its difference is that the upper frame is installed at an angle relative to the soil surface. The length is arranged from east to west, the south side of the frame is usually half as low as the north. The dimensions of the box are arbitrary, and for better lighting of the plants it can be made of polycarbonate roof.
Drawing of a wooden greenhouse under glass
Butterfly house - a convenient portable shelter
A mini-greenhouse of the “house” or “butterfly” type is suitable not only for growing seedlings. Depending on the height, you can plant tomatoes, peppers, eggplants, cabbage, cucumbers and other vegetables in it to obtain early harvests. Such shelters can be assembled from available materials - boards, slats, film, agrofibre, polycarbonate.
Butterfly greenhouse diagram
The easiest way to make such a structure is to mount a frame from slats and cover it with film or sheath it with polycarbonate. Under polycarbonate, the frame can be assembled from a galvanized profile.
A distinctive feature of this type of greenhouse is that the gable “roof” is made movable on both sides. This makes it easier to ventilate and care for plants.
Cucumbers in a greenhouse “house” under film
To grow cucumbers you need a mini-greenhouse of a slightly different design:
- At the chosen location, prepare a bed for two rows of plants and make a wooden frame. Such a “house” can be arranged on the south side of the house, but the seeds in it must be sown in one row.
- Attach the racks for the side walls to the harness. The height of the central pillar is 1.5 meters.
- Connect the central posts with a longitudinal strip. Twine for gartering cucumbers will also be attached to it, so it needs to be made strong.
- Sew up the sides with film, glass or polycarbonate.
- A removable roof can be made in the form of a frame with sheathing, or a film, which, if necessary, is simply rolled up and tied up.
Mini-greenhouses for seedlings
For those who grow seedlings for their own vegetable garden or flower garden, large volumes are useless. We need small greenhouses. Moreover, many grow seedlings on balconies. All of the above designs can be used for a balcony in reduced sizes. For very small plantings, you can even take plastic egg trays. On one side there will be a container for soil and a lid instead of a shelter. Look at the photos for other ideas.
Make a greenhouse cabinet from wooden planks and cover it with polycarbonate
A plastic egg tray can also be used as a mini-greenhouse for seedlings
A box is assembled from planks, glass is inserted, film or spunbond is stretched, and polycarbonate is attached. Mini greenhouse for seedlings is ready
Thick wire arcs attached to the box, film on top. The greenhouse for the balcony is ready
The use of plastic bottles is already common, only the shape is non-standard. The bottle is only cut and a glass with seedlings is inserted inside, or you can plant it directly in the lower part...
Another way to make a small greenhouse
Their plastic tray can be an individual greenhouse for seedlings planted in the ground
Another design of a small greenhouse for a balcony made of arcs
And this is a portable mini-greenhouse for plants
You can assemble a greenhouse with your own hands in a few hours. There is no need to build any complex structures. Everything is very simple, economical and practical.