Copper tube floor hanger
So, to make a floor hanger, you will need to go to a plumbing store and buy 2 three-meter pipes.
Thickness – 2 centimeters. They need to be cut into the following segments:
- 2 tubes 1.5 meters each;
- 2 x 1 meter;
- 4 x 25 centimeters.
If you don’t have a grinder or a hacksaw, you can order trimming directly from the store. Usually this is done for free.
You will also need:
- Copper elbows of the same diameter - 4 pieces.
- 2 T-rounds.
- 2 caps.
- Epoxy glue or cold welding for gluing. In principle, you can cook them and it will be more correct, but then you will need a gas burner.
- Rubber pads for feet.
When everything is ready, you can start assembling:
- First, measure the area where the clothes hanger will be placed.
- Then connect the small tubes (these will be the legs) and connect them to the squeegee.
- You need to put 2 elbows on the tubes and connect them together with a meter-long tube.
- One and a half meter pipes are inserted into the T-grip. From above they need to be connected with another meter-long tube through the elbow.
Ready! In just a couple of hours, you can assemble an excellent hanger for your hallway with your own hands. Please note that epoxy or cold welding does not “take” right away. She needs at least an hour to harden.
Portable hanger made of plastic pipes
Copper is expensive, but plastic, not so much. A hanger made from polypropylene or PVC pipes will cost less and are also easier to work with.
For the hanger you will need:
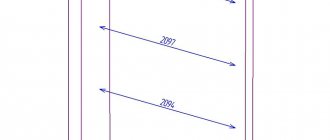
- The tube is 2 meters long with a diameter of 2.5 centimeters. They will need to be divided into segments: 6 x 12 centimeters, 1 – 80, 2 – 20, 1 – 10.
- 45 centimeter tube with a thickness of 2 cm. You will need three 15 centimeter sections.
- 4 elbows with a diameter of 2.5 cm.
- 3 elbows with a diameter of 2 cm.
- 6 T-rounds.
- Glue for plastic.
- 4 adapters from 2.5 to 1.25 cm.
- 3 adapters for 2 cm.
- Spray paint.
The hanger is assembled with your own hands like this:
1. So, first you need to cut the pipes into the necessary pieces. This can be done right in the store.
2. Now you need to assemble the legs. They are assembled from short tubes through bends.
3. Now the “hand” is assembled.
4. An 80 cm piece is inserted into the center of the legs. You can put “hands” on it.
All connections must be secured with glue so that they do not move. When it dries, you can paint the hanger. Any spray paint will do. It's better to use good enamel. It will create a thick protective layer that will not wear off. In addition, it can be applied in 1 layer.
DIY photo of hangers made from PVC pipes
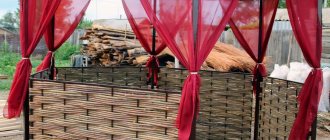
For greater stability, you need to provide either a reliable base or fix it to the wall. Polypropylene structures do not take up much space, if necessary, they can be used not only at home, but also outside. To tightly connect pipes, you should use a special soldering iron, you can rent it. Connect elements construction can be done using glue, or without it. Polypropylene is not subject to corrosion, has a high degree of resistance to ultraviolet radiation and moisture
Mobile hanger on wheels
To make the floor clothes hanger more mobile, you can screw legs to it. You can glue them using the same glue that the stand was assembled from.
The wheels must be metal. Plastic adheres worse and can withstand less load from clothing.
Convenient coat rack with shelves on wheels
If you need not just additional storage space for clothes and shoes, but a functional piece of furniture, then a homemade coat rack with shelves on wheels is a great option.
Essentially, this is an improved “version” of a mobile hanger made from water pipes.
The only difference is that the modified design has an additional vertical module with shelves, which is attached to the base, and an upper shelf for flower pots.
First of all, we make a module with shelves.
We saw off two wide boards of the required length, make markings and screw wooden blocks onto them on which the shelves will rest.
Next you will need to prepare 5 shelves. We lay them on the support bars, and screw them on the sides with self-tapping screws to the side walls of the module.
At the next stage we make the base of the hanger.
This can be either a single piece of plywood, chipboard or MDF, or two boards glued together or fastened together using wooden slats.
We screw furniture wheels to the bottom of the base. Then we install a vertical module with shelves. You can “plant” it on wooden dowels or screw it onto wood self-tapping screws (but it is better to use Euro screws - confirmed ones).
The stand and crossbar are made from steel water pipes. We connect them together using fittings. We screw the lower part of the rack to the base, and the end of the crossbar to the side wall of the vertical module.
At the last stage, all that remains is to install the top shelf. Metal pipes can be painted, and wood can be coated with mineral oil or wood stain. Or you can leave it as is.
Master class on creating
a functional
floor-mounted clothes hanger with your own hands
in the author’s video below. Video source: YouTube channel Laini Ozark.
If we realistically evaluate labor costs, then among all the design options described, this is perhaps the most complex.
But still, even a novice woodworker can cope with this work. In order not to waste time gluing boards, you can use a purchased furniture board.
Wooden floor hanger
A wooden floor hanger is a cool idea for a hallway. She looks stylish, unusual and easy to put together.
It will require 4 straight sticks. You can take cuttings from a shovel or hoe. You will also need paint and masking tape to bring them into their “divine” form.
They are very easy to make and will take no more than 10 minutes:
- First, the cuttings need to be painted in the main color.
- Then make a ring out of masking tape and cover it with another layer of spray paint.
Now you can start forming the hanger. The sticks need to be tied tightly with a decorative cord like this.
- Then you need to lift it and straighten the legs.
The hanger looks cool. You can always fold it and put it in the closet. The downside is that you can't hang a lot of clothes on it.
Board hanger
An avant-garde floor clothes hanger that is easy to make with your own hands. All you need is a good board, preferably from rich wood species: beech, oak or walnut.
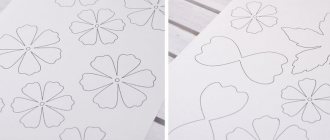
It is advisable to take a planed board so as not to waste a lot of time on processing. You need to mark the grooves on it, as in the photo. This can be done with a manual or electric jigsaw.
It can already be used, but it is advisable to modify it:
- Surface grinding. It is better to remove all irregularities with a plane to level the surface. If it is already smooth, you can start sanding it with sandpaper. First coarse (120 R), then 320, 600, 800 and so on with a minimum step of up to 1500.
- Varnishing. When the surface is prepared, it needs to be covered with a generous layer of varnish. It is better not to use oil - it may not dry completely and ruin the clothes. First, the board must be moistened with a cloth and waited 15-20 minutes until it dries. The water will slightly raise the fibers, which will need to be sanded with 1500-grit sandpaper. After this, you need to coat the board with varnish in 2-3 layers.
That's it, the great hanger is ready. Takes up little space and can be hidden behind a closet if necessary.
Mobile hanger made from water pipes
Homemade
A floor
clothes hanger made of plastic pipes
is a good option for a home hallway, but the design is still not rigid enough.
When storing large quantities of clothing, PVC pipes
or made of
polypropylene
may bend slightly.
If you need a more rigid structure, then there is an alternative option - a floor hanger made of pipes
, which are used when installing water pipes. It’s not difficult to make it yourself.
We suggest taking the idea of the author of the YouTube channel Hannah Cho as a basis. An interesting feature of this hanger is that it is not only stable, but also mobile.
. Thanks to the wheels, it is easy to move indoors.
Now let's take a closer look at how
metal
hanger . The materials for its manufacture are shown in the photo below.
An edged board is used as the base of the hanger.
We saw off the workpiece to the required size and grind it if necessary. You can immediately paint the board or coat it with wood varnish. Before varnishing, the surface can be impregnated with stain.
Next, using 90-degree corner bends, you will need to connect three pipes. As a result, we will have a U-shaped structure - these are two side posts and the top crossbar of the hanger.
The author decided to make the support legs into which the racks will be inserted from plumbing fittings: flanges, couplings, angles and tees.
To assemble one support leg, you will need two flanges, two angles, four couplings and one tee. The assembly sequence is as follows:
- First, we take two flanges and screw two couplings into them.
- We screw the corners onto the couplings (at 90 degrees).
- We screw the two remaining couplings into the side holes in the tee.
Then we connect both parts of the support leg together. Using the same principle, we make the second leg.
At the next stage, we screw the support legs onto the bottom of the racks, and screw them to the top of the base of the hanger.
You will need to screw furniture wheels to the bottom of the base (it is advisable that they all be swivel).
The two wheels must have a lock so that the floor hanger does not move from side to side when you need to hang or remove hangers with clothes.
Wooden
the base can be used to store indoor or outdoor shoes. This way you will save some useful space in the hallway.
In fact, we have created an original hanger in the Loft style, which will complement the interior
, decorated in an industrial style.
If you don’t like the brutal appearance of metal
pipes, you can paint them.
In general, this design is very reliable and will not bend even under heavy weight. You can safely hang jackets, coats and fur coats on it.
Details on how to assemble a mobile
floor
clothes hanger
, shown in the video below.
One of the main advantages of this design is also worth noting that its manufacture requires a minimum of tools: in fact, only a hacksaw or a hand-held circular saw to saw off the board, and a screwdriver.
Complete wardrobe rack made of wood
How to make a clothes hanger with your own hands that will not be inferior to store-bought ones? This instruction will help you make a stand that will last forever from natural wood.
For it you will need:
- 2 beams 40x40.
- Handle for installing the crossbar.
- Packaging of wood screws.
- Saw on wood.
- Miter box (preferably).
- Coal ruler.
- Drill with wood drills.
- Screwdriver.
When everything is ready, you can start assembling:
1. It is necessary to cut out the necessary parts from the bars in accordance with the drawing.
2. The side ribs are sawed at 45 degrees to fit correctly.
3. All that remains is to connect all the parts together. To prevent the tree from bursting, it is necessary to pre-drill a hole for the screws.
Once assembled, the hanger must be coated with a thick layer of varnish. Since outer clothing, including wet ones, will be hung on it, the tree may become infected with mold. It is also recommended to coat with fire retardants and antiseptics.
DIY coat hanger
Hello to all DIY lovers. It's no secret that clothing plays a big role in a person's life; it helps us overcome the cold seasons, as well as protect ourselves from the effects of the external environment, be it snow, rain or other adverse weather conditions. Upon returning home, there is always a place for clothes hangers, which allows you to place, for example, your jacket until the next time you go outside. The fact is that hangers sold in stores cannot always be installed in a convenient place, whether due to lack of space or simply an inappropriate design that does not fit into the overall interior of the hallway. In this article I will tell you how to make a homemade coat hanger that will always be within seconds’ reach and at the same time not take up much space. To make a hanger hanger with your own hands, you will need:
* Several boards * Sawing machine * Dowel router * Thickness planer * Jointer * Wood glue * Clamps * Wooden dowels * Chromed metal pipe * Flange for attaching the pipe * Electric drill * Screwdriver * Self-tapping screws * Pencil * Wedges for gluing * Grinder * Angle grinder Here are all the materials and tools with which you can make this homemade product.
Before reading the step-by-step assembly, I suggest watching a video on how to create this hanger.
Let's start assembling.
Step one.
First, you need to level the surface of the square board on a jointer, and then pass it through a surface planer; this is done so that when gluing the boards there are no gaps that could weaken the part due to loose pressing across the entire plane.
Now you need to saw the board on a sawing machine; in this case, it was necessary to make a dozen narrow boards.
When working with a sawing machine, be as careful as possible and use protective equipment, goggles and a respirator.
After all ten boards are ready, we glue them together into one “pie” and press them using clamps for gluing the boards. Next, wait for the glue to dry completely.
Step three.
We saw the finished board of boards in half on a sawing machine, then we jointed each part.
After jointing the boards, you need to make an oblique cut at 45 degrees for further joining of parts.
We also run the parts through a thicknesser, ensuring they are of the same thickness.
We sand the workpieces with a sander with medium-grit sandpaper.
Step four.
We set an angle of 45o on the dowel router and make holes for future dowels in each part, two for each will be enough.
Step five.
It's time to saw off the required section of chrome pipe for the hanger; an angle grinder helps with this.
When working with an angle grinder, be careful, remove flammable objects away and use headphones and safety glasses.
With its help, we grind the end of the pipe and remove burrs from the cut area.
Step six.
Now we install the pipe on a homemade wooden frame of the future hanger using pipe flanges.
There are three holes on each of the flanges, thanks to which the pipe will be attached to the planks. First you need to drill holes for the screws, and then use a screwdriver to secure the flanges with the pipe to the boards.
The final touch is to protect the hanger from external influences, moisture and dirt. It is best to use oil for wooden furniture.
At this point, the homemade hanger is ready, installing it indoors is very simple and will not take much time; just install a couple of dowels in the wall, which will hold it securely through the body of the hanger.
Thank you all for your attention and creative success.
Become the author of the site, publish your own articles, descriptions of homemade products and pay for the text. Read more here.