During construction work on your dacha or suburban area, sooner or later the question arises: where or where is the best place to park your car? Is it worth building a large permanent garage, or can you make a less budgetary, but extremely practical carport? In this article, we will take a closer look at how to make a carport for your dacha with your own hands and tell you why you should choose this option.
Carport: photo of an extension to a house
This material is divided into two large chapters:
- The first part tells about what kind of shelters there are for your “iron horses”. A complete classification is described, starting with the type of roof and frame, ending with the type of structure and the material from which it is made.
- In the second chapter we will look at how to build a carport with your own hands. As an object, we chose an arched structure with a frame made of a profile pipe - the most common option.
You can also use the services developed by our team:
- Calculation of the price of polycarbonate in the central regions of the Russian Federation, depending on the thickness of the material and other parameters.
- Calculation of the price of a canopy depending on its type and modification of your car.
A polycarbonate carport on a summer cottage is a common practice among people who value their vehicle. Building such a structure is not a difficult task, and you will be using it for quite a long time. At the same time, your car or truck will be protected from adverse natural influences.
Why you shouldn't leave your car without shelter
First, let's talk about safety precautions. Surely you love your car and would not want it to spontaneously break down. What can threaten a car in the country? Hail, for example, can cause significant damage to the exterior, and strong gusts of wind can cause branches and rocks to get into the car, damaging or breaking the windows. It’s so easy to avoid this, just install a small canopy over the car to the house. The problem will be solved, and while the car is away, you will be able to organize picnics and parties under the canopy - this design is multifunctional.
Country carport options
The variety of design options makes you throw up your hands at first - which carport is better to choose? You have to think for a long time when looking at models. However, we would advise you to consider this design not only from a functional point of view. Don't forget that the aesthetic part is also important. Builders will tell you that the best carport is the one that is quick to build. We will try to decide which one is suitable for your site.
With a metal frame for the house
Shed with gable roof
Gable carports are like mini housing for a car. They are attractive in appearance, especially when there is a house nearby with a roof made of the same material and color. Gable roofs for canopies are installed where there is room for walking. For example, when the area under the canopy is far from buildings. Or, when an extension is made, the canopy is made in the same style as the house.
The two roof slopes are attached to a strong sheathing, which is tied around the perimeter. Due to reinforcement, the structure becomes durable. It is stiffer and stronger compared to a lean-to canopy. Snow melts off a gable canopy faster, reducing the load on the supporting structures.
Gable awnings are more difficult to install than single-pitch ones and take more time. In essence, a gable canopy is a connection between separate pitched roofs. Accordingly, they will require more material with identical dimensions.
By type of design
When determining the type of design, you must rely on the dimensions of your car. Carports are divided according to the type of construction into:
- folding;
- open;
- closed;
- sliding
Each of them has both its own advantages and a number of disadvantages.
Folding carports
Folding carports are an ideal option for a small area - in fact, they are an extension of the canopy of your veranda and can simply be rolled up when not needed. This folding design is as practical as possible, it does not take up much space, however, it will not become a second kind of gazebo, and it is unlikely to protect you from slanting rain.
Closed carport
Such a building is, in fact, a semblance of a garage, only with less energy consumption for its construction. The structure has sheathed walls and fits perfectly into the overall landscape design, resembling a gazebo. Its only drawback can be considered bulkiness, because a closed carport is usually not adjacent to the house, but is usually a separate structure.
Outdoor carport
This carport is a type of covered gazebo, but without sheathed walls. It's easy to install (it's unlikely to take you more than a day to build), and you can also use it as a gazebo. The disadvantages are obvious: such a carport at the dacha will not protect against snow and will not become a refuge in the winter.
Carports: photo of option for two vehicles
Sliding carport
A sliding carport is an opportunity to kill two birds with one stone: to cover the car and not take up much space on the site. Difficulties may arise at the assembly and installation stage - sometimes it can be difficult to understand the construction schemes, especially if this is your first experience in constructing such objects.
Sliding canopy option
Original car canopies
Simple carports will no longer surprise anyone, so people turn the most unusual ideas into reality by creating carports. Originality is manifested, as a rule, in the form of a canopy or unusual materials for its construction. For example, the carport made of plastic bottles, which was invented by Garth Britzman, is striking in its zest.
The photo below shows two polycarbonate structures, a real miracle that costs a lot of money. A dome-shaped canopy will save the car from any precipitation, even slanting rain. At the same time, the canopy is large enough to conveniently open the doors and trunk of the car. The main thing is to find a site for such a carport.
Here are two more unusual canopies that attract attention with their frame. The frame is made of wood, and the roof is not just pitched, but wavy. Making such a carport is not easy; you need a special wood processing machine.
The carports in the next picture are also quite unusual. The canopy on the left is a metal and plastic structure that automatically moves and extends. A remote control is used to control the canopy. The carport on the right attracts attention with its supports made from a combination of wood and metal.
Few people will be able to install such carports at their dacha, but the next two options are quite feasible to erect near the house, and they look non-standard. For manufacturing you will need a metal profile bent in a certain way and polycarbonate. The construction will be expensive, but not prohibitive.
So, when planning to build a carport, decide on its design, create a sketch and, if necessary, a detailed drawing. Only after this will it be possible to translate the idea into reality. We hope our review will help you decide what you would like for your “iron friend”.
Roofing material
If you don’t yet know how to make a carport, now it’s time to decide on roofing materials. This is an important part of the construction, and the choice must be made carefully. There are several optimal solutions:
- polycarbonate;
- metal profile;
- metal tiles;
- textile.
Polycarbonate carport
A country carport made of polycarbonate is an option for those who value their time. The material is practical and has a number of useful properties for construction:
- light weight;
- low price;
- flexibility;
- ease of installation
- durability.
The downside may be that it is not environmentally friendly. Also, if not properly cared for, scratches often appear on this material.
Metal profile
This material for the roof of a carport looks more presentable than polycarbonate, however, it also requires more when installing. The metal profile is coated with polyester or plastisol - this significantly strengthens it, making it the most reliable. You can also note the distinctive features:
- sustainability;
- durability;
- strength.
The disadvantages of a metal profile lie in the price (the material is not cheap) and in its certain “sonority” - raindrops falling on the roof can be too loud.
Metal tiles
When choosing this material for the roof, be sure of its durability and practicality. This material is distinguished by:
- light weight;
- fire resistance;
- attractive design.
However, metal tiles have a drawback - the material is too noisy during rain or hail.
From fabric
A fabric carport is the best way to protect your car from the sun. The fabric is an awning, it is lightweight and its installation is quite simple. Unfortunately, it is hardly possible to call it durable, because such a canopy will need to be periodically updated - remove the awning and replace it with a new one.
Which carport is better?
Each type of material has both pros and cons. Thus, natural wood burns and often rots, metal alloys become covered with rust and require a welding machine for their installation. In addition, these materials need to be maintained regularly. It is very troublesome to build a building from stone and brick; experience in laying, mixing concrete mixture is required, and the time required is much greater than when constructing a metal or wooden canopy.
The choice in this case is determined by your abilities. For some, it would be preferable to build a structure out of wood, for others it would be more convenient to weld metal parts and make a very reliable and high-quality canopy for their “iron horse.”
If we talk about roofing materials, then, of course, it is much easier and faster to use rigid sheets: corrugated sheets, polycarbonate or slate. Rolled roofing felt has a lower cost, but to install it you will additionally have to construct a sheathing for the rafters. The same can be said about soft tiles.
The optimal solution is polycarbonate or corrugated sheet. If we compare these materials, it should be noted that corrugated sheeting often suffers from corrosion, but a polycarbonate carport has no disadvantages.
By roof type
The roofing material has been selected and now it is important to decide which type of roof is right for you. The roof can be:
- single-slope;
- gable;
- arched, etc.
We recommend that you make a choice based on your own preferences - we will tell you about some of the advantages of each design.
Project for one car made of wood and tiles
Single-pitch canopy
A lean-to carport is the most economical construction option. Typically, such a structure is adjacent to the house and perfectly protects not only the car, but also the entrance to the house.
In order for such a roof to be reliable, however, you will have to seriously try - mainly, make sure that the angle of the slope has a sufficient degree of inclination. Otherwise, your carport with a pitched roof will collect a lot of snow in winter, which can cause it to sag or even collapse.
The option with a pitched roof is good if your car is small.
Gable canopy
Gable roof with metal tile roof
A gable roof is a more reliable option for winter. It is also important to take into account the fact that its construction will take a little more material and time - the drawings for the structure will be more complex. A gable carport is most often installed at those dachas where people spend most of the time of the year, including the winter period.
Arched
Arched carports are cheaper than gable carports. There are quite a few options for their designs, but most often such structures are made from an 80x80 mm profile pipe and 8 mm cellular polycarbonate. In this case, beams are most often used: 80x80 and trusses: 60x60/40x20.
Construction of a polycarbonate carport
The frame for the car shelter is made with your own hands from a profile pipe. The top can be covered with polycarbonate. First, they make the base for the platform. For it, a layer of soil 30 cm thick is removed. Holes are dug on the sides for installing supports with a depth of 70 cm to 1 m. The bottom of the future site and the holes for the supports are filled with a mixture of sand and gravel 10 cm thick. It is well leveled and compacted. Then wooden formwork is installed. For strength, a reinforced frame is made of metal rods with a diameter of 8-12 mm. They are tied in the form of a mesh with a cell size of 20x20 cm. The area is filled with concrete mortar.
Important!
The holes for the support pillars are reinforced separately. They are filled with concrete mortar to a height of 20 cm. Then pipes for supports are installed and concrete is added, filling the hole to the ground level.
After the concrete has completely hardened, the next stages of construction begin. The supports in the upper part are connected by welding a metal profile with a cross-section of 4x4 cm to the base. The auxiliary strapping is secured, maintaining an angle of 90° to the supports to form a right triangle.
The stiffening ribs of the rafter system are attached by welding. Then the metal profile parts are welded at right angles to them at a distance of 80 to 120 cm. A canopy is welded on the edge. Metal elements are cleaned and washed with a solvent. After complete drying, they are covered with a layer of primer and painted.
Polycarbonate sheets are laid on the rafters of the carport. They are secured to press nuts, then water will not seep inside. When fastening, maintain an interval of 30 to 40 cm. Open end sections of polycarbonate sheets are sealed with planks. The side parts of the canopy are covered with a lattice of wooden slats or an awning.
By frame type
The roof is one thing, however, the frame of this building is important. They come in a variety of forms, each with its own positive and negative properties. The following types are distinguished:
- wooden;
- metal;
- brick;
- forged.
Most often, a frame is selected for the purpose of maximum integration into the landscape design of the site (in other words, so that it is in harmony with nearby buildings).
Wood
A carport frame made of wood is an ideal option for lovers of environmentally friendly materials. Wood is used quite often, and there are a number of objective reasons for this:
- low price;
- attractive appearance;
- availability of processing;
- reliability of structures.
Soft tiles on the roof of a gable carport
. However, there are also disadvantages. One cannot help but recall the easy flammability and susceptibility to rotting. Also, a wooden carport must be constantly treated with anti-insect compounds.
If you still decide to give preference to a wooden canopy, then you can familiarize yourself with the main types, characteristics, average prices and photographs of wood in an interactive form.
Metal (corrugated pipe)
A metal structure is, first of all, a reliable building. Metal is not afraid of destruction, it is durable and easily withstands bad weather. It is also worth saying a few words that such canopies will not cost you that much - if you choose corrugated pipe as a material, then the assembly will not increase your budget.
The disadvantage of the material will, of course, be corrosion - you will have to periodically treat the frame with anti-corrosion agents.
Brick
Brick is a material that makes sheds more like good-quality garages. Brick has quite a lot of advantages:
- strength;
- little fear of temperature changes;
- durability;
- aesthetic appeal of buildings.
Frame on brick pillars
Unfortunately, the material also has many disadvantages: it is not cheap, and it takes quite a long time to build from it; you will also have to think about a stronger foundation, because the construction will be heavy.
Forged
A wrought-iron canopy over the porch or a free-standing one will not only protect your car, but will also create a feeling of aesthetic harmony in the yard (especially if you want to use the building as a resting place when you are not in the car). The disadvantage may be high airflow - such structures are rarely sheathed, so it will only protect you from summer rains, but not from precipitation in winter.
Single-pitch carports
A lean-to canopy can be made as an extension to a house (outbuilding, bathhouse) or separately. This is a canopy with a slope in one direction.
When the site and entry point are limited, a canopy is attached to the house and sloped away from the wall so that snow and water drain away at an angle.
Such a canopy requires less fastening material and supporting structures than gable or arched canopies.
Sheds can be made from any material. As a rule, they are matched to the color of the roofs of buildings on the site.
If a canopy with a slope in one direction is a free-standing structure, consider the slope in the direction where there are no garden paths and paths, so that rainwater and snowdrifts do not interfere with the passage.
In our SNT there was a case when a summer resident, without the consent of another neighbor, installed a carport and made a slope over their common fence. All the snow fell through the fence to the neighbor. In the spring there were snowdrifts and icicles, in the summer the streams did not dry out - the shady side. The neighbor hasn’t gone to his dacha for a year. Arrived in May. The tiled garden path that runs along the fence has turned green and covered with moss, and in some places there is still snow. Civil strife began, all areas were cursed. As a result, the canopy had to be removed.
On a note! If the shed is located directly under the slope of the roof of the main house, do not forget to take into account the increased snow load. Layers of heavy snow will slide down from the common roof onto the canopy.
So, if in the Moscow region the snow load per 1 square meter = 180 kg, then with additional snow falling from a higher surface the load will increase to 300 kg per square. This means that you need to choose either a more durable material or do frequent lathing. With proper planning, a lean-to canopy fits perfectly into the space as an additional or separate structure, is easy to install and is economical.
We build a semicircular carport from polycarbonate and metal with our own hands
Now that you know about the types of carports, it’s time to learn how to make a carport with your own hands from polycarbonate in the courtyard of a private house. This is easier to do than it might seem at first glance. All you have to do is follow the instructions carefully:
- select the necessary tools;
- choose a location on the site;
- prepare a project and drawing;
- lay the foundation of;
- install the frame;
- lay the roof;
- lay the floor.
Let's look at each stage separately.
Material and tools
When we build something in the country (be it a house, a gazebo or a shed), it is important to understand that the quality of tools and materials comes first. You can’t make a good building out of bad materials, so go around the stores several times in search of high-quality tools and materials. To build a carport with your own hands you will need:
Materials:
Anchors
Profiled pipe
Concrete Corner Gravel
Cellular polycarbonate
Screws with thermal washers Fittings
Cink Steel
Sand
Tools:
Welding machine
Screwdriver
Bucket
Gloves
Extension Shovel
Bulgarian
Trowel
Drill
Hammer
Rope and pegs
Screw keys
Choosing a place on the site
When choosing a location on a site, pay attention to the location of the territory itself. It is highly not recommended to install wooden buildings in low-lying areas - they will not last long due to humidity. You also need to understand that if you would like to install a brick structure, then a more thorough foundation is needed for it, and therefore you should choose a place that is more level and preferably without the presence of nearby groundwater.
Also worthy of attention is the fact that a car needs not only space in the canopy itself, but also an area to drive up to it and turn around. As soon as you find such a place on your site, start designing.
Project and drawing of a carport
Building a carport for a country house with your own hands requires drawing up a project - this is the next stage, and, I must say, it is no less important. To do the work yourself, you must understand as clearly as possible what dimensions the building will be (height, width, length), what kind of roof you choose and how you will use it. If you have found the answers to all these questions for yourself, you should develop a drawing of the canopy.
| # | Description |
| 1 | Polycarbonate |
| 2 | Lathing |
| 3 | Roof truss |
| 4 | Tie farm |
| 5 | Rack |
A good do-it-yourself drawing for a carport should contain several projections. Draw one short side, one long side, one top view. If you prefer unevenness and asymmetry, you must indicate this too. Enter the dimensions, mark the mounting points, the optimal width and height (taking into account the parameters of your car). The more information you display on your carport design, the easier it will be for you to build in the future.
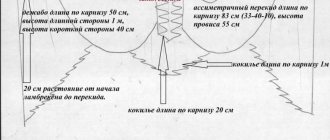
We invite you to familiarize yourself with the interactive form of standard sizes of different types of polycarbonate carports. We also attach a project drawing of an arched canopy. (Dimensions may vary depending on your specific plan.)
Project drawing of an arched canopy
| # | Description |
| 1 | Cellular polycarbonate |
| 2 | Lathing 40×40 |
| 3 | Truss belts 40x40 |
| 4 | Arched truss |
| 5 | Rack 80x80 |
| 6 | Base plate 200x200 |
| 7 | Truss belts 30x30 |
| 8 | Side truss |
| 9 | Rack 80x80 |
| 10 | Base plate 200x200 |
Foundation
Building a foundation for a polycarbonate carport with your own hands involves a step-by-step procedure.
- Dig holes 70-100 cm deep and 35-40 cm wide according to the number of supports. Make preliminary markings so as not to make a mistake with the location of future supports.
- Place waterproofing material at the bottom of the holes.
- Place a 16 mm reinforcement cage into the holes so that its uppermost part is at ground level.
Fastening fittings 16 mm - You fill in crushed stone with sand and pour the concrete mixture in layers, gradually compacting each layer. The hardening time is 3 days.
- Cut out a 10 mm foundation embed from galvanized steel and weld it to the reinforcement after the concrete has hardened.
- Drill holes in the embed for anchors with your own hands (approximately 50 mm, depending on the anchor). Clean the hole from dust and pieces of concrete.
- Hammer the M12x150 anchor into the prepared hole with light blows of a hammer, then tighten the nut with a wrench.
Fastening anchors - We weld the supports to the mortgage at an angle of 90 degrees.
- It is necessary to weld 4 gussets cut from 10 mm galvanized steel to the mortgage and support posts. This is done for greater stability.
Construction of a foundation for a canopy
| # | Description |
| 1 | Pillar |
| 2 | Headscarves |
| 3 | Mortgage 10mm |
| 4 | Reinforcement cage 16mm |
| 5 | Concrete with crushed stone |
Frame
- Carry out calculations for the height, width and angle of inclination of the arched truss. Also calculate the parameters based on the expected load level. It must be remembered that arched structures, in turn, are divided into: round hipped polygonal
- We use truss chords (top and bottom) 40x40 mm, braces 20x20 mm, racks 80x80 mm.
- Set the step between nodes, as well as the number of spans. The smaller the pitch, the higher the strength of the roof, but the greater the weight. The greater the weight, the thicker the profile pipes and the strength of the foundation should be. We recommend a pitch for trusses of no more than 100-140 cm for large sizes and 40-60 cm for small ones. However, we should not forget that everything here depends on the number of spans.
Hemisphere truss frame - After taking measurements, it is necessary to determine the method of installing the arched truss and carport frame: on the ground, or directly on site, depending on the dimensions.
- To obtain accurate data, the best advice is to use an engineering calculator or computer algorithm. You can also rely on the indicators of SNiP P-23-81.
- If your arch is not yet complete, but consists of 2 or 3 parts, you can use M12x35 bolts for connection (or weld).
- Attach the arched trusses to the racks using a welding machine or M12x110 bolts. This operation cannot be done alone, so ask someone for help. Use a level and tape measure to check the correctness of this part of the frame.
- The guides are attached to the upper parts of the arches. You can also use a welding machine or M10x55 bolts.
- Treat the surface with an anti-carrosion compound and proceed to installing a polycarbonate roof.
Roof
- Selecting the type of profile for cellular polycarbonate. To choose correctly, you need to familiarize yourself with the parameters of the stiffeners. The data is shown in the table below. For an arched canopy, we recommend choosing a material with a thickness of 8 mm and a bending radius of 1400 mm.
Construction type Picture Panel thickness, mm Distance between stiffeners, mm Weight Minimum bending radius, mm Single chamber 4 5,7 800 700 6 1300 1050 8 11 1500 1400 10 1700 1750 Two-chamber 16 20 2700 2700 Reinforced 10 16 1700 1750 16 2700 2800 - An important point is that different polycarbonate materials are suitable for different canopy designs. You can see the type of canopy roof depending on the thickness of the panel below.
Visor 6 mm
Arched 8 mm
Inclined 10 mm
Horizontal with a slope of 16 mm - As a rule, the length of the panels is 6 or 12 meters, and the stiffeners are located along the length of the sheet. Use the data to calculate the amount of polycarbonate for your roof.
- We cut the polycarbonate into separate straight pieces of long length using a grinder. First, make a marking where we will cut, and only then get to work. Cut sheets 10-15 cm longer than the arc of the arch.
Important: The grinder must have a cutting wheel and frequent teeth. Cut at low speeds and strictly between the stiffening ribs - in this case the cut will be smooth and correct.
Honeycomb panel markings
Start of sheet cutting
Completing the cutting of polycarbonate
After the work has been done, it's time to learn how to attach polycarbonate to a metal frame.
- To connect the sheets you will need a special detachable connecting profile. Please purchase it separately. Do not forget that you need to leave compression gaps, since polycarbonate tends to expand when temperatures change.
Detachable connection profile# Description 1 Polycarbonate 2 Detachable connection profile 3 Profiled pipe 80x80 mm 4 Screw 5 Thermal washer - For direct fastening, use thermal washers (we recommend matching the color to the polycarbonate). They are attached with special core drills at the rate of 6 pieces per 1 square meter. Different thicknesses of material will require thermal washers of different lengths. See table below.
Thickness of cellular polycarbonate, mm Minimum length of self-tapping screw, width 4.8; mm Minimum length of self-tapping screw, width 5.5; mm 4 25 25 6 25 25 8 32 32 10 32 32 16 38 38 25 45 45 32 50 55 - Drill the first holes no closer than 45 mm from the edge of the sheet so that the layer does not crack.
fastening polycarbonate to a profile pipe# Description 1 Arch 2 Polycarbonate 3 Screw with thermal washer 4 Screed 5 Screw 6 Retainer 7 Thermal washer 8 Screed - End profiles should be placed on the ends of the polycarbonate.
How to lay out the floor under a canopy
The final stage in the construction of a polycarbonate carport is laying the floor. Please note: the decorative component here will fade into the background, because it is important that a car can be driven on the floor - therefore, the material must withstand serious weight loads.
Single-pitch made from corrugated pipe
The ideal option would be a stone or simply concrete floor. To install it, you need to dig a hole up to 40 cm deep, fill it with sand and crushed stone, and then fill it with concrete mixture. To ensure the resulting area dries evenly, use an old rag to cover the concrete.
Exploitation
Making a carport out of polycarbonate with your own hands is not all; some troubles will still remain. Wooden structures will require wood treatment and painting. Metal ones must be coated with an anti-rust solution. Plastic structures can develop holes over time - they need to be either replaced or patched. How to make the maintenance process more efficient depends on the specific type of canopy.
DIY carport
Recently, car enthusiasts are increasingly building their own structures to protect their cars from polymer. This is due to the relatively low cost , ease of installation and variety of colors of the material. Installation of a polymer structure can be completed in one day. However, before this it is necessary to prepare the site, the construction of which may take several days, during which the concrete must “set”.
Canopy area
After looking at photos of carports, choosing the one you like and making a design project for it, you can begin building a platform for the car.
For work you need to prepare:
- cement;
- crushed stone;
- sand;
- water;
- shovel;
- bayonet shovel;
- container for mixing cement mortar.
Stages of work:
- Remove the top layer of soil along with the turf from the entire site.
- Dig a trench along the entire perimeter of the site to a depth of 20 cm.
- In the places where the supports are supposed to be installed and in the corners, dig holes measuring 20x20x70 cm.
- Install pillars or embedded metal parts and fill the holes halfway with cement-sand mortar with crushed stone.
- Using a level, check the verticality of the supports, adjust if necessary and fill the remaining part of the hole.
- Fill the entire trench with mortar to ground level.
- The resulting foundation should harden and settle well. This usually happens within 1-2 weeks.
In the future, the site can be concreted, paving slabs laid on it or sprinkled with crushed stone.
Carport: photo options
If we have inspired you to create your own building, but you have not yet decided which polycarbonate carport will be the best option for you, we are ready to show you the most interesting and original models. We think that among them you will find, if not your own future building, then at least a lot of ideas for creating it.