Plates in the dining room
Before starting a project in this room, we advise you to look at the best options for DIY plates for the wall, because a dining room or kitchen will be the most successful solution for experiments by a novice decorator, and also very suitable for handicrafts.
This is where your products will look most integrated. Some tips will help you in drawing up your project:
- If the walls in the dining room are covered with wallpaper with patterns, then you should use plain plates
- In the case of dark interior colors, light decor will look most organic, and vice versa, dark plates are better suited with light wallpaper.
- If you are the owner of wall plates with small patterns, you should not hang them high.
- Handmade decor will look very good. There are a lot of video tutorials on how to make a plate on the wall with your own hands.
Placement and selection of plates to match the color of the walls
In the interior, decorative wall plates can be placed in different ways. Depending on the imagination of the performer, the required number is selected.
If the wall covering is monotonous, light or white, then the products should be in rich colors and with bright patterns.
If the wall is covered with wallpaper and painted in intense colors, then white plates painted with a pattern in the background color will look especially impressive.
Plates on the wall in the kitchen, photo
These items also look great as single-color elements, but in bright colors. By the way, such plates can be arranged in the form of geometric shapes, thereby creating several groups.
When decorating a room with beautiful ceramic or glassware, you must strictly adhere to the basic design rule. It is as follows: on decorative plates, the pattern and color, the direction of the lines should fit into the interior. For example, when placing a composition in the kitchen, the plates should match the textiles and details of the given room.
They can also be integrated into the design, playing with the contrast with the main picturesque style of the kitchen. For example, white walls can be separated by a set of dishes with patterns in red or blue colors.
Decorating home walls using plates
You can choose original decorations for each room, but most often decorative plates can be found in kitchens and living rooms.
They are great for creating a complete composition in a studio apartment, on the veranda or terrace of a country house and are less often used in the interiors of bedrooms, bathrooms and hallways.
Wave
Calculate the exact cost of repairs using an online calculator
and receive a free detailed estimate for repairs
Calculate
Large wall surfaces that are not filled with furniture can be decorated with a wave-shaped composition of decorative plates - it will create the illusion of no boundaries, making the room seem larger than it actually is. On a dark background, waves of light plates with delicate paintings look impressive; on walls decorated in pastel shades, multi-colored plates with large patterns will play a more interesting decorative role.
Wall placement options
You can use one of the common options listed in the diagrams below, or come up with your own.
In one row. Allows you to focus on a selected area. This arrangement of plates can be placed above pieces of furniture along the wall. For example, above a sleeping place, a fireplace, which will highlight these items advantageously.
Symmetrical. An ideal solution for rooms where everything is symmetrical. For example, above a fireplace or mirror, plates should be placed at the same distance, one above the other.
Creation of geometric shapes. This option will be original for filling empty space on the wall, for example, repeating a square shape using the appropriate arrangement of plates.
Wave. A way to decorate a wide wall surface. You need to draw a curved line in the shape of a wave and place a composition of plates of various shapes and sizes along it. A beautiful option if you use products in the form of sea shells and flowers.
Arch. This placement is suitable for decorating a space near a mirror, instead of a painting, or near a window. For its implementation, round or oval-shaped products would be ideal. You can place them above the planned object in the room in the form of an arch. This will allow you to decorate the wall - in the living room near the mirror or in the bedroom above the bed.
Patterns. You can use decorative plates to create a simple figure in the form of a star or snowflake. To do this, it is better to use plates of different sizes and shapes, as well as an old unnecessary set of dishes, which you can even give more preference to. This option will require precise calculations and patience.
Ascending. The main condition is that you need to choose the right size plates. Moreover, they should have only one shape - only round or only oval.
Plot. The plates should be placed so as to create a pattern. It will be perceived more effectively if you hang the objects as closely as possible to each other.
Arbitrary location. Sort of like “orderly chaos.” This method does not require a serious choice of shape and size.
A number of other options for arranging decorative plates in the interior can be seen in the video below:
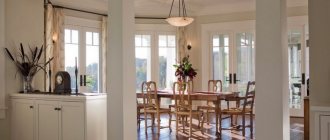
Plates in the living room
How to properly hang a plate on the living room wall? To decorate a living room, it is not at all necessary to be guided by the direction of the interior style. Here you should take into account only shades, textures and their combinations.
When decorating a room of any style, the main thing is to use your imagination and you will get an incredible result that will greatly surprise you.
If there is a fireplace in your living room, it would be blasphemy not to decorate the space above it. Here you can hang completely different plates of various sizes and shapes. Try using artsy decor to give your living room a luxurious look.
The plates look most organically in the space between the windows, as well as above various chests of drawers and cabinets.
Free flight
On a small area of free wall, for example in an opening between windows, plates can be hung in any order. So that they do not discord with each other, choose one connecting element for them: if the plates match each other in shape or color, the chaotic decor will turn into spectacular and unusual. Another advantage of this decoration is the ability to modify it at any time, because you can always replace one plate with another without disturbing the composition.
Ready-made mounting options for decorative plates.
Metal stand.
This stand can be left on a table, chest of drawers, windowsill or mounted on the wall.
Wall holder.
This wall plate holder will look very harmonious in any room of the house.
Transparent holder.
A great idea is a compact, durable and transparent holder that completely encircles the plate.
Shelf for plates with holding bars.
This wonderful design will keep the plates in place.
Where to buy wall plates.
Decorative plates are traditionally presented in souvenir shops, in coastal shops (can be purchased during vacation), in “home decor” departments, as well as in online stores. Personally, we recommend checking out this store; we buy from them ourselves and are always satisfied with the product.
I suggest you consider a selection of photos of wall plates:
How to make a decorative plate with a mosaic from egg shells (video):
Decorative plates for the wall will be a wonderful addition to a modern interior, and we can say with confidence that your guests will not ignore such a bright and harmonious plate composition.
Dear readers, do you have wall plates at home? I look forward to your feedback, and also recommend subscribing to receive news from the “Comfort in the Home” website.
Show hidden content
Cobra
Decoration methods
Creating a unique decor for the kitchen or dining room with your own hands is not only a way to save money, but also an opportunity to get designer items exactly in the style and color scheme of the overall decor of the room. There are many techniques that can be used to accomplish creative work.
- Decoupage with napkins, photos, fabric.
- Quilling.
- Stained glass covering.
- Decoration with satin ribbons.
- Artistic painting.
Next, we will consider each method of designing plates for walls in more detail.
Plates can be placed anywhere and however you want
You can write words in English on the plates
See also: How to decorate a wall with photographs, photos.
Decoupage
Decoupage is one of the most interesting ways to decorate plates. For decoration, you can use special napkins, magazine clippings, photos and even fabric, with which you can really create original draperies. For work you will need the following materials:
- PVA glue;
- scissors;
- brushes;
- varnish;
- acrylic paints;
- water container (for example, a deep dish);
- a ring from a tin can, if the product will be hung on the wall;
- acrylic lacquer;
- napkins for decoupage (or other selected material);
- plate.
It is not necessary to decorate the plates; simply hanging them on the wall can decorate the interior
Decorative plates on the wall will perfectly complement the interior of the room
A wall completely decorated with decorative plates will look very unusual.
After all the materials and tools are prepared, you can begin decorating the plate using the decoupage technique. The main stages of work are shown in the table:
| No. | Actions | Materials |
| 1 | Preparation of the product includes coating the surface with acrylic varnish. In this case, at least 5 layers are required. Each of them must be allowed to dry thoroughly. | Acrylic varnish, brush. |
| 2 | If a photo or varnished picture is used, then they are placed in water for 10-15 minutes, after which the image layer is separated from the main part of the paper | A container of warm water, photos, magazine clippings. |
| 3 | Cutting out an image. It is better to prepare a round mold according to the size of the decorative plate. Or you can use individual elements of the composition. | Scissors, pictures. |
| 4 | Using PVA glue and a soft brush, the images are attached to the product. Smooth out bubbles and wrinkles from the center. | Brushes, glue. |
| 5 | After drying, the dish is once again coated with an acrylic fixative. | Varnish |
| 6 | A ring is attached to the back surface of the product. It will help you hang the plate on the wall. It is better to completely connect with the entire lid on which it is placed. | Tin can, quick glue. |
If necessary, you can use acrylic paints with a thin brush to draw some details of the picture. This way the result will look much brighter. This is done after the base layer has dried before coating with varnish. For wall mounting, in addition to the described method, you can use various hooks or loops.
You can use plates of different sizes in the interior
Plates of different colors will look very nice
See alsoDecorating the table for the holiday: tips and tricks.
Quilling
Quilling is a technique based on twisting thin strips of paper. The method is relatively new and very exciting. So, to create a unique dish you will need:
- plate (it is better to use a plastic or foam product);
- a set of quilling paper (sold in craft supply stores, you can buy a set of the most suitable color scheme);
- tools for twisting paper ribbons (sometimes come complete with strips), they can be replaced with an awl;
- toothpicks;
- ruler;
- a simple pencil;
- PVA glue;
- image.
Designing a product using the quilling technique includes several stages:
- You need to divide the decorative plate into 4 equal parts, marking its center. You also need to use a pencil to mark the location of the drawing.
- Making curls from paper. Using ribbons, you can create entire compositions of flowers, birds, and various patterns. Each element is coated with glue using a toothpick and attached to the plate.
Don’t be afraid to come up with new elements and compositions from paper ribbons. The main thing is to choose the right color scheme that will fit perfectly into the interior of the kitchen or dining room. Also, do not forget about hooks for attaching plates to the wall.
Painting plates in Japanese style
The plates can be decorated as you like
Decorative plates against a white wall look very beautiful
See also: Create bottle decor with twine with your own hands
Stained glass covering
Stained glass always looks stylish on any piece of furniture. To decorate in this way, you can choose a transparent glass plate so that the stained glass effect is noticeable.
For decoration you will need:
- glass plate;
- stained glass or acrylic paints;
- circuit;
- you can use various beads if desired;
- degreaser;
- brushes
Before you begin decorating a piece with stained glass, the plate must be thoroughly washed and degreased so that the paint adheres and dries evenly. After this, you can outline the contours of the image with a pencil, or you can start working with paints without them if you want to improvise.
You can make a collage like this out of plates, and place a plate with a clock in the middle
Decorative plate with painting
First of all, a contour is applied to the plate and dried for several hours (the exact time for each type of paint is indicated on the packaging). Dry in a well-ventilated area. It is recommended to apply it in two layers so that the line is convex. Then you can paint the colored areas.
If you want to add additional decorations, it is recommended to do this when the paint begins to dry. You need to lay out the elements with tweezers and lightly press them into the layer. All actions must be clear and accurate so as not to spoil the overall appearance of the product.
You can decorate the plate with artificial flowers
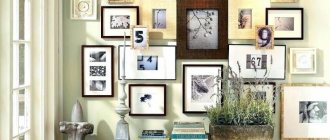
Example of using decorative plates on the wall
You can use plates to create a collage on the wall
See also: DIY decor for an exclusive interior
Decoration with satin ribbons
Satin ribbons are increasingly being used for interior decoration. And, of course, with their help you can quickly and originally decorate plates. First of all, it’s worth considering ways to create decorative elements from satin:
- Weaving in different ways from several ribbons. The result is a strip of the desired length with a pattern.
- Sewing. It is carried out using thread and needle. A whole composition in the form of a panel is assembled from different pieces.
- Kanzashi - flowers made of satin ribbons.
The elements necessary for decoration are simply attached to the product with glue. Most of the time is spent on preparing parts of the overall composition.
Decorative plates for the kitchen will perfectly complement the interior
You can decorate the plates yourself
See also: Making panels with your own hands for the interior
Artistic painting
Painting plates is a rather difficult but exciting activity. Any drawn plot is allowed, it all depends on the overall interior of the house. Landscapes, ornaments, fairy-tale or mythical scenes, flower arrangements, animals and birds, Gzhel or Khokhloma paintings look great on decorative plates.
For decoration you will need:
- white plate;
- degreaser;
- pencil;
- acrylic paints;
- varnish;
- brushes
First, the plate is washed and wiped with a degreaser. Then the drawing is drawn with a pencil, after which they begin to paint the product. When the paints are dry, you can varnish them.
Don't be upset if the artist's talent is completely absent. In this case, a stencil can always come to the rescue. The drawing with it will turn out no less beautiful. You can buy it at hardware stores or places that sell craft supplies.
Instead of paintings, you can hang decorative plates on the wall
In the kitchen, decorative plates will perfectly complement the interior
An example of the use of decorative plates in the interior
See alsoHow to use papier-mâché in the interior
Mounting the cymbals
When using plates as decorative interior elements, it is important to securely fasten them. There are several ways.
For expensive collectible or souvenir plates, as well as vintage items with a common theme, it is recommended to use special wall holders. They can be of different shapes, have special fastenings to the wall and places for attaching plates.
As an option, you can make narrow shelves with limiters or glue loops to the plates themselves on the back side.
When deciding how to properly hang a plate on the wall, you can use special Velcro, adhesive discs, or glue the mount to the plates yourself. Decorative store plates are often already equipped with ready-made fasteners.
When making the mount yourself, you can use a loop from a tin can or one made from wire yourself. You can glue the workpiece to the back of the plate using universal glue, adhesive tape or tape.
Wall mounting methods
Having determined the location and layout, you need to think about how to attach the plates to the wall. There are several methods, you can use any.
- Velcro fastenings. A fairly simple option, you just need to glue a piece of adhesive tape with one side to the rim of the bottom. Use the reverse part to hook the plate onto the wall.
- Using a paper clip. The device must be unbent, forming a loop from one part. Place the other half on the plate, grease with superglue and cover with a cloth circle, press tightly.
- On a hairpin or pin. Coat the back of the plate with hot glue. Apply the pin and wait until it hardens. A loop is ready for hanging dishes.
- Ready holder. It is made of two wire springs, which are connected to each other by additional elements at the top and bottom. The ends of the structure have two hooks on each side. They cling from the back to the edges of the plate, which is then attached to the wall using springs. The size is chosen in the store, depending on the parameters of the dishes.
You can see what the invented composition of plates will look like by using paper mockups. They are very simple to make; you need to trace the outline of the plates on paper and cut out the resulting circles. Having temporarily attached the models to the wall, future locations for attaching decorative elements are outlined. If everything is satisfactory, real plates are placed instead of paper circles.
Options for decorating plates yourself
Truly unique decorative plates that can harmoniously fit into the interior of the room can be made with your own hands.
The best options for plates for the wall with your own hands can be obtained by using different decorating techniques.
Vertical
For interiors in the minimalist style, a good decorative option would be to hang decorative plates strictly in a row. For such an accent, only three or four objects will be enough, which will not take up much space on the wall, but at the same time will play a decorative role no worse than volumetric installations. If you want the interior to become more contrasting and dynamic, hang plates of different diameters in descending order.
ballarddesigns.com
1/2
ballarddesigns.com
2/2
Decoupage
One of the simple and successful solutions for decorating dishes is the decoupage technique.
To work you need to prepare:
- scissors,
- PVA glue,
- acrylic paints and varnish,
- tassels,
- water dish,
- napkins for decoupage,
- plate.
Detailed instructions on how to decorate the plate will help you cope with the task.
- The plate needs to be washed and dried. Then it is covered in stages with several layers of acrylic varnish. Each layer must dry before applying the next varnish coating.
- A photograph, picture or postcard is soaked in water for 15 minutes, then the bottom layer of paper is carefully removed. Special decoupage napkins do not need this procedure.
- The picture is carefully glued to the plate. Smooth its surface.
- After drying, cover with a layer of varnish.
- Attach the loop to the wrong side of the plate.
Using acrylic paint you can highlight some of the details of the picture. Draw the elements to the final varnish coating.
Attaching decorative elements to the wall with your own hands
Once the design has been thought out to the smallest detail, all the decorative elements have been assembled, it’s time to choose the most appropriate option for mounting all the attributes on the wall. You can create fasteners yourself or use purchased analogues.
Almost every store offers convenient Velcro. They usually hold objects very securely and come off easily. If necessary, the Velcro can always be removed and the plate itself can be moved to another place.
Today, supermarkets sell special adhesive discs. They are even more reliable than Velcro. There are different sizes that allow you to attach decor of any format and proportions with your own hands.
Another reliable fastening option is a paper clip. A rectangle is cut out of thick fabric. We attach a massive paper clip to the plate and pour hot glue on it. Then we put the fabric on top of the paper clip and the glue stain. Leave it for a while for the homemade mount to harden.
Similarly, using glue and a fabric covering, you can attach a pin or a homemade ring to the plate. Once the fasteners are ready, the decorative plate is carefully fixed to the surface on the wall.
Rules for placing decor and creating compositions
When creating a stylish interior composition, you can use two principles - correspondence and contrast.
These are the best options for placing several souvenir plates, complementing the interior design concept, or highlighting unusual accessories used for wall decoration.