How to properly build fireplace walls.
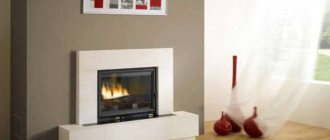
Before you start laying, draw out the order in which you will lay out each row of bricks.
Without this you cannot start work. Only an experienced stove maker can start working without order. It’s good if such a specialist is next to you during the construction of the fireplace. The ceiling is made using steel angles that rest on the walls of the portal.
The upper tier of stones must be installed without using mortar; only the side seam must be filled. Above the roof, it is necessary to expand the pipe and form a cap that will prevent rain and snow from entering the fireplace.
Making a pipe
We pass the ceiling. The width of the chimney in this part is 500 sq.cm (a quarter brick). We fix basalt wool along the outer walls of the masonry.
Please note that the edges of the insulation and at the same time the protective casing are placed in a lock in the form of a groove. A quarter is selected in one sheet into which part of the second sheet is immersed. We glue all the bricks along the outer edge with construction tape, so that later we don’t have to bother with finishing. And let's start laying.
After you have laid out five rows of masonry, stop. Now let's do one little trick. We install four threads vertically upward along a plumb line. These will be our guides, both vertically and along the width of the pipe laying.
We lay the pipe to the roof slope at a distance of 50 cm. In the upper part it is necessary to install a hatch to access the inside of the chimney so that it can be cleaned. We make a cut in the roof decking and sheathing, while fixing the roofing elements so that it does not lose its original rigidity, and then lay the pipe up to the roof slope. In the same way, we line the pipe with basalt wool at the junction of wooden structures and only then proceed to finishing.
We carry out finishing work in two stages. The first is to remove construction tape and clean the surface of the brick and seams with a stiff brush from excess mortar, adhering drops and other defects. And then, using a sponge and foam solution, we wipe the entire surface of the oven. This is necessary to remove the adhesive from the tape and restore the shine to the brick.
Tips and tricks
Here are a few helpful tips and recommendations to help you best complement your home with a corner fireplace.
- The base of the fireplace must have an independent foundation. Otherwise, when the house subsides, the main single foundation of the building will shrink, which can also affect the fireplace structure. As a result, its base is deformed, and gas will penetrate into the room.
- It is necessary to create a project and lay a fireplace at the stage of building the foundation of the house. The width of the foundation must be at least 15 cm larger than the future fireplace and can support the total weight of the structure including the chimney (a brick fireplace weighs about 1 ton). In addition, it is necessary to take into account the weight of the facing material.
- Since the likelihood of overheating of adjacent walls increases, they should be made of non-combustible materials. Wooden walls must be protected with a metal sheet.
- The back wall of the fireplace should be made at a slight slope.
- Regardless of what type of fireplace you choose, remember that the chimney pipe must be higher than the ridge of the roof of the house. And all interfloor ceilings through which the chimney will pass must be insulated with asbestos material.
- The shallower the depth of the firebox, the greater the heat transfer, but with a significant decrease the room may become smoky.
- If the fireplace will be used mainly for heating the room, then the structure must be lowered as low as possible so that the floor in the room warms up faster. From a decorative point of view, the fireplace can be raised slightly above the floor: this option looks more elegant and original.
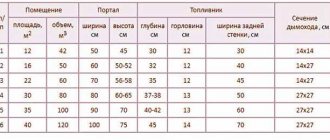
- The size of the firebox is calculated based on the size of the room. The ideal volume of the firebox is equal to 2% of the total volume of the room. To do this, the area of the room in meters must be divided by 50. The resulting number is the optimal size of the firebox in square meters.
| Room area, sq. m | Firebox dimensions | Chimney hole dimensions, cm | ||
| Height, cm | Width, | Depth, cm | ||
| 12 | 45 | 53 | 30 | 14x14 |
| 16 | 50-52 | 60 | 32 | 14x27 |
| 25 | 60 | 75 | 37 | 20x26 |
| 30 | 60-65 | 80 | 37-38 | 27x27 |
| 35 | 70 | 90 | 40-42 | 27x27 |
| 40 | 77 | 100 | 45 | 27x27 |
The ratio of the size of the firebox and the hole for the chimney should be 8: 1. If the dimensions are increased, the heat from the fireplace will go outside, and more firewood will be required to maintain the fire. And as the diameter decreases, the thrust will decrease. Excess mortar between bricks must be removed immediately, otherwise over time it will leave stains on the surface of the stone. As for facing the fireplace, recently modern designers have given preference to unlined fireplaces. But it is worth considering that the initial attractive appearance will not last long.
And in this case it is very important to use modern materials and perform the installation efficiently. The easiest way to cladding a fireplace is plaster. The final layer of finishing can be decorated with patterns or prints, and also given a rich color using water-based paint
The inside of the combustion chamber is not plastered.
- Sloppy masonry can also be disguised with decorative tiles, stone or marble, but this option is more expensive.
- Do not place the TV above the fireplace under any circumstances - this is a gross violation of safety rules. The most ideal location for the TV area is next to the fireplace. This way the fire will not interfere with your enjoyment of watching the movie.
- The first lighting of the fireplace must be carried out after the adhesive and cement mortars have completely dried: place a small amount of brushwood, branches or small firewood at the bottom of the firebox and gradually heat the fireplace.
- Don't forget to regularly clean your fireplace.
Types of outdoor fireplaces
Before you build an outdoor fireplace in a country house or near a private house with your own hands, it is important to decide on the type of structures, which come in the following types:
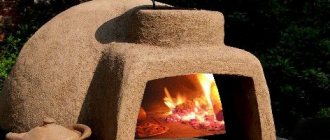
BBQ oven
An outdoor fireplace with a barbecue function for a summer house or home is very beneficial because it allows you not only to perform a decorative function, but also to prepare healthy food. The complex device is very beneficial for small areas, as it saves space. In addition, due to the presence of the walls, excellent protection from wind is provided, thanks to which the fireplace operates effectively in any climatic conditions.
Outdoor fireplace with barbecue function
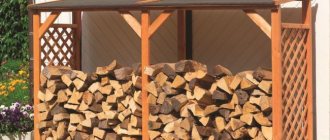
Structurally, an outdoor fireplace stove consists of a combustion chamber, a woodpile, a countertop, a washbasin and a roof. Depending on the chosen material for construction, it can be stationary or portable. For stationary brick fireplaces, it is necessary to lay a foundation.
Decorative
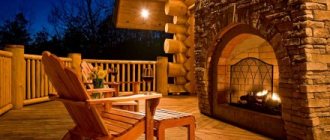
Decorative fireplaces are built with the aim of creating a unique design and emphasizing the main focus in landscape design near private houses. They are built mainly from natural stone and decorated with various frescoes or engravings in an ancient or modern style. Their design is classic, but outwardly they look very original.
At the same time, they can be used for their intended purpose. However, you should not count on high efficiency of thermal energy generation, since due to the large number of decorations, the thermal conductivity of the walls of the chimney and combustion chamber is reduced. That is, it is quite possible to warm up next to it on autumn or spring days, but in case of significant cold weather they are ineffective.
During construction, the masonry scheme is relatively simple, but the main difficulty lies in the formation of the cladding. Therefore, only experienced craftsmen can build such fireplaces themselves. You can enjoy the beauty of outdoor decorative fireplaces in the presented photos.
Mobile
Mobile fireplaces are the most popular, as they are available in the most incredible designs made of steel, which are not only compact in size, but also relatively light in weight. That is, it does not permanently occupy a site in the local area, it does not need to be succinctly combined with landscape design, and it does not need to spend a lot of time on production.
To ensure mobility design, one has to be content with mediocre heat transfer and relatively low heat capacity. In other words, while the fire is burning in the furnace, heat is released, and after burning, the entire structure cools down quite quickly.
It is allowed to use natural stone, tiles or granite chips as cladding for external walls. Any home craftsman can make such a design, since the scheme is simple and it is very difficult to make mistakes during installation.
Video of laying a country fireplace yourself
Watching the video will allow you to see step by step all the stages of building a fireplace. The recommendations given in the video will allow you to build, determine the types and sizes of the fireplace on your own and save money. After all, the services of professionals are an expensive pleasure. The video will help you avoid basic mistakes and do everything right.
A fireplace in a country house is a pleasant addition to the interior, which also warms and gives home comfort. And if it is made with your own hands, then it is doubly pleasant and warm. It will be difficult for a beginner to build on his own. But, if you follow the step-by-step instructions, then there should be no problems. The main thing is to use only high-quality materials in construction so that there are no defects or damage.
Fireplace laying + instructions and video
The laying of an English-style fireplace with a straight chimney is carried out strictly according to the diagram. Before masonry begins, the wall behind the fireplace is thermally insulated with a metal sheet or thick foil, and wooden structures are additionally treated with a fire-retardant solution for interior work. You should also take care of the fireproof floor covering in the front of the fireplace, where sparks and embers can enter.
Laying a brick fireplace - photo
Before laying begins, the bricks are sorted, putting aside those that have cracks and chips. They can be used for laying the foundation. Before each stage, it is convenient to lay out the bricks dry, cut them, and sand them.
Red ceramic bricks are briefly soaked in water before laying, but refractory bricks cannot be wetted; dust and dirt are wiped off its surface with a damp cloth. This measure promotes more uniform drying of the masonry mortar. The order of a brick fireplace with explanations is presented in the drawings.
- The base of the fireplace (rows 1 and 2) is made of solid red brick. Its area is 1140 by 1270 mm, two rows of masonry with dressing. Before starting laying, it is necessary to check the level of the foundation; if necessary, small unevenness can be leveled by increasing the thickness of the seam. The foundation is laid using a cement-sand mortar, the ratio of cement and sand is 1:2 - 1:3. Rows 3 and 4 are laid out similarly according to the scheme, while the bottom of the firebox in row 4 is made of fire-resistant bricks with fire-resistant mortar. The ratio of clay and sand should be such that the solution does not stick too much to the trowel or spatula, but also does not slide off it.
- The next stage of laying the fireplace is the construction of the firebox walls. They are laid in accordance with the order, with the inner walls being laid out from refractory bricks on clay mortar, the outer walls - from ceramic bricks, on cement-sand mortar or on a mixture of clay and sand with the addition of 10-20% cement. The bricks forming the rear corners of the firebox are cut diagonally with a grinder. This shape of the firebox promotes better heat transfer.
- The firebox installation is completed. In the twelfth row, to complete the framing, a corner and a steel strip are installed on top of the masonry according to the diagram and order. The rear part of the twelfth row is made of interlocking bricks, cut at an angle so as to form a vault.
- Rows 13 to 16 form the fireplace arch and gas tooth - a protrusion in its upper front part that prevents backdraft and smoke from entering the room. The fifteenth row forms a narrowing of the chimney, due to which increased smoke pressure and increased draft are created. Next, the chimney expands, and in row 16 a cleaning door is built into it, through which accumulated soot is removed. The inner surface of the chimney is still made of fireclay bricks, the outer surface is made of red ceramic.
- The next stage is the laying of a gradually tapering chimney and chimney. It is carried out according to the scheme, while carefully rubbing the seams from the inside with your hand and immediately wiping them with a damp cloth to remove any remaining solution. Any roughness on the walls of the chimney will later lead to the accumulation of soot in this place.
- The last stage is laying the fireplace chimney. The lumen of the pipe is narrowed to one brick and blocked in the 25th row with a damper.
- make a brick pipe of the required height. The fireplace is dried for 2-5 days at room temperature, after which they begin to slowly heat it, achieving uniform heating and sintering of the clay solution on which the firebox is placed. This will prevent it from crumbling and extend the life of the fireplace. After laying and burning, you can begin finishing the fireplace.
Details
Step-by-step construction plan
It’s not difficult to make a simple fireplace for a summer house with your own hands, and the first step is to purchase building materials. It is best to make it from fired ceramic stone/brick, because in many respects the technology is similar to the masonry of a classic stove. At the same time, no innovations like multi-slit brick are required here, and a simple solid brick will be just right. White silicate bricks are practically not used when laying fireplaces, since they have a different area of application. In addition to ordinary red brick, fireproof elements are needed - fireclay, and mortars for laying the “body” of the structure are prepared from quartz sand, clay and water. The base should be laid on a mortar containing cement.
Please note that building mixtures are often made as hackwork, and then counterfeit materials are sold. When purchasing, check the accompanying documents for the product.
There are also pleasant exceptions. Manufacturer KNAUF marks bags with an accuracy of up to a second, and all numbers are clearly visible. In the same warehouse, in a container with goods, all bags should have temporary labels that are close to each other, but at the same time they differ from each other. Fans of avant-garde solutions even agree to build reinforced concrete fireplaces, and the justification for this can be either free cement, or an acute shortage of bricks, or even the desire for originality. The fact is that creating formwork, tying reinforcement and vibrating the concrete mixture is an amateur job, with low thermal results. The decoration of the fireplace facade is carried out using various materials - natural or artificial stone, tiles, marble or ceramic tiles. On the construction market you can buy ready-made fireplace kits, where the kit, in addition to finishing materials, includes a mortar and all the parts necessary for the work. When developing the overall design concept, you can apply the same finish to adjacent surfaces, as shown in the photo. This way the fireplace will fit organically into the interior, but everything should be decided during the design process, and not at the last moment.
How to make a chimney according to all the rules
There is regulatory documentation according to which the construction and installation of chimneys (ducts) for a fireplace should be carried out, and these are:
- PPB 01-03 “Fire safety rules in the Russian Federation.”
- GOST 9817082 “Combined household appliances operating on solid fuel. General technical characteristics".
- SNiP 2.04.05-86 “Ventilation, heating and air conditioning.”
What is important for summer residents in such serious industry rules?
We will try to present the entire list of requirements in a condensed volume:
- The thickness of masonry joints must be at least 1 cm, and loose joints are unacceptable.
- Root and wall smoke ducts must be made of high-quality red solid brick (ceramics) of a grade of at least M100, with normal firing, without impurities and cracks.
- In terms of fire resistance, the thickness of the walls of the smoke brick channel should be at least 12 cm.
- Its internal surface must be unplastered and smooth.
- From the outside, the smoke brick duct in the attic (attic) room must be treated with plaster and whitewashed. However, under no circumstances should it be placed near the structural elements of the rafters.
- The distance from the inner surface of the smoke exhaust duct (finishing dimensions) to the combustible protected structure of the building must be at least ¼ meter, and to the unprotected structure at least 0.38 meters.
- A brick fireplace for a summer cottage is made with your own hands so that the free space between the roofing structures and the chimney should be covered with a steel roof apron. But this caution indicates that the choice of location for installing the fireplace is limited.
- Ideally, smoke ducts should be installed strictly vertically and not make ledges. But if the internal layout does not allow this, it is permissible to make channels with a ledge at an angle of no more than 30 degrees vertically and a horizontal deviation of no more than 1 meter.
- If the smoke channel has a rectangular cross-section, its internal dimensions must be at least 27*14 cm. And if a steel sandwich chimney with a round cross-section is used, then the internal diameter must be more than 0.2 meters.
A lightweight steel coaxial chimney (pipe within a pipe) with a layer of basalt fibers between the shells can be used as a smoke channel. Here I would like to warn users against using cheap counterfeits. Different basalt materials:
- The most popular one is used for thermal insulation, and the adhesive composition, which contains basalt fibers, is designed for a temperature level of +260 degrees.
- There are also basalt fire-retardant materials, where adhesive compositions hold up to +760 degrees. But in both cases, basalt fibers are used, which begin to melt at temperatures of +960 degrees.
Naturally, fire-retardant materials are imported, and they were much more expensive even before the sanctions. Have you guessed which of the two described materials the “masters” put into the sandwich pipe?
And a few more words about fire safety equipment:
- Check the smoke ducts once a year to see what condition the internal walls are in and whether there is soot on them.
- The smoke duct should be cleaned all year round - at least 6 times a year.
Those who do not adhere to these rules will suffer a soot fire and an emergency.
Premier firebox
Craftsmen do not recommend heating the fireplace in the first month after assembly, and this is understandable - mortars with cement gain strength and dry out under natural humidity. There is no point in testing them at such a moment.
This is followed by trial heating of a fireplace for a wood-burning cottage, made by yourself:
- For 1.5 weeks, 2 times a day, carry out short-term heating (up to ½ hour) with a small amount of firewood, and the ash hole (on the ash pan facade) should be slightly open.
- It is best to place crumpled paper on the grate, and finely chopped firewood and wood chips on top.
- After setting fire to the paper, close the door and partially open the ash pan. But if you have difficulty igniting, you can leave the combustion door a little open.
And now about the choice of firewood.
Main types of outdoor fireplaces
The popularity of outdoor fireplaces is growing every summer season. This forces manufacturers to introduce more and more new types to the market. You won't find any kind of fireplaces - low and high, large and small, round and square, open and glazed. This list can be continued for a long time. We will focus only on the main types of outdoor fireplaces.
Decorative fireplace
This fireplace is usually used to decorate the veranda and garden. It is also called a garden fireplace. It can be of any shape - it all depends on the wishes of the customer. Most often, it is made using stone masonry technology and is additionally lined with decorative stone, as well as various frescoes and engravings. As for heating functions, it is superior to other types, as it has a classic design. However, excessive decor and design features often prevent it from giving off a lot of heat. But it’s quite enough to keep warm on a cold summer or autumn evening.
A decorative fireplace will add coziness to the country veranda
Mobile fireplace
It is distinguished by its mobility and original design. Most often it is installed on legs or wheels and does not have a pronounced chimney. As a rule, these are open structures that resemble a bowl or box with a fire. The materials used are stone, granite, marble. The undoubted advantage of such a fireplace is that it can be freely moved throughout the entire area, as well as removed in winter and rainy times. The downside is the relatively low heat transfer, slightly stronger than from a classic good fire.
A mobile fireplace looks like a fire in a bowl, which can be an excellent design solution
Types of garden fireplaces for a summer residence
You can decorate the flame in different ways, everything will depend on the purpose for which you will use the fire. Based on this criterion, it is possible to distinguish types of fireplaces and other similar structures.
So, if you plan to give the fireplace only a decorative role , which you want to look at, admire the flames, or simply create a cozy atmosphere, then the fireplace will look like a classic indoor fireplace.
It will have the same components, but you will have to think about what to make it from and how to arrange it. Another difference from indoor fireplaces is exposure to precipitation and other adverse environmental conditions.
The material can be very diverse, the main thing is that it is fireproof. The base can be made using brick or stone masonry. A modern option is the use of gabions.
It can be built into a retaining wall or created free-standing. But then it is better to make a backdrop in the form of a high hedge or plant ornamental trees and shrubs. The base of the retaining wall will be decorated with plantings of low-growing, beautifully flowering plants.
It is also worth remembering that even a fireplace for a garden needs a proper chimney exhaust device . Of course, you can try and do everything yourself, or you can buy a ready-made one, install it in the garden and decorate it beautifully with green plants. An example is the Zen fireplace developed by AK47 Design.
The development is an open structure, which includes a round steel sheet, grill grate and barbecue. It can be filled with any decorative fireproof filling (gravel, sand), raised above the ground or buried.
Another interesting type that can be installed even on the lawn is a mobile fireplace . It usually comes in a compact shape and comes in a variety of heights and styles. Sometimes the package includes built-in shelves.
You can either make it yourself (which is not easy) or buy it ready-made. In any case, this is an excellent solution for small areas. You can store it in the garage or storage room.
The next option is to create a fireplace with barbecue . Such a structure will play not only a decorative role, but also a utilitarian one. You can cook various dishes, the most popular of which is aromatic kebab. You can also install a barbecue there, but an interesting option is to integrate it into the overall structure.
You will also need a canopy and a hard-surfaced area. You can not only do this option yourself, but also, if you wish, buy a ready-made structure.
If you have a small country house, which is used for its intended purpose only in the summer, and there is practically no space for a kitchen, it doesn’t matter, you can attach an open terrace with a canopy to the house and put an outdoor stove under it.
Design and dimensions of the hearth
Structurally, similar fireplaces, an example of which is shown in the photo, are similar to their traditional wall-type “brothers”. The hearth consists of an open firebox without an ash chamber, a cone-shaped smoke collector with a chimney tooth and a straight chimney pipe. The difference is the triangular cross-sectional shape, which complicates the construction process.
The principle of operation of a triangular fireplace remains the same: wood is burned on the hearth of an open firebox, combustion products are removed through the chimney shown in the diagram below. A portion of the heat is retained by the chimney tooth (in general, about 20%), the rest goes away along with the smoke due to the natural draft that occurs in the vertical channel.
In order for the hearth to properly serve as a source of heat, it is necessary to select the dimensions of the structure to suit the volume of the room and take into account a number of points:
The size of the firebox opening is defined as 1/50 of the area of the room (usually the fireplace is located in the living room). The height of the portal is made approximately twice the maximum depth of the fuel chamber. If the draft is weak, smoke will enter the room, and excess will lead to increased heat loss, especially when the fireplace is not lit.
Therefore, the optimal cross-section of the chimney is taken to be 1/9 of the area of the combustion niche. For normal operation of the fireplace stove, it is important to organize the flow of air into the living room, otherwise the draft in the chimney will worsen. Burning wood often “shoots” heat particles through the front opening. To prevent fire, a pre-furnace sheet of metal is laid on the floor in front of the fireplace. If the structure is adjacent to the walls of a wooden house, then flammable surfaces must be protected with galvanized roofing.
A table that shows the dimensions of the portal and the cross-section of the chimney duct of corner fireplaces depending on the size and volume of the room will help you simplify your calculations.
We suggest considering the construction of a brick fireplace in a private house or country house using the example of the classic “Annushka” fireplace shown in the photo. The project is designed to heat a living room with an area of 18-20 m² with standard ceilings, the cross-section of the firebox opening is 70 x 50 cm (width x height).
Often in residential buildings, a simplified method of constructing a brick hearth is implemented using a cast-iron fireplace insert. How this is done is described in detail in the video:
Brick kiln devices
If we are building a fireplace stove for a summer house, we start from the foundation. The depth of the foundation is about 1 meter. A waterproofing layer is placed at the bottom of the dug hole. For this, roofing material folded in two layers is used. To hold the masonry together, a clay solution is made. Soak the clay for 3 days, then mix it with sand. The brick is also pre-soaked so that it does not take moisture from the mortar. You can’t build a fireplace haphazardly, especially if you make it yourself, with your own hands. Depending on what kind of structure you decide to make from brick, what kind of hearth it will be: corner, built-in or wall-mounted, choose step-by-step instructions, the so-called order. Where each row of masonry is painted with maximum precision.
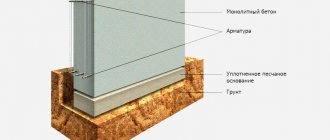
Foundation for a fireplace - main stages of construction
If you plan to build a brick heating device of one type or another in the designed house, a permanent foundation for them must be provided in advance. It is best to first determine the location and size of the foundation for the fireplace. Otherwise, you will have to perform this work in an already built house, which cannot be done without dismantling the finished floors.
Work on making a foundation for the fireplace should begin by marking its location. The dimensions of the base itself must exceed the dimensions of the fireplace in plan by 10 cm on each side. Based on the calculated parameters, the future recess for filling is marked.
The depth of the foundation for the fireplace can be different and varies from 0.5-0.7 meters to 1.5 meters or more. This parameter depends on the level at which groundwater is located and the depth to which soils freeze in a given area. In the case of permanent rather than temporary use of a brick heating device - a stove or fireplace, the last parameter is usually not taken into account.
According to the markings on the soil, made using corner pegs and cords stretched between them, remove the top turf layer of soil and dig a hole with smooth horizontal walls. The bottom of the recess is carefully leveled in a horizontal plane, I control its required position by level.
Concreting the foundation
A special feature of building a foundation for a fireplace with your own hands is the layer-by-layer filling of the hole dug in the wound with a concrete mixture of various compositions. For work you should prepare the following materials:
- Finely seeded river or quarry sand without foreign impurities in the form of roots, grass, aquatic vegetation;
- Cement is the main type of binder when performing concrete work. To obtain a high-quality fireplace foundation, you must choose this building material correctly - it must have a uniform, loose consistency and not be crumpled or expired. The grade of cement should be chosen not lower than M400.
- Crushed stone is a medium-sized crushed natural stone. In construction, granite and limestone gravel are most common. The first type has the best frost resistance, the second has the lowest price among analogues.
- Rubble stone is a natural stone, which is larger pieces of rock, reaching linear dimensions of 0.5 meters and a mass of 50 kg.
The first layer of the foundation for the fireplace is a concrete pour made of sand-cement mortar and filler - medium or fine crushed stone. A little bit of this mixture is required. The thickness of the first layer should be about 0.25 meters. After the concrete has partially set, the next layer is poured. It is based on a larger stone. The technology for pouring a rubble foundation is as follows:
- First, a layer of large pieces of rock of one type or another is laid;
- Next, to compact the backfill, the gaps between the rubble stones are filled with medium-sized crushed stone;
- The next stage is pouring the stone backfill with a cement-sand mortar of medium thickness.
The rubble foundation is raised to the ground level. Regardless of the floor level of the first floor, the base of the fireplace must be raised to a level approximately 10-15 cm below this value. To do this, it is necessary to install formwork.
Production and installation of formwork
The foundation formwork for the fireplace is a hollow structure made of durable wooden, plastic or steel panels. For making it yourself, the first type is best suited. To make it, you will need edged boards of an inch thickness or sheet materials - plywood, OSB, lined with chipboard.
Installation of formwork for a fireplace
Shields are knocked together from boards using nails or connected with self-tapping screws, without recessing their heads deep into the wood. When assembling, you must try to minimize the gap between the lumber to avoid rapid removal of moisture from the concrete solution. Formwork made of sheet materials is more preferable in this case.
Installation of the foundation formwork under the fireplace should provide the future foundation with the correct geometric shape. To fix the panels, spacers made of wooden slats, ties made of boards or bars are used. After installing the formwork, it is recommended to coat all seams between the slabs with bitumen mastic.
We build a garden fireplace ourselves
What do you need?
As with any type of construction, in order to build an object that will last a long time, it is necessary to select high-quality materials. To build a fireplace you will need:
- Ceramic single brick with a high degree of density. The greater the weight of the brick, the better for construction.
- Clay for bricklaying. Experts advise purchasing it at brick factories, where the building materials themselves are available. This guarantees high quality masonry.
- Rubble stone. Quantity is not limited.
- Masonry mixture.
- Cement, crushed stone, sand, metal reinforcement.
- Material for the construction of a firebox with a high level of fire resistance. The best is considered to be the Austrian fireclay RATH or the Russian product ША5.
- Cladding tiles, glazed or fireclay bricks.
Important.
Fireclay blocks for constructing a fireplace insert can be replaced with a cast iron chamber, which can be purchased at a specialty store. This will reduce the installation time of the structure.
Making a garden fireplace with your own hands
The dimensions of the future device and its design have a direct impact on the amount of material purchased. The location of the fireplace on the street does not limit the owner of a suburban area in choosing the shape of the structure.
The shape of the so-called eternal corner is considered to be the most successful and optimal for use in the country; photos of such a fireplace can be found on the Internet. By its design, it looks like a body consisting of three corners, the side walls of which have increased dimensions.
The base of the fireplace and the shelf are made in the form of an element with four corners. This design allows for excellent air flow into the fireplace. Side walls of increased dimensions are capable of delivering much more heat flow than standard installations.
There are models of wood-burning fireplace stoves for summer cottages, which are similar in shape to the traditional device used by mountain workers to burn coal.
If you do not take into account the non-standard appearance of the fireplace, such a device in the country can ensure proper operation in any weather. The main part of the body, the base and the chimney are made of natural stone. To strengthen the structure and give stability, firewood and stone are stacked on both sides of the body for cutting. If you want to have a long-burning fireplace on your property that could fit perfectly into any gazebo design, opt for a standard classic design.
DIY brick foundation for a garden fireplace
Taking into account the structural features of the fireplace, namely: the material of construction, the height of about 2 - 3 meters, the presence of a firebox, and this together gives considerable weight, the base for the device must be strong. In addition, the height of the device cannot provide the fireplace with the required stability. The foundation for a garden fireplace can protect the structure from tilting and destruction during heavy rains, which can wash away the base.
A garden fireplace has standard body dimensions of 70 x 120 cm, therefore, a hole for the foundation needs to be dug 130 x 160 cm in size and 45 - 50 cm deep.
A cushion of sand with a layer height of 5 cm and crushed stone - 3 - 5 cm is poured onto the bottom of the pit. Next comes the turn of crushed brick, bitumen or any other building material. The pit is filled with concrete mortar at ground level.
After the allotted time for the concrete to harden, waterproofing material is laid on top. You can opt for the good old, but proven roofing material. In addition, it is necessary to lay a layer of asbestos cardboard. After laying the materials, a cement screed is made on top. In the center of the created concrete slab of brick, a tunnel is laid out, which leads to the back side of the base under the fireplace.
On the sides of the concrete slab, formwork made of plywood or boards is installed. The base of the firebox for the future fireplace is built in the center, leaving space for the ash pan. Concrete mortar is poured into the installed formwork, after laying rubble stone.
After the work has been completed, it is necessary to wait about a month to allow the concrete to finally set. After this, you can proceed to installing the pipe, building walls and the combustion chamber.
At first glance, the base for a garden barbecue fireplace may appear too large, but in reality the height of the building will be 2.5 m and the width 1.6 m, so as a result you will get a proportionate structure. A foundation of such high strength will ensure the stability of the garden fireplace, which is important for our weather conditions, as well as the characteristics of the soil. If the body exceeds 1 m - 1 m 10 cm, and the height of the pipe is 270 - 320 cm, then a reinforcing grid must be immersed in the concrete slab. The fireplace body is provided with support for the corners using steel corners.
How to make a fireplace with your own hands from brick
The recommended thickness of joints in the fireplace masonry is 3 mm. In the corner you need to attach a metal sheet, bent at 90°, the dimensions of which are equal to the dimensions of the fireplace being manufactured. It should reach the height of the fireplace mantel. This device will be a heat reflector.
Order of the corner fireplace:
- Rows 1-4 need to be filled with bricks. The fourth row will be the hearth of the structure.
- On the 5th row you need to lay out the ash pit. You will need to install supports for the grille, which consist of several steel strips. These strips will then need to be pressed down with the top bricks.
- On the 6th row you need to fix the supports. A grate is installed on the top of the bricks.
- On the next row a portal is laid. You need to start from the bottom salary.
- In the next five rows of masonry, it is imperative to bandage the seams. At this stage, a portal is formed. Starting from the 11th row, the mirror is laid out at an angle.
- The 14th and 15th rows are laid out with ligation of the seams. The portal is covered, the mirror is raised and tilted.
- In the 16th row, the laying out of the mirror is completed, after which the rise of the upper part of the tooth begins to form. On the chimney side, the tooth must be coated with clay to provide reliable protection against burnout.
- Rows 17-19 should be laid out of hewn brick. The façade part of the structure is being formed.
- On rows 19-22, a chimney is made and a fireplace damper is installed.
- At the next stage, the chimney opening needs to be shaped into a “dovetail”.
The arrangement of the corner fireplace is shown in Fig. 1.
How a chimney is made
The pipe can be made of either brick or metal. When laying a brick structure, a concrete solution should be used.
During the manufacturing process of the chimney, you will need to regularly wipe the excess layer of cement or clay solution inside the structure. If this is not done, the mixture may dry out quickly. There is no need to plaster the inside of the stove.
Particular attention should be paid to the fireplace insert. If it is not made correctly, smoke will escape into the room through the fireplace portal
This is very important for the construction of a corner fireplace. Everything should be carefully thought out so that the chimney passes correctly through all the ceilings
If possible, the chimney can be routed to the outer wall.
Processing of seams: 1 – Hollow out, 2 – With jointing: a) roller; b) fillet, 3 – In a row.
To get uneven lines of the fireplace, you will need to lay bricks with a smooth overlap - 5-6 cm in each row. To even out the tilt of the fireplace wall, you will need to embed a sheet of steel into the brickwork. To cover the portal opening, various lintels should be placed around the circle. Drawings of the circle should be made based on the size of the firebox. After a decision has been made regarding the configuration of the arch of the hole, the circle should be temporarily supported with racks. Laying begins with the installation of the central brick. Then the masonry can be carried out on both sides simultaneously.
When laying out the fireplace chimney, you need to carefully monitor its vertical position. When the pipe is brought to the roof, a solution consisting of sand and cement should be used for the construction. To protect the pipe from rain and snow, you should make tin devices called chimneys.
Finally, finishing and cladding are required.
How to properly sew seams
Jointing is done using a clay solution. After the clay pulp is ready, dry, purified sand will need to be poured into the mass. The mixture should be stirred until a thick mass without lumps is obtained, which is easily formed.
To ensure convenient jointing in the future, during the bricklaying process, the cement mortar does not need to be brought to 0.5 cm to the outer edge of the wall.
During the bricklaying process, it is necessary to constantly monitor the geometry of the structure being manufactured using a building level. Before laying, the brick must be moistened to obtain a durable structure.
You can lay out the chimney with your own hands, without using a trowel or other equipment. In this way, it will be possible to prevent small stones or other elements from getting inside along with the building mixture.
Making a corner fireplace from brick is quite simple if you have order and follow the correct sequence of actions.
Kinds
Traditional wood-burning fireplaces can vary in the finish of the outer walls, the type of firebox, its location, the method of heat transfer and the type of radiation. From the wide variety of traditional fireplaces that use wood as fuel, you can choose the one that best suits you
It is important to find out in advance what types of devices exist and what their differences are. Classification by mounting technology
Wall fireplaces
These are free-standing structures adjacent to the wall. Such fireplaces can be installed in an already rebuilt house. It is attached to a wall made of fire-resistant building materials. The chimney is also placed on the wall.
They are installed exclusively in spacious rooms, the floor and walls of which can withstand significant loads. Wall-type device portals are finished with ceramic tiles, brick, wild or natural stone.
Built-in products
They are erected at the stage of construction, renovation or modernization of a house. Part of the chimney pipe and firebox is built into the masonry of the wall itself.
These fireplaces are small in size, so they can fit in bedrooms and small offices. The façade of the firebox is sheathed with a half-brick border and trimmed with all kinds of decorative materials.
Corner fireplaces
They are located in the corner of the room, which is very interesting in terms of the decoration of the room. The fireplace chimney is “hidden” in one of the walls. The open fragment of the firebox is made of light blocks, steel, concrete. The surface is covered with plaster, lined with brick, wild stone and other materials.
Island outbreaks
These are free-standing structures. A flat platform (base) is erected in the center of the room. It can be closed or open type. The base goes into a smoke chamber (smoke collector) connected to the chimney.
The heat output coefficient of these fireplaces is low, and the structure takes up a lot of space. The main difference is the originality of execution.
Suspended structures
They are one of the modifications of island-type fireplaces. They are not tied to the floor, but seem to hang from the ceiling. Hanging devices are usually made of iron, which is the lightest material. The combustion chamber can be closed or open.