When constructing a furnace, they use not the usual cement mortar, but clay mortar. This is necessary to achieve tightness of the masonry and prevent cracking. Clay for the stove is mixed with water and filler. The result is a durable plastic solution that can withstand high temperatures. You can buy a ready-made dry mixture at a hardware store, or you can collect clay in a quarry, ravine or on the river bank. In the first case, it will be easier to prepare the solution, in the second it will be cheaper.
Types of clay solutions
Depending on the type of clay, the following solutions are distinguished:
The most plastic solutions are fatty, the least plastic are thin. When dry, fatty ones shrink strongly, crack, and skinny ones begin to crumble. In any case, the tightness of the masonry is broken, and combustion products enter the room, which is fraught with poisoning. Therefore, before starting work, you need to make sure that normal clay is selected, and when preparing the mixture, the optimal proportions of the components were maintained. This can only be determined experimentally.
Basic methods of preparing clay mortar for laying a stove
When constructing a furnace, they use not the usual cement mortar, but clay mortar. This is necessary to achieve tightness of the masonry and prevent cracking. Clay for the stove is mixed with water and filler. The result is a durable plastic solution that can withstand high temperatures. You can buy a ready-made dry mixture at a hardware store, or you can collect clay in a quarry, ravine or on the river bank. In the first case, it will be easier to prepare the solution, in the second it will be cheaper.
How to check the fat content of clay
Experienced stove makers can determine fat content by touch, but to do this you need to be a real professional. Most people don't, so it's worth turning to more reliable methods. Take a little clay (about a liter jar) and carefully remove all foreign objects from it - pebbles, twigs, etc. Divide the entire volume into five equal parts. Next you need to add sand in the following proportions:
- 1 part - do not add at all;
- Part 2 – 25% sand;
- Part 3 – 50% sand;
- 4th part – 100% sand;
- Part 5 – 150%.
Add water to the resulting mixtures, mix and knead until you get a homogeneous plastic mass similar to dough. It shouldn't stick to your fingers. There are many ways to check fat content online. We offer two of the most common and reliable ones. Choose the most convenient one.
Roll and dry clay balls
Roll the prepared “dough” into balls, press them between your palms into flat cakes and leave to dry. You must know exactly which cake is made from which mixture, and where and how much sand. All that remains is to wait until it dries completely and determine the proportions. It will take 3 days to dry, in dry weather - 2. The “correct” cake is dense, does not crack, does not crumble, and if it falls from a height of 1 m, it does not fall apart. It is used to determine the ratio of sand and clay suitable for preparing masonry mortar.
Checking with boards
Prepare clay mixture balls as described above. You will need two smooth, well-planed planks. Place the balls between them and gently press on top, gradually increasing the load. The balls will begin to turn into cakes, on which cracks will form at some point. If cracks appear almost immediately, this solution is thin; if the volume of the ball has decreased by half or more, it is too greasy. Normally, the material should change shape up to about a third.
Features of preparing solutions for other parts of the furnace
As has already been said, to lay a good sauna brick stove, in addition to clay, you will need two more mortars: with fireclay for the firebox and with cement or lime. for pipe and base.
How to prepare a solution with fireclay
To prepare the mortar for laying the firebox of a sauna stove, you need to choose clay from the lowest layers - very fatty. It is usually almost white, light gray or slightly yellowish. Fireclay sand or mortar is added to the soaked and rubbed clay (must be purchased at the store). You will need a lot of sand, and it costs a lot. To save money, it can be mixed with quartz (white) in a 1:1 ratio.
Fireclay mortar is sold in stores
Since the clay is obviously oily, test batches are made by adding a large amount of sand at once - from 3/4 or more. When mixing this solution, high demands are placed on the quality of water - it must have a hardness of no higher than 8 points. When preparing fireclay mortar, you only need to determine the required amount of sand. Strength tests are unnecessary - fireclay is a guarantor of the required qualities.
Is it possible to use a ready-made mortar for laying a firebox with fireclay? It is possible, but it costs a lot of money, and you will need quite a lot of it.
Lime or cement-lime mortar
The base of the furnace and the fluff of the chimney are made from a solution with increased mechanical strength - with the addition of lime and/or cement.
To prepare a solution using lime, you need lime dough. Not self-slaked fluff, but a paste-like mass made by professionals. This is the material on which it is better not to skimp. It is advisable to buy it ready-made, packaged in airtight containers (check the expiration date). When you extinguish fluff yourself, particles of quicklime remain in the paste. During operation, they absorb water vapor, are extinguished, and tear the seams. Therefore, it is more advisable to use ready-made lime dough, and of good quality.
Lime dough does not have to be bought in buckets, you can buy it in bags
To prepare lime mortar, self-extracted sand, sifted through a sieve with a mesh size of 1 mm, is suitable. There is no need to rinse it, since lime will destroy all microscopic living creatures, and alumina impurities will not affect the strength of the solution either. If the sand is purchased, then its fraction is 0.7-0.9 mm. You can use any drinking water, including tap water. There are no requirements for hardness, but process water with impurities still cannot be used.
Preparing lime mortar for the stove
Open the container and knead the dough using a smoothly planed wooden paddle. You begin to add sand in portions, achieving its uniform distribution throughout the entire mass. The “starting” amount of sand is 1/2 of the volume of lime. After mixing everything, look at the fun. A solution is considered normal if the layer of solution on the surface is 2-3 mm, with possible small tubercles and streaks. If a very thin, almost transparent layer remains on the surface, through which even the wood is visible, the solution is thin (too much sand). If the layer is large and loose, there is not enough sand, the solution is too greasy.
Veselko, which is used to determine the fat content of a solution
Lime mortar can be kneaded using a drill, but the fat content must be tested using planed wood. This is how fat content is determined most accurately.
When determining the proportions of lime mortar, we take more sand, but the plasticity rate remains. Experts first bring the solution to a slight “fattiness” by adding up to 5 parts of sand to 1 part of the dough, and then bring it up to standard by adding clean paste. In this case, the strength of the seam is ensured precisely by the grains of sand, and the lime only glues them together.
We check the viscosity (amount of water) using two bricks. We lay about 3-4 mm of mortar on one, the second brick on top, tapping lightly with the handle of a trowel, we level it. A bead of mortar about 1-2 mm thick should form on the sides. If it stands and does not drain, everything is fine. The solution was mixed properly. If there is no roller, the solution is not squeezed out, you need to add a little water. If, on the contrary, the roller floats down, there is too much water, add paste (sand, as agreed, was placed along the maximum border within the limits of plasticity, so a small amount of paste will not hurt).
Cement-lime mortar
The proportion of cement in this solution is very small. For one part of cement, take at least 9 parts of lime paste (and no more than 15). Cement grade - from M200 to M600. The higher it is, the less this component is required, but the strength of the mortar increases when using high-quality cement. You can use a ready-made adhesive composition for ovens as an additive. Its main component is high-quality cement.
The whole difficulty is that this solution has a short shelf life - it must be used within 45 minutes from the start of mixing. Therefore, it is necessary to conduct experiments with the amount of sand and water on a test batch (all actions are similar to determining the lime composition). When mixing the working cement-lime mortar for laying the furnace, all pre-measured components are quickly mixed in a certain order. The finished material is immediately taken to work.
Lime-cement mortar must be used quickly
You can mix the solution with the same paddle, or you can use a drill with an attachment. The mixing procedure is as follows:
- First, add water to the lime (if this is necessary according to the test results), stir until smooth. Mix with a mixer for about 2-3 minutes, manually for 10-15 minutes.
- Continuing to stir, add the required proportion of cement in a thin stream. Having achieved homogeneity of the composition, stir several more times.
- Continuing to stir, gradually add sand. Having poured out the entire required volume, stir a couple more times. The solution is ready for use.
All these subtleties were developed experimentally. The technology is different from that used by our ancestors. They beat clay. For laying a simple cooking stove, just broken clay will do, but a sauna stove with its temperature conditions requires a good, strong mortar.
Video: preparing clay mortar for the oven
To prepare a good mortar for laying a stove, you should have a clear idea of the quality ( fat content ) of the clay . In this regard, it is necessary to possess certain skills in his (her) assessment. Experienced kiln masters determine the quality of clay by simply rubbing it between their fingers, but this requires a lot of experience and practice. For less experienced craftsmen, there are more informative techniques. Below are four of them.
Clay for stoves: varieties and methods of quality control
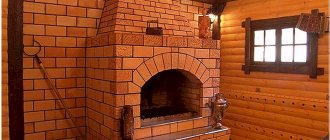
What owner of his own country property does not dream of taking a steam bath or simply relaxing near the fireplace admiring the burning of an open flame. But a pleasant rest is preceded by work on the construction of a stove device. And for the work to be successful, you need to understand which clay is best to use for laying stoves and what qualities it should have. At the same time, thanks to the various impurities included in the clay: lime, sand, mica and other components, the plasticity and fat content of the clay mortar for the furnace is determined.
The first way to determine the fat content of clay
You need to add water to a bucket of clay (10 l) and mix everything until creamy using a long planked board. If the solution is of low plasticity and requires rich clay, it will cover the board with a thin layer (1 mm).
The very plastic solution will cover the board with a thick layer of clay. Sand needs to be added. It is introduced in small portions, adding a liter jar per bucket until the solution reaches normal plasticity.
Clay has normal plasticity if the adhering layer of clay on the board has reached 2 mm and adheres to it in separate clumps.
Methods for preparing clay-sand mortar
After the quality of the clay has been checked by any convenient of the previously discussed methods, you need to understand the features of preparing the mortar for laying the furnace.
Many stove makers claim that it is the process of preparing sand-clay mortar that is technologically the most difficult. I would like to note that in this process it is important to take into account the individual characteristics of the stove structure being built. So, for example, an adobe oven is made from a mortar that is completely different from the mixture for laying bricks. Most mortars used in the construction of furnaces are prepared in either a 1:1 or 1:2 ratio of clay and sand, respectively. At the same time, in order to bring this composition to the ideal consistency, it is diluted with the required amount of water. The amount of water is calculated in accordance with the volume of clay - add 1/4 part of water to one part of clay.
I would like to note that today, stove makers use several methods for preparing clay-sand mortar to build a stove with their own hands.
The folk version of making clay involves preparing a wooden box that is lined with tin. After this, the clay is soaked in it for 3 days. After this period, sand is added to the resulting mixture. At the same time, depending on the volume of the solution being prepared, it is kneaded with hands (if the volume is small) or with feet in rubber boots if a lot of solution is needed. After everything is mixed to a homogeneous consistency, to check the quality of the resulting composition, dip a shovel into it and if it slides slowly without sticking, then this indicates that the solution has been prepared correctly.
There is a simpler option, for which normal clay is used.
This composition is mixed without the use of sand. To prepare such a solution, use a special shield , on which a thin layer of clay is poured, which is constantly watered with water.
So, one row is poured onto another until a height of 300 mm is reached. Then the resulting embankment is nailed with sharp movements with a shovel placed on its edge. Thanks to this, the resulting composition is divided into parts. This is the only way to thoroughly mix the clay. In this case, this procedure is repeated at least 5 times. There is another option for relatively quickly preparing a clay solution for building a furnace, which involves laying clay in layers in a barrel, while wetting each layer with water. After a certain period of time, the material will become soft and will be ready for further kneading. But to remove excess impurities and lumps from such a solution, use a special sieve with small cells. In order for the solution to acquire the necessary plasticity, water is added during the mixing process. But this only applies to clay with normal fat content. If the material is too greasy, then you need to sift the sand that will be added when preparing the solution.
Naturally, progress does not stand still and additives are constantly appearing that can significantly improve the quality of such solutions. Therefore, building any stove, barbecue or fireplace with your own hands should not pose many problems. But you still need to know all the basic nuances of carrying out work of this kind before erecting a stove device in a country house or on a summer cottage.
The second method for determining the fat content of clay
This method is used for clay of medium fat content. Five portions of clay, cleared of large particles, are measured in a liter jar. Leave the first portion, add one tenth of a jar of sand to the second, one quarter to the third, three quarters to the fourth, and a full jar to the fifth.
For oily clay, sand is added in different proportions: leave the first portion, half a jar of sand is added to the second, a full jar to the third, one and a half jars to the fourth, two jars to the fifth.
Add water to the mixture of sand and clay until you get a solution that can be kneaded well with your fingers and does not stick to your hands. Now you need to roll five balls with a diameter of 5 mm from each portion. Then, from two balls of each portion, cakes are made with a thickness of 2.3 cm and dried together with the balls in a draft-free room on the floor for 8.12 days.
If the dried balls and cakes do not crack and, falling from a meter height, do not scatter on the floor, then the solution is suitable for masonry. Small cracks along the edges of the cakes are allowed.
It is easy to determine whether the solution is fatty or lean by looking at the dried cakes. The cakes made from a fatty solution crack at the edges, while the balls made from a thin solution do not form cracks, but they crumble when they fall.
How to determine the quality of clay
Buying clay for the stove will not be a problem, but it is also important to prepare it according to all the rules. After all, the quality of construction and its durability will depend on this.
I would like to give one example. Clay for masonry can be used in quite different ways. You just need to choose the right proportions. We make a ball from the solution we made, then throw it on the ground. When the ball crumbles, this means that the solution contains not enough clay and a large amount of sand. If the solution contains a lot of sand, cracks will appear. When the ball remains intact, then everything is fine, or the solution is greasy. Now we’ll figure out which clay to choose for laying the stove and then prepare the solution.
You need to add a little water to half a liter of clay. Mix well with your hands until the water is absorbed and the clay does not stick to your hands.
- When the thick dough is ready, you can mold a ball with a diameter within fifty millimeters. From this ball we make a cake with a diameter of one hundred millimeters. We dry it for three days.
- When cracks appear on it, this means that the clay is oily, therefore, you need to add sand. If there are no cracks, and the ball does not crumble when it falls, it means that a solution can be made from clay.
- When the clay is thin, it will not crack. This clay is fragile, so it must be mixed with oily clay.
- You don’t need to add sand and clay all at once, but in several stages, gradually. In this case, it is necessary to control the quality of the solution.
You will need three liters of clay. It needs to be put in a container. Then add water and stir thoroughly.
- If the clay sticks, it is very oily. You need to add sand to it. When small pieces are visible on the jig, it means the clay is normal. To prepare a solution from this clay, you do not need sand.
- If the oar is covered with a thin layer, then the clay is thin. It must be mixed in certain proportions with fatty clay.
Attention: But do not overdo it, so as not to get very thick clay or vice versa. Nothing good will come out of such a solution then.
This method is more suitable than others for determining the quality of clay.
- You should thoroughly mix half a liter of clay to make a thick dough. Knead well. Roll a ball with a diameter of fifty centimeters. Place the ball between two smooth boards.
- Press down the top board, squeezing the ball. Repeat until cracks form on the ball. The fat content of the clay will depend on the formation of cracks and the degree of flattening of the ball.
- In the case where the ball has broken up, the clay is thin. If the clay is a little fatter, then cracks will appear when you press 1/5 of the diameter. In normal clay, cracks will appear at 1/3 of the diameter. Cracks will appear at ½ diameter in oily clay.
- If the clay is oily, the rope stretches out and gradually becomes thinner. A sharp end appears at the site of the rupture. There are no cracks at all when bending. If the clay is normal, then the tourniquet is pulled out gradually. Discarded when the thickness at the rupture site is reduced by twenty percent. When bent, small cracks form.
- After repeating this several times, you will have no doubts about the quality of the clay. You will learn to determine the correct proportions to create a solution. The stove you make will last a very long time and be strong.
- When conducting experiments, mix several types of clay. Sand is added and removed. This is the only way you can determine the optimal proportions for your solution. If you make a mistake, it won’t be a big deal if you had a tendency to get fat.
Attention: According to professionals in this matter, this will not greatly affect the functioning of the stove. Otherwise, there will be a lot of sand in the solution, which will affect the strength of the furnace. If the solution is too greasy, many cracks will appear when plastering the stove. It's not so scary. Using grout you can get rid of cracks.
You know, choosing the right clay is only half the work. You need to be able to prepare the solution correctly and efficiently.
The fourth way to determine the fat content of clay
You can also test the clay solution using strands 1.1.5 cm thick and 15.20 cm long. They are rolled out of clay and tested for stretching around a round wooden mold with a diameter of 5 cm.
Fat clay ensures smooth and gradual stretching of the rope, which does not form cracks.
Normal clay promotes smooth drawing of strands, which break off at a thickness of 15.20% of the initial diameter of the strand. And small cracks appear on it when laying it flat and the thickness of the seams is 5 mm, 20 liters of mortar are consumed. For Russian stoves, the solution consumption increases by 15.20%.
It should be taken into account that only a plastic solution of the required thickness fills all the unevenness of the brick and ensures strong adhesion. The seams between the bricks become tight and gas-tight. Only by strictly following the technology for making clay mortar can you achieve good quality stove masonry.
SPLETENO.RU Folk crafts
- Are you here:
- Publications
- Clay products
- Fat content of clay. Determination of fat content
Leaders of views
Types of craft. Types of folk crafts
Drying and firing clay
Clay. Properties of clay. Clay composition
Preparation of birch bark. Time and methods of harvesting birch bark
Preparing the vine for weaving
Found a mistake?
Methods for testing clay
Before directly laying the furnace, you need to find out how the fat content of the clay can affect the solution and how, if necessary, you can change its characteristics.
First of all, the fat content of clay depends on the presence of sand in it. Oily clay contains a small amount of sand. In turn, if it contains a large amount of sand, it will be skinny. It is these qualities that affect the plasticity of mortar for stoves. I would like to note that upon contact with water, clay absorbs it like a sponge, while becoming plastic and significantly increasing in volume. In turn, under the influence of high temperature it quickly loses liquid and, if the water completely evaporates, its structure will become porous. With further heating, the clay will begin to melt and simply bake, turning into a solid material resembling stone. These properties of such a useful substance are very important when building a stove.
Checking the quality of clay by drying
Our ancestors also used various clay products and solutions when building furnaces. Moreover, as it became known from history, when building a clay stove, a person independently made not only mortar, but also bricks, which were a solid basis for laying the chimney. But in our time, such a binding component is used only as a building mixture for fastening various materials together.
- Take half a liter of clay and add a small amount of water to it, after which everything is thoroughly kneaded with your hands until the mixture stops absorbing moisture.
- After preparing the stiff dough, a ball with a diameter of up to 5 cm is rolled, from which a flat cake is subsequently made twice as large.
- Under natural conditions, it dries for 3 days. If cracks form on the cake, the clay has a high fat content and in order to prepare a high-quality mortar for laying the stove, it must be diluted with sand.
- If during the drying process no cracks appeared on the cake and it did not disintegrate when dropped from a height of 1 meter onto a hard surface, then such a binding material is completely ready for preparing a solution.
Origin of clay:
Clay is a naturally occurring product formed from feldspar and igneous rocks that has a fine texture when dry. By origin, these rocks are continental, formed on the mainland, and marine, formed at the bottom of the sea.
As a result of shifts in earth layers, earthquakes, and floods, granites, volcanic glass, tuffs, and porphyrites were crushed. The physical change and destruction of rocks was influenced by the crystallization of salts, freezing of water, and the vital activity of microorganisms.
The formation of sea clay layers occurred when clay substances were deposited by water currents, accumulated and settled. Clays of the marine group are:
– coastal-sea. Their place of formation is coastal regions, river deltas and bays. Clay layers often alternate with coal, sand, and silt;
– lagoon. Clays formed in sea lagoons contain high concentrations of sulfides, calcite, and iron. Fire-resistant species are common among lagoonal alluvial rocks;
– shelf. Rocks that were formed at a depth of more than 200 m have a denser structure and homogeneous composition.
Continental clays are also divided according to their place of origin. They are:
– deluvial. A characteristic feature is the mixed composition, its heterogeneity even in one time layer;
– lake. The best fire-resistant clays are formed precisely on the bottom and shores of lakes. They contain all the components necessary for the manufacture of fireclay materials;
– proluvial. They are formed by the destruction of rocks, washed away and carried along erosion furrows to the foot of the mountains. Their characteristic feature is layering, looseness, heterogeneous composition;
– river. They can be found in river floodplains; they contain a large amount of impurities in their composition and most often turn into pebbles.
There are also residual rocks with low plasticity, formed as a result of weathering of rocks.
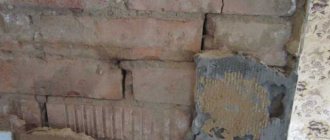
Skinny compounds are neither strong nor durable
It is not recommended to use thin types of clay for oven mortars; they are not plastic and do not give strength to the masonry.
Video: An experienced stove maker shares the secrets of producing high-quality clay
Determination of clay fat content experimentally
If the clay is mined independently, its fat content can be determined immediately at the excavation site. To do this, you need to take a handful of the mineral in your hand, moisten it a little with water and knead it until smooth. Organoleptically, by touch, you can feel how high the fat content of the clay is. If it becomes sticky and plasticine like plasticine, then it is a fatty breed. Skinny clay, crumpled into a ball and moistened with water, will still crumble. This version of the material will have to be “fattened”.
There are several more accurate test tests for the fat content of this material, and they must be used to select the optimal clay option.
First way
You need to take about 0.5 kg of clay, which is diluted with 100÷130 ml. water. The mass is mixed until smooth. It is better to carry out this procedure manually in order, as they say, to tangibly feel the homogeneity of the composition, which at the end of kneading should not stick to your hands and have the consistency of plasticine.
From the resulting mass you need to roll two balls with a diameter of 40÷50 mm. One of them remains intact, the other is crushed into a cake. These test samples are left to dry for two to three days at room temperature.
If, after drying, cracks appear on the prepared parts, this indicates that the clay is very oily, and when mixing the solution you need to add a little more sand than indicated in the recipe.
If the cracks are insignificant, and the ball thrown onto the table from a height of 800-1000 mm does not break into pieces, then the clay has a normal fat content, this grade is excellent for masonry mortar.
Second way
To test clay using the second method, you will need 2÷2.5 kg of clay, which is kneaded using a paddle, adding water. You need to bring the mass to the consistency of plasticine, and if it still continues to stick to the wooden paddle, it means the clay is very oily. When mixing the solution, add more sand to it than required according to the recipe.
Clay, which has a normal fat content, remains on the funnel in separate clumps, but does not stick to it completely.
Third way
This method of testing clay for fat content is considered the most accurate. To carry out the test, take 0.5 kg of clay, which is mixed with water to form a thick dough. Next, a ball with a diameter of 40÷50 mm is rolled out of the resulting mass. Then, the ball is compressed between two smooth boards until cracks appear in the clay. In this case, the fat content is determined by the thickness of the cake and the type of cracks that appear.
- If the clay has low fat content or is thin, then even with slight compression the ball will crumble into pieces.
- If the clay is very oily, then when compressed by half the original diameter, narrow cracks form.
- If, when the ball is compressed by ⅓ of its original diameter, cracks appear in the clay, then it has normal fat content and is well suited for masonry work.
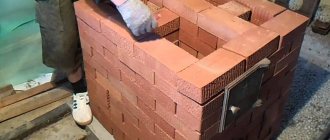
Standard brick for laying a furnace
The construction of the entire stove, depending on its size and model, may require from 550 to 2500 bricks, not taking into account the laying of the chimney pipe and the foundation. Therefore, having calculated the costs of the required amount of all materials, it is quite possible to think about saving at least on clay and sand for mortar, especially since they can be found literally under your feet when you go out into the countryside.
If you decide to carry out this simple process of preparing such materials yourself, then some questions will certainly arise:
- Where can you dig up clay and find sand, thereby saving quite a significant amount?
- How can you determine the quality of a material and its suitability for oven mortar?
- How to correctly formulate a solution based on the fat content of the clay that was found?
- How to prepare the components for the solution?
- How to make the right batch?
- What components are needed for the solution, besides clay?
It is quite possible to find simple answers to these questions. And it’s worth starting in order.
How to find and select clay?
Clay is usually easy to find near any suburban area. The layers of this mineral do not lie too deep, but each of them can have a different composition. Such layers can be clearly seen on steep banks of rivers or the sea, as well as in quarry developments. It is there that you can notice that numerous layers have different shades and densities.
Clay:
Clay is a sedimentary rock with a fine-grained structure and complex composition. Plasticity, viscosity, fire resistance and other properties of clay are determined by which rock-forming substance is the main one.
These can be clay materials such as kaolinite (Al2O3 2SiO2 2H2O), andalusite, disthene and sillimanite (Al2O3 SiO2), montmorillonite (MgO Al2O3 3SiO2 1.5H2O), halloysite (Al2O3 SiO2 H2O), hydrargillite (Al2O3 3H2O), diaspore (Al2O3 H2O), corundum (Al2O3), monothermite (0.2[K2MgCa]O Al2O3 2SiO2 1.5H2O), muscovite (K2O Al2O3 6SiO2 2H2O), nacrite (Al2O3·SiO2·2H2O) and pyrophyllite (Al2O3·4SiO2·H2O).
For example, montmorillonite, which belongs to layered silicates, has sorption properties and has a pronounced ability to swell strongly.
Different types of clay may contain particles of kaolinite, andalusite, muscovite, hydrargillite, nacrite, corundum, pyrophyllite and other constituent minerals in different proportions.
Among the impurities, the most common particles are quartz, gypsum, calcium, dolomite, pyrite, siderite, magnetite, and glauconite.
For laying individual sections of the furnace, different solutions are required
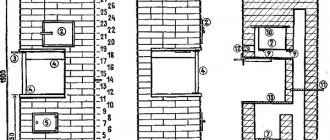
The attached diagram identifies individual zones of the furnace structure in which different clay mortars can be used for masonry.
1 – The foundation of the furnace is built on the basis of cement-sand mortar, but around it you can make a waterproofing layer, a kind of “castle” 100÷150 mm wide from clay, which must be compacted well.
2 – Waterproofing from roofing felt sheets is laid on the foundation.
3 – The first two brick rows of the kiln are usually laid on cement-sand mortar. Sometimes a little lime is added to it for greater plasticity.
4 – Next, heat insulation is made from a sheet of asbestos or other heat-resistant material. The material is laid on a clay mortar.
5 – The heat-storing zone of the furnace is laid out on a clay-sand solution that can withstand temperatures of 500÷600 degrees - this is how much this zone can be heated.
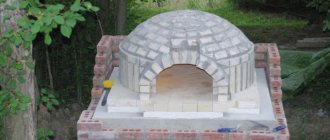
6 – The combustion chamber of the furnace is made of fireclay bricks, and a solution of fireclay clay is used for its laying, since the temperature in this area of the heating structure can reach 1 thousand degrees.
7 – Laying the source of the chimney is done using a clay-sand mortar. In this area, the oven heats up to 300÷400 degrees.
8 – The chimney fluff, located under the ceiling of the room, is laid out on a clay-sand mortar.
9 – A metal box, arranged around the pipe for fire safety, can be filled with sand, expanded clay, vermiculite, or the same clay-sand mortar.
10 – The neck of the chimney is laid out on a cement-sand mortar with the addition of clay.
11 – The pipe head, exposed to atmospheric precipitation, is usually laid out on a cement-sand mortar.
If the solutions are made independently and used in combination, you can save up to 12–15% on their purchase.
Making solutions using clay
In addition to the fact that you will need to find, dig up and clean the clay from impurities, you should also know how to properly make oven solutions.
This table presents the materials that are used for laying stoves and the proportions of the solutions.
| Types of solutions | Clay mortar | Mortar | Cement mortar |
| Materials used | Consumption of ingredients in volume parts | ||
| Sand | 4 | 2,5 | 3-4 |
| Fireclay clay | 1 | – | – |
| Regular clay | 1 | – | – |
| Lime | – | 1 | – |
| Cement M400 | – | 0,5 | 1 |
We will not dwell on cement-sand and lime mortar - they are not included in the content of this publication. We are only interested in clay-based compositions.
Clay-sand mortar
As is already clear from the above diagram, the “lion’s share” of the areas of the heating structure are laid out on a clay-sand mortar, which is why it can be called the main one in the construction of the furnace. The materials from which this mixture is made have a fairly affordable price in specialized stores, but can also be obtained independently - in this case they will cost almost free.
Clay sinterability:
This property is defined as the ability of a plastic material to transform into a solid, stone-like state when fired at high temperatures. Clay after firing should not soak in water. This property is acquired due to irreversible changes in the structure of the material, namely, the removal of physically bound water, the decomposition of clay material into silicon oxide and aluminum oxide. At temperatures from +1000 °C to +1200 °C, new water-resistant mineral compounds are formed. The melt of fusible components solidifies when cooled, making the mass hard and durable.