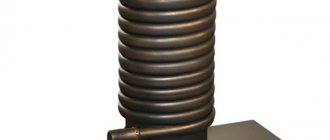
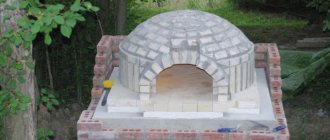
Once upon a time, classic brick stoves for a home were a mandatory attribute and the only method of heating. Professional stove makers were in demand and respected. Today, there are many new means for heating premises that operate from different energy sources, from solid fuel to electricity. However, good stove makers remain in demand and the online request for “brick stoves for home drawings with instructions” remains frequent.
Some build stoves for a bathhouse, for a summer residence, or simply because their home is remote, which is why there is no alternative. Different types of stoves can perform a heating function; some models can be used to cook traditional dishes. Some are large in size, others are compact and quickly erected. Some are planned before the house is built, while others need to fit into an existing space. Stoves are ordered or made by hand in order to save money, others are built to fill the decor. In any case, all such equipment must be built from high-quality and suitable materials, in accordance with existing SNiP. You can find any drawings with instructions on the Internet, but you need to understand that building a stove for your home with your own hands will not be so easy.
Advantages of a brick stove
Why does the brick kiln remain competitive, more and more being built, with so many advantages?
It would seem that today there are many alternatives for heating that are much more convenient to use, and according to manufacturers, they have greater efficiency (coefficient of performance). But why are brick ones still in demand in some areas or buildings? One of the reasons is that a brick stove “breathes.”
This means that when the furnace warms up, moisture is released from the base of the structure. As it cools, moisture is absorbed back. Thanks to this, it maintains the normal dew point in the room. It is this indicator that indicates that “a cozy atmosphere is maintained in the house.”
The ability of a brick oven to “breathe” not only has a positive effect on human health, but also allows you to feel comfort even at a non-domestic level. When calculating a house's thermal engineering, temperature indicators during the heating season are set within 18-20 Celsius. Air humidity should be optimal for health. The home stove provides optimal air humidity, with a heating temperature of about 16 degrees Celsius. At this temperature, a person does not feel discomfort; clothes and bedding remain dry. At the same time, in panel houses, when using centralized water heating, even at a temperature of 18 degrees Celsius, excessive air humidity may be felt.
For water heating, the optimal temperature range will be 20-23 Celsius. And for electric heating with infrared emitters, the temperature should be even higher (since they greatly dry out the air). It turns out that a brick kiln with an efficiency rate of about 50% will be more profitable, in terms of savings, than modern systems with rates of 60-80%. Thus, the savings will be more significant, because the loss of heat in the house depends on the difference in temperatures inside and outside the room.
Selecting oven surface size
Before starting construction, you need to choose the type and model of the future structure. The main criteria for selection will not be its appearance and ease of construction, but heat transfer (the ability to heat the required area).
When choosing a location for its placement, you should know that the side surfaces of the furnace have the greatest heat transfer. This is a determining factor when choosing a location.
Different models have different shapes:
- Rectangular;
- In the form of the letter T;
- With a bed or kitchen equipment for cooking.
They can serve as a heating device for living rooms, or be a space divider.
For a small home area, you should not choose too massive structures; even if they have a wide range of functions, they will take up too much space and give off too much heat. To heat the entire furnace you need a lot of fuel, and the heat transfer will be too great.
The location of the stove relative to the living rooms is also important, and the insulation of the entire house is also a criterion.
Table of stove sizes, taking into account the area of the room
The structure of a stove for the home, stoves for the home of the classical design
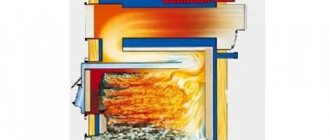
The oven consists of 3 main parts. The body of the stove, the foundation and the chimney leading to the roof.
Furnace diagram example: The furnace consists of:
- Foundations - foundation;
- Waterproofing material;
- Shantsy. They are holes, they are made to create heating in the lower part of the room. They serve as “legs” in the structure;
- Blower;
- The opening of the air channel helps to warm up the room over the entire height;
- Blower door;
- Grate grate;
- Kindling door;
- Furnace part;
- Vault of the combustion part;
- “Hailo” (Sometimes the vertical part of the firebox with the nozzle is called the hailo);
- Door for cleaning;
- Strangler Pass;
- Dushnik;
- Valves that regulate the direction of travel;
- Convector channel;
- A valve that closes the chimney after heating the stove. Close it after heating so that the oven does not cool down.
- Exhaust door;
- Chimney hole;
- Cover (top of the furnace);
- Cutting the chimney under the ceiling;
- Overlap;
- Chimney on the roof (otter or fluff).
Foundation
The foundation for the stove is made separately from the general foundation of the house. A conventional reinforced concrete strip foundation is used. Insulation is laid on it in several layers of roofing material, and on top of them is a sheet of asbestos. The asbestos is covered with an iron sheet (preferably cast iron, but this is very expensive; ordinary roofing metal will do), and the top is covered with felt. The felt bedding is pre-moistened, laid on the foundation and allowed to dry. Only after this do they begin laying. The bedding itself is needed to ensure that the foundation does not absorb all the thermal energy of the furnace. In simple words, “so that the heat does not go into the ground.”
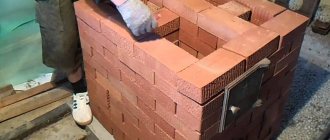
Masonry base
The base of the masonry is made in oblique shading from simple red brick, on a cement-sand mortar. This part is located under the firebox and will not experience high thermal loads. The firebox is made of red ceramic bricks, combined with fireproof (fireclay) material. A clay mixture with sand (sometimes with the addition of fireclay) is used as a solution.
A sheet of metal and asbestos is placed in front of the blower door. The thickness of the asbestos layer should be about 5 mm. Its edges should be laid in the masonry of the stoves. The removal of the metal sheet is at least 250 mm. The edges are tucked in, pushing them towards the floor.
Unlike cement-sand mortar, a mixture of clay and sand dries out rather than setting. Therefore, with constant exposure to moisture (especially in winter), the solution becomes wet. For this reason, some part of the furnace that does not experience high temperatures (up to 300 degrees Celsius) is placed on a cement-sand mortar. Portland cement grade 400 and quartz quarry sand are used.
To ensure the accumulation of soot in the lower part of the channels, the edges of the transitions are made rounded. Each new channel must be higher in height than the first (lower transition). It is much easier to remove soot from the lower channels.
Chimney
The chimney is made of red ceramic bricks and ordinary cement-sand mortar. Such bricks are cheaper than fireclay bricks, and the mortar is much stronger. We must not forget about cutting the chimney inside the apartment (in the ceilings). The cutting performs fire-fighting functions. A thick layer of bricks warms up more slowly in the event of a soot fire, and thus transfers less heat load to the ceiling.
The upper chimney pipe (otter), which is located above the roof, performs decorative functions and is a side for drainage of precipitation. The draft in the furnace will depend on the height of the pipe.
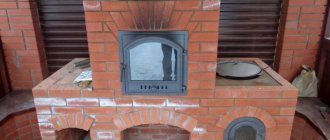
The design of a deck oven and its operating principle
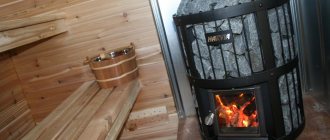
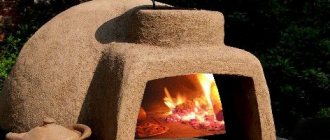
To heat country houses, they increasingly began to resort to brick stoves, abandoning a variety of electrical appliances and gas.
The stove has always made it possible to quickly and for a long time warm a living space with living heat. The main thing in stove heating is the ability to initially accumulate heat and then gradually release it. The most economical option for brick fireboxes is a hearth stove. It is more common throughout the world.
A stove is called a hearth if it has a surface where fuel for kindling is placed.
The hearth oven is loved for its economical use. Top combustion in such a furnace occurs evenly and does not consume a lot of fuel. During the combustion process, the fuel is oxidized due to air masses entering through the furnace door, which releases heat.
If you look at the structure of the hearth stove itself, you will get three main parts of the firebox:
- The lowest tier is a chamber for loading heating material.
- The level above is responsible for combustion. The highest temperature is recorded in this area.
- The upper floor removes gases after burning wood and generates heat.
Place for a stove in the house
Its efficient operation will depend on where the stove is installed. The best location would be the intersection of all the walls in the house. With no larger area, it will be possible to effectively heat the entire space. The closer the oven is to the exit, the better. The heated air will prevent cold air from entering from the outside. In addition, in this case it will be easier to deliver fuel for the furnace.
Example:
Factors to consider:
- The structure must be installed so that all side parts can be reached. This is necessary for proper operation and the possibility of complete cleaning.
- The stove should not be part of the general foundation of the house, since its foundation will experience completely different types of loads.
- The location should be such that the chimney pipe does not rest against the floor beams. This needs to be calculated when building a house or when laying the foundation for the stove.
- There must be a fire-resistant floor in front of the firebox door. (sheet metal or ceramic tiles) to prevent accidental fires.
Design and principle of operation
The construction of a stove will be pointless for the purpose of constant use in harsh climatic conditions, because the design of the stove is not intended for long-term heating of a large space. This stove is less heat efficient than others, so it is better suited for seasonal use.
Small oven is rough
The design of a rough stove is relatively simple, but in order to build a building yourself, you need to know the basic principles of heating engineering and have skills in working with bricks. The principle of operation of coarse stoves is the same as that of other brick kilns.
Firewood is placed in the firebox, the open ash pit allows smoke to escape without entering the room. A special winding chimney removes combustion gases to the outside. This design of chimney pipes allows you to retain heat and heat a large area. A long pipe and a special type of shield make it possible to heat with minimal fuel consumption.
The design contains the following elements:
- A blower with a door, necessary for good air circulation,
- Firebox - a chamber for supplying fuel to the stove,
- A shield with special channels designed for the passage of gas,
- The chimney in the furnace, as in any other furnace, is designed to remove gases from burnt fuel to the outside. A door and a damper are required.
Equipment and building materials for building a stove with your own hands
Brick
There are sources on the Internet that claim that bricks for stoves and fireproof bricks are one and the same. In fact, they only have linear dimensions in common. The dimensions of a regular single building brick are 250 by 125 by 65 mm, and a standard stove brick has a size of 230 by 114 by 40 mm. Sometimes 230 by 114 by 65 mm is found. In the construction of the furnace, special high-quality brick of grade 150 is used. It is resistant to temperatures up to 800 degrees. It would be possible to build an entire furnace from it, but it cools quickly and is not suitable for a full-fledged furnace.
Fireclay bricks are used to lay the furnace channels in the combustion chamber. It can withstand high thermal loads. It is used in Swedish stoves or sauna stoves. It can withstand temperatures up to 1800 degrees, but in home ovens this temperature does not exist. It is valued for other qualities - the ability to retain heat for a long time. It makes no sense to build the entire body of the furnace out of it, since it is very expensive and has weak strength.
Bricks for the stove
To distinguish high-quality fireclay from low-quality one, there is an opinion that it should have a yellowish tint. But such a calculation is not correct, since fireclay can change color depending on its deposit. A sign of high-quality fireclay is the fine grain of the brick. Another way to check is to check for sound. The brick is tapped with a hammer. The sound should be clear and clear, not dull. The last way to determine the quality of a material is radical. They break the brick in half and look at the break. High-quality fireclay is broken into large pieces.
As a substitute for expensive fireclay, clinker bricks are sometimes used in kiln construction. It is just like red ceramic, but it is fired at elevated temperatures. It has greater strength and fire resistance.
White silicate is not suitable for any parts. It is not resistant to thermal stress and absorbs moisture too much.
Sand
Medium-fraction quarry sand is used as sand in the cement-sand mortar. It is sifted through a sieve to remove large fractions and various organic inclusions. The presence of additional inclusions in this case is very important. All organic impurities will burn from heat, causing the masonry to crack and begin to crumble.
Masonry mortar
To lay the stove you will have to use several types of mortar based on:
- Cement;
- Lime;
- Clays;
- Chamotte.
Clay-based mortar is characterized by its plasticity. It is used in places experiencing high temperature loads. This solution is cheap in price. Clay can be easily found on almost any plot of land by first cleaning it. It can withstand temperatures up to 1100 degrees Celsius. This mixture dries when exposed to high temperatures, but becomes wet when exposed to moisture. The furnace masonry can always be disassembled and reassembled. But you can’t lay a foundation on such a solution.
A mixture of clay with the addition of fireclay is used in the combustion chambers. This solution can withstand the highest thermal loads.
The lime mixture is used on the foundation masonry or for the chimney. This solution is quite strong, but can only withstand 450 degrees Celsius.
Cement-lime is even more durable than ordinary lime, but fire resistance is reduced even more. Used in the foundation.
Cement-sand mortar is used for laying a chimney. It has the best strength and resistance to precipitation. The seams of such a solution will not allow smoke and digging into the room and will provide good draft for the firebox.
Operating rules
To maximize the service life of the stove, you should strictly follow the rules of its operation:
- It is not recommended to use coarse wood for heating premises in winter because, due to its low thermal power, it will have to be heated more intensively, and this may lead to increased fuel consumption and the appearance of cracks in the masonry;
- the chimney should be periodically maintained and the ash pan should be promptly cleared of ash to ensure optimal draft and stable operation of the stove;
- It is recommended to use coal or firewood as fuel, since they do not emit gases harmful to human health and do not stimulate the formation of deposits of chemically active soot in the chimney;
- when firing the stove, you should not add more fuel than the recommended amount in order to prevent the flame from entering the chimney or disrupting its standard operating modes;
- Only metal utensils should be used on the hob;
- When heating, the firebox door must be tightly closed.
Gruba is an excellent economical stove, which is perfect for heating rooms with an area of up to 30 m2 and cooking. It has a simple design, is unpretentious in operation, repairable, and does not always require laying a foundation. Even a person who has no experience in carrying out this type of work can post it.
Examples of brick stove designs
Stove for a summer residence
The average size of a country house is about 15-20 square meters. With a consumption of only 280 bricks, you can build a small stove with dimensions of 2 meters by 3 and a heat capacity coefficient of 1.90 kW. As mentioned earlier, the combustion part is made of refractory brick, and the entire body is built of red ceramic.
The figure shows a sectional view of the furnace design
This simple option can be easily made by every beginner out of brick with his own hands, without even making mistakes.
Scheme with order, order instructions
Despite its small dimensions and light weight, it still requires the construction of a separate foundation. The foundation must also withstand the pressure of the chimney.
The thickness of the seam for masonry should be standard 8-10 mm, while the thickness of the seam between refractory bricks should be half as much.
It is better not to change the drawing if you do not have your own experience.
For such a stove, the chimney is laid in a brick floor.
Quantity of material:
You will need about 210 pieces of regular bricks, about 75 pieces of fireclay bricks. The clay solution will take about 70 liters. Sand 0.4 cubic meters m. One grate, door for combustion chamber, ash chamber and cleaning room. Two smoke valves. Sheet of metal for the foundation. For waterproofing, about 3 meters of roofing material.
The number of bricks is approximate, since there will be a certain percentage of broken bricks.
Russian stove
Such a furnace has an efficiency of 80 percent. She has a beautiful appearance. You can cook food on such a stove and its design includes a bench. The masonry and construction schemes are quite simple. Its main disadvantage is its design feature, due to which it only heats the upper part of the room. But in our country, it is still popular.
What it consists of:
- A) heated part;
- B) niche;
- B) pole;
- D) forge;
- D) shower part;
- E) shield;
- G) valve;
- H) chimney pipe;
- I) Repainting the furnace.
Large, small and medium furnaces are built according to their size. Let's consider a small one, measuring 1270 by 650 by 2380 mm.
Necessary materials:
Red bricks, about 1620 pieces. The clay solution will take about 1000 liters. Made of steel, a plug measuring 430 by 340, a valve measuring 300 by 300 (two pieces), a samovar measuring 140 by 140 (one).
Order of the Russian stove:
Row No. 1 is laid out from solid ceramic bricks, on a lime mortar with the addition of cement. The formation of the furnace part occurs;
Row No. 2 to No. 4 a well is laid out. All seams are tied. On the one hand, they leave room for baking;
Rows No. 5 to No. 7 erect a vault over the oven;
Row No. 8 to No. 10 a castle for the vault is being erected;
Row No. 11 lay out a cold stove. Sand is poured into the remaining space between the stove and the oven;
Row No. 12 is laid out “under”. It is made from special bricks;
Row No. 13 is the beginning of the cooking chamber;
Rows No. 14 to 16 are done in the same way as the previous one;
Row No. 17 installs the arches of the mouths;
Row No. 18 laying the furnace walls;
Row No. 19 vault walls;
Row No. 20, using half bricks, narrow the hole above the pole;
Row No. 21 aligns the walls;
Row No. 22 is the stage of leveling and reducing the front pipe part;
Row No. 23 lay out a samovar;
Rows No. 24 to No. 32 installation of view valves;
Row No. 32 chimney laying. In a Russian stove, the chimney is made of 2 bricks.
Some features can be seen in Fig.
Before you start laying stoves, it’s worth trying to lay out at least one without mortar to understand the essence of the schemes. But with effort and patience, everyone can make a stove with their own hands.
home
Hello, you have come to a site whose purpose is to freely educate residents of Russia and the CIS countries about the basics of laying stoves and fireplaces with their own hands. First of all, our reader is a middle-aged man who wants to learn how to install stoves and fireplaces. More than 100 detailed drawings of various heating and cooking stoves, fireplaces, outdoor complexes are publicly available on the site, and these are not just numbers; in each you can find not only a detailed video clip, but also photos of the results. In just over three years of existence, we have helped tens of thousands of craftsmen improve their skills and abilities, and suggested something completely new to them. Most materials contain comments from users and for us this is undoubtedly a higher indicator than simple numbers. So, in order not to overwhelm you with theory and words, I will describe in more detail the structure and content of our site. Currently, the following sections of our website are the most popular among users:
On our own behalf, we take full responsibility for all the material on the site and give a 100% guarantee that all drawings, GOST diagrams and SNiPs are correct and recommended for use. On the site you will not find a single unverified material taken from your head. All articles were written by masters of their craft, stove masons with more than 12 years of experience. Currently, the site already provides a detailed description of the masonry of most famous stoves in Russia, and we regularly continue to upload fresh material.
Also, under each video lesson there are links to proven thematic materials from other sites. Thus, to the detriment of the creators of our portal, we make it easier for general surfing for visitors to find the information they need.