Today you can count more than a dozen different types and designs of stone ovens for cooking, but the Pompeian oven occupies a special place among them.
Pompeii oven
Compact, efficient and beautiful - it will not only allow you to cook delicious food, but will also look stylish on any country plot. How to lay out a Pompeian oven with your own hands, and what technical nuances should be taken into account, we will discuss in this article.
A standard Pompeii stove is characterized by certain proportions that must be observed regardless of the shape and size of the structure. Thus, the height of the entrance is approximately equal to 50% of the total height of the dome. This allows you to optimize the work process as much as possible, create normal traction and reduce heat losses.
Design Features
Thanks to the special internal structure of the oven, it heats up quickly and retains heat for a long time. Historians claim that the Pompeian oven appeared on the Iberian Peninsula and was initially used specifically for preparing an open cheese pie, where the structure was not needed to heat the room.
Decoration of a Pompeii oven
Later it spread throughout the world. It is also called Neapolitan, Italian oven, tandoor.
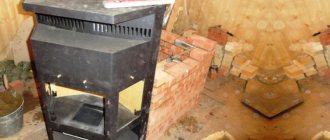
The Pompeian oven will not only be an ideal design for preparing pizza, pies and bread, but will also decorate any countryside area. In combination with a gazebo or barbecue, it becomes a real landscape decoration, becoming a favorite vacation spot for the whole family.
Stove in the yard
Basically, such a stove is installed in suburban areas on the street, in a barbecue area, in an outdoor garden, but if desired and some technical modifications are made, a Pompeii stove can be built in the house. To do this, of course, you will have to provide not only a reliable, solid foundation, but also a chimney.
In this article we will look at the classic option for building an Italian oven in the open air. Before proceeding with the step-by-step instructions, I would like to warn you that laying a Pompeian stove is a very difficult and expensive undertaking.
But if you do everything correctly, then such an oven will delight you for decades, giving you an authentic look to your dacha and helping you prepare delicious homemade baked goods. Thanks to our clear and simple instructions, even a beginner can master the laying of a Pompeian stove with his own hands.
The structure of the Pompeian stove is somewhat similar to the design of the ancient Slavic stove.
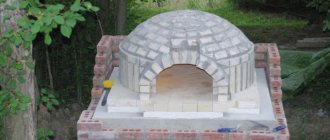
Construction of a Pompeii furnace
But, unlike a traditional Russian stove, it heats up much faster. You can cook pies in it literally 30 minutes after heating, while a Russian oven will take at least 3-4 hours before reaching the optimal temperature for cooking.
This heating rate in the Pompeii furnace is achieved due to the lower thermal mass. The layer of brick that is heated is only 12 cm. Within 45 minutes after kindling, the temperature in this oven reaches 260 degrees, and after an hour - 370 degrees.
How is the temperature distributed in a Pompeian oven?
| In 30 minutes | In 45 minutes | In 60 minutes | In 90 minutes | |
| Outer part of the vault | 150 | 260 | 370 | 370 |
| Inner part of the vault | 315 | 370 | 370 | 370 |
The peculiarity and main advantage of the Pompeian oven is that you can cook almost any dish in it in a short time. Thanks to the high temperature that is reached inside the vault, pizza and bread are perfectly baked in it. Smoke adds a special piquancy to baked goods.
Main features of furnace construction
If you have decided to build a wood-burning pizza oven yourself, then you need to carefully study each stage of the construction work.
- The construction of a Pompeii furnace begins with the construction of a solid foundation . First of all, this is due to the large weight of the finished structure. As a base, a concrete slab is used, installed on a gravel pad deepened into the ground by 40 cm.
- A stand is mounted on a pre-prepared base , the main purpose of which is to provide convenience in the process of preparing pizza. The height parameters of the stand are calculated taking into account the height of the chef, so specific figures are not given. To make a stand, fire-resistant brick or sheet metal is most often used. Pre-prepared firewood can also be stored in the resulting niche.
- A tabletop made of reinforcing mesh filled with concrete on top of the stand At the same time, to ensure the strength of the product, its thickness should not be less than 200 mm. Otherwise, the structure will not cope with its direct responsibilities. High-quality insulation and the ability to withstand the large mass of the stove itself are very important here.
- To make the furnace itself, fireclay bricks are used , laid on a special clay solution. It is very important to strictly adhere to the proportions of the building mixture: add 6 parts clay to 4 parts sand. This is necessary to ensure high heat resistance of the finished product during direct operation.
A high-quality thermal insulation layer is also of great importance, especially when it comes to a thin-walled Pompeii stove. Thanks to this, the furnace equipment will heat up quickly and cool down slowly. It is this feature that makes pizza cooked in a wood-fired oven the most delicious.
Operating principle of the Pompeii furnace
The efficiency of the Italian pizza oven is due to the technical design features.
Principle of operation
When solid fuel burns, two streams of hot gases arise inside the dome:
- Convection flow that comes from the firebox itself.
- The reflected flow comes from the walls of the dome.
It is also noteworthy that the temperature in the Pompeii oven is self-regulating.
Movement of cold and hot flows
The hotter the wood burns in the stove, the greater the amount of gases released. Rushing upward in a powerful stream, they block the flow of oxygen in the section of the pipe mouth. Consequently, the intensity of combustion decreases, and hence the temperature decreases.
When the temperature drops, the flow of hot gases also weakens, again opening up access to oxygen.
This cyclical process helps regulate the optimal temperature in the oven necessary for cooking bread, pies, pizza and any other food.
As can be seen from the figure, it is the dome that is the main element of the furnace, accumulating thermal energy from the fire.
Having analyzed the operating principle and design of the furnace, we can summarize and highlight the main pros and cons of the Pompeii furnace design.
Benefits include:
- Fast heating. Already 30 minutes after kindling, raw food can be loaded into such an oven for cooking. While the heating time of a classic Russian stove is at least 2 hours.
- Good heat dissipation. Even after the wood has burned, the heat in the Pompeii stove continues to be maintained for several hours, allowing food to be “stewed.”
- The compact dimensions of the unit allow the stove to fit seamlessly into almost any summer cottage.
- Stylish appearance.
Stylish appearance
The disadvantages of the Pompeian stove include:
- Complexity of design. Unlike the traditional laying of a brick stove for a summer residence, skill will be required here to correctly lay out the dome, which is an integral attribute of the unit.
- High cost of materials.
- The need to build a strong foundation, since the stove is not light in weight.
Electric pizza ovens MORELLO FORNI (Italy)
| STANDARD | REGULAR DOME | MOSAIC DOME | COPPER DOME |
The FRV100 E-vento is the latest model of electric pizza oven.
Suitable for any environment, thanks to its shapes and unique dome design - “Palladiana” mosaic or antique-style metal cylindrical design (optional, ordered separately).
Equipped with a rotating surface with conventional heating, thanks to the patented Morello Forni system, the oven ensures a minimum baking temperature while simultaneously baking the product evenly.
Artificially moving air optimizes baking and reduces costs. The fireproof mass, reaching approximately 900 kg, and the specially designed geometry of the internal part provide unprecedented temperature stability. Between 12 hours the temperature reaches its minimum and rises rapidly with minimal energy consumption. In almost just 20 minutes, an internal temperature of about 400°C is reached.
The spring-operated door and ergonomic handle grip make it easy to constantly open and close the oven. The automatic mechanism regulates and controls the air flow, which avoids heat loss when opening the oven door. The software, entirely developed by Morello Forni factory engineers using the latest technology, provides and controls the automatic thermostatic functions of the oven. The exclusive control system “INTELTOUCH” allows you to set up various cooking programs.
| Model | Buy | Furnace dimensions, mm | Weight, kg | Number of pizzas 30 cm | Productivity, pcs/hour | Design |
| Pizza oven MORELLO FORNI rotary electric FRV100 STANDARD | price 1,128,935 rub. | 1300x1300x2050 | 650 | 6 | 70 | standard |
| Pizza oven MORELLO FORNI rotary electric FRV100 CUPOLA BASIC | price 1,241,434 rub. | 1300x1300x2050 | 650 | 6 | 70 | regular dome |
| Pizza oven MORELLO FORNI rotary electric FRV100 CUPOLA MOSAIC | price 1,362,826 rub. | 1300x1300x2050 | 650 | 6 | 70 | mosaic dome |
Financial and economic aspect of building a Pompeian oven with your own hands
What is the reason for the relatively high price of such a stove?
- The Pompeian stove is made of fireclay bricks, which cost an order of magnitude more than usual.
- The design of the stove is quite heavy, and for ease of use it must be raised to a height of 80-100 cm. To do this, you will have to lay out a brick stand on which the stove itself will be built, which means you need to think about a good foundation.
To slightly reduce the cost of building a stove, any materials available on the farm are suitable for the stand: blocks, ceilings, old bricks, etc.
Building a pizza oven
Another disadvantage is the lengthy process of laying a Pompeian stove. A rather complex design, which requires the presence of a foundation, a pedestal, the stove itself, and a large countertop, indicates that the whole process will take at least a month.
In addition, you will need significant technological breaks to harden the concrete for the foundation, etc.
If you come to the dacha only for the weekend, then the entire masonry process can be rationally distributed into several stages, calculating that the technological break for “setting” the materials occurs during your absence.
Traditionally, the Pompeian oven has the following layout:
- solid foundation;
- pedestal for the stove;
- bake.
Pompeian pizza oven
The oven itself, in turn, consists of four parts:
- base (furnace bottom);
- dome (vault);
- entrance arch;
- chimney.
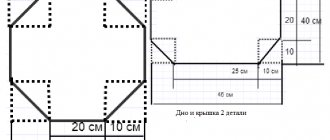
The base (pedestal) is made of small cinder blocks, 20*20*40 cm each.
The tabletop is a monolithic slab made of reinforced concrete 10 cm thick.
Tabletop
Unlike a traditional stone stove, here the chimney is located at the front. This determines one of the main differences in the design. The fire rises up along the dome, heating the vault. Thanks to this, heating is carried out simultaneously from above and below, which contributes to fast cooking.
The Pompeian stove has undergone many changes over the many years of its existence, and today you can find several of its varieties.
Neapolitan oven
There are Tuscan and Neapolitan ovens. The Tuscan stove has a higher arch and is more versatile in use. You can bake not only pies in it, but also cook stews, meat, and soups.
The Neapolitan oven is traditionally used for baking pizza and has a small dome that is approximately 80% of the total dome height.
Tuscan oven with a higher arch
As for the shape and size of the stove, the most optimal design is the one with an internal diameter of 80-110 cm. It is not recommended to make the stove smaller than this.
The spherical arch of the oven serves for maximum heating and heat accumulation, and the arched entrance is used for storing firewood and the food itself.
The size of the oven may vary, but in any case, strict proportions should be adhered to: the height of the arch should be approximately equal to 60% of the total height of the dome.
The width of the entrance for storing firewood should be equal to the total height of the dome.
Multilayer dome of a Pompeii oven
The vault itself has several layers:
- the internal surface is made of fireclay bricks;
- clay coating;
- 1st layer of basalt wool (thermal insulating);
- 2nd layer of perlite;
- Facing layer made of cement mortar.
In this case, the thickness of each layer should be approximately the same size, 5-10 cm. The more heat-insulating layer is laid, the longer the oven will cool down.
The facing layer can be made from any moisture-proof and water-repellent materials, since its main purpose is protection from precipitation. If the stove is being baked in the house, then this protection can be omitted.
In addition, the facing layer also performs a decorative function, so you can make it to your taste: decorative plaster, painting, mosaic, etc.
DIY pizza oven
There are many different variations of pizza ovens, ranging from small clay ovens to larger concrete ovens.
You can build your pizza oven on a wooden pallet so you can move it if necessary.
Although, if you decide to do this, remember that the structure will likely be around half a ton, so you may need a forklift to move the finished oven.
Many people find a more permanent location for the stove and build a brick stand for it so that it is at waist level when you stand in front of it. However, this option allows you to move the oven to another location with relatively little effort.
Materials you will need:
- Regular sand (general purpose sand, usually containing small amounts of crushed stone, gravel, etc.);
- Construction sand (fine sand, or sifted);
- Cement;
- Filler (crushed stone or expanded clay);
- A bucket or pipe for the chimney (you don’t have to install it, then the smoke will come out through the front opening);
- Construction shovel;
- Brick laying trowel;
- Bricks (ideally fireproof);
- A large piece of cellophane;
- Several wooden boards to form a vault;
- Chipboard;
- Wooden pallet;
- Screwdriver;
- Wood screws;
- Saw.
The exact amount of building materials depends on what size you decide to build.
You can build this stove in stages, so there is no need to know the exact quantity at the initial stage of construction.
When building a furnace, heat-resistant bricks should be used.
When heated to high temperatures, standard building bricks will expand and cracks may appear in the kiln.
The pizza oven can be equipped with a chimney.
The main advantage of a chimney is that smoke does not come from the firebox directly into your face, but without a chimney the design is significantly simplified and heat loss is minimized.
We advise you to first build a stove without a chimney, and if you decide to add one later, you can do it without any problems.
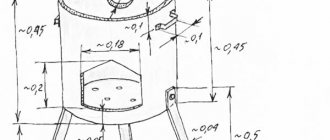
Certain relationships must also be observed between the inner diameter of the furnace, its height and the height of the firebox opening.
The height of the opening should correspond to 63% of the height of the chamber - this is important for efficient combustion of fuel. The height of the chamber should be 60-75% of its diameter.
You need to lay fire bricks at the bottom of the chamber, so the diameter of the chamber will depend to some extent on the number of bricks you have.
The stove must be placed so that the firebox is directed in the direction opposite to the main direction of the wind. It is also advisable to build a canopy over it.
It is necessary to begin construction with a foundation and a base for the slab on which the stove should stand.
The bricks must be laid close to each other. The thicker the bricks, the more heat they can accumulate.
To adjust the bricks to the dimensions you need, you can use a grinder (you will need a lot of spare discs), or line the base of the chamber with square bricks and wall the corners into the walls. The bricks must be laid so that they form a level base.
To shape the roof of the furnace chamber, you need to make a sand mold after installing the firebox door. The door can be steel, or maybe wooden.
If you choose wood, it should be fire-resistant; oak is a good choice.
Before closing the wooden door of a heated oven, it will need to be moistened with water.
It is advisable to attach the metal door not to clay walls, but to a concrete slab.
DIY clay pizza oven
A clay wood-fired pizza oven can brighten up any garden.
And pizza cooked in such an oven will be incomparably tastier than one bought in a store or made in the oven.
There are two technologies for clay stove construction.
In the first case, formwork is used, and in the second, an adobe oven is formed with your own hands from pre-prepared blocks.
The first option is complex and is more suitable for small fires intended for baking bread and preparing baked dishes, while the second can be used to build a functional Russian oven.
Nowadays, few people build full-fledged clay stoves with their own hands to heat their homes; most often they can be found in the garden in the form of a primitive stove for bread and pizza.
This original model easily copes with baking dough products and effectively decorates a country plot.
To make a stove for your summer house with your own hands, the first thing you need to do is decide on the shape and size. The size of the oven depends on what you are going to cook in it, and, of course, on the available space in the garden.
You are unlikely to be able to immediately determine the amount of materials, so it is best to take it with a reserve.
In order to make a domed clay stove you will need:
- clay;
- sand;
- straw;
- sawdust;
- glass bottles;
- fireclay bricks;
- a couple of sheets of regular newspaper.
Furnace construction process:
- Creation of sand-clay mixture (adobe).
When kneading, the main thing is to choose fatty clay that is easy to mold in your hands and to make the correct proportion of sand and clay.
- Insulated base.
Glass jars or bottles provide reliable thermal insulation. And fireclay brick will be the basis for creating a dome furnace.
- Creating a sand oven.
More precisely, this is not the stove itself, but only its layout. Reminds me of the principle of how papier-mâché is made. Cover it tightly with newspaper and moisten it.
- Creation of a thermal layer.
The main purpose of the thermal layer is to retain heat inside the oven. After the first dome is ready, all the sand is carefully removed from it.
- Next, adding a little straw to the mix, they make an arch under the door.
- Insulation layer.
The purpose of this layer is to retain heat in the thermal layer. It is much thicker and sawdust is added to it.
- Finishing.
Coat the stove with clay to give a smooth surface to the stove and add sculptural decorative details.
Clay for work should be selected very carefully, since its quality almost 100% determines how many years your stove will operate. If you are using red clay that is in a solid state, first crush it and sift through a sieve. It is possible through a regular kitchen.
In order for the pizza to turn out to be of high quality, it is necessary to heat the oven for at least an hour before starting to cook it. After this time, a sufficient amount of coal will burn, and the heat inside the oven will be evenly distributed. Therefore, the pizza will not burn.
Basic rules for arranging a Pompeian oven
Following step-by-step instructions and a diagram for laying a Pompeian stove, even a beginner can handle the work. But in order to avoid mistakes, it is necessary to adhere to the following basic rules when performing work:
- The furnace inlet must have a spherical shape. In this case, the width of this entrance should be equal to the height of the dome. Whatever shape and size you plan to make the stove, be sure to adhere to these proportions.
- Thanks to the spherical design of the inlet, maximum heat is maintained in the furnace and smoke is collected.
Maintain the proportions of the entrance and dome
- For the Pompeian stove, use only straw or firewood (pellets are allowed only during the first test firing). Quite high demands are placed on firewood. It is better not to use coniferous wood, as the resins released during the combustion process can negatively affect the further operation of the stove, and even the taste of food.
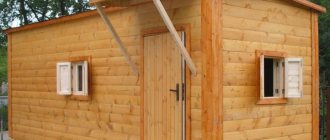
- You can only build the base and chimney from ordinary bricks. And the dome itself must be made exclusively from fireclay (fireproof) bricks. If the Pompeii oven is being built outdoors, then it would not be a bad idea to build a small canopy. Although it is lined with hydrophobic material, constant precipitation can negatively affect its technical characteristics and strength.
- The chimney is located on the front of the stove, especially in cold climates.
Technical characteristics of furnaces
The main similarity between Pompeii and Russian stoves is the ratio of the sizes of the stove arch and dome. For both types of ovens, the widest part of the arch is equal to the height of the arch of the inner chamber. The height of the vault usually ranges from 60 to 80 percent of the entire stove dome. The optimal width of the internal base of the firebox is about 1 meter. A wider chamber will heat up worse and retain heat poorly, and a small firebox is not convenient to use and will not allow you to cook dinner for a large number of people.
The Pompeian stove differs primarily in the location of its chimney. It is located at the top, immediately behind the entrance arch. Thanks to this, hot air moves through the chamber from bottom to top, quickly and evenly baking the dish. The height of the chimney is selected depending on where the stove is located. If the stove is located under a canopy, then the pipe must be extended beyond the roof, otherwise the entire space under the canopy will be filled with smoke.
Interesting! If the stove is installed in an open place, the chimney can be up to 1 meter high.
You can light a Pompeian stove with straw or wood, for example, alder, cherry, apple tree.
You can light the stove with straw and wood. Alder, cherry, apple, oak, and ash produce the least amount of smoke. The stove should not be heated with fuel pellets, coniferous wood or damp wood. When such fuel burns, a lot of soot is formed, which will spoil both the taste of the finished dish and the appearance of the stove itself.