Finishing and decorating the fireplace
Depending on the choice of style, the fireplace is decorated.
Here you can use your imagination and think through a variety of designs and details for decoration. Although, if you take into account that this is a fireplace made of plasterboard with your own hands, it is better to beware of heavy finishing materials. There are several options to consider
Plaster
Decorative plaster for finishing has many types, some types very naturally imitate stone, such as Venetian. A little experience is required to work with this material. Available in the form of a dry mixture, which is easily prepared for finishing. Also, perforated tape is attached to the corners to make the product durable. Apply on the right side of the lower corner, covering a small surface. After 10 minutes of drying, you can begin the rubbing process to create the desired pattern.
Dye
Painting a fireplace is one of the most budget-friendly and easiest options to implement. Before starting, the entire surface is intensively puttied, then fine-grained sandpaper is taken and sanded to make the surface as smooth as possible.
Film
Self-adhesive film - even an inexperienced beginner can handle it, it is glued to a ready-made (with putty, primer, sanding) flat surface, you can choose a pattern that suits the fireplace.
Fake diamond
Artificial stone for finishing is a very attractive option, as it looks very impressive, similar to a real fireplace.
Stucco molding
Decorative stucco molding made of polyurethane is easy to use, as it is attached with regular mounting adhesive. Its details can be painted in any desired color.
Tile
Ceramic tiles can become a real masterpiece for a fireplace; their variety and colors will allow you to choose a unique design for your personal fireplace. During installation, a reinforcing plaster mesh is used. Before laying, the surface is primed with an adhesive mixture.
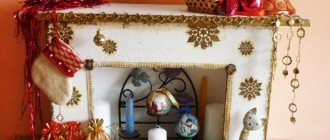
And finally, you can complete all the splendor by decorating the surface. Here you can also use metal grates to fully resemble fireplaces, you can place figurines and frames on the surface, you can place real firewood in the firebox, and use lighting. Here the imagination is given full rein. A little skill and patience and the real highlight of the room will come out.
7db3c80e09e5c5a58d5f0567b0acb269.jpeA fireplace is not a luxury
It's not just about warmth; a fireplace is a luxurious and sophisticated detail of absolutely any interior. However, those who live in an apartment often only have to sigh about the impossibility of installing such a giant.
But there is a great way out - to make a false box and build an ordinary electric fireplace into it. This option can be built with your own hands.
Related articles: Do-it-yourself decorative fireplace made of plasterboard
DIY fireplace portal
Necessary materials for the fireplace
To create a corner decorative fireplace out of plasterboard with your own hands, you will need certain tools and consumables. Therefore, you should have at hand:
- plasterboard - for covering a false fireplace and creating its shape;
- guides (28x27) and rack-mount (60x27) metal profiles - for building a frame base;
- self-driving screws (14-16mm) – for fixing frame elements;
- self-tapping screws with a countersunk head - for connecting the frame and drywall;
- screwdriver or screwdriver - for working with metal profiles and sheets;
- dowel nails - for attaching a profile frame with a concrete base;
- metal scissors;
- building level and measuring tape;
- abrasive mesh and bars - for cleaning plaster and putty.
Also, many craftsmen advise using a hand-held circular saw with a cutting depth of 16-24mm for cutting drywall. But if you don’t have such a tool, you can use a large kitchen knife.
Depending on what will be used to cover the corner fireplace made of plasterboard, it is necessary to select the brand of material. For example, decorative and ceramic tiles require moisture-resistant sheets. In addition, this moment also determines the need for additional materials - glue for tiles or wallpaper, and other similar costs.
When starting to create a fireplace from plasterboard with your own hands, you must have drawings on hand, even before purchasing building materials! The point is that this will help you calculate your expenses. Also, depending on the external configuration, the seller can recommend one or another brand of the building material itself.
As for the fireplace itself, you can use an electronic photo frame. It is very difficult to light a real fire in an apartment, and it is not safe. Therefore, it is better to make corner fireplaces made of plasterboard electric. Firstly, the atmosphere and warmth will be no worse than the real thing, and secondly, you can save a little on fireproof materials. After all, the same fire-resistant drywall will cost more than an ordinary brand.
To create a corner false fireplace with your own hands, the drawings must be drawn up taking into account all the requirements. The project must indicate:
- socket locations;
- where exactly will the false fireplace switches be placed;
- Are there any heated surfaces in the design that will require their own heat-resistant material;
- if an electric option is used and not a photo frame, then you will need to consider an outlet for heated air, which also requires permission;
- will there be a pedestal near the fireplace;
- The drawings calculate not only the height and width of the false structure, but also its depth.
These points are important, because when the frame is created, its elements will need to be attached to the wall, and an electrical cable may pass there. And this is already fraught with consequences.
To make it easier to deal with these issues, you can use a life-size va. By the way, such a sketch will also help in calculating materials, and if you paint it, you can get your bearings in the color scheme.
When it is difficult to make such a plan-drawing yourself, you can always turn to a specialist for help. The designer will be able to offer several options for corner designs and from them you can already judge which option is most acceptable.
Marking the area for a false fireplace
When starting to build a corner fireplace out of plasterboard on your own, you first need to decide on the location of the structure. It was for this purpose that a sketch layout was needed. An electric fireplace can serve as a separate element of the interior, or it can act as a stand for vases, photographs, and even a TV.
Next, appropriate markings are applied to the wall and floor, which will initially indicate the outline of the fireplace. The base for the frame is done like this:
- According to the existing drawing, it is necessary to secure the sections of the guide profiles. To do this, use a drill or hammer drill, and insert a dowel into the resulting hole.
- Next, a rack profile is mounted into the guide element. It also happens that the base of the wall is not perfectly vertical. In this case, you can use direct hangers, which will help eliminate this drawback.
- If the layout implies a pedestal, then it’s time to create its base.
Preparatory activities
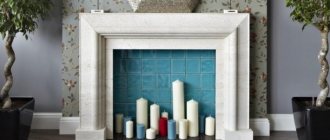
The design of a false fireplace, be it corner or rectangular, usually requires the presence of two basic elements: a portal and a device inside. A portal is a massive structure designed to imitate a stove, and the apparatus can be a bio-fireplace burner or an electric fireplace. In principle, you don’t have to install the device inside, then the firebox can be easily decorated with firewood, candles, fir branches or other decorative elements.
The most reliable, strong, but at the same time easy-to-handle material from which you can build your portal, fireplace frame, is plasterboard. This material is easy to use, light in weight and versatile.
In the future, you can easily attach any decorative coating to a plasterboard base: tiles, mosaics, gypsum stucco, plastic panels with imitation brickwork, whatever.
Before starting work, it is advisable to choose a suitable place where the false fireplace would fit perfectly. Many people choose a corner fireplace because it takes up less free space. An excellent solution would be to place a dummy opposite the front door in an unused corner. With this arrangement, the fireplace immediately becomes the main accent in the interior of the room, the center of attention.
A simple sketch of a future fireplace
You can easily get inspired by ideas from the Internet, where you can even find a drawing of a corner fireplace made of plasterboard with dimensions. All you have to do is adjust them to suit your realities. You should choose the appearance of the fireplace in such a way that it does not particularly stand out from the style of the entire room, but better supports the given style.
Good to know: How to decorate a homemade plasterboard fireplace, suitable materials
At the final stage of preparation, you should collect the tools necessary for construction and suitable building materials. Let's briefly go over the materials, you will definitely need:
- Metal profile for the construction of a frame for drywall.
- To make a durable structure, you will need metal and wood screws to secure the drywall.
- Drywall for covering the frame and creating the shape of a false fireplace.
- Plaster will be required to level the corners and recesses from self-tapping screws.
- To prepare for tiling, you will need a primer. It is also better to prime the drywall before painting.
- At the preparation stage, you should decide how the finishing will be done and purchase the appropriate material: tiles, plastic panels, mosaics.
Additionally, various decorative elements may be needed: corners, moldings and more.
Successful placement of an imitation of a real fireplace
To make a corner fireplace from plasterboard, you will need construction tools:
- For marking you will need a pencil or marker, ruler, tape measure, level, plumb line.
- For basic work you will need a screwdriver, hammer drill, jigsaw, construction knife, metal scissors, pliers, screwdriver, hammer.
Other tools may also be useful, it all depends on the complexity of the structure and the methods of finishing it.
Tools and materials
There are three types of false fireplaces: authentic, conventional and symbolic. The latter look more like a painting than a fireplace; the costs of their construction are minimal. Conventional fireplaces are a structure that protrudes from the wall and has a special portal for the electric fireplace screen. Reliable fireplaces have an imitation firebox, inside which a bio-heating pad or candles are installed.
The most suitable material for a false fireplace is plasterboard. It is lightweight, durable, and machineable. An important point is that it can be faced with dolomite, stone or tiles. Using this material, do not limit yourself to strict forms, experiment and create your own unique project!
A universal option for small rooms is a corner fireplace. Its advantage is that, without taking up much space, the structure will become the central point of the design. Secondly, a free corner is still easier to highlight than a free wall.
19253f45cc7b3211849ab0c1b0b0faba.jpe
The first thing to start with is to make a project. There are options with different dimensions, shapes and finishing methods. When making a drawing, it is better to use ready-made projects and then transform them at your discretion.
It is important to decide on the design and “fit” it into the room. Therefore, it is better to make an estimated layout (using real dimensions) from paper or cardboard
This will help save time and materials during the installation process. Having a ready-made project, it is easier to calculate the required amount of materials. To build a false fireplace you will need a metal profile, drywall, screws, primer, putty and finishing materials.
Drawing option
To build such a fireplace with your own hands, you will need a set of tools that every master has:
- drill;
- long ruler;
- grinder (or hand saw);
- square;
- level;
- electric jigsaw.
If possible, purchase tools that will make the job much easier. The first is a hand-held circular saw with a dust removal function (connected to a vacuum cleaner). For cutting drywall, it is more practical, and the result is more accurate than with an electric jigsaw. The second is an abrasive mesh and various types of attachments. When grinding, it does not become clogged with dust and is easier to work with.
Installation and facing works
A decorative fireplace portal requires not only competent design, but also compliance with the standards of the installation and cladding process.
First of all, make sure that there is an outlet near the planned installation location, and if there is none, install one. Next, we begin to screw in the racks of metal profiles. If the shape of the structure is straight, assembling it will not be difficult. If you provided for the presence of rounded elements, to obtain the required shape, you will need to cut the metal profile and thereby perform the rounding. The optimal distance between cuts is 40-60 millimeters.
Now we move on to the lining of the fireplace portal. If this is the simplest and most primitive false fireplace, you can use cardboard or foam. However, for portals in which the heater will be installed, it is best to use drywall. It is cut out according to the diagram and secured with self-tapping screws. The inner surface of the frame, in order to avoid melting and overheating, is also lined with fireproof materials such as asbestos or magnesite.
An important stage in any finishing process is the preparation and insulation of the surface. It is necessary to properly seal all the seams and knocks between the sheets of drywall and the frame itself. To do this we use putty. If you are planning further cladding of the portal, you need to prime and sand the surface well.
False fireplace made of plasterboard
So, for those who have decided to build a fireplace, we offer a step-by-step work plan.
1. Preparatory stage
First, we draw up a cost estimate: we write down and calculate all the necessary materials and tools, trying not to miss anything. We carry out the drawing. A convenient and reliable way is to draw marking lines for the future fireplace at the selected location and then transfer the actual dimensions onto paper. Don't be afraid to use curved lines; drywall bends easily.
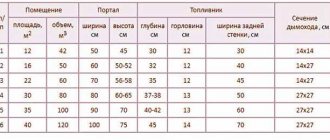
If you want a false fireplace to look more natural, use the proportions of a regular wooden fireplace, where the height is related to the width as 2:3, and the depth of the hearth to the height is 1:2.
When making calculations, do not forget to take into account the thickness of the drywall sheet. To make sure that the calculations are correct, you can build a visual model of the fireplace, where any shortcomings are eliminated and changes are made
2. Stage of assembling the frame base
To make the frame we will use galvanized profiles, guides and racks. The guide profile is similar to “P” and has corrugated walls, which adds rigidity. The rack profile comes with a strip in the middle. This adds convenience during installation and centering of fasteners.
b0e6860ce7ea591823793c86c15b893c.jpe
b143632e63d5c02bcecf6bdafad56ad7.jpe
To assemble the frame, we will perform a number of steps: - Using a building level, we check the marking lines drawn on the floor and walls. — Cut the profile to the required length. To obtain a part with a radius, we cut the profile along its entire length every 1 cm, and then carefully bend it. — We lay out and attach the profile to the floor. We fix the rack profile on the wall with dowels. We place the fastening material in increments of no more than 1 meter. — In a room with little humidity, you can further strengthen the frame base with wooden slats, only using coniferous species. — We increase the strength of the structure with jumpers, using a rack profile for this.
3. Stage of preparation of plasterboard parts
The blanks are cut with a knife, a stationery knife or a construction knife. You will also need a rule, which is a flat board or a meter ruler. The drywall is scored, turned over to the other side, and the cut is made again. Then, when pressing on the plasterboard sheet, it breaks off along the notch. A roughing plane will help remove any resulting unevenness.
Direct fireplace made of plasterboard
Useful article: DIY marble imitation
We cut out semicircular parts using a hacksaw or jigsaw, followed by processing of irregularities. To bend a sheet of drywall, proceed as follows: the sheet is laid face down on the floor, and shallow holes are made using an awl. The drywall is saturated with water, but the bottom layer must remain dry. After the plaster has soaked, bend the sheet into the desired shape and securely fix it until it dries completely.
4. Stage of covering the frame base
For the firebox, heat-resistant material is used: mineral wool is placed under the metal plates and screwed onto self-tapping screws. The panel is covered with heat-resistant varnish and paint. We attach the plasterboard blanks to the frame base using gypsum-metal fasteners at a distance of 20 cm from each other.
Imitation of a fireplace in the living room
5. Surface leveling stage First, we treat the drywall with a primer, and after it dries, we apply putty, starting with the heads of the screws. When the putty dries, smooth out the uneven areas.
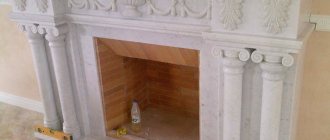
6. Stage of finishing a corner fireplace A mantel made from a wide board will add charm. It is fixed to the wall and frame. Its surface is covered with paint and stain. When starting to design a corner fireplace, do not forget that its overall appearance should harmoniously fit into the surrounding interior. It is not forbidden to use some decorative elements, for example, columns, pilasters, but everything should be in moderation and not violate the integrity of the composition.
Corner fireplace
Once the design is ready, you can buy an electric fireplace and install it inside. The interior of the living room should be cozy, so when doing your own renovation, think about the location of the fireplace in this room. Simple methods allow you to imitate a real fireplace and add a touch of originality to the atmosphere.
We create a fireplace from plasterboard with our own hands: step-by-step instructions from frame to finishing
The plasterboard fireplace itself is not difficult to build; everything can be done with your own hands; it is enough to have basic skills in working with profiles, plasterboard and finishing materials. The profile is cut to size using metal scissors or a hacksaw, the parts are fastened together with self-tapping screws, and one part is inserted into the U-shaped profile of another. If it is necessary to make an arch, then the sides of the profile are slightly cut with metal scissors and the profile is bent with the untouched part inside the arch.
Drywall can be easily cut with a sharp knife or hacksaw. The drywall is fastened to black hardened self-tapping screws, recessing the cap 1-2 mm into the material; later these places, along with the joints, are puttied or lined with finishing materials.
Gypsum elements are cast in silicone molds or made by hand molding. You can also use ready-made gypsum stucco. If the hearth in the fireplace is decorative, without heating, you can use polystyrene or polyurethane elements.
To install an electrical fireplace, you need to provide a socket at such a distance that the cord does not become strained. The cross-section of the copper wire for an electric fireplace with a power of 2 kW must be at least 2.5 mm2.
- Draw a sketch of the fireplace and calculate the material. If you are planning to install an electric built-in fireplace, check the installation dimensions of the selected model. Mark the floor and walls and cut the material.
- The fireplace frame is made of galvanized profile, fastened with self-tapping screws. Stiffening ribs should be in all corners and at the joints of gypsum board sheets; in addition, if you plan to install heavy objects on the mantelpiece, make additional struts and vertical posts.
- The frame is sewn up with sheets of drywall using self-tapping screws and a screwdriver. The upper planes on which the shelves will be installed are left open. The firewood arch is made from separate strips or thinner plasterboard is used - 6.5 mm. An electric firebox is installed in the finished frame, and the connection to the network is checked.
- Start finishing the fireplace. First, a plaster solution is mixed from alabaster and water and stucco molding, pilasters and moldings are cast in silicone molds. You should not mix a large amount of solution at once - it hardens quite quickly. To extend the life of the solution, you can dilute it with milk rather than water.
- Attach decorative elements to gypsum putty, leveling and rubbing the seams. This can be done conveniently using a spatula and a soft, damp brush.
- They begin lining the portal with stone. It is also attached to gypsum putty with grouting, and the selection of elements is carried out before gluing begins. It is better to start with small stones, placing them in the center of the element. To form the corners, the stone is cut slightly obliquely with a sharp knife so that there are no sharp changes.
- The wall above the fireplace is lined in a similar way, imitating an apron and a smoke duct.
- After finishing, the joints are finally grouted with the same putty, and the stone itself is painted with white acrylic paint using a brush. Coloring gives the stone a fresh look and matte shine.
- Moldings and stucco are painted with “golden” paint using a thin brush; after the paint has dried, they are aged - treated with a bituminous patina, trying to paint hard-to-reach places. After treatment, part of the patina from the protruding elements is wiped off with white spirit. Not all elements can be covered with patina, but only some of them, for example, a console or pilasters.
- Artificial stone mantels are installed on the upper surfaces. Glossy dark stone in combination with a plaster finish looks very rich and advantageous, but you can also use other materials, such as MDF or natural wood.
- The final chord is to coat the stone and decorative elements with acrylic varnish with a wet stone effect; this can be done in several layers. After the coating dries, the surface of the fireplace will acquire dust-repellent properties.
- It's time to try out the firebox. They connect it to the electrical network, set the mode, turn it on and enjoy the beauty, safe flame and warmth.
If you don't want to spend money on an electric fireplace, you can do without it. It is enough to decorate the inside of the firebox with stone or tiles; you can also install mirrors. A backlight is installed in the niche - for this purpose it is convenient to use an LED strip, gluing it to the bottom of the firebox and connecting it to the electrical network. A living flame can be created by placing candles of different shapes in glass or ceramic candlesticks.
If you do not have the necessary skills or time, you can only make a frame with a niche and purchase a ready-made polyurethane fireplace portal, selected to fit your firebox.
Installation and its features
The main distinguishing feature of this device is its angular location. Therefore, certain nuances arise here when assembling the frame. The assembly of the frame from metal profiles is carried out as follows:
apply markings. It is worth noting here that the lines should run along the edges of the frame and in the corner, where installation of profiles is also necessary;
- the markings must completely repeat the drawing to scale;
- after the markings have been applied, we begin to attach the profiles;
- on the floor along the walls we install the starting profile so that it meets in the corner;
- Next we lay out the base of the fireplace on the floor. We assemble it according to the standard scheme, removing it using guide profiles. As jumpers, it uses rack profiles cut into separate sections;
Frame base
- along the lines along the walls and in the corner we attach a guide profile, which fits into the starting one, fixed to the floor;
- All fastenings between the wall, floor and profiles are carried out using dowels.
Remember that the larger the fireplace, the more we form its base. A powerful and stable base is the key to the strength of the entire structure. After you have installed the base, we move on to assembling the niche and frame of the fireplace portal. To do this, insert the profile guides into the base and remove the box. Then we attach jumpers between the guide profiles. We connect the profiles together using metal screws.
Ready frameWe complete the installation of the frame, placing wires in it for connecting devices that simulate a real flame.
What can be placed in a false fireplace
Inside the fake fireplace, real candles are placed in metal candlesticks, a bright salt lamp, and an LED strip around the perimeter of the portal. Inside the structure they place logs or their imitation made of cardboard, old chests and read books, shoe boxes and baskets made of pine roots, inside of which souvenirs or board games are stored. For beauty, they are painted to look like birch firewood with bark.
When determining the location, the size of the room, the height of the ceiling, and the arrangement of furniture for visual contemplation are taken into account.It is permissible to decorate the structure before each holiday. Bright garland lights and shiny foil snowflakes for the New Year, paper or cotton angels for Christmas, green leaves in the spring and yellow-red-brown ones for the beginning of autumn. On Halloween, the fireplace is decorated with small pumpkins, faces carved on them and lanterns inside. Paper flowers, forest driftwood, children's drawings, crafts made from acorns and pine cones are also quite acceptable.
The fireplace is installed in such a place that it does not interfere with the movement of residents.
The wall-mounted fireplace plays the role of the main accent in the interior; sofas and armchairs are placed around the viewing point.
Types of decorative fireplaces made of plasterboard
Depending on the purpose of use, there are two main types of these units:
- interior;
- electric.
A plasterboard fireplace that serves as a decorative interior decoration
In the first case, the stove is used as a decorative element of the interior. Imitation of flames in this design is carried out due to the process of burning ethyl alcohol. Such a fireplace is not suitable for full heating of a room. Today, the most popular are interior units made of plasterboard sheet (GKL). During installation of such a device there is no need to use fire-resistant materials. Almost anyone can organize such a false fireplace. Photos of similar structures, as well as all the necessary drawings, can be easily found on the Internet.
All interior units can be divided into the following categories:
- simulating the burning of fire;
- simulating burning fire and smoldering logs;
- imitating a natural fireplace.
The third option is the most popular, as it does not require the organization of a ventilation system. In the first two cases, ventilation may be required to eliminate gas combustion products.
A plasterboard structure can be equipped with an electric fireplace that looks like a real one
The electrical device, in addition to serving as a decorative decoration for the interior, also serves as a heater. Electrical devices are highly powerful and have an appearance that closely resembles natural fireplace models. Ready-made false fireplaces are sold in specialized stores, as well as on the Internet. You can buy a ready-made structure to save time, however, from a financial point of view, it is better to assemble this unit from plasterboard yourself.
Structure and layout
A decorative fireplace consists of a special housing and built-in equipment. You can install it anywhere, but it will look most relevant in the largest room. The body can be made of any fire-resistant material.
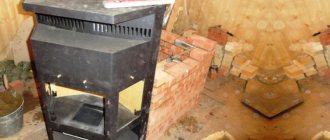
Installing a camera and covering a corner fireplace in a house under construction
But the most successful for such work will be the use of drywall. This material is very light, durable, and easy to process. And the price for it is very favorable compared to other materials.
Drywall also has another advantage - it is easy to cover:
- dolomite;
- stone;
- ceramic tiles.
First, you need to decide on the space allocated for the fireplace. It can be any wall, but if we are talking about an apartment, it is not so easy to find a free wall.
Related article: Do-it-yourself hipped roof for a gazebo, how to design and build it
In addition, the structure will stand out significantly and, thus, take up extra space. The best option is a corner fireplace made of plasterboard. A free corner can be found in any room, and the space will be minimally affected.
Then you should decide on the dimensions of the fireplace and its appearance. There is an incredible number of different finishing options. You can come up with your own design, or choose the appropriate option from the photo on our website.
Option for a corner fireplace in a country house with a chimney
Electric fireplace in a multi-storey building
Note. It’s easy to draw up a fireplace design on paper; to do this, you just need to decide on the dimensions of the product and take into account the thickness of the walls.
Installation master class
Having prepared the project, start marking. Building a false fireplace body is a simple process, so you can do it yourself. At the points where the metal profile is attached, make marks on the floor and wall.
After this, secure the guide profiles and install the racks to them. Check the evenness of the installed parts. Secure the frame using self-tapping screws.
When the metal frame is ready, cut out the parts from the plasterboard
When doing everything yourself, it is important to accurately observe the dimensions of the necessary parts. The next stage is cladding the frame
Recess the screws into the casing by a millimeter so that there are no protrusions.
Metal carcass
Complete the fireplace base and mantel. If necessary, sand the corners and make flutes. Attach the foot with glue, and mount the shelf using self-tapping screws for reliability. If you plan to use a candle in the fireplace, attach heat-resistant material to the drywall in the upper part of the firebox.
c61ac5fc08288b9c169b02c3c3faba61.jpe
After this, carefully fill the cracks and holes from the screws. After drying, sand the surface with a mesh or sandpaper. It is better to putty in two or three layers until a flat and smooth surface is formed. If necessary, glue sockets and other decorative parts to the side and cross parts. Materials must be made of non-wetting material; the putty used for final finishing must be water-based.
Using a photo frame in a fireplace