Wall pie of a frame bath
Floor covering installation.
Very often, when we talk about a wall, a picture of brickwork appears in our heads, but nowadays a wall is not just stacked bricks or concrete, but a very complex, multi-layered structure.
The wall can be made in several layers, each of which will consist of a specific building material, combining insulation, bricks and other materials necessary for the work.
An example of a properly made pie would be the following combination of layers:
- Beam with a thickness of at least 150x50 for the frame.
- Mineral insulation, which will be located between the frame racks (you can use rolls or mats of mineral wool).
- OSB board with a minimum thickness of 15 mm.
- Horizontal type lathing.
- Insulation required for horizontal sheathing.
- Vapor barrier (or wind barrier), the use of a multifunctional membrane is acceptable.
- Vertical type lathing.
- Exterior finishing.
- Material for vapor barrier.
- Lining (or drywall) for interior decoration.
The process of creating a wall pie
Stages of insulating a bathhouse from the outside.
The outer covering must be laid on the sheathing, this will create a gap for ventilation (condensation will evaporate rather than accumulate). It is unacceptable to place external finishing directly on the membrane to prevent the insulation from sticking to the finishing and causing it to sag.
After the frame is erected, it is necessary to complete the interior finishing using boards approximately 2-3 centimeters thick. It is best to use wood that will not rot in high humidity, such as linden, aspen, and larch. The selected sheets are nailed to vertical beams. Wooden lining is used for finishing most parts, which also helps to strengthen the entire structure, and not only creates a pleasant appearance.
It is allowed to use special film or parchment as a vapor barrier material. The film is placed with the foil towards the side of the room to allow faster heating. This material is simply necessary for a frame-type bathhouse to avoid moisture or condensation getting on the internal walls.
Insulation is applied to the vapor barrier to provide the required level of thermal insulation. The waterproofing is attached directly to the beams. Next, the external walls are sheathed using DSP or OSB sheets, attaching them to the beams. The outer walls of the bathhouse are sheathed using clapboard, siding, block house, and boards to give the structure the appropriate appearance.
We invite you to familiarize yourself with the Heat-resistant cable for saunas and baths
Ceiling insulation
For the ceiling we also recommend using pressed mineral wool, a thickness of 10 cm will be enough
It is very important to make a reliable vapor barrier; mineral wool under the ceiling works in the most difficult conditions
Ceiling insulation
The sheets can be placed on the rough ceiling (the optimal option from our point of view) or secured against falling out with any metal slats, and special 20x50 mm slats can be nailed to secure the finishing lining.
Step 1: Nail the sub-ceiling to the ceiling joists. To do this, you can take unedged boards of the second or third grade with a thickness of approximately 20 mm. Don't forget to remove the bark. Over time, wood pests will always appear under the bark, which will begin to damage not only the boards of the rough ceiling, but also all the wooden structures of the frame bath. The distance between the boards is 20÷25 cm; for fixing, you can use ordinary nails or wood screws.
Draft ceiling installation
Example of a draft ceiling
Step 2. Place sheets of insulation in the free niches of the rough ceiling, carefully aligning them around the entire perimeter. First, you should put all the insulation from the attic side, then correct their position from the inside. Insert a knife or hacksaw blade into the joints between the sheets and, moving them forward/backward, achieve a perfect fit of the insulation on all sides.
Laying mineral wool
Step 3. Do a vapor barrier. To do this, you can use aluminum foil, modern membrane materials or ordinary polyethylene film. All these materials cope well with the tasks, although the difference in price can be very significant.
Bath ceiling vapor barrier
Be very careful when working with foil - it tears quickly. And any hole significantly reduces the effectiveness of the vapor barrier with all the resulting negative consequences. The vapor barrier is fixed with a stapler; do not allow the material to sag too much. The distance between the finished ceiling paneling and the insulating material must be at least one centimeter.
Sheathing slats are fixed on top of the vapor barrier for installing the lining
Step 4. Nail slats approximately two centimeters thick to the ceiling beams; the lining will be attached to them.
Video - Insulation of a frame bath
Step 5. Check the position of the waterproofing and insulation, if everything is normal, then begin finishing the ceiling. During sheathing, additional work may occur if the stove chimney exits through the roof. How to finish a chimney pipe?
The principle of protecting an insulated ceiling from heat
The scope of work will depend on the material of manufacture and the type of chimney. Let's look at the four most common types of chimney pipes.
- Sandwich pipe. The most modern chimney, has built-in thermal insulation, and is mounted together with the ceiling trim.
- An ordinary metal pipe. The most dangerous in terms of fire safety standards. When insulating ceilings, you need to leave a distance of at least twenty centimeters between its walls and the nearest wooden elements. The hole in the ceiling after insulation and installation of the chimney should be covered with a sheet of metal. To seal cracks, use a thin layer of mineral wool or sheet asbestos. The material is placed between the ceiling sheathing and a sheet of iron and tightened tightly with screws or nails.
- Ordinary brick. As a rule, the wall thickness of such a chimney is 220 cm. Additional measures for insulating wooden structures are the same as in the case of metal ones.
- Classic brick. It has a special thickening (fluff) at the place where the ceiling passes. Additional fire prevention measures are not taken in the area where the chimney passes through the ceiling.
Vapor barrier and bath insulation
Bath wall construction with vapor barrier.
Experienced builders recommend using rolled ursa 50 mm thick to insulate walls. It is laid between racks located vertically, with the slats alternately nailed to them. In some places it is possible to nail directly to the outer boards, but this can only be done using special nails that have a rubber washer under the head.
A negative for a frame bath is the formation of moisture in winter, when it is hot in the bath. It is for such moments that a vapor barrier is needed. At the moment, the best option is plastic film, which should be placed under the inner lining.
It is important to note that the steam room will require high-quality vapor barrier lining. A good example of this type of vapor barrier is aluminum foil, vapor barrier film, glassine and other materials. For this room, it is undesirable to use roofing felt or roofing felt because of the specific odor that will be released when heated.
Thus, a wall cake is obtained consisting of the following layers:
- layer of outer lining;
- a layer of glassine;
- insulation layer;
- a layer of polyethylene film;
- layer of inner lining.
It is very important that a small gap of 5 cm thick is formed inside the wall.
Special attention is paid to the steam room, where the heat insulator should be placed with foil inside to obtain a thermos effect.
Return to contents
Frame-panel structure for a bathhouse: project features
A simple frame made of wooden beams, covered with insulated panels, is a frame-panel bathhouse.
Advantages and Weaknesses
The undoubted advantages of the design are the low cost of materials, speed of construction, ease of construction work, minimal shrinkage, low thermal conductivity and very rapid heating of the material. Of the minuses, it is worth noting the joints between the shields. However, with adequate organization of vapor barrier and mineral insulation, they will not interfere, since the structure will become airtight.
Who is a panel bath suitable for? If you do not have a large budget and are looking for quick construction, this option is for you. The disadvantage is the fragility of the project, only 10 - 15 years, while an expensive log bathhouse will last a lifetime. The structure itself weighs little, so it is placed on a columnar foundation; the pillars are placed at the corners of the building, at the intersections of internal walls and under their edges.
How to assemble a frame-panel bathhouse
Assembling the frame of a panel bath begins with treating the wood with an antiseptic to protect it from rot, insects and fungus. Treating all load-bearing structures and finishing with fire retardants is highly desirable to ensure fire safety. The pillars are covered with roofing felt to avoid excessive moisture.
Next, the frame of the panel bath is assembled in the following sequence:
- base piping;
- load-bearing racks;
- installation of the top trim and ceiling;
- wall cladding (in layers - internal cladding, wooden frame, vapor barrier, insulation, water and wind insulation and external cladding);
- roof.
If you study the reviews of owners about frame-panel baths, you will find a lot of positive impressions. Just a few days for assembly, the efficiency of the stove with sufficient power, the possibility of purchasing a ready-made frame-panel structure - these are the main positive aspects that the owners of such baths talk about.
Protection of the chimney ceiling passage from heat
The chimney passage through the ceiling must be equipped with a passage unit. Even when using a special sandwich pipe on the chimney, no contact with wooden parts is allowed.
There are ready-made passage units available for sale, which are a sheet of metal with a hole for the pipe and a box surrounding it. A square hole is cut in the ceiling the size of the box plus a layer of insulator.
The passage unit, lined with a layer of insulator, is inserted into the hole, which is also pre-studded around the entire perimeter with insulator, and is fastened with screws. The chimney, wrapped with asbestos cord, is passed through the hole and vented outside. The box of the passage unit can be covered with expanded clay on top.
Construction of a bathhouse using frame technology is an economical, effective and quick solution to the problem. The result will be a fully functional sauna, the heating time of which is almost half that of a conventional wooden one, and the fuel costs are lower. Such properties make the choice of materials for a bathhouse and frame construction technology the most profitable and preferable. More than enough information is given here about the construction of the walls of a frame bath. Now it’s up to you and a bathhouse made of boards and insulation will be able to delight you and your household.
How to insulate a bathhouse from the inside - brick, frame, block or log
Before starting work, be sure to eliminate all defects: seal and insulate the cracks, treat the walls with fire retardants and antiseptics, if you think necessary, check the tightness of the connections, etc. After completing the preparatory work, you can begin installing the thermal insulation.
The pie itself generally looks like this:
- a wall on which bars are packed;
- heat insulator laid between the bars;
- vapor barrier;
- a lathing made of planks that holds materials and serves for installation of finishing.
Bathroom wall insulation scheme
Step 1. A sheathing of bars is attached to the walls, into which the heat insulator is tightly inserted. The thickness of the bars must correspond to the thickness of the thermal insulation. A vapor barrier is attached to the bars, which is usually aluminum foil. After the foil, a lathing under the lining with a thickness of 20-3 mm is attached, and then the walls are sheathed with lining.
Main conclusions:
- There is no need to leave a gap between the insulation and aluminum foil in the bathhouse;
- It is advisable to leave a gap between the aluminum foil (or other foil material) and the lining so that condensate can flow down freely. Otherwise, the lining will rot very quickly.
We tightly lay the heat insulator between the bars. The thickness of the insulation corresponds to the thickness of the bars
The pitch of filling the bars under the insulation is determined by the width of the selected heat insulator: the distance between the bars should be approximately 1 cm less than the actual width of the insulation (in this case, the insulation will fit tightly to the bars).
Step 2. Insulation is placed tightly between the padded bars, without gaps, with little effort. With the correct distance between the bars, the heat insulator holds well on its own, but to be sure, you can fasten it using hot-dip galvanized or stainless steel screws and washers of large diameter (read about the choice of fastening materials for a bathhouse in this article).
If the heat insulator you choose is foil, to ensure tightness, cover each connection with a patch of aluminum tape, and on top you need to secure another piece of foil with an adhesive backing - tightness is very important: most heat insulators lose their properties in the presence of moisture. For example, the thermal conductivity of wet basalt wool is much greater than dry one. For this reason, the insulation should not be allowed to get wet.
In this case, you also need to carefully approach the sealing of the joints of foil thermal insulation and bars: they need to be glued with the same foil tape, ensuring that there is at least 5 cm of overlap on both the insulation and the bars.
The joints must be taped with aluminum tape. For steam rooms, it is recommended to use foil or foil-coated materials as a vapor barrier.
In other rooms, you can install any other material that is suitable for its performance characteristics.
The strips of the selected material are laid so that they overlap by at least 5 cm. All joints are additionally carefully glued using foil tape, which is sold in the same place where vapor barriers are sold. Attach it to the bars using staples and a construction stapler. To maintain tightness and prevent steam from entering the thermal insulation, it is advisable to seal the joints with the same foil tape.
The video below shows how insulation is installed in a Finnish sauna and covered with aluminum foil.
When insulating the ceiling, there should be an “entry” of the heat and vapor barrier onto the walls. When installing wall insulation, run it over the top of the wall “pie”, and then carefully seal the joints (use foil tape again).
Step 3. After completing the installation of the “pie,” a sheathing of slats is filled onto the protruding bars. It will hold the materials and also serve as the basis for attaching the interior decoration.
This is what the wall may look like after all the work is completed: 1 - insulation, 2 - vapor barrier, 3 - lining
The warmer the sauna itself is, the less wood will be consumed to heat it and the longer the heat will be retained in it. In general, insulating a bathhouse is a complex process. And the relaxation room, steam room and dressing room can be insulated in completely different ways: due to their constant microclimate. So how to properly insulate a bathhouse? Let's figure it out.
What kind of bathhouse, insulation of walls from inside or outside?
A question that torments many bathhouse owners when they think about insulating them. In fact, everything is not as difficult as it seems. If you are already familiar with the concept of “dew point,” then it is not very relevant for a bathhouse - this is a room that is used from time to time, and when used, the temperature and humidity jump sharply and high. Because of this, the dew point slides back and forth when you heat the sauna, splash water on the heater, when it cools and ventilates.
Therefore, the main task of the owner is to create proper ventilation in the bathhouse and thoroughly dry the premises after the bathing procedure. It is also worth installing insulation that does not deteriorate from dampness and dries out easily.
At least first of all, the insulation is installed from the inside, because by insulating from this side, you will not waste energy every time heating the entire thickness of the walls, which have managed to cool down to street temperature in the winter since your last visit.
And when insulated from the outside, they end up inside the “pie”. And it doesn’t matter what kind of walls we are talking about - they all cool down in the cold. If the internal insulation is not enough, then you can take on the external one, with one condition: you need to leave a gap between the waterproofing and the cladding in order to get a ventilated façade.
IMPORTANT! For external cladding, it is better to use a membrane as waterproofing, which will release vapors from the insulation, but will prevent the penetration of street moisture.
In addition, there are specifics regarding the material of the walls: block baths, due to the hygroscopicity of the blocks, require external cladding, which is almost always combined with insulation from the outside. But wooden baths are not insulated from the outside, for fear of the walls rotting.
The warmer the sauna itself is, the less wood will be consumed to heat it and the longer the heat will be retained in it. In general, insulating a bathhouse is a complex process. And the relaxation room, steam room and dressing room can be insulated in completely different ways: due to their constant microclimate. So how to properly insulate a bathhouse? Let's figure it out.
So, how to insulate a bathhouse from the inside, depending on what material it was built from.
Thermal insulation methods
Many steam room owners do not know how to insulate a frame bathhouse. Thermal insulation methods:
- A classic method of insulation during construction work. This is a mandatory stage during the construction and cladding of the frame. The insulation is located inside the walls, between layers of hydro- and vapor barrier.
- External insulation of the frame. This is an additional measure that is needed if internal insulation is insufficient. For thermal insulation, polystyrene foam is used, which is glued over OSB panels and frame sheathing.
You need to think in advance about how many layers of insulation are best to sew into the walls. This will avoid unnecessary work.
How to build a bathhouse on a frame basis
Pre-design the location of the stove, chimney, ventilation, veranda and select the type of roof.
Foundation and bottom trim
Now about the foundation, lower trim and construction of walls:
- A budget columnar foundation made of asbestos-cement pipes with concrete filling is suitable for a lightweight frame structure. You will need 4-meter asbestos-cement pipes with a diameter of 100 mm and a filling solution made of cement, small crushed stone, sifted sand and water. First, the pipes are cut into equal halves, then inserted into wells drilled with a gas drill (depth 1.5 m; diameter 200 mm). Next, sand is poured and compacted, and at the final stage it is filled with concrete mixture.
- The bottom trim is made from several edged boards with a cross-section of 150x50 mm, nailed together. The logs for laying the floor from the boards are cut into the frame afterwards. Pieces of roofing felt are suitable for waterproofing. For additional strength, the logs and piping are attached to the foundation pipes with metal plates, pre-walled. Finally, the structure is treated with a solution to protect it from rot and insects.
Construction of walls and roofs in a frame structure
When the wood has rested and dried well, the preparation of frame racks and parts of the rafter system for the roof begins. The installation sites for frame racks are marked. The final assembly is done like this:
- Two corner posts and several intermediate ones are mounted.
- Strictly leveled with screws, sheathing is done with oriented strand boards from one selected corner.
- The remaining racks are exposed and sheathed according to the same principle.
A solid structure is obtained by sequentially adding racks and attaching OSB boards to them. Door and window openings are taken into account immediately.
Construction of the roof
The roof is done as follows:
- All rafter structures are assembled on the ground according to a single template.
- After assembly, they are lifted to the roof one by one, each having its own stand, above which the installation is carried out.
- Before installing the last truss, mark out the shape of the pox sheets for future cladding of the pediment.
- For ease of assembly work, temporary floors made of ordinary boards are laid on the beams.
- A ventilated roof is considered to be the best in terms of functionality, so a special film is laid between the rafters and the counterbeam, and the sheathing is placed directly on the beam.
- One of the most desirable roofing materials is ondulin.
Finishing a frame bath
External cladding with spruce or pine boards is the best and visually attractive option. The horizontal position of the elements ensures stability and additional rigidity of the frame bath. Sometimes the boards are placed end-to-end with the installation of hydro- and thermal insulation under the sheathing.
The internal lining is made to protect against environmental influences. For the rough ceiling, OSB sheets that were used previously are also suitable. Three layers of insulation will be needed to reduce heat transfer. The walls of the steam room are covered with screen foil, and the remaining walls are covered with glassine.
Next, the boards are nailed face down to the joists; at this stage, you can save money and reuse the scaffolding. The stove-heater is placed in the steam room, and the boiler-heater is placed on the side of the dressing room. For the sake of fire safety, we recommend laying a brick wall between the steam room and the relaxation area.
Insulation of walls in a bathhouse made of foam blocks
When starting the process of insulating a bathhouse, priority attention should be paid to the walls. Here the main role is played by the internal frame, which ensures reliable fixation of the insulation and other materials used in the insulation procedure
The insulation is evenly distributed under the frame, and then the structure is sheathed with waterproofing. Most often, it is based on foil and similar components, whose features prevent heat from escaping from the room.
As the name suggests, the material also serves as a reliable protection for walls and insulation from moisture. In no case should you neglect waterproofing, otherwise there is a high probability of mold, mildew and other unpleasant issues. When the material is laid, the walls of the bathhouse are lined with wood. Here, ordinary lining or planed boards can be used with equal success. Along with interior decoration, external wall insulation is also used. All features and stages of both procedures will be discussed below.
Important: wall insulation when building a bathhouse made of foam blocks may not be necessary, especially if the thickness of the blocks sufficient for your climate is used. It’s up to you to decide whether it’s worth insulating or not; further material will help you weigh the pros and cons.
Insulation materials
There is a huge amount of materials on the market for insulating foam block baths. Each of them has its own advantages and disadvantages, which this article will help you understand. So, most often used:
- Styrofoam. One of the traditional materials for insulation. Recently, it has been used less and less for walls, retaining heat worse than its competitors. At the same time, it seems to be the best option as insulation for the base and foundation;
- Glass wool. With proper waterproofing, it can reliably protect the room. Its structure includes glass production waste, sand, and felt. In general, it holds heat well, but the disadvantages include a specific smell during the aging process of the material;
- Expanded clay. It is used to insulate ceilings and floors by backfilling the corresponding areas;
- Jute felt. This is a completely natural material that is produced from the plant of the same name. In ancient times, felt was used in the production of burlap and other products, with excellent thermal insulation properties. The main advantage of the material is moisture rejection. As a result, along with insulation, it serves as additional protection against moisture. The disadvantages include fragility, as a result of which flax wool is on the market today, in which jute is combined with flax for greater strength;
- Basalt wool. Its main advantage is excellent fixation, which allows you to simply place the material under the frame without the use of dowels, etc. This is a mineral material, the result of processing certain stones. In particular, as the name suggests, basalt wool is extracted from basalt. Today it has the highest thermal conductivity coefficient. Basalt wool is not subject to combustion, guaranteeing fire safety;
- Ecowool. An excellent choice for thermal insulation. It is a product whose structure consists of cellulose, antiseptics and fire retardants. When using it, you can do without vapor barrier, in addition, mice and rats do not eat the material. In Western Europe and North America, ecowool has been used for a long time; in Russia, its advantages are currently being actively studied;
- Waterproofing. Most often this is foil and materials made on its basis. Provide protection for materials and walls from moisture penetration, keeping them dry;
- Foiled polystyrene foam. Today, one of the most popular insulation methods is where polyethylene foam is covered with a protective layer of foil on top. It has the advantages of all the materials described above. It is durable, easy to install and long lasting. Among the disadvantages, the possibility of corrosion should be noted.
- Liquid insulation or polyurethane foam. It has been used relatively recently, having already noted excellent sealing properties, heat and sound insulation, absolute resistance to moisture, and an almost endless service life. It grips well on any surface and does not require the creation of a frame.
Steps 2 and 3: How to make walls and ceiling
Arranging a steam room in a bathhouse with your own hands will not be complete without finishing the walls and ceiling. In this case, the owner needs to decide for himself whether his steam room will need insulation, and in particular, whether he will use foil for this purpose.
Many people do it in the standard way - with mineral wool and foil. Moreover, this insulation scheme is used not only in bathhouses made of bricks or blocks, or frames, but also in log houses, in bathhouses made of timber. However, in practice, it all depends on how cold your winters are, how well you sealed everything possible - walls, basement, roof, whether your ventilation works correctly and much more.
It happens that it is enough to take a rational approach to sealing, and there are no problems with the rapid cooling of the steam room. If they remain, or you are one hundred percent sure that in your climate you cannot do without insulation, then proceed according to the scheme described below.
It is assumed that you already have the walls of the steam room. The thermal insulation “pie” itself is the same for any wall. You won't even need a diagram if you understand its principle.
In humid and hot rooms, condensation is inevitable, especially when the weather outside is frosty. This condensate must evaporate. At the same time, it is highly desirable that it does not get inside the insulation if mineral wool is used as it. Because it will take a long time for water to evaporate from it, and its presence greatly reduces the thermal insulation properties of mineral wool.
Start arranging the steam room walls with your own hands by adding sheathing to the walls. However, you should think in advance in which direction you will ultimately attach the lining, because the counter-lattice is made in a direction perpendicular to the length of the lining.
The diagram shows wall insulation; a foam block wall is shown as an example. See more details about the scheme here.
And the counter-lattice coincides in direction with the sheathing. So, first you place the sheathing beams soaked in antiseptic and attach them to the walls, floor and ceiling so that they can hold the mineral wool mats.
The sheathing step is made along the width of the insulation minus 1-2 cm in order to compress the insulation and it supports itself due to expansion.
Insulation is inserted between the bars to insulate the wall
A film, either a regular film, a wind barrier, or a waterproof membrane is attached over the sheathing, releasing vapors from the insulation to the outside.
Insulation is inserted into the space between the sheathing beams. After which it is covered either with foil or any other vapor barrier. The vapor barrier is sealed using metal tape, for example.
A counter-lattice is placed on top of the vapor barrier, creating an air space 2.5-3 cm thick, sufficient for the lining to dry out.
The insulation is covered with a vapor barrier and counter-battens are nailed
And the lining is already attached to the counter-lattice. You can read about how this is done here.
In general, you can use screws, dowels, and staples for fastening.
IMPORTANT! Everything said above about walls applies to all types except frame. There is a slightly different device, read in detail in the article: Insulating the walls of a frame bath: the right “pie”. The ceiling in the steam room will be either flat or suspended
The structure of both is discussed in this article.
The ceiling in the steam room will be either flat or suspended. The structure of both is discussed in this article.
In principle, only a suspended ceiling is suitable for insulation, and it is immediately insulated from the attic side. In this case, a variety of materials are used, but it is desirable that they are non-flammable and do not emit anything harmful when heated significantly (we remember that the ceiling is the most heated part of the steam room, because hot air tends upward).
Find out more about ceilings and walls:
- Let's look at it in detail: how to insulate a steam room in a bathhouse
- We insulate a brick bathhouse. Why is it more important from the inside, how to insulate brick walls
- The choice of insulation for ceilings is discussed in detail here.
- How to properly insulate the ceiling in a bathhouse with a cold roof or attic? What is the difference, how to avoid mistakes?
- Should I insulate the bathhouse ceiling with clay and sawdust or sawdust and cement? Which is better and is there a difference?
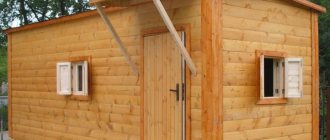
The process of creating a wall pie
Stages of insulation of the living room.
The outer covering must be laid on the sheathing to create a gap for ventilation (the condensate will evaporate and not accumulate). It is unacceptable to place the outer shell on the membrane to prevent sticking of the insulation material with the shell and its sagging.
After the frame is built, it is necessary to remove the internal frame, vikorist boards with a thickness of approximately 2-3 centimeters. It is best to pick up wood so that it does not rot when exposed to moisture, such as linden, wasp, and modrina. Selected sheets are nailed behind additional flowers to stand vertically on the beams. To finish each part, a wooden lining is put together, which helps to enhance the entire structure, and not just create a nice look.
As a vapor-insulating material, special spitting or parchment can be dried. The spitting area is lined with foil up to the placement side to allow for more heating. This material is simply necessary for laying frames in order to prevent staining of moisture and condensation on the internal walls.
Before vapor insulation, insulation is applied to ensure the required level of thermal insulation. The waterproofing is attached directly to the beams. Next, sheathing of the outer walls is carried out using additional sheets of DSP or OSB, attaching them to the beams. The outer walls of the hall are sheathed with additional lining, siding, block house, boards to give the structure a proper appearance.
We invite you to familiarize yourself with Waterproof enamels for metal
Assembly of frame-panel baths: projects and prices
The construction of a bathhouse using the technology of assembling panel structures on a frame basis is characterized by high construction speed and low costs for basic materials. The projects provide for and take into account all the requirements corresponding to the construction of structures of this category: ventilation, water supply, sewerage, electricity supply.
3D visualization of a small frame bathhouse
Projects of frame-panel baths
The main feature of this technology is that assembling a frame-panel bathhouse with your own hands is very easy - according to the principle of a designer. The modern market offers a large number of ready-made panel kits designed for installation on a frame. Thanks to the three-layer structure and low thermal conductivity of polystyrene foam used in SIP panels, this material has good characteristics and is excellent for baths.
Projects for frame baths assume a gable roof; there is no attic space in it, since the panel structure is a lightweight building. The internal space under the roof can be used for storing bath equipment. Depending on the type of soil on which construction is planned, the foundation for a bathhouse can be columnar, shallow strip or pile. The last version of the base is used on sandy soil.
To create the frame, timber posts are used: 120x120 mm timber is suitable for corner posts; for intermediate supports, material of a smaller cross-section can be used. The ceiling is made of beams 40x75 mm. If the bathhouse is planned for year-round use, the thickness of the insulation is taken to be 15 cm; for seasonal use, a layer of heat insulation of 10 cm is sufficient.
Project of a small frame-panel bathhouse 4 by 3 m
As for the floor, it is recommended to make it pourable. For its installation, an edged or tongue-and-groove board mounted with a slope is suitable. The layout provides for the division of the frame-panel bathhouse into several rooms. The partitions between them are made of wood. If the bathhouse is heated by a stone stove, a separate foundation is made for it.
Price of a turnkey frame-panel bath
Taking into account the construction technology, the cost of a frame-panel bathhouse is always lower than the price of a structure built by any other method. Before placing an order, you should ask the manufacturer about the provision of additional services. Such as installing a stove, installing a roof, installing a chimney. Considering the high speed of assembly, no more than 7 days pass from the date of order to the start of operation of the panel bath.
Taking into account the fact that frame-panel baths are inexpensive, the customer can afford to choose any of the presented projects. This also applies to those whose budget is quite limited.
Manufacturers offer several configuration versions:
- turnkey facility - factory assembly of walls and partitions, finishing of facades and internal walls;
- finishing in the rough version - cladding either the facade or only the internal walls;
- without cladding - the object is only an assembly of panels.
The process of assembling a small frame-panel bathhouse with a foundation on piles
Before you buy a sauna of a frame-panel construction, you need to pay attention to the sandwich assembly diagram. Any deviations in the sequence of arrangement of elements inside the sandwich panel may cause rejection of the product from this manufacturer
If the finishing of the panels can be done independently, then re-sorting all the panels for the correct arrangement of materials in them at your own expense makes no sense.
Exterior wall decoration
It doesn’t matter that a frame sauna will be an inexpensive option for a bathhouse, it can be given a very expensive and exclusive appearance, and you don’t have to get by with just painting the walls. Thanks to a large number of modern building materials, you can give the bathhouse walls a decent appearance. The external walls can be finished with thermal panels, facing bricks, vinyl siding, or block house.
We suggest you read: How to choose the right stones for a bath? Types of stones for baths
What is important here is the imagination of the master, who can make a beautiful and functional room from a frame version of a bathhouse.
Source
Insulation of a steam room in a bathhouse
steam room walls. Insulation from the inside of this part of the bathhouse is similar to the insulation of the remaining walls of the bathhouse. Since the steam room must maintain a high temperature for a long time, it is necessary to install the vapor barrier material especially carefully. The thickness of the heat insulator should (preferably) be twice as large as in the washing room
Pay attention to the door to the steam room. The junctions between the walls and the frame must be insulated with thick fiber material and sealed with metallized tape.
ceiling
Ceiling insulation is usually started after finishing work on the walls. To improve the tightness of the room, you can carry out work on the ceiling and walls simultaneously. Features of thermal insulation of the attic floor are presented separately.
The ceiling bears the greatest temperature load, so higher requirements must be placed on the heat-insulating material. It must have fire-resistant properties. If there is an attic, it is necessary to coat the boards with clay, a mixture of which is actively used for insulation, and fill it with, for example, expanded clay.
Read also the material: Choosing insulation for a steam room: so that it is both warm and environmentally friendly
ATTENTION! It is necessary to leave a small space between the vapor barrier material and the lining. The air gap becomes an additional heat-insulating layer and allows natural ventilation to function inside the walls and ceiling.
wooden bath
If the bathhouse is wooden. A bathhouse built from logs or beams retains heat better than others. The need for insulation depends on the thickness of the wall material.
Walls made of timber need to be insulated if their thickness is less than 15 centimeters. Walls made of logs are insulated if the diameter of the logs is less than 20 centimeters. If the walls are thicker, either they are not finished from the inside, or they are covered with waterproofing material and covered with clapboard.
Lathing is used only in cases of severe blockage or uneven walls. The steam room can be insulated with combined insulation of small thickness.
There is also the possibility of external insulation of log and timber baths, using thermal insulation between the crowns.
block baths
Recommendations for insulating a bathhouse made of blocks depend on their type.
from foam blocks. The construction of the “pie” is no different from baths made of other materials. The difficulty lies in the material of the walls itself. Foam blocks do not hold fastenings well; high loads are contraindicated for them. Find out more about insulating a bathhouse made of foam blocks.
The main weight of the sheathing should fall on the floor (about how to insulate the floor, here). For fastening you need to use only special fasteners. The best way is to use a U-shaped structure that is attached to the floor and ceiling.
Thermal insulating material should weigh as little as possible. The heat insulator is secured with threads or tapes to the sheathing, thereby reducing the load on the wall. The vapor barrier is overlapped and secured with staples to the bars. The seams are carefully taped with foil tape. To reduce the load on the walls, you can use combined materials that combine the properties of a heat and vapor barrier.
The lathing for interior finishing is made in the form of the same U-shaped structure. The lining is fixed in the usual way, since the load is already distributed mainly on the floor.
from expanded clay concrete blocks. Despite the fact that such blocks retain heat quite well, a bathhouse made of such material must be insulated from the inside. Walls are exposed to moisture over a wide range of temperatures. When used this way, the material will deteriorate quite quickly.
The sheathing made of wood or (worse) a metal profile is secured with dowels
When using metal, you should pay attention to the characteristics; the material must be suitable for use in rooms with high humidity
In the future, the insulation “pie” is performed in the usual manner. The thickness of the heat insulator depends on the thickness of the blocks, area of residence, and the presence of external insulation. It is recommended to use insulation with a thickness of at least 10 centimeters. Fastening the vapor barrier and lining is no different from similar work in bathhouses made of other materials.
Stages of building a frame bath with your own hands
To ensure that the construction of a frame bath is not a problem, but an exciting process, it is worth studying the step-by-step instructions from specialists in advance - this will help not only to prepare all the building material in advance, but also to plan the progress of the work.
Foundation
Most often, a columnar foundation is installed under a frame bath - it is quite simple to do, no specific knowledge is required for this. But if there are doubts (or confidence) about the instability of the soil in the place where the frame bath is supposed to be placed, then it is worth spending a little more time and making a classic strip foundation.
Stages of arranging a strip foundation for a frame bath:
The future structure is planned, the foundation is marked, a trench is dug 40 cm wide and 50 cm deep (dimensions are approximate, you need to calculate them individually).- The finished trench is filled with sand to ground level. Be sure to compact the sand during the filling of the trench, so that this process is of better quality; it is recommended to periodically moisten the sand with water.
- The formwork is placed about 50 cm high and 30 cm wide.
- Inside the formwork, the base is reinforced with metal wire.
- The concrete solution is poured - this can be done at once, or in layers, but make sure that the previous layer does not have time to dry completely.
- After the foundation dries, its top layer is covered with roofing felt - it will serve as waterproofing for the frame walls.
We recommend reading: How to make formwork with your own hands
Please note: when pouring the foundation, experts recommend embedding metal rods into the concrete solution so that they protrude 2-3 cm above the surface of the concrete. They will serve as support for the frame, give stability to the entire structure, and therefore they should be placed in the corners of the future bathhouse.
Walls
The technology of erecting walls for a frame bath with your own hands is not difficult even for an ignorant person - you just need to follow some recommendations from experts. They will be as follows :
- the lower trim is made of strong timber, the cross-section of which should be 10x10 cm;
- the beam for the lower trim is installed on metal pins pre-embedded in the concrete solution;
- in the corners the strapping is fastened with nails and metal wire;
- At the corners, braces are placed - wooden blocks cut at an angle of 45 degrees.
Next, intermediate racks made of wooden beams with a section of 10x10 cm are installed along the walls, and only after this can you begin laying the floor joists. For them, it is advisable to use a beam with a cross-section of 15x5 cm, which is laid in the required order directly on the waterproofing layer of the foundation.
All that remains is to make the outer cladding of the walls of the frame bath - it is convenient to use “lining” for this, which is both practical and looks great.
Please note: experts do not recommend immediately doing the internal lining of the walls of a frame bath - first you need to install the roof and mount the roofing material.
Roof
The most practical roof option for a frame bath is a gable structure. It is assembled on the ground and then the finished frame is lifted onto the top frame of the walls of the bathhouse. For this you will definitely need helpers - you cannot cope with the process of lifting the roof frame alone.
Then everything is simple - a layer of insulation (mineral wool), a layer of vapor barrier and a sheathing of thin wooden slats are applied. The last stage is laying the roofing material, which must be selected individually. Experts recommend choosing the same roofing material that was used for the roof of the main residential building. In this way, it will be possible to maintain the harmony of the entire exterior of the garden plot.
Floors and ceiling
The floors in a frame bath are, naturally, made of wood - these can be planed boards, which must fit tightly to each other and be mounted on pre-laid logs. It is imperative to carry out work on insulating the floor in the type of structure under consideration - the same mineral wool is used, and a layer of vapor barrier will also be required.
Please note: if the design of a frame bath includes a “washing room”, then for it you need to make a completely different floor design:
- it must have a concrete base - a separate foundation is built for the “washing room”;
- it is necessary to lay a pipe as a water drain;
- Laying layers of vapor barrier and insulation is not necessary;
- From above, the concrete floor is covered with boards.
The ceiling is made according to the same principle as the floors - wooden boards are laid on pre-laid layers of heat/vapor barrier along the roof frame.
Insulation of a frame bath
We are talking about laying a layer of thermal insulation material, which means mineral wool. In order not to make a mistake when carrying out this type of work, you just need to remember what the finished wall of a frame bath should look like in section :
- external lining;
- glassine (or any other vapor barrier material);
- mineral wool;
- polyethylene film (or special vapor barrier);
- external lining.
Please note: the insulation of the walls of the steam room must be carried out with special care; it is recommended to lay heat-insulating material with a foil side in this “compartment” of the building and additionally use ordinary insulation. The goal is to create the effect of a thermos in the steam room of a frame bath.
As for exterior and interior decoration with decorative materials, it is impossible to recommend anything here. The choice of a specific type of finishing material depends on both personal preferences and financial capabilities.
Making a frame bathhouse with your own hands is a fairly creative process that will not be problematic even for an inexperienced person. Start construction work, strictly follow the step-by-step instructions and everything will definitely work out.
( 66 votes, average: 4.80 out of 5)
Modular home or “quick” housing
Metal tile roof: do-it-yourself metal tile installation technologies