Technology of masonry work during the construction of a brick fireplace
We will assume that the foundation of the fireplace has already been built, poured with durable concrete and will support the weight of the structure.
- The concrete surface should be waterproofed with an inexpensive coating cement-polymer mixture (for example, CeresitCR 65), coating it twice with a brush or spatula.
- If the fireplace is adjacent to a wall made of combustible material, fire protection must be installed.
An inexpensive and effective option for fireproofing a fireplace and a wooden wall is a slab of basalt wool (at least 5 cm thick), covered on the fireplace side with reflective foil
Preparation of clay-sand mortar. When making your own, the clay should be soaked in advance. Water is added to the finished mixture before starting work in accordance with the instructions. The brick should be soaked - lower it into a trough of water for a few minutes. If this is not done, the masonry mortar may dry out too quickly and not gain the necessary strength.
In addition, the wet brick can be moved if necessary, which is important when a fireplace is laid by a not very experienced craftsman. Lay out the first row, it should be as even as possible, the horizontal level should be carefully controlled. If you “missed a little” with the foundation, the first row can be laid out on a cement-sand mortar, this makes it easier to correct flaws in the foundation. Next, the fireplace masonry is carried out in strict accordance with the serial plans
We recommend laying each subsequent row dry first, and only then applying the solution. If the fireplace is large, pull the cord; if the structure is small, control with a level and a square is sufficient.
If there is more than one brick in a row that needs to be split or sawn, we recommend that during dry laying you number all the elements, both solid and adjusted to size. The numbering should be duplicated on the serial plan
The vertical seams of the bricks should not be located one above the other; the need for bandaging should be taken into account when drawing up the drawings.
Laying begins with corner elements, strictly monitoring compliance with the horizontal level between them
Excess mortar is removed with a trowel, the seams are unstitched, and contaminated bricks are wiped with a wet rag.
The shape of the joint determines the profile of the seam, concave, convex or rectangular
Another way to make a neat seam is to lay the bricks along the guides
Take a closer look at the photo: a square metal profile is inserted into the seam from the outside; after a few minutes it is removed.
You should not place more than 8-10 rows in height in one shift.
Stages of constructing a fireplace
Zoning
Designers do not advise giving in to fashion trends and copying design ideas without taking into account dimensions, location and other nuances. Before planning and arranging furniture, every detail is thought through. There are several simple rules that experts advise you to follow:
- Let the room have natural light. To do this, remove excess walls (except for load-bearing ones).
- If the rooms in the apartment are small (12 sq. m or 16 sq. m), the layout of the kitchen combined with the dining room will be the right solution.
- If the ventilation system is not designed correctly, the smell of food will spread throughout the apartment.
Kinds
Brick fireplaces include three main parts. This is a portal, a chimney and a firebox.
The firebox is a niche for lighting a fire. The portal is the outer part of the fireplace, which is decorated with various materials (stone, molding, wood and others). The device through which smoke escapes from the room is called a chimney.
Fireplace structures are distinguished according to the method of their construction - they are open, closed and semi-open. When the firebox and chimney of a brick fireplace are not separated from the wall of the room, but are built into it, then the heating device is called closed.
The chimney and firebox are made recessed into the wall of the room. They are also called closed (English) structures. Their advantage is their size. They are compact and can be installed in very small rooms.
However, the walls in buildings where a fireplace is planned must be made thicker, since their strength decreases.
They are erected immediately with the construction of the building. Their design is taken into account in the general design documentation for the residential complex initially.
A structure laid along the wall and bordering it is called a wall or semi-open fireplace. In such designs, the firebox and chimney are not built into the wall. The construction of a semi-open fireplace is possible in a room that was built a long time ago. Its redevelopment will not be required in this case. A wall-mounted fireplace is considered the most common type. It can be the same size, full length or taper at the top. It is not connected in any way to the structure of the wall itself.
Fireplace devices located at a distance from the walls of the room are called open (island). They are one of the most unpopular species. The installation of such structures is welcome in large rooms, because their area takes up most of the space of the room where they are installed. Island (open) structures do not touch the wall, the flame is visible from anywhere in the room.
Corner fireplaces are located in the corner of the room, hence their name. With their help, empty corners of rooms are conveniently used and adjacent rooms are heated.
The chimney of corner fireplaces is concentrated in the wall of the room. It cannot be laid out with hollow bricks. The open part of the smoke chamber is made of metal. It can be made of iron or concrete. The surface is covered with brick, stone, and plastered.
Fireplaces in which the flame is not fenced off from the common room are called structures with an open firebox. The firebox is made of fireclay brick. It can also be an iron or cast iron opening.
A decorative lattice serves as a barrier (barrier).
Closed fireplaces, on the contrary, are equipped with heat-resistant glass (a door with glass). It is concentrated between the firebox and the room. At the bottom of the closed firebox there is an additional chamber for the ash pan. Air is supplied from it into the chamber where combustion occurs. On the fireboxes of this type of fireplace, a mechanism is installed that allows you to control the damper. All the nuances of the design and functioning of the fireplace are skillfully hidden under the cladding. It is made of stone, decorative brick, tile. There may be wooden frames.
Wood-burning brick fireplaces are widely used for installation in dachas. The function they perform is cooking and heating with a water circuit.
Such units are cheaper than stationary ones. Fuel consumption for fireplaces with stove elements is high. However, their advantage is the ability to use thermal energy regardless of external media. For example, electric boilers often do not function due to problems with the supply of electricity to holiday villages. There is also no need to supply gas communications (in the case of a gas boiler).
The stove-fireplace for a bathhouse is equipped with a tank for heating water. Tanks vary in volume and models. The presence of a closed or open portal distinguishes bath structures from other types. Brick fireplaces for baths heat up the room very quickly, and the heat is retained for a long time. At the dacha, you can attach a barbecue to the brick fireplace.
To install wood-burning brick fireplaces, you need to conduct a thorough engineering analysis
Particular attention is paid to the location of the chimney
Open fireplace project
heating the room.
This gives a certain illusion that there is no firebox at all. There is simply a corner lined with bricks with a base on which you can light a fire.
Behind the apparent simplicity of this structure lies a complex engineering calculation that provides the structure with a certain lightness. High-quality work and fire safety for fireplaces built in a wooden house are of paramount importance, therefore they are put at the forefront. All parameters are precisely calculated, designed and implemented.
It is worth mentioning a few subtleties of building a fireplace in a new, newly built wooden house. Construction of the fireplace, in this case, will have to be postponed for about a year. The thing is that after the construction of a wooden house, some certain time must pass for the structure to shrink. If the fireplace is installed in a “damp” house that has not undergone shrinkage, then such defects as cracking, smoke emissions into the room, and much more may soon appear.
But the beauty of the fireplace, which is presented to your attention, is that it is designed and created in such a way that its structure is an element separate from the house:
- It does not have a close connection either with the walls or with the very structure of the house’s decoration.
- All parts of the fireplace can easily withstand the shrinkage of wooden walls, without suffering any damage to the structure. This will ensure maximum safety and reliability during further operation of the fireplace.
Facing
The external decoration of the fireplace is responsible for its perception, place in the interior of the room, and compliance with the style. The need for such work is dictated by your needs and the quality of the masonry produced. The fact is that, provided that the masonry is neat, in which the seam sizes are the same everywhere and vertical and horizontal levels are maintained, a surface with a natural brick texture looks very original in any interior.
If necessary, various heat-resistant materials are used for finishing. The most popular are ceramic tiles, tiles and decorative stone. These three types of material are presented in many color and texture options.
Drawings and diagrams
The most common type is the corner fireplace. It fits organically into the space of even a small room. The chimney and its portal are located in the corner, due to this the room is not cluttered.
In order to assemble the fireplace correctly, you first need to make drawings and diagrams of both the whole structure and individual parts. Careful calculations will make it possible to avoid mistakes when laying. First of all, you need to know the size of the country house, make designs for the chimney and firebox, and clarify what material the masonry will be made from. The drawings need to show the fireplace in different projections: top view, side view, straight view.
A well-built fireplace must meet the following characteristics:
- warm up the room;
- have no cracks or defects to avoid smoke;
- its appearance should be combined with the interior of the room.
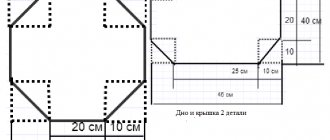
For example, it is planned to install a fireplace in a room with an area of 20 square meters and a ceiling height of 3.5 meters. The volume of the house will be 70 cubic meters (20x3.5). The ratio of the height of the fireplace and the depth of the firebox is 1/2 or 1/3. Failure to comply with the dimensions and installation of a firebox of increased depth will reduce the heat in the room. When the depth is shallower, there may be smoke. Therefore, adherence to dimensions is the main criterion for successful work.
The smoke openings depend on the area of the firebox. The standard dimensions of a chimney are 14x14 cm. With a round chimney, it can be from 8 to 14 centimeters. The chimney diagram must be worked out to the smallest detail. It is best to make it from brick. The construction of a chimney begins with laying the foundation, then installing rows (slats) to mark the rows of masonry, then welding (grouting the inner surface of the chimney) is done, the head (upper part of the chimney) and the chimney (cap) are installed.
The most initial and important element in laying a fireplace is the calculation and construction of the foundation. It must be reliable and durable. We must not forget that it is impossible to make the same foundation for the walls and fireplace. These bases must be different, since their weight load is not the same and over time the shrinkage will also be different. After the size of the foundation has been calculated, a plan for the fireplace at the basement level is drawn up. The width of the foundation should be five to seven centimeters greater than the width of the basement row.
After the calculations, they proceed directly to pouring the foundation and laying the fireplace.
Fireplaces with a water heating circuit are very popular. To install them in suburban buildings, they resort to welding machines.
In terms of external characteristics, such a fireplace is similar to a stove on legs with an external exhaust pipe.
The heat exchanger is made at least 5 mm thick. It heats up quickly and ensures heat distribution throughout the room. The fireplace and water supply system are connected to it depending on how the entire heating system in the house is made. The volume of coolant at which the entire circuit will work efficiently is 55-85 liters. The maximum area that can be heated using a fireplace with a water circuit is 230 cubic meters. The expansion tank is installed within 7-11% of the total volume of the heating circuit.
The firebox for a metal fireplace is made in two ways. It is made separately from the entire structure. The coil is inserted and then connected to a common fireplace.
The second method is to make the fireplace without a top cover. The fireplace base (jacket) is inserted inside and secured, and then the coil is fixed.
If the fireplace insert is located on the same level as the heating radiators, then an additional circulation pump is installed. It helps the movement of cold and hot water and prevents the coil from boiling. The efficiency of the fireplace when using a circulation pump increases significantly. The pump is placed in the basement of the house or utility room.
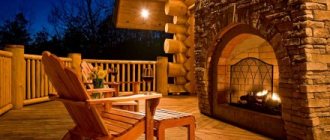
Design and dimensions of the hearth
Structurally, similar fireplaces, an example of which is shown in the photo, are similar to their traditional wall-type “brothers”. The hearth consists of an open firebox without an ash chamber, a cone-shaped smoke collector with a chimney tooth and a straight chimney pipe. The difference is the triangular cross-sectional shape, which complicates the construction process.
The principle of operation of a triangular fireplace remains the same: wood is burned on the hearth of an open firebox, combustion products are removed through the chimney shown in the diagram below. A portion of the heat is retained by the chimney tooth (in general, about 20%), the rest goes away along with the smoke due to the natural draft that occurs in the vertical channel.
In order for the hearth to properly serve as a source of heat, it is necessary to select the dimensions of the structure to suit the volume of the room and take into account a number of points:
The size of the firebox opening is defined as 1/50 of the area of the room (usually the fireplace is located in the living room). The height of the portal is made approximately twice the maximum depth of the fuel chamber. If the draft is weak, smoke will enter the room, and excess will lead to increased heat loss, especially when the fireplace is not lit.
Therefore, the optimal cross-section of the chimney is taken to be 1/9 of the area of the combustion niche. For normal operation of the fireplace stove, it is important to organize the flow of air into the living room, otherwise the draft in the chimney will worsen. Burning wood often “shoots” heat particles through the front opening. To prevent fire, a pre-furnace sheet of metal is laid on the floor in front of the fireplace. If the structure is adjacent to the walls of a wooden house, then flammable surfaces must be protected with galvanized roofing.
A table that shows the dimensions of the portal and the cross-section of the chimney duct of corner fireplaces depending on the size and volume of the room will help you simplify your calculations.
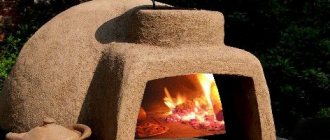
We suggest considering the construction of a brick fireplace in a private house or country house using the example of the classic “Annushka” fireplace shown in the photo. The project is designed to heat a living room with an area of 18-20 m² with standard ceilings, the cross-section of the firebox opening is 70 x 50 cm (width x height).
Often in residential buildings, a simplified method of constructing a brick hearth is implemented using a cast-iron fireplace insert. How this is done is described in detail in the video:
Design
Before you start building the structure itself, it is very important to design it initially, since not only the appearance of the fireplace, but also its functionality depends on this. Designing a corner fireplace occurs in several stages, which we will discuss in more detail later.
Stage 1. Preliminary sketches
At this stage, you need to make a detailed design and sketch of the future structure.
The process of designing a corner fireplace should be done in the following sequence:
- Determine the room and the corner in which the fireplace will be built.
- Make a preliminary drawing of the structure. This way you can determine whether it will suit this particular corner and the interior of the room in general.
- Taking into account the rafter diagram and the attic floor diagram, draw a design drawing for the future fireplace.
Stage 2. Calculations of linear parameters
In order for the fireplace to function and meet all safety criteria, it is very important to make the correct calculations, taking into account all the necessary parameters. For example, for safe and high-quality work it is necessary to create optimal traction
This is necessary in order to eliminate possible smoke in the premises and at the same time the fireplace operates with maximum heat transfer. Also, good draft will help you light and regulate the permissible level of fire in a matter of minutes.
In addition, a standard corner design should perform the following functions:
- Heat the structure evenly and quickly;
- Have a high level of heat transfer;
- Have an attractive appearance.
Stage 3. Determining the size of the fireplace insert
Determining the correct size of the firebox completely affects the quality of heating the room. Therefore, the size of this element is calculated based on the parameters of the room, or rather its area. To put it simply, the size of the fireplace insert is determined according to the following formula: the area of the room must be divided by 50. Thus, you will get the approximate size of the firebox window.
The most optimal proportions for a fireplace window are considered to be 3:2, while the height of the firebox window should be less than the width of the hearth itself. The depth of the combustion chamber is also an important parameter, since the effectiveness of the fireplace will depend on it. Half or two thirds of the total size of the firebox is considered standard.
Stage 4. Calculation of the dimensions of the chimney for the fireplace
In order to prevent smoke from occurring during the operation of your corner fireplace in the future, it is very important to correctly calculate the parameters of the future chimney. The activity of wood burning and the formation of normal draft also depend on this.
The most optimal is considered to be a chimney diameter of at least 150-170 millimeters, the rectangular cross-section of which should be in a ratio of 1:10 to the size of the combustion chamber.
Dimensions of decorative fireplace
The dimensions for which a corner fireplace is determined according to the area of the room for decorative installations can also be determined based on the following tips and recommendations:
The room chosen for installation and installation of the structure must have suitable dimensions. As a rule, the dimensions of the stove should not exceed one twenty-fifth of the living room;
First of all, it is recommended to buy the firebox itself
Electric fireplaces are universal
Miniature corner fireplace for a home or apartment
- Since there is no real flame burning in the hearth of false fireplaces and the structure does not heat up, it is quite possible to make it not only an addition and decoration to the interior, but also add a certain functionality. To do this, equip the frame with various racks, tabletops or shelves on which you can place books, accessories and other necessary, useful little things;
- If you want to install a purchased electric or bio firebox into a decorative portal, all calculations are made according to the existing installation dimensions. If the portal is purchased, you can find its installation dimensions in the instruction manual included with the purchase. For home-made frames, all measurements are taken by hand; choosing a hearth of suitable size in this case is quite difficult and it is quite possible to make it only to order.
You can also view photos of corner fireplaces in various interiors in this article.
How to calculate the dimensions of the combustion chamber
In order to calculate the size of a corner fireplace and its combustion chamber, adhere to the following rules:
- To calculate such a parameter as width, you will need to add up the width of the firebox itself and its side parts, as well as add up the frame consoles;
- To calculate the height, add up the height of the firewood, mantelpieces and other decorative elements;
Dimensions of a rectangular metal hearth
The ratio of the firebox to the parameters of the purchased frame
General dimensions of the hearth and portal
852d4e845cb1cc45950c2430b4da3a62.jpe
Step-by-step arrangement of a fireplace
The work may take a week or more, so be patient.
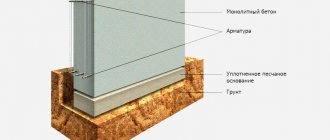
- Let's start with the foundation. The base on which the fireplace will stand should be slightly wider by 5-6 cm on all sides than the structure itself. The depth of the foundation pit is 600 mm, and if the house is high above the ground, you can simply compact the soil under the future structure and assemble wooden formwork. The inside of the formwork should be treated with bitumen-based mastic or roofing felt.
- If a pit was used: lay a layer of crushed stone or finely crushed brick 100 mm thick, water it a little and tamp it. Then we level it. We install the formwork on top of the pillow.
- Pour a solution into the formwork box - cement and sand in a ratio of 1:3. Fill it to 100 mm, level it and leave it to dry. We lay a layer of rubble on top of the dried concrete, mix it with crushed stone, and fill it all with concrete. We carry out the procedure until the foundation reaches the floor level. The last layer must be covered with waterproofing or polyethylene, and then left to dry for a week.
- We remove the formwork and lay 2 layers of roofing material on top of the foundation.
- There is already a need for order here. In accordance with the diagram, we lay out the first row of bricks. Before laying, keep each brick in water for about 2 minutes so that moisture from the solution is not absorbed into it.
- When laying the base, the bricks are placed on the edges; in other cases, the elements are placed flat.
- When laying the firebox and chamber, level the mortar with your hands, this makes it easier to detect lumps and eliminate them.
- To tilt the back wall, each subsequent row is laid out with an indentation of 4 cm.
No matter how simple the work may seem, masonry requires a lot of time and effort, as well as the ability to handle mortar and brick. If you are not sure that you will create a brick fireplace with your own hands exactly as described, entrust the work to the craftsmen. It will be more expensive, but you won’t waste materials and won’t waste your time. A corner fireplace stove has some differences in design, since food is cooked in it. Therefore, this manual is not suitable for this design.
Equipping a fireplace in a country house is not so difficult if you have certain skills in laying bricks
It is very important to carry out all work carefully, to make the seams thin, otherwise the structure will not have the properties that you expect from it. It is also worth remembering that a corner fireplace and a corner stove are 2 completely different things, and they have different purposes, which means the designs are different. If you manage to do everything according to the instructions, then the fireplace will last for decades, creating a cozy, warm corner in your home even on cold winter nights
//www.youtube.com/watch?v=nFLmrISqlHw
The sequence of laying a fireplace from bricks
Base structure
If there is a floor in the room, dismantle its section at the location of the future fireplace.
If there is a subfloor, arrange wooden formwork for pouring concrete 5 cm larger than the size of the fireplace base according to the project. A layer of crushed stone mixed with sand is poured onto the bottom to compact the soil and compacted. Concrete is poured 10 cm below the existing floor surface. The concrete is covered with a thick layer of sawdust and moistened to prevent the formation of cracks. After a week they are removed and the formwork is removed.
The foundation is insulated from the brickwork with two layers of roofing felt to prevent the transfer of moisture from the soil through the concrete to the body of the fireplace.
Brickwork
The first row of bricks is laid without using mortar. The complexity of further work depends on the correctness of its location. Be sure to check right angles, horizontal rows and measure the evenness of diagonals. The first row should raise the masonry to floor level.
The masonry of the next three rows is continuous and forms the base of the fireplace, and from the fourth the design of the combustion unit begins. All rows are laid according to the brick fireplace drawing, the horizontal and vertical work is constantly checked to prevent distortions. The bricks are laid with the seams bandaged.
The height of further masonry of the combustion chamber occurs according to the scheme and depends on the accepted volume of the internal space of the fireplace. The walls of the firebox are made of fireclay refractory bricks. A steel sheet is fixed during laying and serves as a reflector.
The chamber in which the smoke is collected before it is sent out into the chimney is 5-6 bricks high.
Laying a brick pipe with your own hands is carried out to the entire remaining height to the ceiling of the room. When making the front surface of the fireplace, selected decorative bricks are used, unless other wall decoration is provided.
The metal firebox frame for the fireplace is attached with your own hands using embedded metal parts, which are inserted into the joints of the masonry and sealed with mortar. The elements are made from steel strips with a thickness of at least 3–4 mm. You can use annealed wire, the diameter of which is no less than 2–3 mm.
Chimney
- You can insert a sandwich of steel chimney pipe into the decorative brick chimney of the corner fireplace. This is done because brick does not work well in an aggressive smoke environment and quickly collapses. A combined chimney will last much longer. Cleaning is performed in more comfortable conditions;
- When bringing metal pipes out through a hole in the wall, insulation is provided. If the wall is made of stone, brick or concrete, then it is enough to fill the hole with foam for outdoor use. When passing through wooden walls, the pipe is wrapped in two layers of asbestos, and only then insulated;
- When laying pipes, a solution with the addition of cement is used. When working, after each new row, be sure to wipe the inner surface of the pipe, removing any escaping solution. Plastering of pipes is not performed;
- The height of the pipe on the roof depends on the ridge; the closer the location to it, the higher the chimney. In any case, the pipe is made no lower than 50 cm from the roof surface. This rule also applies to flat roofs.
Laying a fireplace with your own hands will bring a lot of pleasure to the owner and his assistants, who will be happy to take photos of the entire laying process. Dull winter evenings will be diluted by the warmth of a live fireplace fire and leisurely friendly conversation while the wood crackles.
Step-by-step instruction
In fact, laying a corner brick fireplace with your own hands is no different from conventional construction, with the exception of thin seams - the thinner they are, the better the fireplace will retain heat inside. To do this, the solution must be as homogeneous as possible and without lumps. The permissible thickness of stove seams is from 1 to 3 mm for the fuel compartment and up to 5 mm for the chimney and body. In this case, the seams must be filled completely.
How to build a brick fireplace:
- The easiest and fastest way to build a fireplace is during the construction of a house, when interior decoration has not yet begun. The first step is to take care of a stable foundation, the dimensions of which should be 5 cm wider than the base row of the structure on all sides. Dig a pit of the appropriate size with a depth of 60 cm. If the floor level is located much higher than the surface of the ground, you just need to carefully compact the soil under the future fireplace and make formwork from wood. Coat the inside of the formwork panels with bitumen mastic or attach roll waterproofing (ordinary roofing felt will do just fine). Sheet iron can also be used to make formwork.
- Compact the bottom of the pit and pour a 10 cm thick layer of crushed stone or brick chips there, pour water on it and compact it thoroughly. The surface should be as smooth and horizontal as possible.
- Install the formwork on the crushed stone “cushion”, then put large stones or broken bricks (rubble) inside. There will be gaps between the stones, so add a little more crushed stone to fill them.
- Mix classic cement-sand mortar in a ratio of 1:3. First mix the dry ingredients, and then add water little by little, bringing the solution to the desired consistency (thick sour cream). Pour concrete into the formwork in a layer of 10 cm, level the surface and leave to dry for a day.
- The next day, again place a layer of rubble mixed with crushed stone on the dried concrete and fill it with concrete. Thus, bring the foundation almost to the level of the finished floor (5 cm lower). Carefully level the last layer of concrete, cover with polyethylene to prevent it from cracking, and leave to dry for 5-7 days.
- After the foundation has completely dried, dismantle the formwork.
- Cover the foundation with 2 layers of roofing material and begin laying bricks in accordance with the chosen order.
- Since bricks absorb moisture, they should be kept in water for 2-3 minutes before laying and applying mortar. If this is not done, they will take all the liquid from the clay mortar, and it will lose its strength and binding characteristics.
- When laying the basement row, install the bricks on the ribs. For the remaining rows, the bricks are laid flat. When the height of the structure reaches 25-30 cm, you can begin to form the walls of the combustion compartment.
- If the façade of the fireplace is not planned to be plastered or covered, when laying the front part, try not to bring the clay mortar to the very edge of the brick by about 5 mm - this will allow you to beautifully embroider the seams later. When starting to lay each row, check the horizontality with a building level, and the verticality with a square and a plumb line.
- When you lay out the firebox and smoke chambers, smooth and level the mortar not with tools, but by hand. This way you can feel and, if necessary, remove large particles and lumps in a timely manner, making the seams thinner. When you have completed 5-6 rows, wipe the inner walls with a damp cloth to remove excess solution - then this will be quite difficult to do.
- If you are bandaging the firebox masonry, the lining must be done separately without bandaging, so that temperature changes do not destroy the structure.
- If you remember, the rear wall of the fuel compartment and smoke collector should be inclined. To do this, lay each subsequent row with a slight overlap on the bottom one (4-5 cm). To prevent soot from accumulating on such a “ladder”, it is recommended to cover the masonry with a steel screen 3-4 mm thick.
- To make the ceiling of the portal, use a steel corner (you will need a fireplace lining) or a circle - a special formwork that allows you to create arched masonry. To do everything beautifully and correctly, first install the brick without mortar, evaluate the result, and only then lay it according to all the rules.
- When you bring the chimney to the roof, change the clay mortar to a cement-sand mortar - it copes better with atmospheric loads.
The design of a corner brick fireplace, no matter how simple it may be, requires utmost attention and skills in working with materials. If you doubt your abilities, it is better to entrust the work to a professional or at least enlist his support and recommendations.
How to make a fireplace with your own hands from brick
The recommended thickness of joints in the fireplace masonry is 3 mm. In the corner you need to attach a metal sheet, bent at 90°, the dimensions of which are equal to the dimensions of the fireplace being manufactured. It should reach the height of the fireplace mantel. This device will be a heat reflector.
Order of the corner fireplace:
- Rows 1-4 need to be filled with bricks. The fourth row will be the hearth of the structure.
- On the 5th row you need to lay out the ash pit. You will need to install supports for the grille, which consist of several steel strips. These strips will then need to be pressed down with the top bricks.
- On the 6th row you need to fix the supports. A grate is installed on the top of the bricks.
- On the next row a portal is laid. You need to start from the bottom salary.
- In the next five rows of masonry, it is imperative to bandage the seams. At this stage, a portal is formed. Starting from the 11th row, the mirror is laid out at an angle.
- The 14th and 15th rows are laid out with ligation of the seams. The portal is covered, the mirror is raised and tilted.
- In the 16th row, the laying out of the mirror is completed, after which the rise of the upper part of the tooth begins to form. On the chimney side, the tooth must be coated with clay to provide reliable protection against burnout.
- Rows 17-19 should be laid out of hewn brick. The façade part of the structure is being formed.
- On rows 19-22, a chimney is made and a fireplace damper is installed.
- At the next stage, the chimney opening needs to be shaped into a “dovetail”.
The arrangement of the corner fireplace is shown in Fig. 1.
How a chimney is made
The pipe can be made of either brick or metal. When laying a brick structure, a concrete solution should be used.
During the manufacturing process of the chimney, you will need to regularly wipe the excess layer of cement or clay solution inside the structure. If this is not done, the mixture may dry out quickly. There is no need to plaster the inside of the stove.
Particular attention should be paid to the fireplace insert. If it is not made correctly, smoke will escape into the room through the fireplace portal
This is very important for the construction of a corner fireplace. Everything should be carefully thought out so that the chimney passes correctly through all the ceilings
If possible, the chimney can be routed to the outer wall.
Processing of seams: 1 – Hollow out, 2 – With jointing: a) roller; b) fillet, 3 – In a row.
To get uneven lines of the fireplace, you will need to lay bricks with a smooth overlap - 5-6 cm in each row. To even out the tilt of the fireplace wall, you will need to embed a sheet of steel into the brickwork. To cover the portal opening, various lintels should be placed around the circle. Drawings of the circle should be made based on the size of the firebox. After a decision has been made regarding the configuration of the arch of the hole, the circle should be temporarily supported with racks. Laying begins with the installation of the central brick. Then the masonry can be carried out on both sides simultaneously.
When laying out the fireplace chimney, you need to carefully monitor its vertical position. When the pipe is brought to the roof, a solution consisting of sand and cement should be used for the construction. To protect the pipe from rain and snow, you should make tin devices called chimneys.
Finally, finishing and cladding are required.
How to properly sew seams
Jointing is done using a clay solution. After the clay pulp is ready, dry, purified sand will need to be poured into the mass. The mixture should be stirred until a thick mass without lumps is obtained, which is easily formed.
To ensure convenient jointing in the future, during the bricklaying process, the cement mortar does not need to be brought to 0.5 cm to the outer edge of the wall.
During the bricklaying process, it is necessary to constantly monitor the geometry of the structure being manufactured using a building level. Before laying, the brick must be moistened to obtain a durable structure.
You can lay out the chimney with your own hands, without using a trowel or other equipment. In this way, it will be possible to prevent small stones or other elements from getting inside along with the building mixture.
Making a corner fireplace from brick is quite simple if you have order and follow the correct sequence of actions.
Calculation of the main parameters of a corner fireplace
Before work, you need to decide on the masonry scheme, select sectional and order drawings of the structure, and sketches of the design of the fireplace facade. The dimensions of the corner fireplace are determined in accordance with the volume of the room in which it will be installed. The fireplace area of a fireplace in a room of 15 m2 should be 0.25–0.3 m2.
The size of the future structure and its individual elements is determined depending on the area and characteristics of the room.
- First of all, we determine the width and height of the fireplace insert opening. It is also called the firebox portal. It is a niche, for laying which fire-resistant fireclay bricks are used. A firebox of the correct size will be able to provide the required amount of heat and an aesthetic appearance of the entire structure, so its dimensions depend on the area and configuration of the room. The standard ratio in small fireplaces is 2:3. In our example (for a room of 15 m2), the width of the firebox portal will be 40 cm and the height will be 60 cm.
- Then we determine the depth of the firebox. This is a very important parameter on which the efficiency of the structure depends. Depth is related to height in a ratio of 2:1 or 3:2. A fireplace with a deeper fuel portal will have less heat output or require more fuel. A firebox that is too narrow will produce a lot of smoke. In our example, the optimal depth would be 22–30 cm.
- The dimensions of the hole for smoke removal are determined depending on the size of the firebox slot. The quality of draft depends on the size of the chimney. The smoke hole should be 9–15 times smaller than the firebox portal. In our example, if the pipe is square, it should have parameters of 14x14 cm. The diameter of the round pipe should be 10–13 cm.
The side walls of the fuel portal must be laid out with an inclination forward, as this will increase the draft in the fireplace and, accordingly, heat transfer. A chimney is equipped at the top of the firebox. Between it and the inclined wall an additional pass is created in the form of a cornice, which prevents smoke from penetrating into the room and prevents the emission of sparks through the pipe. A special protrusion (smoke tooth) is built above the level of the fuel portal, which prevents combustion products and cold air from entering the room from the street, and also prevents soot from falling down from the chimney.
The dimensions of the corner fireplace are determined in accordance with the volume of the room
If the drawings are drawn up correctly, you can calculate the required number of brick blocks individually and ensure the highest quality performance of all fireplace elements. Currently, all calculations can be made using special computer programs, which also draw up drawings and develop the layout of the fireplace.
Table: proportions for a corner fireplace
| Room | Firebox portal | Chimney cross-section, cm | |||||
| Area, m2 | Cubic capacity, m3 | Width, cm | Height, cm | Depth, cm | Neck, cm | Rear wall width, cm | |
| 12 | 42 | 50 | 45 | 30 | 12 | 30 | 14x14 |
| 16 | 50 | 60 | 50–52 | 32 | 12 | 40 | 14x27 |
| 22 | 60 | 70 | 56–58 | 35 | 12 | 45 | 14x27 |
| 30 | 80 | 80 | 60–65 | 37–38 | 13 | 50 | 27x27 |
| 35 | 100 | 90 | 70 | 40–42 | 13 | 60 | 27x27 |
| 40 | 120 | 100 | 75 | 45 | 14 | 70 | 27x27 |