Device and elements
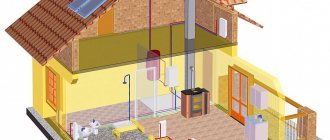
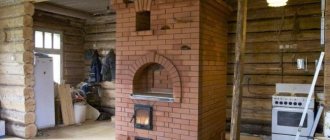
The operating principle of this heating system is based on a long, winding chimney, which makes it possible to heat several floors using a single structure.
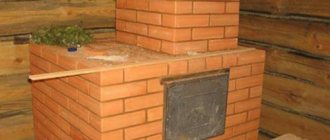
The Dutch oven consists of a firebox and a long winding chimney. The design also includes a blower and several doors. In total, the Dutch style uses several elements:
- Blower and blower door;
- Firebox and fire door;
- Soot collection chamber and cleaning door;
- Chimney;
- Gate valve;
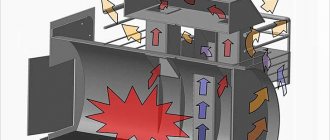
Each element performs its role and allows the circular structure to achieve maximum power levels by distributing a small amount of smoke throughout the heating system in an even amount.
The design of the Dutch oven also requires compliance with certain rules to maintain fire safety and ensure comfortable operation.
Design example
Fire safety rules
Before construction, study the PPB
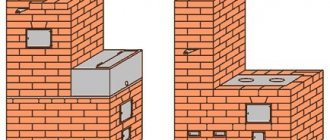
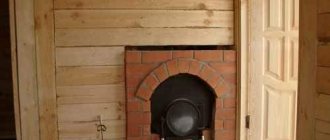
Check out the diagram above, which shows in detail and accurately all the features of installing a Dutch oven in a standard-sized room. To ensure fire safety, an asbestos or metal sheet is needed between the stove and the floor, which will prevent unexpected fire in the room from sparks or fallen coals.
Expert opinion
Pavel Kruglov
Stove maker with 25 years of experience
If the system is installed in a wooden house, then a sheet is also needed between the wall and the stove to protect against fire. You should also know that there should be no furniture or flammable objects near the stove.
The device of a round furnace
A Dutch woman in a metal case is usually placed on a good, stable, reinforced base. Its main part is made of brick and consists of:
Next, the finished round brick oven is wrapped in a “wrapper” - a casing made of smooth or corrugated sheet steel. As a result, we get a metal cylinder that does not take up much space and is not demanding on its location in the room - it will be convenient to place it both between rooms and in the middle.
In historical reality, Dutch ovens come in different shapes, including rectangular ones - its main difference is not in the shape, but in the method of laying bricks, which we will discuss below. The advantage of a round stove is that, thanks to its shape, it will take up less usable space and fit more organically into the space of the room.
Materials and their quantity
| Name | Qty |
| Blower door | 1 piece each |
| Cleanout doors | 2 pieces |
| Fireclay brick | 50-100 pieces |
| Regular red brick | 200-500 pieces |
| Gate valves/gates | 2 pieces |
| Grate | 1 piece |
| Clay | 90 kilograms |
| Sand | Half a cube |
All doors can be purchased in specialized stores or at a building materials warehouse in your city. Many people order designer doors from local craftsmen so that their stove can become a design element of the room.
Expert opinion
Pavel Kruglov
Stove maker with 25 years of experience
If you decide to install a metal casing on the structure and at the same time make it yourself, then in addition to the above materials you will need several sheets of galvanized or roofing metal. Their number depends on the height of the stove and its width; usually 2-3 sheets are enough to make an iron case for a Dutch oven 3 meters high.
Advantages and disadvantages of stoves in a metal case
When considering all the options for installing round stoves in the house, it is worth remembering that this model is most often used as an additional source of heat in the room. It can also be used as a heating device option for heating a temporary room.
However, this model has positive aspects:
- Due to the small wall thickness, the furnace heats up quickly;
- Because fireclay and red solid bricks are used in the design, the round stove has sufficient heat capacity sufficient to heat small areas up to 40 square meters. meters of premises;
- Its low weight allows it to be installed without a massive foundation;
- Small dimensions, ready-made kits are offered with diameters of 65.75, 85.95, and 107 cm;
- Furnaces last 25-30 years;
- The ready-made kit is quickly installed on site and easily connected to the central chimney;
- The finished kit consists of several boxes with building materials, which is why they are easy to transport;
- Furnaces have a relatively low cost;
- They are easy to maintain, and if necessary they can be very easily disassembled and reassembled.
At the same time, owners need to be prepared for the fact that a round stove in a metal case also has its own specific disadvantages:
- It has increased heat transfer, so you need to make sure that there are no easily flammable objects and materials nearby.
- Fuel consumption. Despite the fact that such stoves, like most other heating stoves, are omnivorous, it should be noted that the appetite of this model is almost a third greater than that of conventional designs.
Required Tools
For easy and quick installation, you need to prepare in advance a certain list of tools that will be useful to you in the construction of the Dutch oven:
- Pickaxe or guillotine;
- Measuring tools: level, tape measure, square;
- A basin for diluting the solution;
- Bucket and shovel for convenience;
- Mason's trowel.
If you make a metal casing yourself, then you will also need tools to assemble it: metal scissors, rivets and a riveting device, or a welding machine.
Stages of making a round Dutchman
Foundation
As with any other design, in order for a round Dutch oven to be stable and to function properly, you first need to make a foundation:
- To do this, you need to dig a recess into which the base for the stove will be installed.
- First, take measurements and disassemble the floor covering, deciding in advance on the future location of the system.
- Dig a hole and fill it with cement mortar of the following consistency: 1 bucket of cement, 3 buckets of sand.
- You need to place a reinforcement tie on top of the resulting future foundation so that the foundation better holds the Dutch structure.
- Let the solution dry for 10-15 days before starting work on the construction of the furnace.
Manufacturing of metal casing
Installing a metal casing on a Dutch oven was invented in the Russian Empire by the German designer Utenmark; such systems are often named after him - “Utenmarking”.
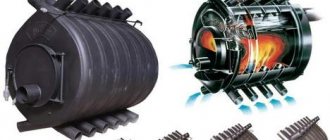
Today on the market of heating systems and products for them there is a wide range of ready-made metal casings for Dutch ovens. They are sold in ready-made sizes, so if you decide to use “utenmarking” purchased in a store, you should compare it with the dimensions of the oven in advance. The finished prefabricated metal casings look like this:
Metal casing
If you decided to make a metal casing with your own hands, then the material you can use is a regular galvanized sheet or roofing iron:
- It is better to prepare the blanks for installation in advance by first making holes for the firebox, valve, vent and door for cleaning. It is important to understand that the masonry is formed by the dimensions of the casing, so take this into account when making it.
Blanks for casing - A sheet of iron is fastened into a round shape using rivets; in extreme cases, the structure can be welded if the thickness of the metal allows this.
Laying and ordering
An important feature in the laying of a Dutch oven is the order of its rows; not every master is ready to undertake the installation of such structures, so the decision to make a round Dutch oven with your own hands is risky. But if you are confident in your skills, then it is important to use a specially invented order of this design.
Appearance
In cross-section, a round Dutch oven with a casing looks like this:
Sectional diagram of a round Dutch woman
Features of brick laying
The installation of the casing is carried out simultaneously with the installation of the Dutch. The section of the system, before covering the firebox, is placed in the floor of bricks - that is, the first three rows. Then, using a plumb line and level, the casing is installed - its first, lower ring. The distance between the wall of the case and the masonry is filled with a ready-made semi-liquid clay solution.
Now the firebox is being formed, and it is important to follow the order and bandaging so that the structure has good stability and high efficiency. When the firebox is formed, you can begin laying the subsequent parts of the Dutch system.
Front rows
Despite the apparent simplicity of the design, the main thing here is the order of the system; without it, the mason will not be able to install the entire system correctly. The first twelve rows begin like this, the diagram shows the dimensions and entire order of the Dutch woman:
Rows 1-12
From 13 to 29, the row and pipe diagram are shown in the following design order:
Rows 13-29
Rows 30-32
Please note that if one row is folded incorrectly, not to mention more errors, smoke will pour into the house and the system will not be able to function correctly.
First test firing of the furnace
It is important to carry out the first fire in accordance with certain rules:
- Test heating of the heating system must be carried out after the entire structure, including the masonry and facing mortar, has completely dried. Premature testing of the furnace can lead to cracking of the structure, which will deteriorate its technical characteristics and lead to operational problems.
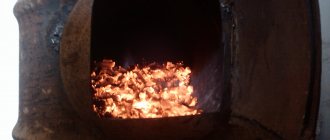
- The first combustion is carried out using 1/5 of the fuel. First you need to lay down wood chips and shavings, and then you can add larger logs. In this case, all valves and dampers must be open.
Expert opinion
Pavel Kruglov
Stove maker with 25 years of experience
If you have a thermometer installed, then make sure that the temperature in the system does not reach 600 degrees Celsius - you need to carry out the test firebox carefully, constantly inspecting the entire structure for damage to the system.
Preparing for work
First of all, carefully study the diagram according to which you will make a stove with your own hands from metal.
Then prepare everything you need for work, namely:
- welding machine and electrodes;
- grinder;
- sheet metal 2-3 mm thick;
- a metal pipe with a diameter of about 15 cm;
- fittings with a diameter of 8-10 mm;
- 4 rims;
- crushed stone;
- sand;
- cement;
- fireproof red brick.
Fig.2. Metal stove with roof
For a small room, a pipe with a diameter of 10 cm will be enough, for larger rooms - 15 cm. If the pipe is too thin, then smoke and air simply will not have time to pass through the chimney. This will lead to extremely unpleasant consequences. As a result, a smoke plug is formed, due to which combustion products will return back into the room. In the process of designing a structure, it is necessary to select the most optimal combination of dimensions of the chimney and furnace firebox. It is also better not to install a pipe that is too wide, because... This will result in reduced draft and clogs that require frequent cleaning.
In Fig. 2 you can see what a metal stove with a vault looks like.
Conclusion
A Dutch oven with a metal casing will be an excellent heating system for two-story country houses, to which gas pipes cannot be connected and a classic boiler heating system cannot be installed. Also, round Dutch ovens are an excellent choice for any agricultural buildings - they do not have enormous power, but are able to heat the room for fairly comfortable living.
The design of round Dutch ovens with a metal casing is the main advantage of these heating systems - despite the complexity of installation, anyone can lay a stove if they use the required order and prepare the solution correctly.
Of course, if you are not sure that you can correctly lay the stove, then it is better to seek the help of specialist stove-makers who will be able to install the entire structure correctly, and the stove will function as it should.
A round Dutch oven in a metal casing or an Utemark oven?
Customers often ask what the correct name for such ovens is. Many people call them a round Dutch oven . This is not entirely true. Since all brick heating stoves lined with tiles from Holland during the time of Peter the Great were called Dutch.
Another name for round furnaces in a casing is Utemark furnace . Dutch stoves began to be called Utermark stoves after in 1820, Joan Heinrich Utemark, a stove master, official and architect, improved the Dutch stove by proposing to line it with sheet iron and install an air chamber inside. The stove was thin-walled, only a quarter of a brick long, quickly heated the room and did not allow smoke to escape from the cracks in the masonry.