Dutch heating method
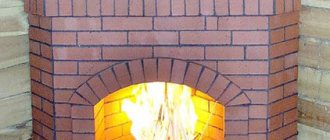
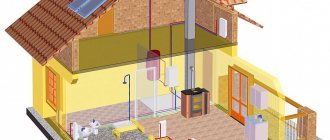
The brick stove is Dutch. Often the stove is used to heat a private house in the suburbs or in rural areas where other heating methods cannot be used. Heating a house in this way is in most cases considered the most suitable option for heating a country house, both when people are continuously in the room, and during periods of rare visits. This heating method uses hot air as a heat carrier. Almost all of these stoves heat the house with their own walls; there are projects where air flows along the walls from the inside, during the process of moving it it becomes hot and goes outside. And if the air is heated only from the surface of the fireplace, then the area of the heat generator should be enough to warm the room.
Basic rules for constructing a Dutch oven with a stove
Regardless of the size and shape of the furnace, during its construction there are several rules that always remain the same:
- The structure is always built on a separate foundation. It is advisable to think about its design at the stage of building a house - in this case it will be easier to determine the exit point of the Dutch chimney pipe and avoid it getting on the elements of the roofing system.
- The foundation is covered with waterproofing material.
- To construct the combustion chamber, high-quality fireclay bricks are used, which are not combined with ordinary bricks.
- Due to its low heat resistance, cement mortar is not suitable for laying a furnace. The brick is laid on a heat-resistant clay mixture. You can purchase it ready-made or prepare it yourself.
- When laying the firebox, the seams should be no more than 5 mm, on other elements - no more than 8 mm. This can be achieved by using a suitable wooden batten.
If the decision to build a Dutch house was made already in a finished house, then in this case it will be necessary to dismantle a section of the floor covering and construct a foundation without connecting it to the main one. Neglecting this rule can lead to dire consequences, since during operation the structure shrinks and the furnace built on the main foundation can become deformed. As a result, the tightness of the seams will be broken and carbon monoxide will inevitably penetrate into the room.
Don't miss: Tape for window insulation: varieties, methods of insulation
In terms of fire safety, the Dutch oven is quite reliable, but during its construction several basic rules should still be followed:
- An asbestos board laid in front of the stove will help to avoid accidental fire from sparks and coals falling from the firebox;
- the Dutch channels should be regularly cleaned of settled soot;
- wooden walls must be protected from the stove with fireproof material;
- it is prohibited to place pieces of furniture closer than 0.5 m to the stove;
- it is necessary to minimize the number of metal elements when constructing a structure.
All iron parts should not be in direct contact with the brick. In places where such a connection is provided, a 5 mm layer of mortar and an asbestos cord are laid - this will protect the masonry from heating.
Dutch oven projects
Dutch oven 002
This stove design is characterized by high efficiency. The main function of a Dutch oven is heating. This heating stove is made from solid ceramic bricks. Its design consists of: Firebox, chimney system, adjustment of the speed of smoke emitted. Being small in size, this stove simply fits into the design of any room.
OP- Dutch 003
The classic design of a Dutch oven is a rectangular structure, laid out in one brick, which has extended smoke channels above the firebox. The main purpose of the Dutch oven is exclusively the heating function. This stove design is characterized by high efficiency. The main function of a Dutch oven is heating
Dutch oven 004
The main purpose of the Dutch oven is exclusively the heating function. This stove design is characterized by high efficiency. The main function of a Dutch oven is heating. This heating stove is made from solid ceramic bricks. Its design consists of: a firebox, a chimney system, and adjustment of the speed of smoke emitted. Being small in size, this stove simply fits into the design of any room.
Dutch oven 005
Designed for a room with an area of 20 to 40 square meters. The classic design of a Dutch oven is a rectangular structure, laid out in one brick, which has extended smoke channels above the firebox. The main purpose of the Dutch oven is exclusively the heating function.
Dutch for home 006
Designed for a room with an area of 30 to 60 square meters. The classic design of a Dutch oven is a rectangular structure, laid out in one brick, which has extended smoke channels above the firebox. The main purpose of the Dutch oven is exclusively the heating function. This stove design is characterized by high efficiency. The main function of a Dutch oven is heating. This heating stove is made from solid ceramic bricks. Being small in size, this stove simply fits into the design of any room.
Heating Dutchwoman 007
The main purpose of the stove is exclusively the heating function. This stove design is characterized by high efficiency. The main function of the stove is heating. This heating stove is made from solid ceramic bricks. Its design consists of: a firebox, a chimney system, and adjustment of the speed of smoke produced. Being small in size, this stove simply fits into the design of any room.
Dutch oven 008
Designed for premises with an area of 20 to 40 square meters. The classic design of such a stove is a rectangular structure, laid out in one brick, which has extended smoke channels above the firebox. The main purpose of the device is exclusively the heating function. This design is characterized by high efficiency.
Dutch oven 009
The main purpose of this design is exclusively the heating function. Tests of the stove are characterized by high efficiency. This heating stove is made from solid ceramic bricks. Its design consists of: Fuel tank, ash pan, damper. Being small in size, this stove simply fits into the design of any room.
Dutch heating stove 010
Small design for a room with an area of 18 to 24 sq.m.
The appearance is a rectangular structure, laid out in one brick, which has extensive smoke channels above the firebox. It has a narrowing above the firebox. Dimensions 750x750 cm. Being small in size, this stove simply fits into the design of any room.
The indisputable positive aspect of the operation of the furnaces themselves is that in this situation the heat conductor is air, which has enormous penetrating ability and a very short heating period.
Of course, heaters have been used by mankind since time immemorial, and over time, certain changes have been gradually made to them. Absolutely all stove heating systems are divided into heat-intensive and non-heat-intensive. Heat-intensive are storage devices that are able to maintain a certain temperature for 3-12 hours. It also depends on what type of design the heat accumulator has. As a rule, in order to increase efficiency, water heating is connected to furnaces. This technique is becoming more common over time. In addition, it fits perfectly in design, perfectly decorating the room.
| Dutch (01) 4x3 bricks For heating residential premises up to 60 sq.m. Installation both interior and island. The location of the doors on any side of the structure. It is possible to install a steam heating boiler. Designed for year-round use. |
Installation of a Dutch oven on a foundation
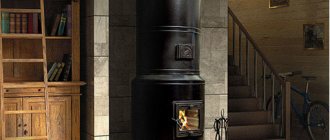
One of the main advantages of a Dutch oven is the ability to fit it into any design while providing high-quality room heating. The shapes and designs of these stoves are varied, and you can choose a model according to the desired size and function. The compactness of the Dutch ovens and the fact that both the stove and its service area take up very little room area speak in favor of these heating units. It is possible to build a stove designed by Utermark - it is perfect for heating a country house or a private house. A brick stove lined with tiles, majolica or tiles will not only heat, but also serve as an additional decoration for the house.
All brick ovens are massive and require a solid, reliable foundation. A reinforced concrete foundation is most suitable for this purpose. Reinforcement must be done not with flat meshes and frames, but with a three-dimensional frame. Reinforcement, concreting and maintenance of concrete are carried out using standard technology; full strength gains occur after 28 days. It is possible to start masonry work earlier, when the strength has reached 75% of the brand strength. Before masonry is carried out, the foundation is waterproofed, vertically and horizontally. You can use both coating and roll materials.
Basic materials for laying the furnace:
- A clay-sand mortar mixture in an approximate proportion of 1:1 (the ratio is unstable and must change to adjust the fat content of the solution. It all depends on the fat content of the clay used; the higher it is, the greater the proportion of sand in the solution required).
- Brick for the combustion chamber - fireclay or red ceramic refractory; brick for chimney ducts and furnace walls - ordinary ceramic brick, it is possible to use slotted and hollow bricks. Sand-lime bricks and dry-pressed products - adobe bricks, slip bricks, etc. - are not used.
The specificity of Dutch ovens is their special elongated vertical design, so the height of the combustion chamber from the level of the foundation edge can be greater than that of other models of ovens. But the fireboxes are usually located no higher than 250 mm above the floor level so that the stove heats up more evenly.
Laying order (example - a small stove 52*52 cm)
- Sand is poured onto the foundation waterproofing in a layer of up to 50 mm, leveled horizontally and carefully poured with water until the layer is completely wetted.
- A feature of the stove masonry of many stove models is that the first rows are laid dry - without bonding with mortar. For a small oven, 12-14 bricks are needed to lay rows along the base. The first row of bricks is laid as a bed.
- The second and third row of bricks are placed on the bed, but already on the mortar.
- The fourth and fifth row will be the beginning of the internal partition of the chimney channel. For future cleanings of the chimney, it is necessary to leave holes; for this, bricks are laid dry in these rows, they will be “knocked out”. Masonry, even without mortar, retains heat much better than a built-in metal door; for this reason, they prefer not doors, but knock-out bricks laid without mortar.
- The firebox door is installed, but the height of its installation depends on the overall height of the stove, and can be installed not in the sixth row, but much higher.
- In the seventh row, the bricks are laid flat (in a bed), except for the back ones - they are placed edge-on. Then all the rows are laid on the bed, and in the eighth row (or in the row closing the firebox door) the laying is done as in fireplaces - with bevels.
- Along the ninth row, an offset is made to the inner surface of the combustion chamber. Heat-resistant material is laid out on the shelf under the hob - kaolin wool, asbestos cords. Then install the slab.
- In this example, chimney channels are formed from the tenth row. In small stoves, it is more rational to make chimneys from metal rather than brick, so as not to burden the structure.
- The view, or stove valve, is installed in this example in the eleventh row, then the chimney pipe is installed.
- The sand, which serves as a shock-absorbing layer, should not spill out along the contour, so it is protected with a plank or plinth, installing them on the upper edge of the foundation up to the first brick row or slightly higher.
- They finish the stove - jointing, plastering or tiling, tiles and so on.
The stove dries out and the clay mortar in the seams sets only naturally, and the first firebox is made no earlier than two weeks later - after the stove masonry has completely dried.
Cons and pros
The main disadvantages of heating using a Dutch oven:
- require a lot of space indoors;
- the heat transfer rate of air is less than that of water, and therefore more of it is needed;
— there are problems with the distribution of heated air throughout the rooms;
- this is a very expensive pleasure.
It is important to note that heating furnaces are much more difficult to maintain than steam heating, for which you simply need to perform the correct debugging, after which you simply need to monitor the correct functioning of the system. When using the stove, it is necessary to constantly take care of the fuel and maintain the structure, and the room in which it is located must be periodically cleaned, since it quickly becomes dirty. It is important to note that the stove takes up quite a lot of space, so you need to choose a suitable place for it, and you also need to constantly care for it and check that it is functioning correctly, since without this work, a fire or carbon monoxide poisoning may occur. However, despite all the above-mentioned disadvantages of stoves, they have high efficiency, quickly heat rooms, are cheap to install and operate, and are also multifunctional, since with their help you can cook food that has a pleasant and unusual taste and rich aroma.
| Dutch (02) 0.75m by 1m Heating. 3 kW. |
Distinctive features of the Dutch woman
As mentioned above, in the present sense, a Dutch stove differs from a conventional stove in that it is decorated with tiles, tiles, plaster or other elements. But the classic Dutch oven has a number of characteristic features:
- a Dutch oven is quite simple to build, and even a beginner with little experience, diligence and accuracy can build it;
- the presence of even minor flaws in the design will not affect the functional component of the stove;
- a real Dutch woman does not have a hob or stove;
- The oven does not have a grate or a blower.
The main distinguishing feature of the gallanka is the duct chimney system.
Oven space
Before directly installing the structure, it is important to decide on the location of the furnace, since this issue is considered extremely important and relevant. Many people think that the best solution is to place the structure in the middle of the room, and in this case the smoke ducts should be laid along the wall, thus reducing the heads and improving draft. However, with this arrangement, constant air circulation is formed, in which it cools near the outer walls and returns to the stove, forming a stove draft. Cold air above the floor, which moves from the walls to the stove, creates discomfort for people who live or are simply in the room, so good health cannot be achieved in this way.
Therefore, the best solution is to place the Dutch oven near the outer walls, however, even in this case there are certain disadvantages. A problem arises with smoke ducts because condensation appears on the internal walls and draft deteriorates, so the room will become dirty very quickly.
A compromise and the most optimal option is to locate the stove in the middle of the house, and the surfaces that give off heat should go into the living rooms, and the parts that are exposed to a lot of pollution, such as the firebox and stove, should be in the kitchen.
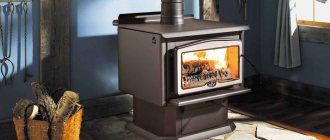
This stove is well suited for a summer residence
Video - Dutch oven
Design Features
Like any building structure that has significant weight, the furnace masonry must rest on a foundation or on a solid reinforced concrete slab located at the base of the floors. It is better to arrange the foundation at floor level, making it 100-150 mm thick from concrete with a reinforcement frame. The dimensions of the foundation slab should be larger than the dimensions of the masonry by 50-100 mm in each direction.
The positive side of the Dutch house is its undemanding quality of building materials. For high-quality masonry, they usually take well-fired ceramic bricks, preferably solid ones. In practice, such stoves are also made from hollow stones, with cracks, and even used ones. The product does not look very aesthetically pleasing, but at the same time it heats no worse than a stove made of high-quality bricks.
The simplicity of the design and the principle of operation allow a completely inexperienced mason to build a Dutch oven with his own hands; he only needs to be able to lay walls of ordinary complexity with dressing. No matter how unsightly the stove is built, it will still work successfully.
In any case, the firebox must be made of good refractory bricks. A sand-clay solution is used as a binder, mixed to the consistency of sour cream. The ratio is as follows: for one part of clay, take 2 parts of sand, which is better to first pass through a sieve. Special building mixtures that are commercially available in bags are also quite suitable for brickwork.
The simplest small stove for a summer house can be folded using the diagram below; it shows the arrangement of a Dutch stove with dimensions 520 x 520.
If you need to increase the height of the building, then this should be done through rows 17, 19, 21, as well as 18, 20, 22, repeating these belts the required number of times. This heat source will come in handy in a country house or other small building with an area of up to 20 m2. When the area of the premises is larger, you will have to install a large heating stove; it can heat a room of up to 50 m2. The figure shows a diagram of the laying of a large Dutch oven.
Note
In accordance with SNiP 1991, stoves in log buildings are permissible only when the number of storeys of the building does not exceed two floors. Taking this into account, the temperature of the walls of the Dutch oven should be no more than 60 degrees.
These units are designed to heat, as a rule, one or two rooms. Their sizes vary depending on the heated area. For example, for a room with an area of 20 m2, a stove with dimensions of 750 x 750 x 2000 mm is quite sufficient, provided that the house is well insulated. Such a stove, stacked in the corner of the room, takes up very little space, and lined with ceramic tiles, and even with a glass fire door, can become a real interior decoration. For two rooms, the heated surface of the oven is doubled. Such a stove is placed on the border of adjacent rooms, and in this case it makes sense to think about making it a heating and cooking stove. These are the so-called “Swedish women”. Being multifunctional, they are ideal for summer residents who like to make preparations, dry mushrooms and berries, etc. Some stoves have two operating modes: summer and winter. Summer mode allows you to use the hob without heating the entire oven. This often comes in handy during long power outages. And now we move on to the fun part. These are combined stove-fireplaces, universal heating devices that combine the practicality of stoves and the aesthetics of fireplaces. The inclusion of a fireplace in the stove design is almost always associated with the need to develop a project. The increased cross-section of the chimney pipe of the stove-fireplace allows you to connect additional heating devices to it on the top floor of the house (metal stoves and factory-made fireplaces).
Principle of operation
If there is a stove and an oven in a Dutch oven, the operating principle of the oven is such that the heat from the firebox heats both the oven and the hob. The oven, as a rule, heats up more, as it is located closer to the firebox.
Don't miss: Why the air conditioner does not blow warm air in heating mode: reasons
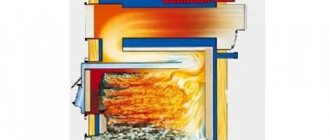
Gas flow diagram
The only disadvantage of this oven is the inability to control the temperature. At the same time, this is an excellent energy saving.
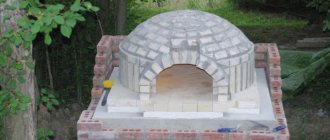
Stages of making a round Dutchman
Foundation
As with any other design, in order for a round Dutch oven to be stable and to function properly, you first need to make a foundation:
- To do this, you need to dig a recess into which the base for the stove will be installed.
- First, take measurements and disassemble the floor covering, deciding in advance on the future location of the system.
- Dig a hole and fill it with cement mortar of the following consistency: 1 bucket of cement, 3 buckets of sand.
- You need to place a reinforcement tie on top of the resulting future foundation so that the foundation better holds the Dutch structure.
- Let the solution dry for 10-15 days before starting work on the construction of the furnace.
Manufacturing of metal casing
Installing a metal casing on a Dutch oven was invented in the Russian Empire by the German designer Utenmark; such systems are often named after him - “Utenmarking”.
Today on the market of heating systems and products for them there is a wide range of ready-made metal casings for Dutch ovens. They are sold in ready-made sizes, so if you decide to use “utenmarking” purchased in a store, you should compare it with the dimensions of the oven in advance. The finished prefabricated metal casings look like this:
Metal casing
If you decided to make a metal casing with your own hands, then the material you can use is a regular galvanized sheet or roofing iron:
It is better to prepare the blanks for installation in advance, having previously made holes for the firebox, valve, vent and door for cleaning
It is important to understand that the masonry is formed by the dimensions of the casing, so take this into account when making it.
Blanks for casing
A sheet of iron is fastened into a round shape using rivets; in extreme cases, the structure can be welded if the thickness of the metal allows this.
Laying and ordering
An important feature in the laying of a Dutch oven is the order of its rows; not every master is ready to undertake the installation of such structures, so the decision to make a round Dutch oven with your own hands is risky. But if you are confident in your skills, then it is important to use a specially invented order of this design
Appearance
In cross-section, a round Dutch oven with a casing looks like this:
Sectional diagram of a round Dutch woman
Features of brick laying
The installation of the casing is carried out simultaneously with the installation of the Dutch. The section of the system, before covering the firebox, is placed in the floor of bricks - that is, the first three rows. Then, using a plumb line and level, the casing is installed - its first, lower ring. The distance between the wall of the case and the masonry is filled with a ready-made semi-liquid clay solution.
Now the firebox is being formed, and it is important to follow the order and bandaging so that the structure has good stability and high efficiency. When the firebox is formed, you can begin laying the subsequent parts of the Dutch system
Front rows
Despite the apparent simplicity of the design, the main thing here is the order of the system; without it, the mason will not be able to install the entire system correctly. The first twelve rows begin like this, the diagram shows the dimensions and entire order of the Dutch woman:
Rows 1-12
From 13 to 29, the row and pipe diagram are shown in the following design order:
Rows 13-29
Rows 30-32
Please note that if one row is folded incorrectly, not to mention more errors, smoke will pour into the house and the system will not be able to function correctly.
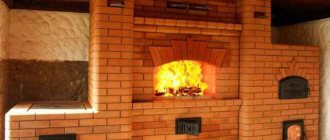
First test firing of the furnace
It is important to carry out the first fire in accordance with certain rules:
- Test heating of the heating system must be carried out after the entire structure, including the masonry and facing mortar, has completely dried. Premature testing of the furnace can lead to cracking of the structure, which will deteriorate its technical characteristics and lead to operational problems.
- The first combustion is carried out using 1/5 of the fuel. First you need to lay down wood chips and shavings, and then you can add larger logs. In this case, all valves and dampers must be open.
Expert opinion Pavel Kruglov Stove maker with 25 years of experience
If you have a thermometer installed, then make sure that the temperature in the system does not reach 600 degrees Celsius - you need to carry out the test firebox carefully, constantly inspecting the entire structure for damage to the system.