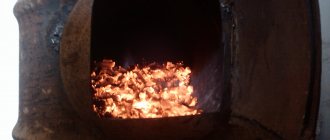
Baby oven made of bricks drawings
Recently, a stove in a garden house is no longer “new”. Amateur gardeners are increasingly building them on their estates and dachas. At the same time, the main requirement for such brick ovens is compactness, which is why the baby oven has become the most popular. Well, besides this, the little stove heats, “cooks” food, and bakes, and is also easy to build! You can build it yourself:
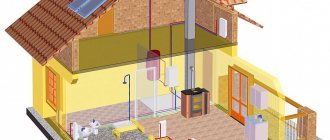
Design of a small oven
The Malyutka cooking and heating stove has a height of 1.9 meters, a width of 0.75 meters, and a depth of 0.63 meters. Its heat output is 1700 kcal/hour! Occupies only 0.47 sq.m. Furnace volume – 0.90 cubic meters. It has a stove with one burner, an oven-cabinet and an extractor hood. It is also equipped with a kindling stroke, used to light the stove after a long period of inactivity + for cooking in the summer (when heating the house is not needed). Through this passage, the heat goes straight into the pipe, without warming up the stove.
This stove also has an oven. It has 2 modes: 1 – when hot gases “approach” it, having previously passed through the revolutions (passes) in the furnace body itself, 2 – when the gases pass to it, passing through the ignition passage, here the temperature of the gases is higher.
Materials for building a stove
Furnace foundation
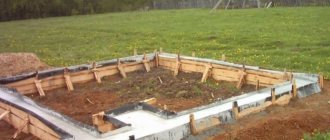
This stove for a baby cottage is built with a foundation! It should be deepened by 50-70cm, and its upper part should be equal to the level of the finished floor. A simpler and more inexpensive foundation is considered to be a rubble-concrete foundation. They do it like this:
First, a foundation pit of 80x65 cm is prepared, and formwork from boards is inserted into it. The inside of the formwork is covered with roofing felt or plywood so that the concrete solution does not ooze through the cracks. Next, layers of broken bricks and rubble stone are laid, and all this is filled with cement mortar. The solution is prepared in proportions 1k3, 1k4. Several layers of roofing felt are laid between the stove and the foundation for waterproofing.
Masonry stove baby
According to this project, a small country stove is installed using a clay-sand mortar. It is prepared in the following proportion: two parts sand to one part clay. Before preparing the solution, the clay must be soaked and the sand must be sifted. We lay the mortar between the bricks in a certain layer - 5-6mm thick. We carry out the masonry with a ligation of ½ brick, or ¼ brick is possible. We check all corners with plumb lines that extend from the nails driven into the ceiling.
Every six rows of masonry, the inside of the stove is wiped down with a wet rag!
After determining the location of the pipe, an opening is made in the ceiling with a fireproof cut in mind. There must be a distance of at least 250mm between the pipe and the wooden floors. Also, do not forget to protect the wall behind the stove if it is wooden. It can be covered with burlap, a 2 cm layer soaked in a clay solution, and a sheet of iron on top. We nail a sheet of iron to the floor in front of the stove to protect against fire.
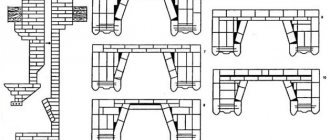
Ordering a baby stove
Rows 1-28 – masonry.
Furnace niche stand (3x3 pipe and 2 plates).
Steam exhaust hood (made of steel 110x930x1).
Furnace niche frame. We connect the parts by welding, screws or rivets. We secure the frame to the wall of the stove with wire, which is laid between the rows of masonry bricks.
Oven/oven. The floor slab is made from a two-burner stove, cut into halves. We close the burner hole that is used for exhaust hood with a valve. We rivet it to the smooth side of the slab itself.
As practice has shown, for a room with a volume of 30 cubic meters. with a double floor, insulated walls and double window frames heated to temperatures of +20°C (with an external temperature of -20°C), you need to burn up to 12 kg of dry firewood in a small stove. And in the next days, with a 2-time fire, it is necessary to burn about 5 kg of wood.
Foundation
For this small stove you will need a base 5-10 cm wider than the size of the future side elements and double waterproofing. The structure must communicate with the wall chimney through a root or cap pipe.
So, to build a foundation you will need to dig a pit to the depth of solid ground. Then it is filled with broken bricks and rubble stones, and the top is filled with M-400 cement in a ratio of 1:5. The base should be completed 1-2 rows to the floor level.
Small stove - the choice of a novice stove maker
The baby brick stove has such a simple design that its laying is really simple. It is almost impossible to screw up its construction, which means that even a beginner in the stove business can cope with this task.
The stove is suitable for home, garden and sauna use.
Features of the “baby”
Already from the name of this model it is clear that its dimensions are more than just modest. For example, the base area is only 0.4 square meters. m. However, the ability of the “baby” to give off and retain heat is very impressive.
The structure is laid out from bricks, which are laid either flat or on an edge. Since its weight is light, there is no need to build a foundation for it. It can be erected directly on a floor made of thick boards fixed to joists.
Built with your own hands, such a stove will replace a potbelly stove. Moreover, the functionality of the “baby” is much more interesting and richer. For example, a hob is additionally installed on it, and if desired, it can be equipped with a fireplace portal, since it has a smoke tooth.
The stove is installed incredibly quickly. Moreover, if you start work in the morning, then in the evening it will be possible to carry out a test fire.
IMPORTANT! For a test fire, use only wood chips and paper to avoid sudden temperature changes that could cause cracks. And before the solution dries completely and is used to melt firewood, you need to wait about a week.
Row after row - and the “baby” is ready!
We offer a detailed diagram and order for the construction of a “baby” stove. In the place where the “baby” will be built, lay a layer of plastic film and roofing felt, covering it all with waterproofing or glassine (78x53 cm). Pour well-dried sand onto this bedding in a layer of about 1 cm. This completes the preparatory work and you can proceed directly to the laying.
The 1st row is laid out directly on the sand base without fastening. For the base of the “baby” you will need 12 bricks, laid strictly level to ensure perfect horizontalness. A thin layer of clay mortar is applied to the top and a blower door wrapped in wet asbestos cardboard or cord is immediately installed. After securing this element, the 2nd row is laid out.
3rd row
it is laid out not with ordinary, but with fireclay bricks. When the row is laid out, a grid of grates is installed on it above the blower.
In the 4th row
bricks are placed on edge. It is important to place a stand inside the chimney, which will serve as an internal partition. In addition, the back part of the stove must be laid without fastening the bricks with mortar, and the building material should protrude slightly beyond the plane of the structure.
The next important step is the installation of the combustion door.
It needs to be wrapped in several turns with asbestos cord. It is important that the door can be opened from both the bottom and the top. Then secure the element with wire and secure it temporarily with two bricks. 5th row
laid out flat with bricks along the contour of the 4th.
6th row
is already laid out with bricks, which are placed on the edge. When the row is completed, the chimney is wiped down with a damp cloth.
In the 7th
the bricks are again laid flat, starting with three-quarters, except for the back wall, which consists of 2 bricks laid edge-on.
8th row
closes the firebox door, and it is laid out with beveled bricks, which will slightly overhang the firebox. This design feature helps to shift the flame to the center of the hob burner when operating the stove simultaneously with the operation of a fireplace with an open firebox.
9th row
slightly shifted back. This is required to keep the door open. Before starting a row, lay down an asbestos cord soaked in water. This will help seal the joints between the hob and the brickwork. If you install the stove directly on clay, this will be a serious mistake, since these materials (cast iron and clay) do not expand equally when the temperature rises.
The 10th row
begins the arrangement of the chimney, which gradually expands backwards. Please note that such a pipe has a displaced center of gravity, so it is necessary to additionally mount a light iron nozzle pipe.
To the 11th row
a valve is installed, which must be sealed with an asbestos cord. A chimney is installed in the quarter, which is connected to a lightweight metal pipe. When moving the pipe to the side, you need to make an overlap of three brick rows.
The final stage before whitewashing is cleaning the chimney of debris and removing excess moisture from there. To do this, remove the knockout bricks from the masonry.
It is recommended to add a little fresh milk and blue to the whitewash. This will protect the structure from yellowing. And the final touch is a plinth, which is nailed to the bottom of the stove so that sand does not spill out from under it.
Malyutka stove
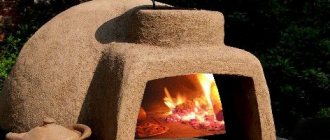
A convenient, beautiful and functional stove is the dream of every summer resident. For all lovers of garden beds or relaxing in the country, the Malyutka stove was invented. Advantages of a baby hearth:
- compact size;
- excellent heat transfer ( 1700 kcal/hour );
- low fuel consumption, you can use low quality wood chips and firewood , which is ideal for a summer residence;
- Cooking;
- quick construction with your own hands: the first kindling can be done a couple of hours after installation (but not for long, with paper or wood chips);
- light weight, the hearth does not require a foundation, but if the stove is larger than the minimum dimensions, then it is better to make a foundation.
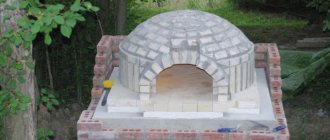
DIY small brick oven
A stove of this type is a compact design that can be conveniently installed in any type of home, from a country house to a year-round home.
The baby is created from environmentally friendly materials, such as red ceramic bricks or fire-resistant fireclay bricks. The Malyutka prototype is a modernized Swedish stove, which, thanks to its design features, can be easily modified; Bell-type prototypes are much less common.
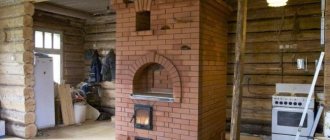
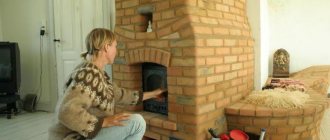
This is what a small oven looks like
The Malyutka brick oven retains only its height from its prototype - the depth and width are easily variable values.
Tools for constructing the furnace must be ready before construction begins.
To create this oven manually, you will need the following tools and materials:
- 210 red bricks or 76 fireclay bricks;
- ordinary or fireclay clay;
- sand;
- firebox doors, blower doors, 2 cleaning doors, 2 view valves;
- roofing material in the amount of 2 sheets;
- metal pre-furnace sheet.
Now we can begin a detailed examination of the construction of the Malyutka stove and its advantages.
Advantages of this type of oven
The baby, which is essentially a mini-fireplace, occupies the minimum area for a heating stove - only 0.4 square meters. meters. It has a simple design that any beginner can assemble, and instead of a whole system of heating channels, it has a fuel cap.
Small ovens have a number of undeniable advantages
A stove of this type does not require a powerful additional foundation , but can easily heat a room of up to 35 square meters. meters. To achieve this effect, in the off-season it can be heated only once a day, and in the cold season - 2 times a day.
The Malyutka stove is economical and can use both firewood, anthracite, coal and other types of filling for its operation.
If the future Malyutka brick stove will be heated exclusively with wood, red brick can be used in its construction, however, only building and fire-resistant bricks are suitable for the construction of the firebox chamber and firebox.
Do-it-yourself Malyutka oven
Before starting the actual construction of the stove, you should consider its location - both adjoining the two external walls of the building and placing it in the center of the room are excluded - due to unreasonable heat loss and ineffective distribution of heated air.
Detailed diagram of a small stove
The little one requires not a powerful, but a good additional foundation . If there is water heating or electric heating under the floor, the entire screed is raised; if there is no screed under the floor, a rectangle of the floor is cut out around the perimeter of the future stove using a grinder with a diamond blade.
A hole is dug 350 mm deep, with the edges as level as possible. A sand cushion 70 mm high is poured into it, which, after filling with water, is left to dry for several days.
The reinforcement sheathing is created from twelve rods with 100-millimeter pitches, welded in two layers crosswise. Next, a lattice that is as identical to it as possible is created. Both of them are fastened with reinforcing bars at the joints - and welded along them.
In the process of making concrete mortar, only M300 cement can provide an optimally strong foundation for Malyutka. The poured foundation must be completed 50 mm before the floor level in order to avoid the formation of a layer of cold air at the bottom of the furnace in the future.
Features of the masonry of the Malyutka stove
Ordering a small stove. Print out the diagram before starting laying.
Preparing for work
In order to build a brick heating and cooking stove with your own hands, first of all, it is necessary to carry out preparatory work. A detailed work plan should be drawn up and a clear sequence of actions should be followed. For example, first of all, you need to find a location for the future stove. Think about where in the house heating is needed most. It is better to place the stove away from the external walls of the house, otherwise the air outside will be heated, and this is not at all advisable. Moreover, the installation must be carried out at a safe distance from the walls, at least 25 cm. In this case, in addition to observing fire safety, air circulation around the heating surfaces of the stove will be improved and heating efficiency will increase. However, it is advisable to prepare the walls and floor next to the future stove with fire-resistant materials. It should be taken into account that the stove chimney should not touch the roof of the house, as this can lead to a fire. The minimum distance between the chimney and wooden floors must be more than 25 cm. To increase fire safety, some developers fill the empty space around the chimney with burlap soaked in clay.
Do-it-yourself brick oven baby
Today, the country has been experiencing enviable stable and unhurried development for a long time. People are already getting used to prosperity and a measured life, so more and more often plots of land are being purchased into private ownership on which light country houses are being built. This allows you to forget about the bustle of the city and relax in the fresh air and, quite possibly, grow your own crops without adding chemicals. But simple houses are not very suitable for living in winter, and even in spring and autumn they are sometimes quite uncomfortable and cool. Each owner independently decides the issue of heating such structures and cooking options in the absence of a centralized gas supply. As an option, you can assemble a baby brick oven with your own hands, which will solve the problems of heating and cooking without spending significant money on it.
Furnace design
First of all, it should be noted that such a stove is somewhat similar to the world-famous potbelly stoves, which have been used for more than 100 years in the most unfavorable and difficult conditions. Because of its design features, it warms up extremely quickly, but accordingly does not retain heat very well, which means that it should not be used as the main source of heating for a home in the winter, but as a stove for cooking and a means of maintaining a comfortable temperatures in the autumn or spring slush, it may even come in handy. (See also: DIY brick oven)
Features of the baby brick oven:
a small amount of building material required to assemble the structure;
quick heating of the oven;
short assembly time, which takes an average of one and a half days for a novice master;
The oven is highly compact, allowing its installation in small spaces.
Choosing materials for a baby stove
To ensure that assembling the stove does not cause any special problems, you must take care of purchasing the necessary building material in advance.
Brick is necessary to assemble the structure itself. It is advisable to use two types of bricks for the stove, so the effect and service life will increase significantly.
Red brick familiar to the average person, no lower than first grade, must be used to make the main body of the furnace.
Fireclay clay bricks, which have a peculiar yellow color with a slight brown tint, are used to create a crucible.
To make the foundation, which is also necessary despite the apparent miniature size of the furnace, you can use natural stone or used reinforced concrete or wooden sleepers. In this case, the wooden sleepers will not fail due to the fact that they are impregnated with a special material that prevents rotting, and since they will be used to make the foundation, the temperature effect on them will be minimal.
Clay – necessary to build the furnace firebox. Due to the fact that raw clay and fired clay have approximately the same coefficient of thermal expansion, when heating a homemade baby stove, the firebox assembled on the basis of a clay solution has less chance of destruction as a result of rapid heating or cooling, because all its elements will expand equally. For the construction of furnaces, it is advisable to use clay of high or medium fat content with the least amount of sand. Such material can be found near the shores of reservoirs.
Cement of a grade of at least 500 will help not only prepare a reliable foundation for the stove made of natural stone, but will also allow you to build its body and chimney. Undoubtedly, clay is more suitable for building a stove, but it is not always possible to get the required amount, so you can make a small brick stove using cement.
Sand - will be needed for preparing clay and cement mortar, and for high-quality masonry it is necessary to first sift it well through a fine mesh to avoid large stones and lumps getting into it.
To make a stove, you will also need metal products that will make the masonry easier and will allow you to create a universal and convenient stove at minimal cost, both in monetary terms and in labor:
cast iron grates are used to ensure a reliable flow of air through the ash pit, as well as to allow spent fuel to spill down in the form of ash;
steel or cast iron doors will give the stove an attractive appearance, and will also protect the ash pan and combustion part from the scattering of sparks and coals during the heating process;
steel valves will help to properly organize the movement of flue gases in different operating modes of the furnace.
When choosing materials, you must rely on a drawing purchased from a construction organization or from open sources. It is advisable to have on hand a plan with a breakdown of the order of the baby stove; this will greatly facilitate its assembly, especially for a novice master.
Furnace assembly
After preparing the building materials and drawings, you can proceed directly to assembling the stove with your own hands.
First you need to prepare a place to start installation. To do this, in the selected room, the required area is marked with chalk, in which the floor covering is completely removed. If necessary, you can use an angle grinder equipped with a cutting disc.
When the floor covering is removed and the work site is cleared of construction debris, holes are prepared using a shovel for laying the foundation. Since the oven is quite small, there is no need to go deep. Railway sleepers or natural stone are placed in the dug pits. When choosing a natural material as the base for the foundation, it must be secured with a cement solution. In this case, there is no need to do step-by-step masonry and fasten each stone separately; it is enough to lay fairly large specimens from below, and fill them on top with a mixture of cement mortar prepared in the proportion of 1 part cement to 2 parts sand, and smaller stones or crushed stone. The solution must be made a little liquid so that it penetrates well between the joints of the stones. After preparing the foundation, it is time to start installing the baby stove; you just need to let it dry for 1-2 days.
After the foundation, it is necessary to pay attention to the order of the future furnace, which will allow the novice master not to get confused when doing the masonry. The ordering itself is a schematic drawing, on which, in addition to the general view of the furnace indicating the breakdown scale, a section of each of the rows is presented. The division into rows is not always tied to a physical row of one brick; basically, the division into order occurs when the internal configuration of the structure changes.
Materials and tools
Red stove brick is the main building material of a small stove.
In order to build a small stove you will need the following materials:
- red stove brick – 60 pcs;
- fireclay brick – 37 pcs;
- clay solution – 20 l;
- blower flap – 1 piece;
- grate – 1 piece;
- fire door – 1 piece;
- cast iron hob – 1 piece;
- valve – 1 pc.
List of required tools when building a furnace:
- a trowel is needed in order to apply and level the solution, and also for cutting seams;
- a pick hammer is needed to chop and sift bricks;
- a level is needed to control the horizontalness of the masonry;
- a plumb line (weight with a cord) is needed to check the verticality of the corners and planes of the masonry;
- the rule (a wooden ruler with a cross-section of 1.5x6 cm and a length of 1-1.5 m, having parallel planes) is necessary in order to monitor the straightness and horizontality of the masonry (for this, a level is placed on it);
- steel m or tape measure.
Baby brick oven
For heating temporary, seasonal or periodically used residential and outbuildings, the best option is an improved modification of the Swedish stove, which received its own name in Russia: the “baby” stove. The “baby” owes its name to its more than modest dimensions, which can be only 750x630 mm, with an arbitrary height, which, however, is not recommended above 2200 mm.
What is this article about?
Drawing with order
Designed by the famous stove master of the last century, V. Volodin, the combined heating and cooking stove-baby, with a minimum occupied space of 0.47 m2, allows not only to fully heat a room of 30 m2, but also:
- Cook ;
- Dry vegetables, berries, mushrooms, herbs;
- Use for drying clothes and shoes.
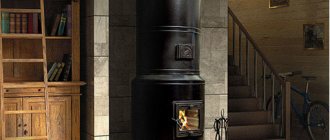
A distinctive feature of the design is a separate hood for the brewing compartment. The smell from cooking food or drying clothes does not penetrate into the room.
The stove is not very economical in fuel consumption (based on firewood) - 4–5 kg per firebox. Capable of retaining heat and maintaining a comfortable room temperature for 6–8 hours.
The finished oven looks like this:
Choosing a location for the oven
Despite its very modest size, the stove is ideal for heating rooms with an area of 14–50 m2. It cannot be called the most economical in terms of fuel consumption, but 3.5–5 kg of solid fuel is usually enough for the stove to fully warm up and begin to heat the room.
Such an oven heats up evenly on all 4 sides. This must be taken into account when choosing the place where it will be installed. In wooden buildings with fire-protected walls, the distance from the stove to the wall of the house should not be less than half a meter. And also you should not install the stove in the center of the room. With such an installation, the circulation of heated air will be extremely unfavorable, and the corners of the room will freeze.
The best option is to install the stove to the right or left of the front door, at a distance of at least 0.5 m from the door jamb. In this case, the cold air entering through the door will not spread along the floor across the entire area of the room and create dangerous drafts.
Material for construction
Depending on the area of the room and the functional purpose of the small stove: heating, heating-cooking, or a stove with a heater for a bath/sauna, the number of red ceramic bricks can vary from 210 to 370 pieces. Fireclay bricks (for laying out the firebox) may require from 16 to 73 pcs. – also, depending on the project.
In addition to the brick you will need:
- Fireclay clay (fireproof) or red local clay – 50 kg;
- Construction sand – 10–15 buckets;
- Doors for the blower and firebox;
- Grate;
- Valves – 2 pcs;
- Reinforcing rod (d 8–10 mm) – 10 linear meters;
- Cement grade M 300-M 400 – 1 bag;
- Ruberoid – 1 linear meters;
- If the stove is planned to be improved - plastered or tiled - the need for finishing material is calculated based on the area of the external walls of the finished stove.
Tool
A small stove is extremely simple to install, so any owner of a building can try himself as a stove maker. You just need to stock up on some simple tools in advance:
- Pickaxe;
- Hammer;
- Level ;
- Plumb;
- Trowel;
- Trowel - for external corners;
- The rule.
The skills of chipping a brick of the required length or chipping it at an angle come with experience. Therefore, in order not to experiment and not waste bricks purchased individually, it is better to use an angle grinder (grinder) with a disc for brick or concrete. This will allow you to get perfectly even workpieces, and not have to worry about trimming protruding uneven ends.
Foundation structure
Despite its modest size and light weight, a small stove requires a foundation. It can be done unburdened - just remove the fertile layer of soil.
But, it is imperative to bring the cement pouring plane “horizontally”. This is important because the furnace support area is very small: from 0.47 to 1 m2. At a height of 2000 - 2200 mm, the slightest misalignment of the base can lead to the collapse of the stove.
The arrangement sequence is extremely simple:
- A hole is dug, 300=450 mm deep. The perimeter of the pit should exceed the perimeter of the furnace by 100 - 150 mm.
- A layer of sand 100–150 mm thick is poured onto the bottom.
- The sand is moistened and compacted.
- The next layer is broken brick or construction waste (stone) – 200–250 mm.
- The top layer is fine crushed stone (fraction 5–20 mm).
- After this, formwork is arranged (plywood, boards, slate, drywall scraps, metal sheets) - whatever you can find. The height of the formwork should be 50 mm higher than the level of the finished floor, so that there is no leakage of cold air from the subfloor.
- Pre-cut reinforcement bars are laid out on the crushed stone and fastened with annealed steel wire or welding.
- The solution for pouring is prepared from a cement-sand-crushed stone mixture in the proportion: 1: 1.6: 3.2. After pouring, the foundation slab is allowed to “mature”. In the first week after pouring, the surface is moistened by covering it with sackcloth or burlap, and watering it with water as the fabric dries. At the end of the first week, the fabric can be removed and the surface of the foundation slab can be covered with polyethylene or roofing felt.
Full strength gain occurs 30 days after pouring.
Masonry
Before starting masonry, do not forget to cover the concrete foundation slab with sheets of roofing felt, placing them crosswise. The edges of the roofing material should protrude beyond the perimeter of the foundation by at least 50 mm.
The layout of each subsequent row is done “dry” - i.e. laid out in accordance with the diagram. If necessary, the brick is chipped or cut with a grinder. Only after this the solution is applied and placed in place.
Given the simplicity of the design, even an inexperienced craftsman will take 1–2 days to lay a small stove.
A small stove is the most economical option for creating comfortable conditions in a room not used for permanent residence.