With all due respect to folk craftsmen, it should be noted that the traditional Russian stove, which has warmed more than one generation during the most severe frosts, does have its drawbacks. They lie in the fact that the structure is too massive and cannot be installed in small spaces.
The chimney device allows warm air to move through the channels, gradually rising upward. As a result, the bottom of the oven remains cold. Considering that the thermal conductivity of air is low, it is easy to guess that the heat in the room will be concentrated mainly in the upper part.
Since modern conditions have not ruled out stove heating, and in some cases owners want to have a real stove in their home, despite the availability of means for more efficient heating, we had to correct the shortcomings and take care of reducing the size of the structure.
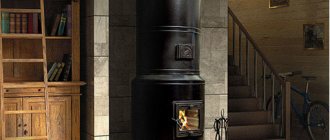
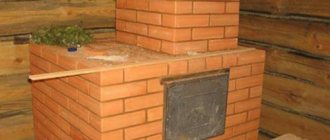
Stove in the house
Features of the Podgorodnikov model
The main idea of the author of the modernized design, which is also known as the “Russian teplushka stove,” is to make the lower part of the stove, traditionally considered cold, in the form of a part of the chimney. This part is called the lower chamber. Smoke can enter it through small holes in the hearth.
There are two ways to heat a Podgorodnikov stove:
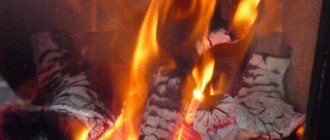
- The first is that the fire is melted in a large firebox - a crucible; this method is considered traditional, since it was used in Russian stoves. Before cooking, it was necessary to heat the stove, collect the coals, and only then put porridge or soup on the stove. Until now, this method is called “in Russian”.
- The second method is implemented in a closed firebox with a grate; this firebox is covered on top with a hob with two burners. A distinctive feature of the model is that the stove plays the role of a shelf in front of the furnace.
Good to know: How to build a baby brick oven, from foundation to masonry
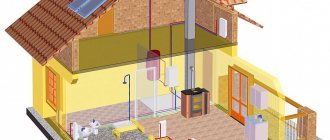
The gas exhaust system is designed in such a way that, regardless of which firebox had to be heated, warm air enters the lower chamber, warming up the stove body, and if the stove is heated from a large firebox, the stove will also heat up. This feature allows you to save fuel and obtain a high output efficiency value. The Russian stove housekeeper can be used in winter for heating or in summer for cooking. Moreover, in summer mode, the damper blocks the path to the lower chamber and smoke from the firebox goes directly into the chimney.
Popular stove project
The process of building a Russian heated carriage Podgorodnikova I.S.
Russian stove “Teplushka” Podgorodnikova I.S. fourth generation.
We once received an offer from a customer to build a large Russian stove “Teplushka” so that he could cook in it, bake bread, dry herbs, mushrooms and berries on a significant scale and for a long time after heating it. There must be a large bed, since the person is large, and one more wish is that it warms up completely from bottom to top and heats the room. The stove was planned for further finishing, plastering and partial insertion of tiles.
We studied the experience of the famous stove maker Alexander Batsulin in the construction of heated houses of various generations. We thought about it, designed it, and made our own changes.
And we present to your attention a photo report on the laying of a fourth-generation heated vehicle.
Materials for laying the furnace: Red brick Vitebsk workshop No. 1 - 1350 pcs. Fireproof brick ShB-8 – 250 pcs. Fireproof brick ShB-6 – 100 pcs. Fireproof plate ШБ-94 – 3 pcs. Russian stove roof slabs (Wolfshäuer Tonwerke GmbH & Ko.) Mortar for laying refractories NKM.Wolfshäuer Tonwerke GmbH & Ko.
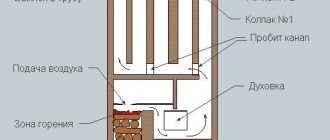
Diagram of gas movement in the Teplushka furnace.
a: Stove firebox. b: Hailo from the firebox to the crucible (cooking chamber). c: Channels from the cooking chamber to the heating chamber. d: Columns supporting the stoves. e: Under the stove. f: Furnace mouth. g: Smoke trap valve. h: Gas path valve from the lower chamber. i: Blower door and ash pan. J: Furnace pipe. Red arrows – gas flow during combustion through the firebox. Orange arrows - gas flow during Russian combustion. Blue arrow – incoming air.
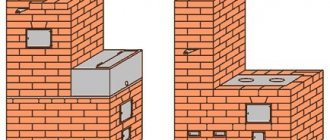
The main firebox of the Russian stove designed by Podgorodnikov is located in one of the corners of the stove, from there the flue gases (FG) are directed under the arch, which is heated. Next, through the holes along the edges of the hearth, the diesel generators go into the lower heating chamber. The furnace chimney starts from the very bottom of the chamber - as a result, the lower zone of the furnace heats up well, and the overall efficiency of the furnace improves. The stove can also be heated like an ordinary Russian stove, burning wood on a hearth in a crucible. This is useful if there is no need to heat the room, but you need to cook food or bake bread. When firing “Russian style”, the blower and combustion doors must be closed, the valve (h) is closed, and the smoke collector valve (g) is open.
1. The first rows of the outer masonry of the furnace. We install cleaning doors and a vent. The size of the stove in terms of 6 by 8 bricks or 1.53 by 2.08 m.
2. We formed two underflow channels, built the walls of the firebox and internal supporting heat-storage partitions.
3. Fold the firebox, separating it from the outer masonry using basalt cardboard. The fire door was installed using stainless steel angles secured to the door with steel rivets.
4. We line the walls of the lower heating chamber (inner fireclay core) separated from the outer masonry of the furnace, laying basalt cardboard everywhere.
5. Lay the first row of the oven floor.
6. The stove floor is covered with red brick only for aesthetic reasons.
7. Lay under the stove, second row. The firebox is closed and the discharged grate is laid. Gas drains are left on the sides for the passage of flue gases into the lower heating chamber.
8. Firebox, view from the inside.
9. We have finished laying the hearth and firebox under the stoves; we only do not line the overflow channel, due to the lack of high temperatures in it. We try on the roof slabs in place to determine the width of the gas drain overlap.
10. We blocked the gas outlets and received support platforms for installing the vaults. Gradually raise the outer walls.
11. The arches have been completed, the inner one is arched, and the outer one is circular with a forward outlet; it will remain brick after plastering the stove.
12. We make the lining of the upper chamber. We lay basalt cardboard in the gap between the lining and the outer wall.
13. Inside the upper chamber we install prefabricated vaults from the German company Wolfshäuer Tonwerke GmbH & Ko.
14. They erected the back wall, and it turned out to be such a big crucible.
15. A backfill of sand was made on top of the furnace roof to increase heat capacity.
16. We cover the bed with two rows of bricks along the steel corners.
17. In the smoke chamber under the valve we install a brass samovar made by craftsmen to individual sizes.
18. The process of installing a samovar.
19. We continue to raise the smoke collector and install two valves in it.
20. After the smoke collector and installation of the valves, we raise the bur to collect the flue gases and move them into the chimney.
21. We blocked the hog and installed a ceramic pipe sleeve. We use a ceramic modular chimney from the German company Schidel for the stove. Pipe diameter 250 mm.
22. The stove was folded; 60 mm thick soapstone slabs were additionally laid on the stove bench.
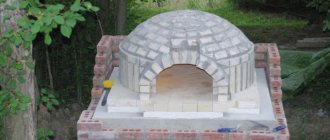
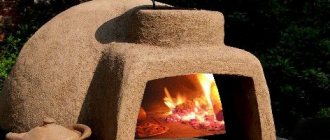
23. This is how the stove turned out, let’s heat it slowly. She will be finishing soon.
24. This is how the stove will look in the interior after finishing.
Ready oven
Construction
The Russian housekeeper stove is not the simplest device, but it is quite accessible for DIY construction. A high-quality order with a description of each step will allow even a novice master to complete all the work without any problems. The difficulty is to understand how the stove works, the features of the device, and the purpose of each component. The 4th generation Podgorodnikov furnace is complicated only by the fact that a chamber with bottom heating appears in the path of gases. In other respects, the circuit diagram corresponds to the classics. The key elements include a small firebox, a large firebox, an ash pan, grates, cleaning doors, a hob, a vault, and under.
The ordering scheme is not difficult to find in an accessible form. There are ready-made projects in which all the preparatory stages are described, calculations and financial costs are made. It should be noted that there are several options for constructing a heated house. They have minor differences, but the project cannot be disassembled, since the circuits are not interchangeable.
Ordinal laying of Podgorodnikov's stove
- Row 1 is the base of the future oven. It is enough to cover only the outer perimeter with facing bricks. The inside can be filled with halves or smaller pieces of red brick.
- Row 2. The outer walls are performed with mandatory dressing. You can observe the appearance of the channels of the lower chamber. The resulting opening will be used to install the blower door.
- Row 3-4. Since the project was created on the basis of the author’s rich experience, all design features are determined by a certain theory. It is not always appropriate to provide this theory in a project. So, for certain reasons, some corners in the channel of the lower chamber are made rounded. A zone is separated that will act as an ash pit.
- Row 5-7. Preparations begin to block the canal. In row 7 it is already blocked.
- Row 8. The wall is tilted by cutting off the edges of the bricks located above the ash pit. The grate is installed. It is important to take into account the thermal expansion of the metal, so you should leave a small gap between the grating and the masonry.
- 9 row. In the back of the firebox, the bricks also have hewn edges. This procedure is performed so that the fuel, after loading, is distributed on the grate. Doors are being installed.
- Row 10-12. The water-heating box is closed, and the walls of the cooking chamber begin to form, creating a large firebox.
- Row 13-16. The cooking chamber has a characteristic arch. It is made of bricks laid on edge. The inward tilt is provided by small brick wedges.
- Row 17. The construction of the vault is being completed. For more convenient work, formwork can be installed before forming the arch. If it cannot be removed after completion of the work, it will burn safely during the first kindling.
Good to know: How a convection oven is used to heat a house, what types it comes in
The formation of the chimney does not require comments, so we will not describe these steps.
Podgorodnikov two-bell furnaces: Design features
This device, also known as the Russian teplushka stove, has advantages over other heating devices. The main idea of its author was to make the cold lower chamber part of the chimney. Smoke enters it through holes located in the hearth.
This design is more compact than a traditional Russian stove. Thanks to its technical features, it is able to heat the entire room evenly, while the air in the lower part of the room with a conventional stove remains cold.
Materials used
Simplifying the design of a Russian stove does not affect the requirements for materials that will be used in construction. The outer cladding and body of the body are made of refractory brick. Only the surface of contact with the open fire is covered with basalt cardboard. If it is possible to process bricks by making cuts in the longitudinal direction, then it is better to use fireclay bricks. The temperature in the lower chamber, although quite high, does not require the use of special heat-resistant materials.
Successful brick buildings
Stove masonry, regardless of the model of the device, is made using a solution consisting of clay and sand. The dosage depends on the fat content of the clay. To determine it without special instruments, you will need to use folk wisdom. We will not list them, since today there are many options for ready-made mixtures intended for furnace work on sale. All proportions have already been taken into account and composite materials have been added that improve the adhesion and strength of the resulting solution.
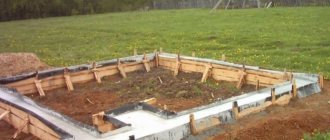
A solid foundation will be formed only with the help of concrete mortar. It is allowed to use filling in the form of stone, concrete blocks, bricks. Crushed stone is poured only in the form of a cushion at the bottom of the pit.
Don’t forget about metal products, which should be purchased in advance so as not to stop the construction process. These are doors for the firebox, grate bars, valves and views, and a hob. If you have a choice between steel and cast iron structures, then you should choose cast iron, as they will increase the efficiency of heat extraction and transfer to the furnace walls.
OVEN “TEPLUSHKA-15” SIZE 129X129 CM
All sections of the furnace are given in Figures 35, 36 and 37,
Drawings of masonry rows
Brick laying in rows is shown in Figure 38. -
SKETCH OPTIONS OF “TEPLUSHEKS”
, "Teplushka-3". In some letters, stove makers asked for a design for a lower stove than “Tep-Lushka-2” for houses with a ceiling height of 2 m. For such cases, a “Teplushka-3” stove with a height of 140 cm is recommended. The height above the stove is 60 cm. allows you to use the platform on the stove for different needs. Sections and laying of the main rows are given in Figures 39, 40.
Rice. 35. Sections of the Russian stove “Teplushka-15” measuring 154×141 cm. (Dimensions in cm)
7 I. S. Podgorodnikov
| Rice. 37. Section B - B laying of the second row of the Teplushka-15 stove measuring 154x141 cm with a pipe on the right. (Dimensions in cm) |
Rice. 35. (Continued)
Rice. 36. Laying the firebox of the Teplushka-15 stove measuring 154x141 cm for different types of fuel:
a - firewood and peat; b
- for Moscow region coal;
c
- for anthracite and coal. (Dimensions in cm)
“Teplushka-3”, unlike “Teplushka-4”, has only two valves: one for the stove, the other for ventilation above the stove. The pipe is covered with a view. The installation of this stove is very simple. The holes for the exit of flue gases from the cooking chamber into the heating chamber are made in the hearth. Laying the walls of the cooking chamber with a thickness of 1 brick begins from the fourth row above the hearth. As a result, the usable hearth area increases. “Teplushka-3” can also be easily adapted for firing “Russian style”. To do this, the holes in the hearth are filled with brick plugs, and a removable grate with a length of 30 cm is installed across the combustion hole 26 cm wide.
7* • 99
Rice. 38. Layers 1... 33 rows of the Teplushka-15 furnace. size 154x follow the cut 3
- 3 (Fig. 36) for the corresponding
X141 cm. When installing the grate in the sixth row of the fuel type. (Dimensions in cm)
Rice. 38. (Continued)
Rice. 38. (Continued)
Rice. 38. (Continued)
If, when laying the stove, you provide a nest so that the grate lies level with the hearth, then you can also use the area of the combustion holes to install pots. The entire floor will be adapted for summer operation of the stove “in Russian style” with firewood stacked on it. Thus, it is possible to increase the size of the hearth without changing the size of the furnace.
Absence of a valve in Teplushka-3 6,
available in Teplushka-2 can cause the stove to smoke when lighting. Therefore, the stove is lit with the damper open, releasing smoke into the chimney through the mouth of the stove and the ventilation valve above the stove. When the pipe warms up somewhat and a draft arises in it, close the mouth of the furnace with a damper. A sufficient vacuum is created in the furnace, the smoke is sucked down the chimney into the heating chamber and removed outside.
The stove in Teplushka-3 is fired with the damper closed, because the chimney sucks not only flue gases from under the stove, but also air from the cooking chamber, which weakens the draft of the chimney.
"Teplushka-5". In Teplushka-5 (Fig. 41), valve 19
“Teplushka-4”, through the opening of which flue gases from under the stove were directed to heat the common chamber of the furnace. This simplified the stove firebox. Otherwise, Teplushka-5 has the same device as Teplushka-4.
Rice. 39. Sections of the Russian stove “Teplushka-3”. (Dimensions in cm)
| Rice. 40. Masonry of rows 1, 2 and 11 of the Teplush-ka-3 stove. The sections are shown in Figure 39. (Dimensions in cm) |
You can heat the common oven chamber from the stove without a valve 19.
To do this, you need to place the undercoat “a” above the undercoat
“b”
in the chimney (Fig. 42,/).
When the valve 23
, under the action of the chimney, fall down to the underside “a”.
Here they pour into the common chamber of the furnace, rise in it to the very roof, cool, become heavier, fall down to the level of the folds “e” or “b” and go into the pipe (see Fig. 41, L - A).
The movement of gases occurs as shown in Figure 42,/.
Below, at the level of the undercuts “a” and “b”
of the chimney, two counter-movements of gases occur: above - “the movement of hot gases from under the stove through the underpass, spreading
“a”
into the common chamber of the furnace; below - the counter-movement of gases through the “b” inlet into the chimney.
A similar movement can be observed at the mouth of an ordinary Russian stove; at the top - under the gas outlet "a" -
Fig.-41. Sections of the Russian stove “Teplushka-5”: c, b, c
- tucks. (Dimensions in cm)
the movement of hot gases from the furnace into the chimney, and below it - the movement of cold air into the furnace (Fig. 42,//).
By placing the folds “a” and “b” at different heights (see Fig. 41, L - A)
and using the principle of gas movement in a conventional Russian stove, we obtain heating of the common chamber of the stove when firing the stove without the help of a valve
19.
When burning the stove in summer, gases are released directly into the chimney through the valve
23.
The stove is heated with the valve closed
12.
Laying the main rows of the Teplushka stove -5" is shown in Figure 43.
"Teplushka-6". This stove differs from the Tep-Lushki-4 stove in the presence of an oven. General chamber
| Rice. 44. Sections of the Russian stove “Teplushka-6”: a and b - folds. (Dimensions in cm) |
Rice. 42. Schemes of the movement of flue gases for heating, the general chamber of the Teplushka-5 furnace (/) and during the combustion of an ordinary Russian furnace (II):
| Rice. 43. Masonry of rows 1, 2 and 13 of the Teplushka-5 stove. Sections are shown in Figure 41. (Dimensions in cm) |
a, b
- tucks
The oven is made like the chambers in “Tep-lushka-2” and “Tep-lushka-4” (Fig. 44). The structure of the stove is shown in Figure 44, L - A.
The figure shows that the flue
“b”
of the chimney is located above the flue “a” of the furnace chamber, so the hot gases from under the stove drop only to the level of the chimney and gas outlet “b”.
Having dropped to level “b”,
the gases go into the chimney, and the entire space from the stove to the gas outlet “b” is filled with hot gases.
The oven is thus immersed in a “hot bath” of flue gases. If you need to reduce or eliminate the heating of the oven, open valve 23.
| Rice. 45. Masonry of rows 1, 2 and 13 of the Teplushka-b stove. Sections are given in Figure 44. (Dimensions in cm) |
If you want to use warm gases from under the stove to heat the common oven chamber, close the valves «18
and
23
and open valve
6.
Then the gases from under the stove drop to the “a” valve, draining
are placed into the common chamber of the furnace and through a hole closed by a valve 6,
drain into the chimney.
The masonry of the main rows of Teplushka-6 is shown in Figure 45.
| Rice. 46. Sections of the Russian stove “Teplushka-7” |
"Teplushka-7". The designs of the Teplushka-7 stove, shown in Figure 46, make it possible to increase the heating surface for a room that needs increased heat flow. On the side of the stove (Fig. 46,/)
Rice. 46. (Continued)
there is a movement of hot gases in a heating oven.
Cold heavy air leaking into the stove through leaks in the doors passes into the pipe, overflowing over the threshold of the firebox 8,
bypassing hoods
2
and 5, filled with hot light air, pressing against the ceiling with a force equal to the excess of the weight of the outside air in the volume of the hood over the weight of the hot air filling it. Thus, hot air does not let heavy cold air into the hood, that is, the oven has a kind of automatic view. The efficiency of the furnace is 80%.
The lower hood absorbs 80%, and the upper hood absorbs 20% of all heat accumulated by the stove. Consequently, almost all the heat is transferred to the lower layers of air. The temperature difference between the floor and ceiling is 2... 4 °C.
or in the rear part (Fig. 46,//) a heating shield is installed 29.
Part of the hot gases from the cooking chamber is directed first to the heating shield and then to the underfloor heating chamber.
⇐ Previous5Next ⇒
Recommended pages:
Features of operation
If the housekeeper stove operates in the proper mode, this will ensure its long service life and efficient performance of its main task.
The stove is not designed for simultaneous operation of both fireboxes. The firebox door must be closed when not in use. You should not allow ash to accumulate; it is better to make it a rule to clean the ash pan before each kindling.
To cook food, you do not need to wait for the wood to burn completely, but you should not start immediately after kindling. You need to wait until the oven warms up, this usually takes about 10 minutes. Another rule that applies to all stoves is to periodically check the condition of the masonry for the absence of cracks and crevices. If these recommendations are followed, Podgorodnikov’s stove will provide high-quality heating for a small house.
Brief biography of the creator
Hot stoves have been used to heat country houses for almost 100 years. Their creator I. S. Podgorodnikov was born in the city of Mogilev (Belarus), in 1886, into the family of a mechanic. After graduating from a real school, he entered the Technological Institute in St. Petersburg. After receiving a higher education diploma, Podgorodnikov got a job at the Putilov Shipyard.
During the revolution, the engineer tried to emigrate to Europe. It was difficult to do this then. To leave Russia, Podgorodnikov decided to walk to Crimea and try to board a ship. However, on the way, the engineer was detained by Red Army soldiers on suspicion of being a Denikin spy. Having found out that Podgorodnikov had nothing to do with the whites, he was simply taken out onto the road and released.
After this, Podgorodnikov changed his mind about traveling to Europe at risk to his life. Not believing his release, he went to Crimea, where he later married and got a job as a technician at a paper factory.
Even during his wanderings around the Central and southern parts of Russia for the purpose of emigration, Podgorodnikov drew attention to some imperfections of Russian stoves popular among peasants at that time. As an analytical person, he began to think about how to eliminate the shortcomings of such equipment.
Subsequently, Podgorodnikov shared his findings on this issue with Grum-Grzhimailo, an outstanding metallurgical engineer. Soon after this, he received an invitation to join one of the Moscow design institutes. Subsequently, Podgorodnikov’s main professional activity was the design of metal furnaces. However, in his free time he still continued to make bricks. The result of his efforts ultimately became a convenient and economical heating stove. Subsequently, it was this, essentially handicraft, model that won the enormous sympathy of the common people.