Brick oven
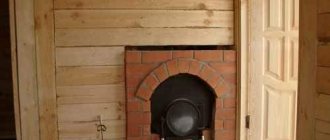
The brick kiln is still in demand by people. Some populated areas are not gasified and a stove in a residential building is necessary. Sometimes it is an additional source of heat in order to save gas or electric heating.
In a country house you can not only spend the summer, but also celebrate New Year, Christmas and other holidays - romantic, unusual and healthy. A simple stove or fireplace will create comfort in the house; you will want to be at the dacha on weekends, sitting comfortably in the warmth.
When installing the stove, a number of conditions must be observed. In addition to choosing the correct design, installation location, components and materials, you need to understand what stoves are coated with so that they do not crack or crumble. A responsible attitude to the work at the construction stage of the building itself and the use of appropriate quality materials does not lead to cracks in bricks and finishing materials.
What is the best way to cover the cracks in the stove between the bricks and the stove?
As a rule, the stove complex in a residential building includes the presence of metal inserts - doors or stoves. Masonry and metal differ in their coefficient of thermal expansion, which can cause destruction of the integrity of the structure. The following are suitable for repairing damage:
- Fireclay clay – it has good fire-resistant properties.
- Adhesive designed for working with stoves, hearths and fireplaces. The thermal indicators of the solution indicate possible heating up to 1000 °C.
- There are special grouts for eliminating cracks in the oven between the bricks.
- A solution based on clay and sand. Suitable for those who prefer to control the production of grouting material themselves.
On a note!
When choosing a particular solution, it is recommended to carefully study its properties, especially fire resistance characteristics and expansion level.
Exterior finishing of stoves
You can increase heat transfer, hide minor deformations and give the stove a more aesthetic appearance by plastering or tiling.
Plastering is the most common; it is possible after settling and complete drying of the masonry.
Important! The walls of the oven intended for plastering should not be dirty and smooth; the solution will not have the necessary adhesion to them. The plastered surface will have defects after drying.
Tiling gives an elegant look and protects the room from the penetration of flue gases when small cracks appear in the masonry.
How to cover the cracks in the stove between the bricks in the house
The home hearth is used for heating and cooking. To maintain the required temperatures and ensure safe use of the oven, all defects must be eliminated. For this purpose use:
- In some cases, experts recommend tiling the stove.
- Complete plastering of home surfaces. Stove makers advise laying a metal mesh with small cells between the brickwork and the layer of plaster.
- Coating cracks with clay mortar. Ideally, use the one that was used for masonry.
Timely, high-quality repairs are the key to long-term use of the stove and maintaining the safety of residents. It must be performed when the first defects appear.
What causes cracks
When malfunctions of the furnace equipment are discovered during use, the first thought that arises is: the furnace is cracking, what should I do? To begin with, it doesn’t hurt to figure out what led to this.
The following factors may be the reasons:
- donkey foundation or structure itself;
- unscrupulous craftsmen and unprofessional work;
- low quality material or unsuitable mortar for masonry or plastering was used;
- the drying process of the masonry is disrupted;
- long heating breaks, sudden temperature changes;
- the technology was not followed when applying each layer during plastering;
- The ventilation system is faulty, condensation.
Note!
Chipboard: what is it? Types, application features, photos, sizes, thickness, explanation, manufacturers
DIY houses made from shipping containers step by step: instructions, diagrams, pros and cons, photos, design
Working pressure in the heating system in a private house: what it should be, how to create it, instructions for adjusting it yourself
Is it possible to use a stove with cracks?
There is only one answer to this question: it is prohibited. Do not use a stove with cracks and endanger people’s lives. If there are no structural defects, it is necessary to begin troubleshooting as soon as possible.
Important! Fires in most cases result in death due to carbon monoxide released, not fire.
How to cover the stove so that it does not crack from the heat?
To prevent the stove from cracking in the house, it is necessary to responsibly carry out the work during the construction of the building. The main causes of the malfunction are laid down at this stage. But if the problem has already arisen, it is important to resolve it promptly. How and how to do this, you will learn about this in the article.
First you need to understand why cracks are spreading along the wall of the stove.
Reasons for appearance
Before properly and reliably caulking the stove, in order to prevent repeated malfunctions, you need to know what can affect the integrity of the stove coating:
- during a long break in heating the house and sudden temperature changes;
- the furnace was laid using low-quality mortar;
- Perhaps the reason is the settlement of the building or foundation. In this case, it will be necessary to carry out major repairs to the foundation, increasing its size and strength;
- after laying the stove, the process of normal drying of surfaces was disrupted;
- when plastering the stove, a low-quality solution was used or a thick or very thin layer was applied;
- Perhaps the reason is faulty ventilation and condensation deposited on the walls of the furnace.
Is it possible to use a stove with cracks?
The answer to this question is unequivocal - you will need to cover up a faulty, smoking stove immediately; it is not recommended to use it. Such requirements are explained not by a violation of the appearance of the walls, but by cracks that allow carbon monoxide to enter the room. Poisoning from combustion waste can lead to dire consequences.
Firefighter statistics show that most people die in a fire because of the gas, and not from the fire.
Damage diagnostics
Therefore, at the first sign of smoke in the house, you will need to do the following:
- diagnose the furnace surfaces and find the fault;
- after this, immediately prepare a solution or buy ready-made material for filling cracks;
- cover the walls and plaster them again.
But first of all, diagnostics will help determine the size of damaged surfaces and the approximate amount of materials to be repaired. If the mortar has simply cracked due to high temperatures, you simply need to remove the layer of plaster and apply a new layer of high-quality materials.
It’s worse if the cracks are through and continue to expand after the work has been done. In this case, it may be necessary to call specialists to identify the causes and lay a new stove. Stone stoves are a complex structure, so you shouldn’t try to lay it out from a book; it’s better to entrust this work to an experienced stove maker.
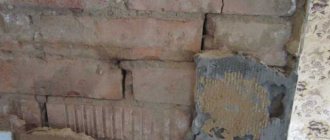
Such cracks can no longer be simply covered up
In this example, you shouldn’t cover it up either. The brick was badly cracked.
If the cracks are small and their size does not increase, you can begin to troubleshoot the problem yourself. To do this, it is important to prepare a high-quality solution and apply it correctly to the wall. How to cover up cracks in a stove so that it does not crack from the heat - knowledge of the basic materials for making the mortar will help in this matter.
Examples of small cracks:
Example 1
Example 2
Example 3
How to cover up cracks?
For these purposes, you can use several options that will reliably seal cracks in the walls and prevent gas from escaping into the room. Let's look at each method in more detail.
Fireclay clay
Before you cover cracks in the stove with fireclay clay, you need to know its advantages:
- the material is resistant to temperature during fuel combustion;
- high level of vapor permeability;
- resistant to moisture when heated;
- environmentally friendly material, safe for humans and animals, therefore can be used in residential premises.
To make the solution you will need to mix several ingredients:
- 1 part cement grade 500;
- 2 parts fireclay clay"
- 7 parts river sand.
The solution is mixed well and water is added. The consistency depends on the skill and type of work, but you should not make it very liquid or thick. To get rid of stones and lumps, the clay can first be soaked in water for several hours and the lumps of material can be crushed, and the cement and sand can be sifted. Such a solution will be plastic and laid on the surface in an even layer.
Plastering walls is easy if you have a certain skill. To do this, it is important to install beacons and, distributing the solution, level the layer on the wall. You will need to prepare a trowel and spatula, the size of which depends on the surface area.
Clay and sand
This is the most affordable, inexpensive solution for plastering surfaces. Such a solution for the oven has sufficient plasticity and is not subject to destruction under the influence of high temperatures.
It’s easy to prepare the solution for use; for this you will need:
- prepare a large trough in advance, add the required amount of clay and completely fill the layer with water. For 1 bucket of clay, pour 3 buckets of water. The clay should soak for 24 hours;
- then mix the solution and add more water to it. We pass the slurry through a sieve, get rid of lumps and let the solution settle;
- drain the excess water, making the solution as thick as homemade sour cream;
- add river sand in a 1 to 1 ratio and mix the solution.
Important! At this time, you can determine the quality of the solution. Having lowered the shovel holder into it, and seeing the adhering clay, in this case you will need to add a little sand. Only after seeing small clumps of sand and clay solution on the holder can you start plastering the walls of the stove.
With this solution it is necessary to repair all cracks that appear, after wetting the surfaces and then plastering the stove in several layers. In villages, they still use the old method, adding horse manure to the prepared solution. This solution is obtained with increased thermal insulation properties. Hay plays the role of air layers that prevent the free passage of heat.
Grout
This oven putty is sold ready-made, but it’s easy to make yourself. The main advantage of this material is the ability to retain its properties even when heated to 10,000. Industrial materials are used for arranging and repairing stoves and fireplaces, but the price of such grout is high, so home craftsmen do it with their own hands.
The mixture for coating the oven is made in several stages:
- knead large lumps of clay and pour it into a trough;
- fill it with water and leave for 10-12 hours;
- pour part of the sand into the soaked clay, maintaining a ratio of 1 to 4, mix the solution well, adding 5 parts of chopped straw in small portions;
- Add 1 kg of coarse table salt to the finished putty and finally mix the solution.
The finished grout can be used to fill gaps between bricks, crevices, cracks and complete the first rough layer of plaster.
Furnace glue
In order to repair a cracked stove, you can buy heat-resistant special glue at a hardware store. Due to its properties, it is not exposed to high temperatures for a long time. It consists of the addition of fireclay clay and cements with high fire-resistant properties.
A plastic and hard adhesive mixture is produced. Using hard materials, the surfaces of the stoves are plastered. Plastic glue is used to fill cracks and seams between bricks.
When using this material, you must follow the instructions when diluting and using the heat-resistant substance. You should not make it in large portions; it dries out quickly and becomes unsuitable for work.
How to properly coat a stove?
In order to reliably cover the cracks in a brick kiln, work is carried out in several stages:
- For large cracks, you will need to completely remove the layer of plaster and use a chisel or other tool to widen the cracks and gaps between the bricks. You need to work carefully, not missing even small cracks. By cutting the crack edges in this way, you increase the area for filling with mortar and improve the quality of adhesion to the main surface of the wall. The minimum depth for filling cracks with mortar is 10 mm.
- Now it is important to cover all surfaces with a deep penetration primer or plain water. Then we heat the stove by adding a small amount of firewood. It is important for us to dry all surfaces before work.
- While the oven is still warm, apply a thin layer of liquid clay solution using a paint brush or a large paint brush. This solution, once dry, will serve as the basis for continuing work.
- You can lay a layer of reinforcing mesh on top or simply cover the surface with old bags. We fasten the steel mesh with self-tapping screws, and glue the burlap with glue or nails, which we hammer into the joints between the bricks.
- Using any of the previously listed solutions, apply 2 layers of plaster, each up to 5 mm thick.
- After drying, you can plaster the walls with an additional layer of lime mortar or simply whitewash the walls of the stove with lime.
Coating process
How long does it take to dry?
It is not recommended to use the oven until the solution is completely dry. When using different materials, this period may vary. Using heat-resistant glue as a putty, the layer of solution will dry within a few hours.
It will take more time for the solution of clay and sand to dry and form. In this case, you will be able to use the stove only after a day. Then the brick oven, protected from cracks with mortar, will remain crack-free for a long time.
Therefore, we do not advise you to rush, immediately flooding your Russian stove with a stove bench. Repairing cracks in a furnace is a simple but important job. The choice of material for the solution is a purely individual matter. The main thing is to do the work carefully and responsibly. Then your house will always be light and clean, without the smell of burning and smoke penetrating through the cracks in the walls of the stove.
Source: https://pechnoy.guru/pechi/izgotovlenie-pechi/remont/chem-zamazat-pech-chtoby-ona-ne-treskalas-ot-zhara.html
Diagnosis of problems
The diagnostics of all surfaces will answer the question why a brick stove is cracking. The worst option would be widening through brick cracks. You can’t do this without the help of a specialist; you may need to re-lay the furnace.
Small cracks in bricks caused by high heat allow you to carry out the work yourself. The cracks need to be filled and the surface re-plastered.
Overview of individual component characteristics
The composition of the mortar for laying a furnace from brick mortars for the construction of furnaces includes a binder component, filler and additives.
The first is responsible for the elasticity, solidity and density of the mixture. The second determines the strength and thickness of the layer between the bricks. And additives are aimed at enhancing certain indicators: resistance to mechanical, temperature or chemical loads.
Clay for masonry mixture
Clay belongs to the group of sedimentary rocks with varying degrees of fat content. The latter depends on the sand content in the composition: fatty - up to 2%, skinny - up to 30%. When the material is mixed with water, a plastic working mass is formed, which has high adhesion to the mineral base.
Oven adhesive
In building materials retail outlets there is a dry adhesive special mixture, as well as a ready-made solution of fireclay clay and cement. This glue is durable and fire-resistant. It is convenient to fill the voids of bricks with ready-made plastic material.
The dry composition is not difficult to dilute in accordance with the instructions. It is recommended to work with a small amount of material, as it dries quite quickly. Along with the advantages, ready-made glue has the disadvantage of being quite expensive.
Clay-sand mixture
Affordable economy class material. To prepare the proper quality solution, only high-quality clay and river sand are used. The clay is poured with water in a convenient container and diluted to the state of milk, then rubbed through a fine sieve.
When the clay and water settle, the liquid top layer is drained. Sand, sifted twice, is added to the clay mixture, ratio 1:2. The liquid composition is diluted from the clay mixture to a creamy consistency and mixed thoroughly.
Note!
Three-way valve in a heating system: instructions on how to choose and install correctly in a private home
Why the bottom of the battery is cold and the top is hot - let's look at the reasons. Review of recommendations on what to do and how to fix it
How to insulate a dog house for the winter with your own hands and inexpensively - step-by-step instructions with photos and descriptions of all stages
It’s easy to check whether the solution is ready. If small pieces of the mixture remain stuck to the stirrer, then the solution is ready, and if large enough pieces remain, then by diluting with water the mixture is brought to the required condition.
A solution containing clay is more likely to lead to defects. There are no exact instructions for preparing the solution; it is prepared based on the experience of the master. There are not many professional craftsmen, so such a solution is not often in demand.
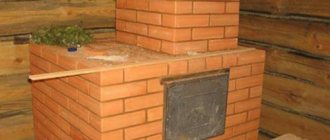
How to cover the stove
Both traditional and brick ovens can crack over time. Even the highest quality oven is not immune to such a defect. Cracks can appear for various reasons, one of the most common being uneven heating. For the safety of the furnace, many craftsmen inquire in advance about how and what to coat the furnace so that it does not crack.
Many household members do not pay attention to the gaps that appear in the masonry or plaster of the stove, but the problem can lead to serious consequences. Even through small cracks, carbon monoxide enters the house, which is known to be very harmful to humans. Such defects can be prevented if you choose the right coating for the oven.
How to coat a stove
Cracks cannot simply be repaired with plaster or other material; all defects must be identified and restored correctly. You should not skimp on such work, as this can lead to even greater defects. The entire process of restoring the furnace lining includes the following steps:
- inspection and determination of the causes of defects;
- selection and mixing of the solution;
- applying grout and plaster.
In most cases, the actions will not take much time, and most importantly, they will not allow carbon dioxide and combustion products to accumulate in the room.
Causes of crack formation
Defects in masonry and coating may appear on the stove due to the following features:
- Use of low-quality or cheap materials. If the putty or mortar was mixed incorrectly, it will sooner or later crack. When working with a furnace, you should not skimp on coating work.
- Failure to comply with finishing technology. When finishing a stove, it is very important to remember the intermediate steps, such as wetting the masonry and drying. Do not rush and apply the coating when the mixture has not yet dried.
- Incorrect drying. Some craftsmen use hair dryers or heat guns to speed up drying. This process is contraindicated in ovens, especially clay ones. The structure must dry naturally to ensure uniform hardening.
- Drawdown. If the furnace substrate or the first row of masonry was done incorrectly, it will sag. Such a defect is more difficult to eliminate; in extreme cases, complete or partial dismantling of the masonry may be required.
The most difficult defect to correct is subsidence. You should never skimp on your furnace foundation. A high-quality stove can survive even after a house is destroyed.
Note! Household members often believe that smoke accumulates in the room precisely because of cracks. But sometimes the reason lies elsewhere.
Often, combustion products accumulate in the house due to the following shortcomings:
- Chimney blockage. You can clean the smoke duct in different ways, but this must be done frequently.
- Clogging of the stove riser with brick chips. The brick gradually crumbles, which leads to clogging of the riser systems.
- Violation of internal masonry technology. In such a situation, you will have to completely redo the chimney.
- Hypothermia of the riser due to downtime. If the stove is left unlit for a long time, it may start smoking. To prevent this from happening, the first kindling is done gradually, heating the stove with paper and wood chips.
If you cannot independently determine the cause of smoke in your home, be sure to invite a professional to do this. An experienced stove fitter will not only help detect defects in the stove, but will also draw up an estimate for the work.
Furnace inspection
To analyze the condition of the stove you do not need to have the professional skills of a builder or stove maker. The main thing is to detect all cracks and assess their size.
If there are no major defects in the masonry, then removing the old coating and applying a new one will be sufficient. In addition, you need to remove part of the mortar between the bricks in the place where the crack formed.
After these procedures, the masonry is covered with mortar so that the patches are not noticeable.
In the case of large defects, some of the bricks will have to be dismantled and replaced with new ones. The danger of a crack can be determined by the characteristic burning smell from the cracks and the release of smoke. Repairing large cracks is a painstaking and lengthy process. It is best to entrust such restoration to a professional.
Mixing the solution
Regardless of the nature of the defects, you will need a solution to cover them. Sometimes chamotte (fireclay clay) or a traditional mixture of sand and clay is used for this. The modern market of finishing materials offers a large selection of different grouts and adhesives. You can make regular grout yourself. There are several recipes for traditional putties:
- Sandy. To mix the composition, you need 4 parts of river sand, 2-3 parts of lime mortar and 3-4 parts of cement mortar. All components are kneaded until smooth to form a plastic mass.
- Fireclay and clay. This type of putty consists entirely of fireclay or clay. Both materials can be purchased at a specialty store.
- Lime. One of the simplest and most common putty for Russian stoves is lime solution. To do this, buy a liquid mass or extinguish the dry composition.
- Cement. For furnaces, it is optimal to use the M400 composition; 0.5 cement is diluted to 1 part water.
All materials are equally popular in caulking stoves. In order to choose a solution suitable for your stove, you should familiarize yourself with the pros and cons of each of the presented compositions.
Fireclay clay
This type of clay is considered one of the most popular putties among traditional compositions. Fireclay is considered a very reliable material; it is resistant to processing at high temperatures. Most of the ancient stoves, coated with fireclay clay, are still functioning.
You can buy fireclay in almost any construction department. The material is packaged in bags of 5, 10, 20 and 50 kg. Before application, the clay must be diluted with water and left for a day to gain viscosity and plasticity.
Sand coating
This composition is very popular due to its low cost. Moreover, it is used not only for coating, but also for laying seams during laying. The low cost of the components does not in any way affect the quality of the composition. After kneading, you will get a very plastic mass that will gain strength after a couple of heating cycles.
To prepare the sand-clay mass, use the following instructions:
- For 1 part clay, take 3 parts water, mix it all and leave it for three days.
- After 36 hours, the composition is mixed again by pouring water into it. To remove lumps, the mass is passed through a fine sieve (1-2 mm mesh).
- Excess water is drained from the mass, and everything is kneaded again. After which you should get a composition reminiscent of sour cream in consistency.
- The final step is adding sand. At this stage it is very important not to add too much sand. The component is poured into the mass gradually, stirring with a stick. During the kneading process, you need to check the amount of composition sticking to it. The quality of the composition is determined by the abundance of mass on the stick. There should be small lumps left on it, no more than 2-3 cm. The ratio of components in the composition is 1:2.5, where 2.5 is clay, and 1 part is sand.
The coating composition is thoroughly mixed and checked for plasticity. To do this, roll the mass into a ball and squeeze it between your fingers. The correct composition turns out to be plastic, like plasticine; when pressed and rolled, it wrinkles well and does not crack.
If chips form on the ball, you should add a little more water. To apply this grout, you must first wet the crack. After that, the mass is pushed into the crack with your fingers, trying to get as deep as possible.
When the mixture is taken, it is rubbed and plastered.
Oven grout
Stove grout is considered the optimal composition for beginning craftsmen. The mass is very easy to work with, but most importantly, it has high ductility and durability. Once applied and dried, it can withstand temperatures of 10,000C?.
Note! Before grouting, the walls are moistened in the cracks.
The disadvantages of this composition include its high cost, but it is fully justified by its high characteristics. If you want to save money, you can make the putty yourself. To do this you will need:
- clay 1 part;
- 2 parts water;
- 4 parts sand;
- 1 part finely chopped straw;
- a pack of regular salt.
The clay needs to be mixed with water (1 part water and 3 parts clay), after which the mass is left for a couple of days. Then sand is poured into the solution and gradually mixed. At the very end, the composition is supplemented with straw and salt, and everything is kneaded.
Furnace glue
This composition can also be purchased at a hardware store. It is very easy to mix and apply.
Today, the construction market offers two types of glue: plastic and hard. The first is optimal for restoration (sealing cracks), the second is used as a finishing touch.
Important! Oven glue dries very quickly, so you need to work with it as efficiently as possible. It is recommended to mix the composition in small portions and immediately apply it to the cracks.
Application of the composition is carried out according to the following instructions:
- kneading 1 liter of glue;
- wetting areas with cracks with water;
- treating cracks with a mixture (you need to push the composition as deep as possible);
- mixing 5-6 liters of hard glue;
- finishing of the furnace.
Cracks can form on any structure; this process should not be started. Timely restoration can significantly extend the service life of the furnace.
Plastering from cracks
You cannot plaster the stove over cracks. First you need to treat the defects using one of the methods described above, and then apply plaster. The composition can also protect the oven from improper heating and cracking.
During the process of restoring the furnace, the plaster is always removed where defects have formed. Decorative trim also needs to be removed.
Before any restoration, the masonry is generously moistened with water, this increases the adhesion of the composition to the working surface. If you skip this step, the solution may simply fly off.
When working with cracks, it is most convenient to apply the putty with your fingers; this will allow you to feel the direction of the putty and its amount. For convenience, it is better to apply the composition with rubberized gloves.
After all defects have been treated, the oven is left to dry for 7-10 days. Only after this period has passed can the first fire be carried out.
Source: https://2proraba.com/steny/shtukaturka/chem-zamazat-pech-chtoby-ne-treskalas.html
Fireclay clay
One of the best materials to cover the stove so it doesn’t fall off. Affordable, sold in stores, packaged in 20 kilograms. Resistant to moisture and temperature. Also intended for plastering surfaces.
The finished solution is obtained as follows: fireclay clay is mixed with cement and sand, the ratio of the components is 2: 1: 7, respectively, water is added. For better pliability of the material, you can initially fill the clay with water, then wipe out the lumps, add cement and sand. The thickness of the mixture depends on what type of work is being carried out, and skill experience also plays a role.
Determining the extent of damage
Before getting started, you should consider the damage and determine the scope of work. If small cracks appear on the surface of the stove (even if in large numbers), to eliminate them you will need to remove the lining and clean the brick from the plaster.
Once all the finishing has been removed, you can start caulking the cracks. At this stage, everyone is wondering what solution to cover the stove to prevent it from cracking.
For these purposes, you can use one of the following mixtures:
• made of clay and sand;
• from special grouts for ovens;
• made of fireclay clay;
• from oven glue.
Can’t decide what to cover the stove with to prevent it from cracking? Consider each option individually.
Oven grout
To eliminate defects that occur in the oven, ready-made heat-resistant grout is sold. Because of its high cost, home craftsmen prefer to make such a solution themselves.
The clay is prepared as for a clay-sand mixture. The soaked clay slurry is combined with sifted sand and while mixing, chopped straw is added, the component ratio is 1:4:5. 1 kg of coarse salt is added to the finished solution, which makes the composition more plastic and resistant to cracking.
Grout perfectly fills voids. You can also use it to plaster the stove surface with the first rough layer.
Covering stove cracks
The material for the upcoming work has been selected, and another question arises: how to properly seal the stove?
You can start working only after cleaning the brick from decorative finishing and plaster. Using a suitable tool, the gaps between the masonry with cracks are widened to fill an area of about 10 mm with adhesive.
When using ready-made adhesive solutions, it is advisable to adhere to some rules:
- prepare the working solution in a limited volume due to the drying speed;
- Wet all cracks with water;
- tightly fill the gaps with adhesive;
- Lubricate the top of the oven with the prepared solid mixture;
- wait for it to dry completely and start plastering.
An unheated stove is a bad option for carrying out repair work with materials containing clay. It is recommended to heat it slightly; this will help you see imperfections and eliminate defects before the putty dries.
The sequence of work will be slightly different:
- Before sealing the cracks, stir the mixture again until smooth (the contents have different densities);
- make sure the material is of high quality. To do this, you can manually make a spherical object, and if cracks appear on it, add a little water;
- wet all the cracks with water and fill tightly with glue (it’s safer to use your hands);
- Plaster also after final drying. Next you can use whitewash.
Instructions for applying clay plaster
The work is performed in the following sequence:
- mortar cakes are applied along the wall at regular intervals, and the material is stretched over the entire surface with a wide spatula, a rule or a trowel;
- Evenness is checked using a level. If necessary, apply a second layer;
- the surface is given time to dry completely: from 1 to 3 months, depending on the season;
- finishing is being carried out. To do this, use a solution consisting of clay, cement and sand in a ratio of 1 to 1 to 3. The mixture is applied in a thin layer and leveled. After three to four weeks, the stove can be whitewashed with lime.
We now know how to coat a stove with clay so that it does not crack. But you should know that half the success depends on the correct preparation of the solution.
Oven overheating
Having installed a new stove, or repaired damage to the old one, you should not test its strength by heating it to its fullest.
The first fire must be carried out with a small amount of firewood, increasing the amount each time. And then there will be no need to get rid of the next problems again.