Application of high temperature sealants
If we limit ourselves to the topic of home heating, then heat-resistant sealing compounds are used in the following cases:
sealing cracks in the brickwork of the stove and chimney;
Cracks in the furnace masonry and sealing the interface between cast iron elements and bricks
- filling gaps between cast iron parts and stone;
- laying ceramic chimneys;
Fixing ceramic chimney elements
- sealing joints of metal chimney fragments;
- cutting device in places where chimneys pass through the walls and ceiling.
Sealing the passage of a sandwich chimney through the roof The use of high-temperature sealants in industry is even more widespread than in everyday life.
Foundation for the furnace.
Types of foundations for the furnace:
- solid foundation.
- columnar foundation.
- mixed.
The foundations should be wider than the base of the stove by 5-7 cm in each direction.
The depth of the foundation depends on the properties of the soil and the groundwater level.
Types of soils:
- rocky soils
- coarse-clastic
- sandy soils
- clayey
- loam
- slurry
Rocky soils are solid solid rocks and some sedimentary rocks: sandstones, limestones.
They have high compressive strength and resistance to groundwater.
Coarse soils are fragments of rock.
They are also solid foundations, since these soils contain a large amount of crushed stone, gravel and pebbles.
Sandy soils - consist of sufficiently dense and strong particles for constructing foundations for furnace foundations.
Clay soils contain large amounts of clay.
Clay in its pure form is very rare in nature, so soil that contains more than 25% clay is considered clayey.
Loam - if the soil contains clay in the range of 10 - 25%.
Suspended soil is soil with a clay content of up to 10%.
Sometimes there are soils with large pores, which are dangerous because when groundwater gets into them, they easily liquefy and lose strength.
More often these are bulk soils that are highly loose.
In dry sandy soils, the foundation depth can be 50 cm, in clayey soils - 75 cm.
The soil on which the base of the foundation rests is called its base.
In wet soils, the depth of the pit from ground level should be at least 1 m.
In strong, dry soils for furnaces weighing up to 2 tons, the foundation depth can be reduced to 25 cm, and for furnaces weighing up to 3 tons to 40 cm.
In wet soils, it is not recommended to reduce the depth of foundations.
Materials used to construct the furnace foundation:
- Rubble stone.
- Cobble stone.
- Brick crushed stone of all types.
- Gravel and pebbles.
- Clay fired red brick.
- Coal slag.
- Iron ore brick.
To construct a foundation, a pit is dug in the ground. The dimensions of the pit should be 10-15 cm wider than the base of the furnace in each direction.
Progress of foundation construction work.
- Dig a pit.
- Lay the material (rubble stone, crushed brick, etc.) up to 10 cm thick.
- Fill with liquid cement mortar.
- Repeat laying the rubble and pouring the required number of times.
- Lay a waterproofing layer (3 layers of roofing felt or roofing felt) over the top of the foundation in the ground.
- Build an external foundation on the waterproofing layer.
Lay out the rubble stone following the rules for bandaging the seams.
Fill the gaps between large stones with small stones.
In this way we bring the foundation to the ground level.
The external foundation can be laid out from the same materials as the foundation in the ground.
The height of the masonry depends on the depth of the underground space.
When laying an external brick foundation, whole bricks are placed along the edges and half bricks in the middle.
The external foundation should be 5–7 cm smaller than the foundation in the ground in all directions.
At the same time, it should be remembered that the platform of the external foundation should be wider than the base of the furnace in all directions by 5 - 7 cm.
The external foundation is not brought to the floor level by 14 - 15 cm (by two rows of brickwork).
The floor is cut to the size of the stove base.
Foundation for the furnace.
According to the dimensions of the stove base, following the rules for bandaging the seams, lay out one row of brickwork.
After this, lay out the second layer of waterproofing (two layers of roofing felt or roofing felt).
The second row of brickwork should correspond to the floor level or be higher, but not more than 3-5 cm.
At this point, the laying of the furnace foundation is considered complete, then the laying of the furnace body begins.
On rocky and rocky soils, foundations are not made in the ground, but an external foundation is laid out from the surface of the soil.
To save building material, external foundations can be erected on columns.
The width of the columns is at least 250 mm.
The distance between the columns is covered with reinforced concrete lintels or a reinforced concrete slab.
If the distance between the columns is no more than the length of two bricks, then the columns can be connected by running bricks into the continuous plane of the foundation.
Sedimentary joints 5–7 cm thick are left between the foundations of the walls of the building and the furnace, which are filled with sand.
Settlement seams are left due to varying degrees of settlement of the walls of the building and the furnace.
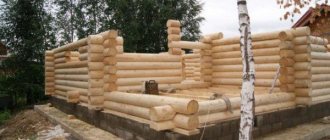
The foundation for the future brick oven is the first stage of construction.
The fate of the furnace itself depends on its reliability and proper design. The average brick kiln is 700-800 bricks. The weight of the brick is 4 kg, so the weight of such a stove is about three tons. A large stove has even more. Yes, a brick pipe adds its own weight, but it usually puts pressure on one corner. And the oven area is 1-2 m2, so it turns out that the load on the foundation is considerable. This means that it must be treated with special attention and respect. First of all, we determine the composition of the soil: sandy, clayey, loam, etc. The composition determines how it will behave in winter frosts. When frozen, clayey and loamy soils exhibit heaving, that is, they expand when frozen due to the moisture present in it. And freezing and expansion can be uneven, which causes movement of the foundation, its bulging and, as a result, distortions. From double impact (the weight of the stove presses from above, the protruding force from below) the foundation may even crack, and after it the stove.
How to make a reliable foundation for a stove
To avoid such impacts and keep the oven intact, use the following steps.
Firstly, a larger area slab is made under the foundation to reduce the load. The slab is well reinforced to avoid cracks and fractures.
Secondly, an enlarged sand and gravel cushion is made under the slab, compensating for the pressure from below in case of heaving of the freezing soil.
Thirdly, to reduce heaving, the space under the house is drained as much as possible, and drainage is installed around the house. This reduces the moisture content of the soil itself.
Fourthly, the foundation is made solid and insulated (if the foundation is piled, it is sewn up and insulated), reducing the likelihood of freezing. The house must also be reliably insulated, including the floor of the first floor. Then the structure of the house itself works like a thermos, retaining soil heat and preventing the soil from freezing.
The combination of these conditions will make it possible to create a strong and reliable foundation.
Let's now look at a specific example. The foundation for our stove will be located on moderately heaving soil in a seasonal house.
Foundation slab
The foundation is made 10 cm wider than the base of the stove, so that 5 cm remains in each direction. Since the stove will be in a house used seasonally, in a house that has already been built, and the soil will certainly freeze in winter, soil heaving is possible.
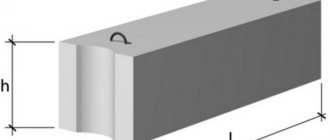
To prevent the foundation from cracking, we place it on a reinforced concrete slab. Slab dimensions (in cm): 200x150x20
(0.6 m3)
We make a sand cushion under the slab, 5 cm thick (sand volume: 200x150x5=0.15m3)
Cement mortar for slab 1:3 (cement/sand)
We must reinforce the slab with a metal rod, 1 cm in diameter, the rods are laid out crosswise in increments of 10 cm and the knots are tied with knitting wire (not welded, so as not to weaken the rod itself).
Foundation - foundation
If we make the foundation for our brick kiln concrete, we will need: cement, sand, crushed stone (or gravel, or rubble stone, or broken brick). It is convenient to make such a foundation if its height is low (within 0.5 m).
If it is higher, it is easier to lay out the foundation box from concrete blocks or bricks (can be silicate or ordinary red masonry). And fill the internal space with concrete mixed with brick and stone filler: crushed stone, pebbles, rubble stone, broken brick. Just don’t use bricks that have been stored outdoors for a long time; they lose their strength when they get wet and freeze and can crumble.
The masonry mortar is also made at a ratio of 1:3. For backfilling (internal filling, the proportion of the mortar is 1:4. The volume of the filler (in relation to the mortar is no more than ½), that is, the stone is no more in volume than the mortar, so as not to lose the binding properties of the mortar mixture.
An example of an estimate for a foundation
oven OVIC -15 with oven 4.5x3 bricks. (117x78 cm)
Slab : concrete, reinforced met. rod (diameter 8-10 mm), with a cell of 10 cm. Slab dimensions (in cm): 200x150x20 (0.6 m3)
The slab is poured into earthen formwork 25 cm deep, onto a sand cushion 5 cm thick, previously well compacted. Lay the metal rods in increments of 10-12 cm and tie the knots with wire. The depth of occurrence in the slab is closer to the middle. Prepare cement mortar at the rate of 1:3 (cement/sand).
The base consists of:
brick box 130x90 (5x3.5 bricks = 15 pcs. in a row)
backfilling - filling (concrete-stone-brick mixture)
Size of sand-lime brick: 250x120x88 mm.
The brick box is laid out on a pre-cured slab (soaked for 5-7 days) along plumb lines. The height of the masonry is up to the level of the lower edge of the floor joists - 12 rows.
Prepare cement mortar for masonry at a ratio of 1:3 (cement/sand)
Cement mortar for backfilling 1:4 (cement/sand).
For backfilling, use broken bricks and stones no more than ½ the volume of the cavity to be filled.
Materials:
silicate brick (250x120x88) 15 pcs x 12 row = 180 pcs.
If a brick has been lying outside in the open air during the winter, it cannot be used.
Slab (0.6m3):
cement - 260 kg
sand - 0.4 m3
brickwork (V=0.65m3): cement - 60 kg (130 l solution)
sand 0.1 m3
backfill (1.107 m3): cement (at the rate of 1:2 solution volume = 0.55 m3) = 182 kg
sand = 0.4 m3
Total:
silicate brick = 180 pcs.
cement = 502 kg (the quantity in bags is determined based on the weight of the packaging)
sand = 0.9 m3
Usually these numbers are increased by 10% so as not to miss by a smaller margin.
Metal
metal rod (diameter 10-12 mm) 2 m x 15 pcs., 1.5 m x 20 pcs. = 60 m
knitting wire (1-1.5 mm) = 10 m
It is necessary to lay waterproofing (roofing felt in 2 layers) between the slab and the base of the foundation in order to cut off the rise of moisture (capillary effect) to the sand-lime brick, which loses strength when regularly moistened. The finished foundation needs to stand for at least 2 weeks for the concrete to gain the required strength.
Facing
Before you line a metal stove in a bathhouse with bricks, you need to prepare for work.
Preparatory activities
You can start laying only after the concrete and brick base has dried. A metal stove is installed on it, and future cladding is marked around it.
But first you need to install a fireproof shield made of any fire-resistant materials on the wooden walls around the fireplace.
Insulation of wooden walls and floors with mineralite
If you decide to prepare masonry mortar from clay, then you need to fill it with water for several days and carefully sift the sand. Since it is difficult to cover an iron stove with bricks and not stain its body with mortar, before starting laying it should be protected with paper, cardboard or film, securing them to the walls with tape.
To prevent water from the solution from being absorbed into the brick, it is soaked in water about half an hour before starting work.
Soaking the brick
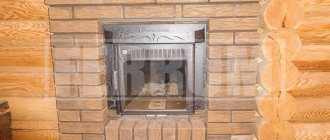
Masonry
When deciding how to brick a cast-iron stove, it is better to choose half-brick masonry. A thicker screen will take longer to heat up, and a thinner screen will cool down faster.
The laying of the first row begins from the far corner, laying a whole brick
It is very important to lay it out evenly and neatly, since all subsequent rows will be aligned with it. They are laid out alternately, with an offset of half a brick. Don't jump over the row, first raising the corners and then filling the space between them.
Laying is done offset
- The permissible thickness of the horizontal seam is 8-10 mm, vertical 3-5 mm.
- The seams are filled completely with the solution, its excess is immediately removed from the surface with a trowel.
Bricks that go beyond the plane are knocked down with a hammer or mallet
During the laying process, you need to constantly monitor the verticality of the walls and corners using a plumb line or building level.
A cord stretched along the upper edge of the row will help to keep the row strictly horizontal.
Auxiliary vertical stands will make work easier
To strengthen the masonry, reinforcing mesh can be placed in the seams every two or three rows.
The photo shows the reinforcement of the masonry with metal mesh
Also, every two or three rows you should unstitch the seams until the mortar loses its elasticity, and wipe the surface from any remaining mortar with a wet rag.
Joining seams
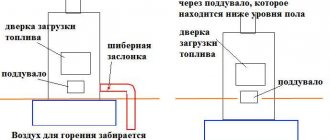
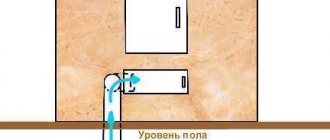
When laying out the walls, it is necessary to leave ventilation holes in them: at least two at the top and two at the bottom. Cold air will flow into the lower ones, protecting the oven from overheating, and heated air will come out through the upper ones.
Furnace ventilation diagram
- As an option, you can line the stove with bricks laid in a checkerboard pattern with holes between all adjacent elements.
- Around the doors of the firebox and ash pit, masonry should be carried out taking into account their full opening.
The brick will have to be cut if it prevents the doors from opening
Where to finish the masonry is up to you. If you have a stove with a stove or heater, it is only brought to the top of the body. You can raise it to the ceiling. Or you can make figured masonry with a vault and chimney lining, turning an ordinary potbelly stove into something like a fireplace.
Metal stove for a bath, lined with bricks up to the pipe
Option with full height masonry and pipe lining
The brick portal turned an ordinary stove into a real fireplace. Now you need to let the solution dry for at least a day. It is desirable for this to happen in natural conditions, so it is better not to heat the stove for now.
We begin to pour the foundation for a brick oven with our own hands
Foundation for a brick oven
Step 1. Marking for the foundation and pit
- Once you have decided on the location of the future furnace, you need to correctly calculate its dimensions based on power. It depends on the area of the room, the number of doors, windows, etc.
- We draw the required size of the oven on the ground. The foundation should be 15-20 cm larger than the heating structure. Make markings and install pegs that will mark the boundaries of the pit for the foundation pit.
- Using a bayonet shovel, dig a hole 70-100 cm deep, depending on the density of the soil and the climate zone (see above).
- We lay a sand cushion 10-15 cm thick at the bottom of the trench. We compact it tightly with a shovel and pour a layer of medium-fraction gravel to a height of 30 cm. Pour a bucket of water onto the surface of the sand-crushed stone cushion and compact it tightly.
Step 2. Installation of formwork and reinforcement
- Let's start building formwork from boards. In principle, any old boards or plywood that you have on the farm are suitable for formwork. This does not in any way affect the technical properties of the foundation.
- The formwork is a wooden box, which, for reliability, is fastened at the corners with metal corners. Connect the boards together using nails.
- We lower the finished formwork to the bottom of the pit.
- After the pillow is firmly compacted, it is necessary to waterproof the base. To do this, we measure the size of the pit onto the polyethylene, cut it out and attach the polyethylene to the walls along the perimeter of the formwork using a construction stapler.
- Reinforcement of the foundation is necessary in order to give rigidity to the entire structure. We will reinforce with steel rods with a cross-section of 12 mm, which must be connected to each other by welding in the form of a frame or metal wire with a cross-section of 0.8 mm.
- The final work on the construction of the foundation is joining the floor to the foundation. It is better to do this by laying an even row of bricks.
Step 3. Prepare the concrete mixture for pouring the foundation
We prepare a mixture of the following proportion: for 4 parts sand, take 1 part cement + 3 parts crushed stone of the middle fraction.
Concrete mixer
Stir the dry mixture well with a bayonet shovel and add water. Mix the solution well using a concrete mixer. In consistency, it should resemble thick sour cream.
Preparing concrete solution
We fill part of the pit with this mixture, not reaching the level of the base floor by 8 cm. This work must be completed within 24 hours. The concrete solution should be complete and not layered.
Fill and wait 2 weeks
After you fill the entire pit with concrete, you need to once again check the horizontalness of the coating with a building level. After the solution has completely dried, it will be more difficult to correct your mistakes.
We check the levelness of the foundation with a building level
Cover the foundation with a layer of polyethylene or roofing felt and leave for 2 weeks until completely dry.
We remove the upper part of the formwork only after complete drying, beating the boards with a hammer. Pour crushed stone and sand into the resulting gap and compact it well.
DIY oven
Previously, it was in every home, but now the stove can be considered a highlight and national exotic. But this is a very convenient and functional thing that can combine heating, hobs, an oven and a warm bed, while having a wonderful design.
If you decorate the stove with tiled tiles or tiles, the stove will turn into the center of the interior design of the house. You can make such a stove with your own hands.
Orders - detailed diagram of brick oven laying
Orders of brick stoves can be obtained for free, and this is almost half the battle. After all, ordering is precise instructions for placing each brick. The only thing you will need is a little experience as a mason. But who living in a private house has not at least once encountered brick laying? Walls, sheds, barbecues, fences...now the oven.
In order for the house to be heated properly, it is necessary to make calculations for a specific room, based on the heat transfer rates of the planned stove. The stove should be of such power that it can easily withstand the night until the next fire.
It is very difficult to make such calculations on your own, but you can use the data of I.V. Kuznetsova. which calculated the average thermal power per unit surface of the furnace. So, an average stove 1.5x1.5x2.5 m should be enough to heat an area of up to 100 square meters. m.
It’s easy to start from this and calculate the size of the stove for your home.
Choosing a stove design - Russian, Kuznetsovka, Dutch or Swedish
When we have decided on the approximate dimensions of the stove, we need to choose the required version of the stove that you will install. A large number of detailed diagrams of Russian stoves - from small to large - can be found on the website. Kuznetsov's bell-type stoves and the so-called Dutch or Swedish stoves are extremely popular.
Kuznetsovkas are famous for their special design, which allows warm and cold gases to move so that the efficiency of the furnace sometimes reaches 90–95%. In addition, there is an almost complete absence of soot and, accordingly, minimal stove maintenance. On the author’s website you can find up to 150 schemes of different masonry options.
“Swedish women” are also popular in our area, but sometimes they call them “Dutch women,” although this is not entirely true. Because the Swede is an independent heating and cooking stove. whereas Dutch ovens were used only as a heating addition.
The choice of the “Swedish” is also good because it is a truly versatile stove:
- Food is cooked on it.
- Heating.
- Possibility of built-in oven.
Let's look at how to make such a stove with your own hands.
Determining dimensions and location
When arranging a foundation for a furnace, it is necessary to comply with all the rules for the construction of foundations and additionally follow a number of rules specifically for the construction of a furnace foundation. Where to begin? First you need to determine the dimensions. Please note that the dimensions of the foundation should be 50 mm larger than the base of the stove . In other words, having a stove whose dimensions are 1000X700 mm, you will need to build a foundation with dimensions of 1100X800 mm.
Having decided on the dimensions, you need to choose the place where the foundation for the stove will be built. When choosing a location, you must clearly know where the chimney pipe will be located. Otherwise, later, when installing a chimney, you may encounter a problem when the chimney pipe rests against the supporting structure of your building. You will need to resort to various options to bypass the obstacle. Of course, if there is simply no other option for installing the stove due to the limited space of the room itself and its internal structure, you will have to build a foundation where possible. But in any case, it is necessary to consider all options. The next thing you should pay attention to is that the foundation of the furnace should not come into contact with the foundation of the building itself . The minimum gap between the main and furnace foundations must be at least 50 mm. If the foundations are located at such a distance, the gap between them must subsequently be filled with dry sand.
Laying the foundation - preparation
We decided on the place. It is necessary to prepare materials and tools. When constructing a furnace foundation, two types of foundation can be used:
- Concrete
- Rubble concrete
a rubble concrete foundation when there is a sufficient amount of rubble stone available. If there is no such material in your area, you can use a regular concrete foundation for the stove. Let's look at how to make a foundation for a stove, describing both of the above methods.
Russian stoves in the interior
Despite the development of technology and the appearance on the market of fashionable cast-iron fireboxes, which are framed in various decorative portals, the Russian stove still remains popular. Of course, it has changed not only externally, but also structurally. It has become more practical, convenient and safe; in addition, its design uses construction technologies and materials that can increase efficiency, as well as the aesthetic component.
Has advantages and disadvantages
Advantages
Wooden houses are the basis of the architecture of ancient Rus'. And, despite the development of technology and the emergence of building materials from which buildings are erected, wood still occupies a special place. Such houses are filled with comfort, and the Russian stove only complements the extraordinary spiritual atmosphere. The installation of a Russian stove in a wooden house must be carried out in compliance with the safety requirements established by our legislation.
Brick
Made from brick - this is a classic. Previously, such structures were built from homemade clay bricks, which were fired over a fire. The products are large in size due to the presence of a hob, a compartment for baking, and a lounger for relaxing.
The brick version is a classic
Advantages:
- Brick takes longer to cool than other materials. A stove built from it will give off heat longer after the fire dies out. As a result, the rooms will remain warm for a long time.
- A large structure can heat even a large house with several floors. This is possible if it is installed in the middle of the house, and the chimney is led up inside the walls that separate the rooms on the second floor. Today, the chimney is no longer made of ordinary brickwork. It is made from galvanized or stainless steel pipes that run in the middle of a compartment located inside the walls. And if ventilation grilles are made in the compartments along the chimney, then the heat emanating from the chimney will spread throughout the rooms.
- The brick does not heat up to a temperature that could create a fire. This building material is quite durable and practical. It can be used as a basis for applying decorative plaster, gluing with tiles and other finishing materials. Moreover, it is capable of serving without restoration for 30 years.
- The cost of such a design is not high compared to purchasing a cast iron firebox and a marble portal. It is worth noting that most of the cost is allocated to creating a high-quality foundation.
Modern and stylish
Unfortunately, like others, brick ones are not without their drawbacks. The main thing is the fact that for a brick structure you will have to build a powerful foundation. It can be a monolithic or reinforced concrete structure. If you install a brick one without a foundation, the floor may sag under its weight.
Precautionary measures
A Russian brick stove cannot be installed in all parts of the house. The location directly depends on the structural features of the building. It is better when the idea of construction appears at the stage of designing a house. Then it is possible to correctly calculate the location, as well as make an appropriate foundation.
If the house has already been built, then you will need to dismantle the floor in the place where the hearth will be installed to the base and make a scaffold.
Russian fairy tale at your home
Other options
Among the variety of options for installing heating systems in wooden houses, it is worth highlighting two main ones:
Fireplace stoves are iron fireboxes with a large viewing window. They can have a hob and are not framed by anything. Minus - the walls of the structure become very hot and can cause burns or fire.
Cast iron fireboxes are beautiful fireplaces that can heat large rooms. Many manufacturers make fireboxes of different sizes that have lifting mechanisms to open the firebox; the protective glass can be oval, prismatic or straight. The fireboxes are equipped with a slide damper, a mechanism for adjusting the combustion intensity. The downside is the high cost of fireboxes and portals.
Finish with beautiful tiles
Recently, these options have become less common for installation in private homes. Despite their attractiveness, they are inferior to traditional Russian stoves in many respects.
Modern Chandeliers and lamps: Which ones are suitable for the living room/kitchen/bedroom? 205+ Photos of Options with suspended ceilings
Construction of the foundation for the furnace: general recommendations
There are several requirements for the base under the stove. And two of them can be identified as the most important:
- It must be durable and reliable.
- Even seasonal soil movements should not affect its design in any way.
At the same time, it is very important to take into account what kind of soil is in the area where the bathhouse is being built: black soil, sandy, clay soil, or is it a wetland?
The following readings indicate how deep the foundation should be for a brick stove in a bathhouse. The soil type is taken:
- sandy - 50 cm;
- rocky - 25-30 cm;
- clayey - 70-80 cm;
- wet soil - 100 cm.
This option is also worth considering separately if there is bulk soil on the site. In this case, the foundation must be built taking into account both the depth of its freezing and the level of dense untouched soil.
What kind of foundation can there be if the stove in the bathhouse turns out to be no more than 700 kg? In this case, you can do the following:
- You need to lay out a clay mortar on top of the finished floor;
- then an asbestos sheet is laid;
- then you need to put a sheet of metal (you can use roofing iron);
- Only now can you install the stove.
In this case, it will be possible to achieve a double goal. Firstly, all fire safety standards will be observed. And secondly, the thermal insulation performance of the floor will increase, i.e. the heat from the stove will not escape under the floor.
The base for any stove can be exactly the same, even if its weight does not exceed 200 kg. But still, experienced builders note that this arrangement option cannot be called 100% reliable, so they advise not to do this if the floor in the bathhouse is wooden. It is better to remove the wooden flooring where the stove is installed and make brickwork. But in any case, underneath you will need a cushion of sand and crushed stone.
Tips for laying bricks
Scheme of the “Heat” stove.
Before laying on the mortar, it is recommended to lay out the bricks without it. At the same time, number them, since some will have to be cut off. Submerge each brick in water for 7 minutes to remove any remaining air from the cavities. Wipe the already laid brick row with a damp sponge. When installing doors, start laying only from them. During work, constantly check the walls with a building level. Level the position of the brick with a rubber hammer. Remove excess solution using a spatula.
It will be easier to do all the work in tandem with an assistant. This makes operations easier to perform, and inaccuracies can be noticed earlier.