How to take a photo with numbers
To take a good digital photo, you need to think through everything to the smallest detail. First you need to decide on the topic of the photo. And then you need to prepare the figure itself, choose an outfit, an interior.
This could be a nautical style for a boy...
... or Disney style for a girl.
You can also use the services of a photographer and do a photo shoot outdoors or in the studio.
It is affordable and easy to take a photo with a number using inflatable balloons.
How to make a volumetric number 2: decor
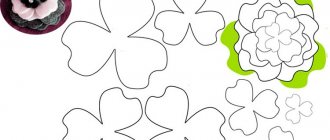
Now let's get to the fun part - designing the two-piece. To do this, you can take corrugated paper (Italian or Chinese, but the former will be much more expensive) or paper napkins. Cut into squares approximately 7x7 or 10x10 cm. If you use corrugated paper, then before cutting it you need to stretch it a little, it will become a little softer and its consumption will be less. When using napkins, you don’t have to measure the squares with a ruler; you just need to cut them along the folds. If the elements turn out to be very large, then you can additionally cut them into four parts.
Next, place a handle in the center of the square and crumple it. Glue the middle of the resulting “flower” onto a cardboard frame. The parts must fit tightly to each other. This way you need to cover the entire frame. To make the number look more impressive, you can make it two-color with a smooth transition of shades.
Photo ideas with numbers
We make the frame and decorations
Don’t worry, making such a figure is quite simple, quick and beautiful. Here are the materials we will need to create our gift:
- Styrofoam. You need a large polystyrene foam parallelepiped;
- tool for cutting foam with nichrome thread. Without this device, you will not be able to cut the material, but will only ruin it;
- marker or pencil and long ruler;
- glue. Here it is your choice, the main thing is that it firmly glues the foam;
- decorations for numbers.
At this moment we will look at how you can make decorations from napkins and paper. For the decorations, here's what you'll need:
- napkins;
- paper;
- stapler;
- scissors.
People don’t have any particular difficulties on how to make a foam frame. First, set the dimensions. Draw a reduced version of your number on graph paper or in a squared notebook. Then transfer the workpiece to a large scale, increasing it to the intended size. Cut out the number using a foam cutting tool. The photo shows the number 9:
The decoration itself will of course take more time, but beauty is worth the sacrifice. We take napkins. You can choose their color yourself. We take out a napkin and unfold it. The result is a square. Now fold the napkin in half again 2 times.
Please note that the napkins from the package are folded into an imperfect square, but we need to get a neat and even square. For this result, make sure that the corners match the other corners as closely as possible.
Fold the square like an accordion. We secure it in the very center with a stapler or thread. The edges can be folded with scissors to make our flower look more natural. Now we straighten the decoration. The flower is ready! Look how beautiful it turned out:
Related article: Beading: necklace patterns for beginners with photos and videos
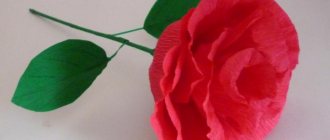
Now let's look at how you can make jewelry from corrugated paper. However, corrugated paper can be different: there is hard corrugation, and there is also soft one. Let's consider the option with rigid corrugation for now.
We will need strips that are 50 centimeters long and 3.5 centimeters wide. Important: the veins should be along, not across.
Stretch the strip. It stretches thanks to the veins.
Then we twist our ribbon into a flower. We tie it at the base with either thread or wire. It turns out something like this:
If you want more airy flowers, you can make them with soft corrugated paper. We take the same dimensions - 3.5 * 50 centimeters. Don't forget that the veins should be along, not across. We tie it at the end with thread or wire. The result is more delicate and airy flowers:
In the following photos you can see what wonderful figures parents made for their babies:
These parents managed to do something nice for their children. You can do it too, only even better. The main thing is to apply a little patience, effort and lots and lots of love!
Monthly photo ideas with numbers
The baby looks unusual and beautiful on the bed, around which a number of flowers is laid out. The optimal angle is from above, since in the first months of life the baby can only lie down. Later, the baby will learn to sit and will be able to look into the lens.
For a child, you can create a festive series of photographs that depict the baby’s life month by month. In the summer, use fresh fragrant flowers. It is not necessary to buy varietal roses or exotic flowers; field daisies, cornflowers, and poppies are quite suitable. Artificial flowers are a good alternative.
Creative photos can be created using seasonal vegetables and fruits, autumn leaves, New Year's toys, and other improvised decor.
The baby does not always have the desire to participate in a photo shoot. To interest your child and at the same time create an atmosphere of childhood and fun, take your favorite toys.
Large numbers made of cardboard or felt will come to the rescue. They are easy to make yourself, and then use for subsequent photo sessions, combining numbers into dates.
Number sheets are the easiest and most affordable number photo idea.
How to make a volumetric number 2: frame
This product looks more impressive, but you will have to allocate 5 to 6 hours for production. So, first things first.
First you need to take cardboard and draw the number 2 of the desired shape and size on the sheet with a simple pencil. If the deuce is intended to be small, then you can print it on a printer, on a regular A4 sheet, then trace it on a sheet of cardboard. Using a utility knife, cut out the part.
How to make a three-dimensional number 2 from cardboard so that it holds its shape? Quite simple. To do this you will need two digit elements. There is no need to draw it again on another sheet “by eye” or measure it with a ruler, just attach the cut out part and trace it with a pencil on the whole sheet. This way the elements will be the same. Cut out the second number in the same way. Place them together and trim the edges if necessary.
In order for the number to stand, you need to make the sides. To do this, cardboard is cut into strips 10-15 centimeters wide. Now we need to proceed to the most difficult part - assembling the frame. To do this, you need to lay the numbers between the two parts and secure the strips of cardboard with paper tape so that they are located between the “twos”. Carefully glue the frame around the entire perimeter so that it does not wobble. As you can see, making a three-dimensional number 2 with your own hands is not at all difficult.
By the way, by analogy with this technique you can make large letters. It is not necessary to make the whole name; for a photo shoot, only the initial is enough.
Ideas for numbers for children's photos
There are many creative options for making beautiful numbers for original photographs.
The most popular version of numbers for photos of children made from balloons. You can purchase an inflatable ball in the form of a number or weave a number from several balls of different sizes, shapes, and colors.
If you cut out the blank of the required number, prepare a lot of flowers from napkins and stick it on a cardboard frame, you will get a delicate number from napkins.
You can replace napkins with corrugated paper.
If you are no stranger to sewing skills, you can make photo numbers from colored felt.
Do you want maximum creativity? Then use numbers from old photos, newspaper clippings or children's magazines, postcards for the photo shoot.
How to make volumetric numbers from paper
To understand how to make three-dimensional figures from paper, namely to make the correct assembly, you must first prepare a detailed action plan and diagram. On a regular sheet of paper you need to create an approximate layout of the workpiece with the parameters indicated on it. It is advisable to maintain the scale in order to at least partially understand what the finished layout will look like.
After this, the cardboard parts are prepared, assembled, and only at the end the finished base is decorated. In general, making this kind of decoration for a holiday will take a little time. As for the cost, it directly depends on what materials will be used in the decoration process and what size the workpiece will be.
Step by step assembly
Various diagrams and templates can be used as a basis. It is important to correctly assemble such a base in any situation. To avoid problems at any stage of work, it is advisable to constantly carry out intermediate measurements. This way you can protect yourself from mistakes.
Seams must be carefully processed and secured. Otherwise, the entire structure will collapse. It is better to trim in these areas with a utility knife. After assembly, it is worth checking all connections for peeling paint glue. Sometimes cracks appear that are best sealed with a glue gun.
Numbers ascending
To make a neat blank from paper or cardboard, you should use ready-made templates. “Paper patterns” consist of several parts, each of which is already equipped with special protrusions for gluing parts at the corners.
The simplest patterns of volumetric numbers:
1
2
3
4
5
7
9
Models “6” and “9” can be made using the same template, so a special version of the sketch is not needed here. If you enlarge the scale of any template and create the proposed layout on a cardboard base, then thanks to the step-by-step gluing of parts you can get a blank with any volume inside.
Photos with balloons and numbers, ideas
Inflatable balloons always symbolize fun. If the ball represents the date being celebrated, the holiday becomes even more solemn and interesting.
Taking a photo with the balloon is an obligatory part of the celebration. But how to conduct a photo shoot so that the photos turn out perfect? You need to create a suitable interior of the room in accordance with the theme of the holiday.
Or you can conduct a photo shoot outdoors, for example, in a park or forest.
A figure made from several balls assembled together looks interesting and quite unusual. The best option would be a separate photo zone.
As you can see, there are many options for photos with numbers. Therefore, fantasize and bring your ideas to life in photographs.
How to make a flat figure
So, we have figured out the question of how to make a volumetric number 2, now let’s move on to the second type. This product is much easier to create than the previous one. To do this, you need to cut out only one part of the number. The second “two” and narrow strips of cardboard for the sides will not be needed.
Then you can also decorate it with napkins in the same way as a volumetric figure. The number can be covered with corrugated paper, satin ribbon, twine. An option for producing such work can be seen in the photo below.
A two-piece, partially trimmed with some flowers or beads, will also look very beautiful. You can use ready-made buds to save time.