Flexible tiles are one of the most common types of roofing in Western countries. In articles "Flexible roofing: review" And “Overview of components for flexible roofing” You can read more about the features of this material and its components.
In this article we will take a closer look at the installation of soft roofing.
- Tools and accessories
- Preparing the base
- Installation of underlay carpet
- Installation of planks
- Installation of flexible roofing
- Connecting to a wall
- Installation of ridge and ventilation
Tools and accessories
To install bitumen shingles, you will need a certain list of tools.
- A hammer is a percussion instrument with a fiberglass or wooden handle and a steel head. Needed for nailing roof elements using nails.
- A roofing knife is a type of construction knife used for cutting soft materials.
The roofing knife has a curved blade for easy cutting of various materials
- A spatula is used to apply mastic to the seams. A tool with a small blade (100 mm) is suitable for these purposes. Alternatively, brushes or trowels can be used to apply mastic to surfaces.
The spatula is convenient for coating seams with mastic
- A construction hair dryer may be required if installation is carried out in subzero temperatures. A hair dryer allows you to heat the mastic and the back adhesive side of the shingles.
The optimal temperature for working with flexible tiles is considered to be from +5 to +25 degrees.
When working in temperatures below +5, you will need to keep the shingles indoors for a day. In addition to tools, the work will require components, which we wrote about in the article .
” The list of necessary items includes underlay carpet, valley carpet, roofing nails, bitumen mastic, metal strips and ridge tiles.
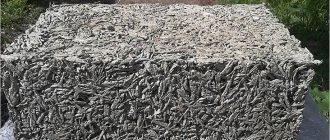
Stage II. Preparing clay
Once good clay has been selected, you can begin to prepare it for processing. Usually flint is prepared for tiles at any time of the year, and only a few of them must survive the winter.
So, it is useful to stack clay taken out of the ground on the surface of the soil in the form of ridges 2 m wide and 70 cm high. Such ridges are generally called stacks. This is how flint is supposed to lie completely before the heat - in the fall it gets wet from the rains, in the winter it freezes, and in the spring it thaws. After all this, processing it completely is much easier. And in order for the flint to freeze better, it wouldn’t be harmful to stir the stacks periodically and at least fill them with water. After all, the longer it is frozen, the unit is better. Even if the flint remains like this for a few years, it will only be for its benefit.
Preparing the base
The soft roof is laid on a continuous flooring, which is made of OSB or plywood. Before starting work, it is necessary to prepare the rafter system.
- Wooden rafters must be coated with antiseptic agents to protect them from the proliferation of fungal microorganisms in order to prevent the appearance of mold.
- A layer of vapor barrier film is installed under the rafter system. The film is secured using wooden blocks, which are installed in 60 cm increments. The coating is attached to the rafters using nails or staples. The films are overlapped with each other using double-sided tape.
Using double tape to join two sheets
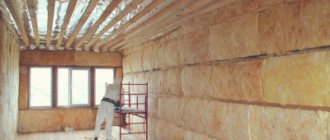
- Insulation is installed in the spaces between the rafters. If laying in two layers is required, then the slabs must be laid offset to cover the seams, which will become “cold bridges”.
Laying thermal insulation
- A layer of windproof film is laid on top of the insulation.
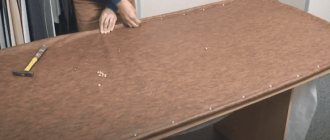
- The next step is to proceed to the installation of a rigid base - flooring under the soft roof. The first layer is laid with a 25 mm thick coniferous board. Laying is done in random increments. The humidity of the material should not exceed 20%.
The photo shows a layer of wind protection, after which there is a plank sheathing covered with OSB sheets
Flooring for a soft roof, made entirely of boards, although allowed by roofing SNiPs, in practice this is done only as a last resort. The reasons for this are quite clear - the board has unpredictable shrinkage, and its deformation changes can damage the roofing.
- After the board, the main covering is laid. The most common decking material is OSB (oriented strand board). The grade of particle board material must be no less than OSB-3; for this type of work, sheets with a thickness of 9 or 12 mm are usually used. It is also possible to use moisture-resistant plywood (FSF) of similar thickness. The humidity of slab materials cannot exceed 12%. The gap between the sheets should be 3 - 4 mm. The sheets are fastened to the sheathing of boards using self-tapping screws. The result should be a flat surface, so it is important that there are no height differences (more than 2 mm) at the joints. When laying sheets, it is important to ensure that the seams are offset (staggered).
The gap between the sheets is called deformation (compensation). Any wood materials tend to change their volume (swell) under the influence of environmental humidity. The gap gives the material the opportunity to change geometry without damaging the entire structure.
“Roofing pie” design
Very often we hear from builders or designers the combination “roofing pie”. When laying flexible tiles yourself, it is important to understand that the durability and practicality of the roof will depend on the correctly installed “roofing pie”. The cake is made in layers and includes: rafter system, films, insulation, lining carpets, and so on. Each layer is laid sequentially and performs its important function.
The “roofing pie” for a cold (without insulation) and warm (with insulation) roof will be different. It is not difficult to guess that a cold roof is much easier to deal with. An approximate diagram of a cold roof is below:
1. Flexible tiles 2. Underlayment carpet 3. Base (OSB board) 4. Wooden sheathing 5. Rafter leg
The “roofing pie” for an insulated roof has many more layers. The diagram of the entire structure looks like this:
1. Flexible tiles 2. Underlayment 3. Film (Windproof membrane) 4. Insulation (mineral wool) 5. Vapor barrier film 6. Base (OSB board) 7. Sparse sheathing 8. Counter beam for creating a ventilation duct 9. Rafter leg 10. Sheathing under insulation 11. Attic filing
Installation of underlay carpet
Underlayment carpet creates an additional layer of waterproofing, protecting the OSB or plywood covering. The lining carpet is a rolled material based on bitumen.
Depending on the slope of the roof slope, the cushioning carpet can be rolled out over the entire area of the hard surface or only in places. The first case is assumed when the slope is no more than 18 degrees. If the slope of the slope is greater than this value, then the cushioning carpet is installed only on the valley, ridges, cornices, end parts and in places adjacent to vertical surfaces.
- Rolling out carpet rolls is carried out parallel to the ridge if the slope is small. Vertical rolling is also allowed (from ridge to ridge). The material must be laid with tension.
Rolling out the carpet from ridge to ridge
- The overlap of the lining carpet on horizontal seams should be 10 cm, on vertical seams - 20 cm, while the seams are coated with bitumen mastic. To apply the substance, you can use a spatula or brush. Some manufacturers produce their own adhesive compositions for attaching carpet.
- After treating the seams with mastic, the carpet is nailed down with roofing nails. It is recommended to hammer in hardware in increments of 20–25 cm.
Endow is an internal angle that occurs at the junction of two slopes to each other. The endova requires increased waterproofing, since it is in this place that water flows from two slopes. For this reason, some manufacturers recommend laying several layers of underlay carpet, the first layer is laid along the valley, then it is covered with horizontal layers on top.
Installation of planks
Metal strips are an important element of roof construction. They protect the wooden elements of the roof from precipitation and ensure the drainage of water into the gutters.
- The planks are fixed on top of the lining carpet with an indentation of 2 cm. Self-tapping screws or nails can be used as fastenings, which are installed in a zigzag manner at a distance of 10 - 15 cm.
Front strip with a projection for draining water from the gable part of the roof
Drip rails or eaves strips are installed on eaves; frontal strips are used on the roof gable; they have a special protrusion that limits the flow of water. In places where the roof adjoins vertical surfaces, abutment strips are installed. If the roof slope has a curved shape, then the eaves elements are cut into small segments.
- The valley carpet plays the role of additional waterproofing on the valley, and it is made in the form of an additional covering that is installed on top of the lining carpet. The edge of the valley carpet is coated with mastic to insulate the seams, and roofing nails are additionally driven on top in increments of 10 cm. The distance from the valley axis should be at least 50 cm on both sides. From the edges, the valley carpet is laid on top of the drip edges.
Scheme for rolling out a valley carpet
- After this, it is necessary to lay a strip of starting tiles; this strip has a rectangular shape, it is devoid of a pattern and figured cutouts. Its main purpose is to provide uniform coverage on the edges of the roof. The strip is placed at a distance of 1 - 2 cm from the bend of the cornice strip. This element is secured with roofing nails.
The first layer is fixed on the starting strip
Different manufacturers of soft roofing produce special starting elements for specific types of roofing, but you can use ordinary tiles, they are universal and suitable for any model.
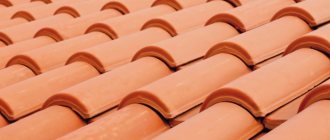
Stage I. Clay selection
The quality of the clay directly determines that ceramic tiles will be durable and aesthetically pleasing. It’s better to take the kind of clay that is usually used for making pots: not greasy, and not excessively sandy. Because while natural tiles made from excessively oily clay tend to warp and crack when dried, amen from skinny ones absorb moisture and withstand frost badly. The clay should be viscous, soft and clean. Here's how to determine its quality:
Method 1. Crumple a piece of clay and throw it with a force on the floor. It should be flattened like dough into a flat cake - without cracks and without crumbling pieces.
Method 2. Rub the clay in the middle with your fingers – you shouldn’t feel any sand.
Method 3. Knead the clay and try to make shapes out of it. It must be plastic.
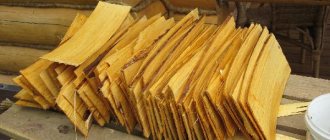
And again, for greater reliability, one ceramic tile is made from the selected clay - for testing. If the flint was suitable, then:
the color is completely smooth, red; the surface must have a straight glassy coating, without any curvatures or cracks; high-quality ceramic tiles lowered into water should not greatly increase in weight; when hitting the city tiles, a clear prefabricated metal ringing can be heard; the finished ceramic tile placed on a pair of bars should be able to easily withstand an adult standing on it; the overall scale of one tile during firing did not decrease by more than 5%; When broken, good ceramic tiles will be the same color without bubbles.
Installation of flexible roofing
When the surface is prepared and all of the above operations are completed, you can begin installing the roof itself.
Please note that it is not recommended to use different batches of tiles on the same slope, as the color shades of the material may differ. It is recommended to take shingles from different packages in a random order.
- Laying a soft roof can begin from the lower or upper part of the slope, and in any case, the laying begins from the central part of the ridge or cornice.
- The first row of starter shingles is laid in such a way that the top layer overlaps the seams and perforated cutouts. Hardware is hammered in at a distance of 20–30 cm from the edge cutout. Depending on the slope, 4 or 6 nails are used to secure one shingle.
- The shingles must be laid staggered to cover the seams, so the second row also starts from the center, but offset. The installation pattern must correspond to the shape of the tiles. Before placing on the roof, the protective film is removed from the back of the tiles.
- The edges of the shingles must be trimmed with a knife, and the side edge should be coated with mastic. This will provide protection from downpours that the wind will blow onto the gable of the roof.
To install shingles at high heights, you will need to install scaffolding
- In places where it is planned to install spot ventilation, at this stage you can make cutouts in the roof. Then a roof point valve (RPV) is installed at these points. After installation, all seams are covered with mastic.
Securing the KTV to the roof using roofing nails
Ventilation holes are inserted one at a time per 50 - 60 sq.m.
- The shingles that meet the chimney and vent pipes are notched to fit the obstruction.
Cutout on soft tiles for connecting to the KTV
- For installation on the valley axis, it is necessary to cut the shingles along the edges so that on the valley carpet the distance between the tiles of different slopes is 15 - 20 cm. The cutting line must be treated with mastic.
Properties of ceramic tiles
Roofing material is produced by different companies, which is reflected in the characteristics of the final product.
Ceramic tile weight
The weight depends on the size and thickness of one product. Classic tiles weigh 4.5 kg. Elements of other shapes and sizes have their own mass. On average, 1 m 2 of roofing weighs from 40 to 70 kg.
Ceramic tile thickness
Dimensions and thickness are non-regulated characteristics. Each manufacturer sets its own parameter. The only requirement of GOST is the maximum tolerance for bending or chipping - 3 mm. The error allowed is 5 mm in length and 3 mm in width.
Specifications
Among the main characteristics are:
- The service life of roofing tiles reaches 100 years. The material is not susceptible to corrosion or other external factors. A ceramic product is only weakly resistant to impacts.
- Ceramic roofing is 100% fireproof. The tiles can withstand direct contact with open fire.
- Resistance to snow and other loads reaches 500 kg/m2 of ceramic roofing. Three people can stand on one section of the roof at the same time.
- The tiles can withstand at least 300 freezing and thawing cycles.
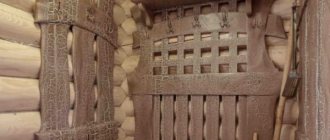
Burnt untreated tiles are brown in color with a reddish tint. The product has a dense structure.
Connecting to a wall
To properly protect roofing materials from water, it is necessary to correctly connect the shingles to the wall or chimney pipes. This task can be performed in two ways. The differences between them are only in the location of the valley carpet. In the first method, the valley carpet is located under the shingles, while the second method assumes that the carpet is located above the shingles.
- A corner block (50x50 mm) must be laid next to the wall or pipe. A lining carpet is placed on top of it.
Scheme of connections to vertical surfaces of flexible tiles
- Either soft tiles or a valley carpet are laid on the lining carpet, depending on the method of joining. In the first method, the valley carpet is laid on the tiles and glued with mastic.
- The valley carpet must overlap the wall or chimney pipe with an overlap of at least 30 mm. To secure the carpet, you can use mastic or dowel nails. A metal junction strip is installed at the end of the carpet, and the seam is treated with silicone sealant.
Installation of ridge and ventilation
After completing the installation of the main roofing covering, you can proceed to work on the ridge. For this roof element, ridge-eaves tiles are used. To ventilate the internal space of the roof, it is necessary to install a ridge aerator. Installation of skates without ventilation is carried out as follows.
- The shingles must be bent so that the fold line is at the ridge of the roof. It is recommended to make an overlap between the elements of at least 5 cm. Fastening is done using roofing nails. In this case, the fastening points must be covered by the subsequent element of the ridge.
- A special hole 4–8 cm wide is cut in the ventilated ridge. A ridge aerator, which has a corrugated structure for air circulation, is fixed on top of this gap. The element is isolated from debris and dust from the street. Shingles are laid on top of the aerator in the same way as a ridge without ventilation.
The aerator ridge provides air circulation