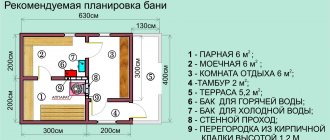
Probably, the overwhelming majority of owners of summer cottages and private country houses cannot imagine their life without their own bathhouse, since such a structure is an integral part of ancient Russian traditions. A bathhouse is not only a place for washing, but also a kind of home “dispensary” that works to restore the strength and health of the owners, and provide the necessary periodic relaxation. But in order for it to bring only pleasant sensations, its arrangement, and in particular all the necessary communications, must be carried out according to all the rules.
Drainage pit for a bathhouse
One of the traditionally problematic components of the bath system is the disposal of used water, so it is very important to properly organize its drainage and collection site. Disposing of contaminated, untreated wastewater onto the ground or into natural bodies of water is strictly prohibited, and such an approach will inevitably lead to penalties from supervisory environmental authorities. Therefore, in the absence of a centralized sewerage system (as is most often the case), a special storage or drainage pit is usually created for these purposes. And in order for the drainage pit for a bathhouse to function effectively, it is necessary to study its design before starting construction, and during the period of arrangement work, follow the recommendations of experienced craftsmen.
Independent study of the geology of the site
To determine the type of soil, you can conduct an express study that does not require special knowledge and is based on visual inspection and tactile sensations. For this purpose, in the proposed pipe laying location, a hole is dug with a depth of 25-30 cm below the TPG. Information about the depth of soil freezing in a given area can be obtained from neighbors, from reference books, and on specialized Internet resources.
| Regions | Soil freezing depth, cm |
| Vorkuta, Surgut, Nizhnevartovsk, Salekhard | 240 |
| Omsk, Novosibirsk | 220 |
| Tobolsk, Petropavlovsk | 210 |
| Kurgan, Kostanay | 200 |
| Ekaterinburg, Chelyabinsk, Perm | 190 |
| Syktyvkar, Ufa, Aktyubinsk, Orenburg | 180 |
| Kirov, Izhevsk, Kazan, Ulyanovsk | 170 |
| Samara, Uralsk | 160 |
| Vologda, Kostroma, Penza, Saratov | 150 |
| Voronezh, Perm, Moscow, St. Petersburg, Novgorod, Ryazan, Tambov, Tula, Yaroslavl | 140 |
| Volgograd, Kursk, Smolensk | 120 |
| Pskov, Astrakhan | 110 |
| Belgorod, Kursk, Kaliningrad | 100 |
| Rostov | 90 |
| Krasnodar | 80 |
| Nalchik, Stavropol | 60 |
Soil freezing depth
It is important to take a soil sample at the bottom of the pit, since sewer pipes will be laid at this level. After which the soil sample is carefully examined visually, rubbed between the palms, and rolled into a rope.
Lump of earth Clay rope
And they evaluate the results according to the table.
Methods for determining soils
If it turns out that the soil is clay or loam, you should know that these categories of soil are classified as highly heaving. In this case, the pipes will need to be laid on a sand “cushion” by analogy with “floating” foundations. The sand will act as a shock absorber during seasonal soil movements and the integrity of the underground part of the sewer system will not be compromised.
Example of a trench with a sand cushion
Example of laying a sewer pipe
After the safe depth for laying the pipeline has been determined, the issue of the location of the septic tank (filtration well) is resolved. The wastewater collection point must be separated from the water intake point by at least 15 m and located no closer than 7 m from the foundation of the bathhouse.
Location of the septic tank on the site
Features of the location of the sepik on the site
Varieties of plums
There are three ways to organize water flow:
- dumping into the ground is quite convenient if the building is placed next to a body of water (as is often done). However, when using detergents in a bathhouse, this option is unacceptable; wastewater with chemicals cannot be discharged into the ground directly, without treatment;
- installation of a septic tank on the site. For a bathhouse built next to a residential building, the drainage from which is carried out into a septic tank, this is the best option. The main problem is that it is necessary to take into account the additional volume of sewage water immediately when purchasing and installing a septic tank, otherwise it will fill much faster than planned at the design stage;
- connection to the centralized sewer system. The most complex option in terms of labor and money, but it practically does not limit users in terms of the composition of waste water and its volume.
The choice of device type depends on several important factors.
- the nature of the building and its location. For a bathhouse built within the city, next to city centralized communications, it is only possible to discharge into a centralized sewer or septic tank. In conditions of dense development, the discharge of water into the ground is unacceptable, since it can lead to soil destruction not only in one’s own area, but also in neighboring areas, and an unpredictable rise of upper groundwater;
- foundation structures. For strip and slab foundations, an existing basement or underground, wastewater must be collected in a single reservoir and drained from there through a pipe. Discharge of liquid directly through the floor into a pit or directly into the ground is only possible when constructing a bathhouse on a columnar or pile-screw foundation;
- type of soil. For clay soils, heavy loams and other soils with a high ability to absorb moisture, the discharge of water onto the soil surface will lead to erosion of the foundation, destruction of supports, flooding of basements and deterioration of the soil condition in the area as a whole.
Conclusion: direct discharge of wastewater from a bathhouse into the ground is possible in a pile structure located on the shore of a reservoir, provided that chemical detergents are avoided and the soil is dense and not prone to erosion. In other cases, it is necessary to organize discharge using a pipeline into a sewer or septic tank.
Choosing the type of sewer system
To improve the bathhouse, it is possible to use three types of individual sewerage:
- non-pressure;
- pressure;
- connected to a centralized city drainage system or to the existing sewer system of a private house.
Gravity system
Gravity sewerage
The non-pressure method of drainage is otherwise called gravity. This is the simplest and least expensive type of sanitary sewer system. Its main advantage: energy independence. Installation of a free-flow system requires careful adherence to the slope of the pipes (1-1.5 cm per 1 linear meter) and is impossible if the terrain of the site is difficult.
Sewer slope
To transport wastewater, pipes of a larger diameter are required than when installing a pressure system. Straightness of the highway is highly desirable. If the pipeline diagram includes turning points, inspection wells are installed in these places. This rule is relevant for any type of sewer system.
Korsis pipe for storm and free-pressure sewerage
Gravity sewerage – PP pipes
Installation of non-pressure sewer pipes
Lookout well
Pressure system
General scheme of pressure sewerage
The pressure sewer system provides for the forced transportation of wastewater, which is provided by a pump or pumping station. The equipment can be installed both indoors and outdoors. A pressure sewerage system for a bathhouse is built if for some reason it is impossible to make a non-pressure one. Features of this type of sewer:
- pressure is more expensive than non-pressure;
- volatile;
- requires insulation of equipment in winter.
The photo shows pipes used for pressure sewerage
Pressure sewerage – pumps
Pressure sewer with sewage pump
Pressure sewer pipe
Inset sewerage system
A less labor-intensive, but most troublesome way is to connect to a centralized sewer network. This method is not possible for all bathhouse owners. Therefore, it makes no sense to consider it in all details.
Connection to a centralized sewer network
More often, it is used to connect the wastewater system to an existing septic tank on the site. However, in this case, you will have to choose the type of drainage system (pressure or gravity).
Connection to a septic tank
Features of pipeline installation
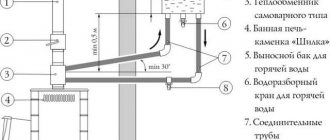
Laying a sewer pipe connecting the internal drain with septic tanks (wells) is the most important stage in the arrangement of the entire system. When installing your own sewer system, a plastic pipe with a diameter of 110 mm is usually used for the external pipeline. It is laid with a slope of about 2-3 percent to ensure gravity flow.
The pipeline imposes an important requirement: the water in it must not freeze even in the coldest season. For this purpose, insulation made of mineral wool, polystyrene foam, expanded clay and other heat-insulating materials is used. The pipes are laid in a trench at a depth exceeding the freezing level by 25–30 cm. Thus, in the southern regions, a depth of 70–80 cm is considered sufficient, and in the middle zone 1–1.2 m. When laying the pipeline, a cushion of sand is poured onto the bottom of the trench and crushed stone at least 20 cm thick.
During sewer construction, an important place is given to inspection wells, which provide free access to the sewer pipe. This is necessary to clean it when clogged. According to SNiP recommendations, such wells should be installed every 10 m of the route, as well as in places where the route turns and branches.
We design a sewerage scheme for a bathhouse
For greater design convenience, the unified sewer system is divided into two types: internal and external. The first includes communications indoors, the second - outside the building. Once you familiarize yourself with the basic principles of constructing a circuit, it is easy to develop it yourself.
Design stages
- It is necessary to draw a plan of the bathhouse, taking into account the thickness of the walls and partitions of the building. Graph paper is best for this purpose, but you can also use a regular piece of checkered paper.
Internal sewerage diagram
The photo shows a typical internal sewerage diagram - Indicate the dimensions, mark the installation locations of plumbing fixtures or drain points.
- Determine the location of the main pipe outlet.
- If the bathhouse has a toilet, take into account the need to install a drain pipe.
Example of installation of a drain pipe
How to properly install a vent pipe on the roof - Plumbing fixtures are connected to the main pipe along the most convenient and short path, aiming for a minimum number of turns in the line.
- The length of the communications is summed up, taking into account the outlet beyond the outer wall of the bathhouse.
- Proceed to constructing a drawing of the external sewer system.
Rules for designing an external network:
- an inspection hatch is provided at the junction of the external and internal sewerage;
- according to SNiP, inspection wells are installed at the turning points of the main line, at the points of connection of a separate side branch of the pipeline, every 15-35 m of a straight main line with a pipe diameter of 100-150 mm;
- according to SNiP, the slope of external sewerage with a pipe diameter of 110-150 mm is 0.01 (1 cm per 1 meter);
- the first inspection well should be located no closer than 3 m and no further than 12 m from the bathhouse;
- if the site has a large slope and there is a toilet in the room, install a multi-stage sewerage system with drop-off wells.
Scheme of a stepped sewerage system
Simplified diagram of external sewerage
Approximate diagram of the internal sewage system of a bathhouse
Water seal options
A water seal is an important element of the sewer system, the purpose of which is to cut off unpleasant odors coming from the septic tank (drainage pit). Simply put, this is a water plug that remains in the pipe even if the bathhouse is not in use. An example of the simplest water seal is a U-shaped siphon. In a pipeline made of plastic pipes, a water plug is created using three shaped elements: bends.
Water seal
Water seal - example
The difficulty is that when the sewer system is rarely used, the water in the water seal tends to evaporate. In this case, experts recommend installing a dry shutter. It is a simple plastic or metal structure equipped with a spring and a valve (membrane) that blocks the exit from the pipe. When water enters the system, the damper is folded back under its pressure, and after the flow passes, it returns to its place.
Ladder with dry seal
Dry water seal - diagram
Craftsmen make unique homemade valve systems for bath drains. If you wish, you can use one of the following options.
| System Description | Illustration |
| A plastic funnel with a diameter slightly larger than the cross-section of the pipe and an outlet with a diameter of 3 cm is installed in a vertical position into the gap in the sewer pipe. A plastic ball (for ping-pong or other) is placed in the funnel of such a size that it blocks the narrow exit. When water gets into the pipe, the ball floats up. | A funnel and ball valve. Example for clarity |
| To install a dry seal for a plastic sewer with a pipe diameter of 50 mm, you will need a 50/110 adapter, which needs to be slightly modified: cut at an angle and attach a circle of thick rubber to it. After which the structure is installed at the outlet of the pipe in a septic tank or drainage pit. | Dry shutter Dry seal in the sewer pit |
Prices for water seal
water seal for sewerage
Options for barrels for cesspools
The buyer can choose from two types of barrels – iron and polymer.
Pros and cons of an iron barrel
Metal barrels have high strength and impressive weight. It is worth considering that metal does not tolerate constant moisture. Without sufficient treatment, corrosion eats away a steel septic tank in 3-4 years. For its installation it is necessary to use lifting equipment.
To avoid metal rotting (corrosion), before installing an iron barrel for sewage, it is worth performing a number of waterproofing works:
- For external use, polymer coating waterproofing can be used. The good thing about it is that, thanks to its plasticity, it can be applied to any surface shape.
- The inner surface should be treated with liquid applied materials. In some options, summer residents use nitro paint, but this method is inferior to processing with factory materials.
Among other waterproofing methods, domestic manufacturers offer injection materials. These are two- or three-component compositions based on polyurethane resin. Their advantages include good adhesion (adhesion) of materials to the surface of the barrel, good water-repellent characteristics and the strength of the material itself. The disadvantages are the high toxicity of the components.
To treat a barrel with elastic injection material, it is necessary to take care of additional protection.
For more competent handling of resins, it is advisable to have special skills in handling such insulation.
Advantages of a polymer barrel
Plastic barrels for drainage pits are easy to use. They are already equipped with a ventilation hole, a convenient manhole cover, holes for installing PVC sewer pipes and much more. In addition, unlike iron ones, they are light in weight and do not require additional equipment during installation.
The barrel material is not exposed to external influences from acids and alkalis of soil water, which solves the problem of its replacement. A huge number of shapes and volumes by displacement allows you to choose the PVC sewer container necessary for your needs. Its inner surface is resistant to aggressive environments.
When laying out a project for a sealed drainage pit, it is worth considering that a closed system is more profitable, since wastewater does not enter the ground and does not cause environmental pollution.
Accumulating wastewater can create underground mudflow pillows and destroy the foundations of nearby buildings. In this case, the only disadvantage of a closed sewer pit will be the constant pumping out of slurry. But if you take into account all the advantages, it’s not difficult to come to terms with this fact.
Which pipes to choose
In fact, the choice of sewer pipes is not so large.
| Type of pipes | Description |
Cast iron pipes for sewerage | It is irrational to use cast iron in our time: they are expensive, heavy and inconvenient to install. Ceramic ones are ideal in any respect, but also have a high cost. |
Asbestos cement pipes | Asbestos-cement ones are the cheapest of all possible, but they often disappoint with their defects. In addition, when installing a non-pressure sewer system, products with smooth and even walls are required. And asbestos-cement ones have a rough inner surface, often riddled with depressions. |
Plastic pipes | The optimal choice is plastic pipes that are resistant to all types of destructive influences. These products are excellent for installing internal and external sewage systems, are flexible in processing, and are available with or without a socket. The warranty period for plastic pipes is 50 years. For long products, shaped elements (fittings) are offered, with the help of which the sewer system is installed. |
The category of plastic pipes includes:
- PVC (polyvinyl chloride);
- PVC (chlorinated polyvinyl chloride);
- PP (polypropylene);
- HDPE (low density polyethylene);
- polyethylene corrugated.
Any of these products can be safely used in a sewer system. The diameter of the main line is selected based on the expected intensity of operation of the building and the number of drain points. For an average bathhouse with a steam room, washing area and toilet, when installing a gravity drainage system, pipes with a cross-section of 100-110 mm are required. If a toilet is not provided, a diameter of 50 mm is sufficient. Plumbing equipment is connected to the main line with pipes with a cross-section of 50 mm.
Prices for plastic pipes for sewerage
plastic pipe for sewer system
Construction of a brick drain
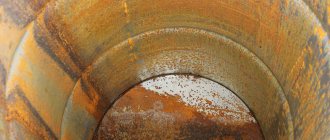
A brick cesspool is the most ancient option for arranging sewer walls. It can be sealed or with an open bottom. To facilitate construction, it is necessary to prepare a foundation pit with smooth walls so that the brick can be laid close to them. This will significantly speed up the work, especially if there is not enough experience in this area. A home cesspool made of bricks is placed on cement mortar. You cannot use light sand masonry, because in conditions of constant humidity, a collapse will be inevitable.
The masonry is done in half a brick in a circle. This way the corners hold each other tightly. With this method, additional modernization is possible to improve tightness. To do this, you need to plaster the walls and fill the bottom. You can use old bricks taken from destroyed buildings. This construction method takes the longest. A brick cesspool is one of the most reliable, and if you use a strong mortar, its destruction will not happen soon. You just need to prepare a hole for the inlet pipe in advance, since it will be difficult to break through the wall later.
Installation of the internal sanitary sewage system
It is necessary to start installing a sewer system at the construction stage of the bathhouse. But it is also possible to improve a building that has already been completed and has been in use for a long time. The scope of work and their sequence are different in both cases, so each option must be considered separately.
Pipes for internal sewerage of a bath
Installation of sewerage during the construction phase of a bathhouse
To carry out the work, you will need a previously drawn up plan (diagram) of the sewer system. In order to accurately find the connection points for plumbing elements (drains, showers, toilets, sinks, etc.), markings begin after the foundation has been erected. In places where the main line is laid, trenches of appropriate width and depth are dug.
Important: The bottom of each ditch is leveled taking into account the required slope towards the septic tank.
Leveling a trench for laying pipes
Ditch for laying pipes
Then they begin laying the pipes. Experts advise starting the installation of a sewer system by installing the main pipe and large (nodal) elements, to which side branches of a smaller diameter are subsequently connected.
Installation of sewer system
At the plumbing connection points, vertical pipes are installed. To prevent foreign objects from entering the network, each outlet is closed with a plug. Install the ventilation riser.
At the connection points, plumbers install vertical pipes with plugs
In regions with cold climates, pipes are insulated. For this purpose, fibrous materials (mineral wool and its analogues), foam half-cylinders, and foamed polyethylene are used. If desired, you can pre-wrap the pipes with noise-absorbing material, which will significantly reduce the volume of sounds emitted by the operating system.
Pipe insulation
Lay geotextiles.
Insulation flooring
Form a sand cushion.
sand cushion
Installation of indoor sewage system
If the bathhouse has been in use for more than a year, it can also be equipped with a system for draining dirty water. To do this, you will need to draw up a diagram and open the floor in the right places. The pipes are installed at the foundation level, in one of the walls of which a hole is drilled to lead out the main line.
Drain drain Installation of drain and floor
Drains are installed in the washing room and steam room. When performing work, the following rules are adhered to:
- the ladder must be located flush with the floor;
- gaps are closed with moisture-resistant grouts;
- tiles are laid after installing the ladder.
Prices for drainage ladder
sewer drain
Construction of a sealed pit
The entire system is simple and easy to install. The sewage system throughout the house is routed into a barrel dug no closer than 5-6 m. All wastewater is collected in the hole; pumping it out with a sewer truck is very convenient, especially if the distance from the fence is no more than 2 m.
You need to dig the barrel no deeper than 7 m. Otherwise, the pumping hose will not be able to collect all the liquid and will only collect liquid from the surface. When calculating the location of the tank, it is necessary to take into account the terrain features. If the house is located in a low area, there is a high probability that after heavy rainfall, water will accumulate in large quantities. It is recommended to use large barrels, since containers with low weight can be pushed to the surface by heaving soil and soil water from the pit.
If a family has more than two people, it is worth thinking about organizing an overflow-type drainage pit. The structure consists of two successively located barrels. The containers are located one slightly higher than the other. The connection is ensured by a built-in additional pipe. The liquid is pumped out individually from each barrel.
In both options, the barrel must be installed, providing easy access to the vacuum truck. When sealing the barrel opening, it is necessary to leave a Ø100 mm ventilation hole for the vent pipe. During the decomposition of organic waste (fecal matter) in wastewater, large amounts of methane are produced. To remove it effectively, the pipe must rise half a meter from the soil level. If the gas is not vented, the barrel will explode.
The area around the barrel lid remains a controversial issue. Some sources do not recommend pouring concrete around the hole. Because when the soil subsides, the concrete circle can begin to put pressure on the upper part of the container and thereby damage its tightness.
Installation of external sewerage for a bathhouse
The main element of the external wastewater disposal system is the septic tank. If the bathhouse does not have a toilet, there is no need to buy a factory-made product or independently equip a well with multi-level filtration of wastewater. It is enough to dig a drainage hole. But it is relevant only for soils with a high level of moisture permeability (rocky, sandy, sandy loam).
Video - DIY drain hole
Installation of sewerage with a drainage pit
- According to the diagram, they mark the area: find the location of the wastewater collection point, determine the route for laying the main line;
- dig a hole 1-1.5 m deep below the TPG;
- a 20-30 cm layer of sand and gravel is poured onto the bottom;
- to prevent soil walls from collapsing, you can install a metal container or a column of large-diameter tires in the hole. A more solid structure is a frame built of brick.
Drainage pit
They begin to lay the highway. Dig a trench to a depth below the TPG and form a slope towards the drainage hole. Lay the pipes and check that the slope complies with the requirements of SNiP.
At the turning points of the pipeline, inspection wells are installed. In order to prevent pipes from freezing in these places during cold times, it is necessary to provide insulation and cover the holes with double covers.
Inspection well
The place where the pipe enters the drainage pit is sealed using cement mortar or foam.
Sealing
The insulation of the main line is carried out in any convenient way: by wrapping pipes with mineral wool or by laying polystyrene foam.
Insulation of the main line
Sewerage with pit
In areas with clay soil, it is recommended to install a pit located under the floor of the bathhouse for waste disposal. The presence of this drainage receiver does not relieve the owner from the need to install an external main that transports water outside the premises. The pit serves as an auxiliary structure for the smooth operation of the sewer system.
Sewerage with pit
A square-shaped pit is dug under the floor with an edge length of at least half a meter and a depth of 1-1.5 m. At a height of 10-15 cm from the floor level, a pipe is installed connecting the pit with the external sewerage system. Maintain a slope of 1 cm per 1 linear meter in the direction of water drainage. The bottom and walls of the pit are concreted.
Digging a pit
How to properly drain a bathhouse
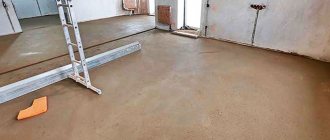
If you are building a system for draining wastewater from a capital bathhouse, then perhaps the best option would be pouring floors with a connection of the lower tier gutter to the drain, and then with the removal of liquid through sewer pipes.
Why this solution is convenient:
- On pourable floors, water drains without delay, all wooden parts dry perfectly, do not rot and are not subject to excessive moisture;
- The drainage channel in the center of the room serves the purpose of a preliminary storage tank, in which small things that fall on the floor remain;
- It is convenient to walk on such a floor without experiencing discomfort, as is the case with a slope; in the center or in the corner you can make a removable lid through which to block the drain hole leading to the sewer and septic tank for the winter.
The design turns out to be much warmer than direct drainage into the underground floor of the room; accordingly, there is no risk of the appearance of moss, fungus, the spread of pathogenic bacteria and freezing of the bathhouse foundation.
Drawings and diagrams
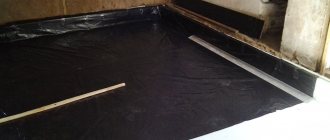
The simplest version of the drain is shown in the sketch below. Directly in the center of the bathhouse foundation you will need to dig a pit, line it with bricks, and fill it with sand and gravel. The walls must be insulated and waterproofed from soil moisture.
A drainage gutter on the subfloor is connected to the drain in the center of the bathhouse.
A sewer pipe will follow through the trench leading to the septic tank. The entrance to the sewer will be insulated, and the drainage systems from the steam room of the shower cabin and washing compartment will be connected to the tee-splitter.
Selection and calculation of material
To manufacture a drainage system and connect it to a sewer pipe on site you will need:
- One bellows with an elbow or drain ladder for each bathhouse room;
- Waterproofing film or thin galvanized metal;
- Corrugated pipe 50 mm;
- Gray polypropylene pipe 50 mm - 1.5-2 m;
- Polypropylene corners, straight and with an angle of 60° - two for each drain;
- Adapter 50-100 mm for connecting an external sewer pipe and draining into a septic tank.
The above list is indicative; for each specific case, you will need to specify the number of elements and parts to build a drainage system in the bathhouse. If wastewater discharge is planned to be ensured only through an internal collection gutter, then the number of parts will be reduced by an order of magnitude, but the quality of the drain will clearly deteriorate. In addition, the gutter will freeze in winter, which means it can only be used indoors in the summer.
Required Tools
First of all, you will need carpentry tools, metal scissors, a grinder and a measure. The easiest way to cut plastic sewer pipes is with a hand hacksaw.
If the trays for collecting water in the underground are made of galvanized steel sheet, then you will additionally need metalworking tools for cutting and bending the edges.
Pipes and flanges for collecting and draining water are installed using silicone sealant.
Step-by-step instruction
First of all, you will need to dig a trench and a pit inside the bathhouse. The dimensions are arbitrary, the main thing is that after strengthening and insulating the walls, there is enough space left to assemble the drain parts and connect it to the sewer pipe.
The second stage is to cut out and lay the joists and pouring floor boards. The floorboards are not fastened, but only tried on and adjusted to size. The logs are treated with a mixture of drying oil and transformer oil, and the floorboards cut to size are treated with silicone impregnation.
Important! At the same time, for preliminary fitting, you will need to lay the drain outlet from the steam room and the sewer intake pipe with all tees and adapters.
Before laying the floor, all drain parts are assembled and leveled
This is done in order to adjust the level of bedding under the outlet pipe and transitions in the bathhouse subfloor. This is the only way to ensure a drain slope of 5°. Otherwise, water will accumulate in the gutter and rot.
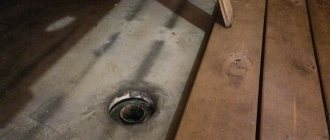
How to drain a bathhouse under the floor
The easiest way to assemble a prefabricated gutter is from bent galvanized metal. To prevent the channel from deforming under load, it must be laid between two joists, as in the photo.
Drainage gutters can also be made from metal; this is easier than sewing up the lower planes with a slab, insulating them and gluing a film.
Each such gutter will need to be made according to the size of the span between the beams. The side edges are bent upward vertically by 3-5 cm, after which the sheet is nailed to the sides of the logs.
The bottom edge of the tray should overlap the central drainage channel.
Advice! Before nailing the floorboards, check the functionality of the drain; to do this, it is enough to spill a few liters of water on each tray. The liquid should go to the wall without any residue.
In the center or at the end of the collection gutter, depending on how the water flow is organized, a drain is cut in, a corrugation is connected to its outlet pipe, and then a drainage system is assembled from sewer pipes.
At the installation site of the ladder, a hatch is cut out through which you can control the operation of the entire drainage system in the bathhouse.
Through the hatch it is convenient to close the drain valve for the winter
Basic moments
The owner of a bathhouse must remember that each stage of sewerage installation requires careful compliance with the requirements for it. The failure-free operation of the system is ensured by a properly designed scheme and exact compliance of the pipe slope with SNiP standards. A comfortable stay in the bathhouse is guaranteed by the presence of a hydro- or dry seal.
You should not neglect the design of the ventilation system, as it forms optimal air exchange and promotes the removal of moisture after bath procedures. This will help prevent the formation of mildew and mold. For regions with cold climates, it is extremely important to perform high-quality work on insulating the sewer system.
Video - Do-it-yourself sewage system in a bathhouse
Video - Draining water in a bathhouse with a water seal system
Criterias of choice
Select the type of well according to the following criteria:
- Dimensions. For many owners, the weight, length and cross-section of the shaft are important.
- Technical characteristics of the material: durability, resistance to corrosion and aggressive environments, fracture strength and tensile strength.
- Price. For many craftsmen, this parameter is important, since installing an extended drainage system can cost a pretty penny.
Often, in order to save money, owners of summer cottages decide to install a drainage well from tires or polymer containers with their own hands. But the tightness of such a tank remains in question, since it is difficult to achieve absolute integrity of the mine. Over time, it will still begin to allow underground water to pass through, and the tires will be deformed under the influence of heaving soil.