Features of connecting a heated floor to a gas boiler
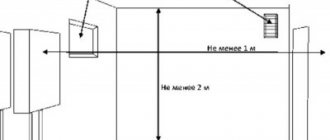
First of all, it is necessary to determine the room in which the floor heating device will be located. This could be an outbuilding with a fairly strong wall (most models are wall-mounted) and the obligatory presence of a window. If this is not the case, you need at least a window. At the same time, there should not be any operating devices near the mechanism (within a radius of 2 m), including a gas meter.
The room in which the floor heating device is located must be equipped with natural or artificial ventilation
In addition, it is important to understand exactly whether you should contact a specialist or not. Usually you can do all the work yourself. The device is secured with brackets at a distance of at least 80 cm from the floor (for safety reasons). Next, it is connected to the water supply and gas pipe. It is the last stage that is the most critical. In many cases, it is better to turn to professionals.
Pros and cons of underfloor heating from a gas boiler
Gas equipment is one of the most popular methods of floor heating in a private home. This option has several undeniable advantages:
- Provides uniform, efficient heating.
- Energy costs are minimal - in many cases this is the most budget option.
- Suitable for any coating and coolant.
- Absolutely safe for health (compared to electric floor heating, which creates magnetic fields).
- Such a floor can be easily integrated into an overall heating system, which simplifies the installation process.
This method has no specific disadvantages. The main disadvantages are of a general nature - they are characteristic of both gas and other types of floor heating:
- Warming up takes quite a long time, and it also turns off slowly, so it is impossible to achieve instant heating or cooling of the surface.
- The system relies on electricity, so in the event of an overvoltage or other interruption, the equipment will shut down.
- Installation of the system requires certain skills. However, installing the boiler itself is not particularly difficult. The most important step is connecting the device to the gas supply.
A gas boiler for the floor has quite a lot of tangible advantages and is practically free of disadvantages
Schemes of warm water floors from a gas boiler
There are several options for connecting a gas boiler to floor heating; the most common diagrams are presented below.
Basic connection diagram
Connecting a gas boiler
Diagram with two-way thermostatic valve
Circuit with pressure gauge and electric pump
Gas consumption for heated floors
Gas consumption is one of the most important indicators that need to be determined before purchasing a gas boiler for heated floors. When calculating, you should proceed from 2 basic rules:
- In accordance with GOST requirements, 1 m3 of gas consumed provides 9.3 kW of energy.
- For every 10 m2 of heated floor, 1 kW of energy is required. If the house area is 100 m2, you will need 10 kW, if 150 m2 - 15 kW, 200 m2 - 200 kW and so on.
At the same time, the real efficiency of the device is never equal to 100%, and in most cases does not exceed 93% (for calculations it is better to take a margin of 90%). Therefore, the difference of 10% should be subtracted from the productivity of 9.3 kW, that is, 9.3 * 0.9 = 8.37 kW. This is more or less a real figure. However, there are other factors:
- frosty winters;
- poor home insulation;
- low heat capacity of building materials.
Then the efficiency can be reduced by another 3%, that is, the figure will be 87%, and then: 9.3 * 0.87 = 8.0 kW. This is the minimum value - a heated floor using gas is guaranteed to receive this amount (at a consumption of 1 m3). Therefore, to heat the entire area of the house you will need:
| Area, m2 | power, kWt | gas consumption, m3 |
| 50 | 5 | 0,65 |
| 100 | 10 | 1,25 |
| 150 | 15 | 1,85 |
| 200 | 20 | 2,50 |
Typically, the power of gas boilers does not exceed 240 kW, and in this series there are already the most expensive models (35-50 thousand rubles). Therefore, if the area of heated floors is not too large (up to 240 m2), you can install 1 powerful device. If the surface is much larger (for example, there are 2-3 floors), you will need not 1, but 2-3 boilers.
When calculating gas for heating a heated floor, be sure to take into account the material of the walls, the characteristics of the climatic zone and other factors
What laying schemes should I use?
There are several schemes for laying water heated floors. Their selection depends on the following factors:
- size and shape of the room;
- arrangement of furniture, massive household appliances;
- the presence of external walls facing the street.
Today, spiral laying schemes are used, when the pipe is laid out in the form of a single spiral, with the supply and collection sides running parallel. There is a double spiral option, which is used if one of the walls of the room faces the street. In this case, a small section of a separate spiral is mounted near the wall, after which the pipe from it is laid out in the form of a large spiral. The option of laying water heated floors in the form of loops or snakes is used for large rooms.
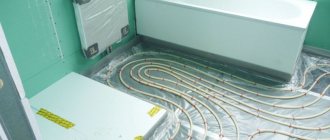
After the installation work is completed, it is necessary to test the floor by filling it with water. Water begins to flow into the cavity of the pipes under a pressure of 5-6 bar. This procedure is carried out within approximately 24 hours. If no leaks are found and the system itself is working properly, then you can begin pouring the cement screed.
Related article: Press pliers for crimping sleeves
Filling work is carried out when the entire underfloor heating system is filled with water; it must not be drained under any circumstances. After pouring, the floor is left for at least 28 days, during which it will dry. When the surface is ready, the selected type of flooring can be laid.
The best gas boilers for heated floors
Warm floors and a gas boiler are the main elements of the surface heating system in the house. Therefore, the selection of equipment requires a special approach. When choosing a boiler, you should pay attention not only to its technical characteristics, but also to reviews from real customers who have already purchased this equipment for heated floors, as well as to the manufacturer’s brand. Based on these indicators, you can rank the 10 best models that are most popular:
- BaltGaz Turbo E 24: double-circuit boiler with a maximum power of 24 kW. Designed for heated floors with an area of up to 240 m2. It has a built-in pump and expansion bank, the approximate price is 30,000 rubles.
- BAXI ECO-4s 24F is a reliable double-circuit gas boiler for heated floors with a power of up to 24 kW. It is placed on the wall, has electronic control, and a built-in pump. Sold at a price of 35,000 rubles.
- Ferroli Fortuna F24 is a double-circuit wall-mounted boiler with electronic control and built-in pump, power up to 24 kW, heated area up to 240 m2. Sold at an average price of 28,000 rubles.
- EVAN Next 7 is a budget model (8,500 rubles), designed for heated floors with an area of up to 70 m2 (power up to 7 kW). The device is mechanically controlled, single-circuit, placed on the wall.
- EVAN Next 3 is another budget model, which is designed for 1-2 rooms (up to 30 m2, power up to 3 kW). Mechanical control, mounted on the wall, single-circuit. Also sold at a price of 8,500 rubles.
- BAXI LUNA-3 240 Fi is one of the most powerful gas boilers (up to 25 kW), which can heat the floors throughout the house. Equipped with a circulation pump and electronic control. The price is about 53,000 rubles.
- Viessmann Vitopend 100-W A1JB010 is another powerful (up to 24 kW) gas boiler for warm water floors. Double-circuit system with built-in pump and expansion tank, controlled electronically. The average price is 41,000 rubles.
- Bosch Gaz 6000 W WBN 6000-24 C is a boiler model from a trusted manufacturer, develops up to 24 kW. A double-circuit device with a pump and expansion tank, placed on the wall. Sold at a price of 49,000 rubles.
- EVAN Warmos-IV-5 5.1 is a single-circuit boiler for underfloor heating, warms a room up to 51 m2. Equipped with electronic control, operates on single-phase mains voltage. Budget model, average price 15,000 rubles.
- Navien DELUXE COAXIAL 24K is one of the most affordable models (price 30,000 rubles), which develops power up to 240 kW and can heat the floor up to 240 m2. Double-circuit boiler with single-phase voltage, built-in pump and electronic control.
Attention! All models described are covered by a manufacturer's warranty for up to 2 years. If necessary, the period can be increased to 3 years for an additional fee.
Underfloor heating pipelines
Water heated floors are a system of hot water pipelines placed in an array of floors. Pipes are made from various materials. Let's look at the main types of pipes for underfloor heating:
- cross-linked polyethylene;
- metal-plastic;
- polypropylene;
- copper pipeline.
Cross-linked polyethylene
Polyethylene molecules penetrate non-ferrous metal braiding
Do not think that pipes are made by stitching polyethylene sheets together. The material owes its name to the molecular structure of the pipe shell. The polymer molecules seem to stitch through the molecular lattice of the non-ferrous metal.
Due to this, a high-strength material is created that can withstand temperature changes and high pressure of hot water.
The standard diameter of pipes for underfloor heating is 16 mm. The pipes are connected to each other with special fittings. To do this, bushings are put on the ends of the pipes being connected, one of which has an external thread, and the second has an internal thread. Using a special tool, the diameter of the pipe end is expanded inside the sleeve. As a result of screwing together the fittings, a completely sealed joint is obtained. The pipes are bent at an angle of 90 degrees without losing their shape.
If you decide to make your own floor heating from cross-linked polyethylene pipes, then you should know that it will be impossible to do this without a special tool.
It is not advisable to purchase a professional set of tools due to its high cost. The best way out is to rent a tool from a professional.
Metal-plastic pipes
The structure of metal-plastic is a layer cake. The upper and lower polyethylene layers are connected by a glued aluminum mesh. The outer shell is highly durable and resistant to aggressive environments. The aluminum reinforcing mesh strengthens the shape of the hose and ensures a long service life of the product.
Related article: How to lay tiles on a wall: laying and how to lay it correctly with your own hands, ceramic tiles yourself
Internal structure of the pipe
What is convenient about metal-plastic is its flexibility. The flexibility of the hoses is necessary for particularly complex pipe laying configurations.
Polypropylene pipelines
Polypropylene will last up to 50 years
Polypropylene pipes are environmentally friendly products with a service life of up to 50 years. The ideal smooth inner surface of the pipeline ensures the unhindered passage of hot water and prevents the appearance of scale and rust deposits.
In rare cases, polypropylene pipes are connected using fittings. Basically, pipes are welded. For this, a special soldering device is used. The ends of the pipes are placed inside the apparatus, where they are heated to the melting point. Then the ends are compressed using the soldering iron mechanism. The welding kit is equipped with nozzles designed for pipes of various diameters. For heated floors, nozzles with a diameter of 16 mm are used.
Handling the soldering machine is quite simple. Almost anyone can create floor heating from polypropylene pipes using welding.
The disadvantage of such pipelines is that they are bent only in a heated state.
Polypropylene pipes are one of the cheapest heated floor designs.
Copper pipes
Copper pipes are expensive
Non-ferrous metal pipelines are one of the most expensive materials. Connecting a heated floor to a boiler made of copper pipes will cost a considerable amount.
However, this is compensated by a lot of positive qualities:
- High thermal conductivity.
- Flexibility.
- Ease of installation of fitting connections.
- Unlimited service life.
- Immunity to corrosion.
- Removal of internal deposits from hot water.
How to connect a heated floor to a gas boiler
Installation can be done independently if you have certain skills and equipment. Usually all the equipment (tank, pipes and other elements) comes with the boiler. The algorithm of actions is as follows:
- First you need to install the device itself. This is usually the simplest stage - you need to follow the instructions. Wall mounting is carried out using metal brackets.
- The second stage is the actual connection to the floor heating circuit. Most models have pipes at the bottom - both for installation to a gas pipeline and for water supply. The connection must be perfectly sealed so that there are no leaks. To do this, you can use tow, sealant, as well as modern sealants.
- At the next stage of installing a heated floor from a gas boiler, it is necessary to connect the device to the water supply system, that is, to 4 connectors - cold, hot water, supply and return pipes. In the place where cold water is suitable, you will need to install a special filter.
- At the last stage, you need to connect the device to the gas pipeline. First, connect the pipe to the gas pipe, then install a filter (it is better to buy a high-quality model), and then seal the joint. This is a very responsible job, and if you doubt your abilities, it is better to contact a specialist.
Connecting the boiler to the gas pipe requires professional skills
Installation of additional automation
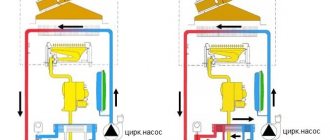
The diagram - boiler - metal circuit - collector - warm floor - is the simplest. It is not complicated by additional equipment.
If several circuits are installed in a house, the coolant in each system must be heated to a certain temperature, then an additional control unit is used. It is a three-way valve with a thermal head and a circulation pump.
Automation will allow you to withstand different modes in individual rooms. The optimal air temperature in the bedroom is 18-20 0C, in the living room 22-24 0C, in the bathroom 30 0C.
The automation is connected to the distribution comb. A bypass is installed between the supply and return collectors. Additional equipment is connected to it. A rotameter is installed at each outlet of the supply manifold. The return outlets are equipped with thermal heads.
- The hot coolant enters the floor line. If the temperature of the liquid in the system rises, the three-way valve closes the outlet of the supply circuit and opens the outlet for the return.
- In the mixing chamber, cold water is mixed with hot liquid from the boiler.
- When the temperature in the water-heated floor decreases, the valve closes the return outlet. Hot coolant is pumped into the floor circuit.
You can connect the underfloor heating system from the boiler yourself. It is necessary to choose the right boiler and determine the water circuit diagram. A separate circuit is drawn for each room.
Additional automation is installed on the distribution comb. Experts recommend maintaining the technology for connecting plastic pipes to collectors.
YouTube responded with an error: The request cannot be completed because you have exceeded your quota.
- Related Posts
- How does the underfloor heating calculator work?
- What is a warm floor National Comfort?
- What should a laminate be like for a warm water floor?
- How to connect an electric boiler for underfloor heating?
- How to make a warm floor from a heated towel rail?
- What concrete is suitable for a warm water floor?
Useful tips
Connecting heated floors to a double-circuit or single-circuit gas boiler requires caution and compliance with safety precautions at every stage. Therefore, while working, it is worth considering several practical recommendations:
- The distance to the nearest wall (perpendicular) should be at least 50 cm, and the gap between the surface of the boiler and the mounting wall should be 3-5 cm.
- Before connecting the equipment to the chimney, be sure to check the draft in the pipe.
- To prevent the heat exchanger from clogging, you can additionally install a water softening system in the inlet pipe.
- The floor heating system must undergo preliminary pressure testing. After this, the unit can be mounted to it.
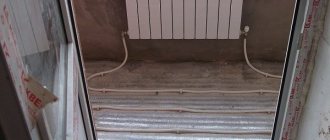
Installation of pipes and pouring screed
Diagram of a water heated floor for wooden floors.
For laying water floors, different pipe installation schemes are used. It depends on the shape and features of the room, its purpose, and the presence of walls facing the street. For the fastening itself, special profiles and brackets are used, which are fixed to the surface of the base base with dowels. This is necessary so that the pipes cannot move after installation.
Related article: Trench convectors - the worst solution for the home
When performing such work, it is enough to use special plastic ties; they fix the pipe to the wall, but under no circumstances should you squeeze it. During installation, the pipe does not unwind immediately from the coil; it is carefully pulled out to the required length, after which it is attached turn by turn. The minimum radius during installation can be from five diameters of the pipe itself. This condition must be strictly observed. Experts recommend that you first make markings on the floor surface, according to which the installation will be carried out.
When laying a water-heated floor, it is necessary to ensure that whitish creases do not form on the surface of the plastic pipes; they indicate improper installation. Such a piece can no longer be used for heating, since it is in this place that breakthroughs will quickly occur. If there is a need to lay a pipeline through a wall, then it should be enclosed in a special winding made of foamed polyethylene. The material is laid tightly, gaps and tears are unacceptable. After installation, all ends of the heating pipes are led to the collector, where they are connected. For this purpose, special crimp fittings or a Eurocone system are used.