Almost all work on leveling the floor and pouring screed involves the use of beacons, which help to complete the rough coating without deviations from the horizon. And if the beacons are set according to the rules, then leveling the screed according to them is quite simple and does not require any special skills from the master for such work. In today's article we will talk about the types of beacons for floor screeds, the nuances of their installation and alignment, as well as the materials from which they can be made. Along the way, step-by-step instructions for installing beacons by level will also be considered.
Without correctly positioned beacons, an ideal floor screed cannot be made PHOTO: regionika-vrn.ru
Purpose of beacons for floor screed
Beacons for floor screed represent the actual level of the new floor, marked throughout the entire area of the room. Essentially, these are marks (markers) located throughout the room, which are at the same horizontal level. This horizontal level coincides with the pre-made marking of the floor screed level. Beacons for screeds must be installed according to pre-made screed markings and after preparing the base of the floor for the screed.
Floor marking
Whatever type of beacon is chosen for work, it must be installed correctly, and this requires accurate markings. First, the planned level of the future screed is noted. Guidelines are made on the walls around the entire perimeter of the room. The more marks, the better.
Determination of the highest point
Method of marking the horizon with a laser level
Using a laser or water level, the highest point on the surface is determined. To do this, mark the first point on one of the walls, at a distance of a meter from the concrete floor. A horizontal line is drawn from it along the entire perimeter of the room. The best way to cope with the task is to use a ruler level: draw a line and check the horizontality.
Varnish for wood and concrete floors: types, characteristics and prices
Next, measure the distance from the line to the floor in different places. Where it is the smallest is where the highest point is located.
In addition to this, it is necessary to check the surface over the entire area. Nails are nailed along the line or screws are screwed in. A wire is pulled over them and, measuring the distance between the base and the lines, the highest point in the entire area is determined. Once identified, its projection is transferred to the wall and the height of the planned screed is added. Using a ruler level, draw a horizontal line. It is called the zero level.
An example of the method for calculating the top and bottom points of the floor can be seen in the video:
Important! The thickness of the final floor must be calculated in advance so that it does not later exceed the height of the threshold.
Defining lines for installation
Marks are made on the floor. They are exhibited according to the following rules:
- The lines should be parallel to each other (ideally and to the walls).
- First of all, mark the locations of the 2 outer beacons. To do this, step 20-30 cm away from the wall and draw a line.
- Marks for the remaining beacons are placed last. The distance between them depends on the length of the tie rule. 10-15 cm are subtracted from it and marks are placed (usually at intervals of 1-1.7 m).
- Self-tapping screws are installed on the lines that indicate the zero level of the floor. They are installed exclusively in places corresponding to the ends of the marks for beacons. They will come in handy in the future when pulling rope guides.
After marking the surface, you can proceed to the installation of beacons. For a quick way to install beacons on a concrete base, watch the following video:
Types of beacons for screeds
Beacons for floor screeds come in two types.
- The first type of lighthouses is all rack lighthouses. The following can be used as slats: a square pipe, a channel, a plaster beacon, a flat wooden lath.
- The second type is professional beacons in the form of tripods (benchmarks). They are placed throughout the room. Each tripod has a retractable rod, which indicates the level of the new tie.
- Rack beacons are often used for installing cement-sand screeds, lightweight concrete screeds, and levelers. That is, where the solution requires manual leveling by rule.
- Point tripod beacons (benchmarks) are very convenient for indicating the level of a cement-polymer floor, finishing screed and self-leveling levelers. The use of these beacons requires certain professional skills.
Let's look at each type of beacon separately.
Rack beacons to indicate the screed level
Rack beacons are installed after marking the level of the screed, which is applied around the perimeter of the room. Beacons are flat, long slats placed on the floor throughout the room from wall to wall, parallel to the length of the wall of the room or parallel to communications laid along the floors.
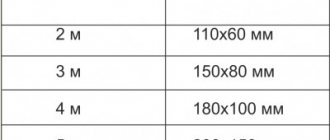
The distance between the slats is selected from 1000 to 1700 mm. It depends on the area of the room and on the tool that will be used to level the screed solution.
Note: The screed is poured in strips along the laid beacons. Even if you installed beacons one meter apart, it is better to fill several spaces between the beacons with mortar to install the screed. To level the solution, you need to use a long rule, 2-3 spans long between the installed beacons. This will not only reduce the work time, but most importantly, the quality of the screed will be very high.
About the floor screed tool
To work on the screed, you need a high-quality purchased tool. An aluminum rule is indispensable for this work. The rule is a flat aluminum profile, 15-20 cm wide, truncated into a cone on one side. The length of the rules varies from 50 cm to 3 meters. Bubble indicators of horizontal and vertical levels can be pressed into the rule. When installing screeds, it is better to use the rule of a length of 2 meters.
Let's return to rack beacons and consider which rack beacons are used for floor screed.
Types of rack beacons for floor screed
Wooden rack beacons
Using straight wooden slats for screed beacons is an old and not entirely accurate way to set the screed level. The use of wooden lighthouses is practically not used now, so this will be short. If you still decide to use wooden beacons to construct a screed, be sure to remove them from the dried screed solution and, after the screed has dried, seal the grooves from the removed beacons with the same solution. Don't forget to prime the furrows first.
Metal rack beacons made of profiles for drywall
As beacons for screeds, you can effectively use a guide profile for plasterboard, PN 28×27 (or any other).
The first and last beacon should be placed at a distance of 20-30 cm from the walls. The distance between beacons is 1000-1400 mm.
To install beacons from the PN 28×27 profile, you need to screw self-tapping screws into the floor along the installation lines. The distance between the screws should be 40-50 cm. The length of the screws should be such that half the length of the screw is screwed into the dowel, no less. This is for durability.
It is better to install beacons from a profile with the base of the profile (shelf) facing up. That is, just cover the screws that are screwed in. To set the level of the beacons, from wall to wall of the room according to pre-made markings, you need to pull the rope tightly. You need to set the beacon profiles along this rope, lowering and raising them, turning screws in and out. Instead of self-tapping screws, the level of the beacons can be adjusted using spacers under the profiles.
After rough alignment along the rope, check the level of the laid profiles using a long rule with a built-in level.
Important! It is necessary to check the level of profiles laid on self-tapping screws not only perpendicular to the beacons, but at a variety of angles. For all checks, the rule level must show a zero horizon.
After setting the profiles, they need to be “frozen” to the floor with a solution. First, in the places where the screws are screwed in. After the next check of the level of the beacons and drying of the solution, the profiles of the beacons must be covered with the solution along the entire length.
Note: PN profiles for beacons should be placed with the shelves facing upwards. At the same time, when setting the level of the beacons, using gaskets or screws, do not forget to take into account the thickness of the profiles (2 mm).
Metal rack beacons made of steel pipes
Another material for rack beacons is steel metal pipes. Pipes can be selected from square, rectangular or round. Basically, such beacons are used in large rooms. Pipe beacons are indispensable when constructing a concrete screed.
Technology for installing rack beacons from pipes
- Mark the beacon installation lines. The first and last beacons should be at a distance of 20-30 cm from the walls.
- Along the marked lines for installing the beacons, you need to place slides of mortar every 40-50 cm. We will smear beacons made of pipes into them.
- Next, we lay the pipe beacons on the mortar slides and, using a rope and a long rule, set all the pipe beacons according to the pre-marked screed level on the walls.
We adjust the level of the beacons by pressing the pipes into the solution or placing additional ones. We check the general level of the beacons, usually parallel to the walls and at different angles. After setting and checking the level of the beacons, we cover the beacons with mortar along their entire length. You can start screeding after the mortar under the beacons has dried.
Note: If the screed is made after the mortar has dried under the beacons, then the screed can be poured immediately between three and four beacons, stretching the mortar using the general long rule.
Metal lath beacons made of plaster profiles
Very often, plaster perforated beacons with a height of 10 mm are used for floor screed beacons.
They are inconvenient for large screed thicknesses, as they are easily deformed and bent, especially at the edges. For thin screeds, plaster beacons are actively used as screed beacons. You need to work with them very carefully, carefully checking the level of the beacons in all directions. Because of their design they are very springy.
Installation technology for plaster beacons for floor screed
As with the installation of pipe beacons. Lay out slides of solution along the line of beacons. The smaller the distance between the slides of the solution, the less the likelihood of errors due to the springiness of the plaster beacons. Then, using a pre-marked level, pressing the beacons into the solution, or placing the solution under the beacons, the beacons are set to the “zero” general level. After the slides of the solution have dried, the beacons must be completely covered with the solution. After the solution has completely dried under the beacons, you can make a screed.
Pin beacons on tripods (benchmarks)
These are professional beacons used for self-leveling floors of various types. They require professional skills and a trained eye. They are a small tripod with a moving rod in the middle. This rod shows the level of the screed. The level is set along the caps on top of this rod.
What methods of installing beacons are there?
There are several types of beacons, depending on the type of screed. It can be dry, semi-dry, wet or based on a self-leveling floor. Let's try to analyze all the options in more detail.
Features of dry floor screed and beacons for it
Dry screed is based on various building materials such as expanded clay, crushed stone, sand. In this case, the ideal option for arranging lighthouses would be to use a metal profile. However, it is worth understanding that the rise of the floor will depend on its height. In addition, if you install such beacons, you should choose a profile with rigid edges so that it does not sag later. If you plan to lay a soft floor covering later, it is better to choose a round or square pipe or channel instead of a soft profile. Naturally, such material will cost more, but reliability should come first.
For dry screed, various bulk building materials are used PHOTO: dekoriko.ru
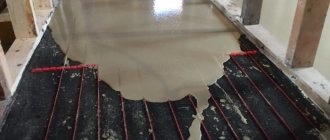
Beacons here are installed at a height equal to the edge of the channel or profile from the zero level. Installation of such beacons is quite simple. Most often, a U-shaped profile is used, which is laid on a plane with the edges up and leveled. After this, expanded clay or other bulk material is poured on top (filling the space between the ribs and channels), which is leveled using the rule. The distance between the profiles should not exceed the length of the tool used for leveling.
Expanded clay is most often used as a dry screed PHOTO: zoompost.ru
Related article:
Pros and cons of dry floor screed : what is a dry floor screed, the technological process of its production, varieties, advantages and disadvantages, how to choose it, how to correctly calculate the consumption of materials, the installation process, reviews from network users - in our publication.
Semi-dry, wet screed and its varieties
This screed is performed using various solutions or mixtures. For her, installing beacons is a little more difficult. If the thickness of the planned screed is small, then you can use special beacons, leveling them and fixing them on plaster or alabaster, which dry very quickly. But sometimes a thick screed is needed. And here it is better to use a metal profile and special concrete screws, called dowels. Let's try to figure out these adjustable beacons step by step.
Pins are special self-tapping screws for concrete PHOTO: fastener-kazan.rf
Step-by-step instructions for installing adjustable beacons for wet screed
To make it easier for the reader to understand the algorithm of work, the instructions will contain photo examples.
| Illustration | Action to be performed |
| First you need to measure the height. To do this, the tape measure rests with the zero mark on the highest point so that the beam of the laser level falls on it. This is necessary to adjust the depth of screwing in the dowels. |
| Then the dowels are screwed into the drilled holes to the required level. Upon further inspection, they can be adjusted in height. |
| Then, using a regular level, the horizon between the dowels is checked. If it is broken, the dowel is screwed in or, conversely, turned out. When the level has shown the exact horizon between the supports of the lighthouses, you can proceed to further work. |
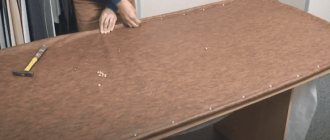
| Now everything is simple. To secure the profiles, it is necessary to knead a certain amount of solution and spread it out so that the caps of the dowels are practically hidden in it. You can make notches at the location of the supports with a spatula so as not to lose them. |
| All that remains is to lay the metal profile with its side ribs down, resting it on the caps of the dowels and check the horizon of the beacons again. At this point, the work of installing the guides can be considered complete. |
As you can see, the work is labor-intensive, but not too difficult. But later, when pouring the solution, it will be very easy to align it along the guides.
Related article:
Semi-dry floor screed technology : what it is, pros and cons, thickness of semi-dry screed, rules of reinforcement and surface preparation, nuances of preparing the mixture, pouring the semi-dry mixture, stages of work.
Are beacons needed when pouring a self-leveling floor?
Controversy on this issue has not subsided for a long time. Some say that there is no point in having beacons with such filling, while others, on the contrary, argue that they are necessary. If you look into it, beacons, of course, will not be superfluous, but it does not always make sense to waste time installing them. Here the answer will depend more on the brand of self-leveling floor mixture. Usually they don’t skimp on such materials, and if the mixture is of high quality, then installing beacons can only take time, without carrying any practical meaning.
Some people make benchmark beacons with their own hands. PHOTO: hellovdo.com
Should the beacons be removed from the screed after the solution has dried or not?
To answer this question, you first need to answer another question. Why is this necessary? If you leave metal beacons in a solution, over time they will rust and in their place, dips and cracks will form.
The classic advice is simple. All beacons need to be removed from the screed, or rather knocked out. Clean the resulting furrows from debris, prime them and, after the primer has dried, seal them with the same solution.
But many companies leave plaster beacons in the screeds, on top of which a self-leveling or finishing self-leveling floor is planned. Allegedly, beacons without contact with air will not corrode. The regulatory documents say nothing about such beacons, and discussions on this matter are not within the scope of this article.
After placing the beacons, all that remains is to mix the screed solution and you can begin installing the screed.
This article is all about screed beacons! Walk on level floors!
©Opolax.ru
Preparatory work
Regardless of the type of beacons being installed, it is necessary to carry out a set of preparatory work. The surface is thoroughly cleaned of debris and remnants of the previous finishing coat; all wooden structures, including baseboards, are removed.
Dust and all types of dirt are removed; if there are any unevenness, they are sanded manually or with a grinder. The result should be a smooth horizontal floor surface.
All cracks and small recesses are carefully sealed with compounds with minimal shrinkage, time is allowed for them to set, and if necessary, re-grinding is done.
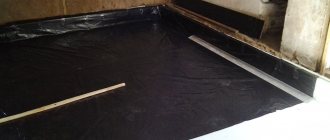
The prepared floor is covered with a protective primer and waterproofing; this will prevent the ingress of excess moisture and strengthen the structure.
Directly to install the beacons, it is necessary to determine the zero mark, which is done using a water or laser level. At a height of 1 m, a mark is placed on any of the walls. Next, at the same level, marks are made on the remaining walls and connected by a base line. The points are lowered 1 m down and connected by a line to obtain the zero level. If the floor is uneven, find the highest point and count the zero level from it. To set the thickness, a distance equal to the smallest thickness of the mortar layer is retreated from the highest point, and another line is drawn. Beacons are installed along it, and unevenness is leveled when pouring the screed.