Inexpensive and healthy, infrared home saunas are gaining popularity all over the world today. Even in Russia their use is akin to a boom. But invisible heat was discovered two hundred years ago by English scientists who noticed that temperature increases already beyond the red light of the solar spectrum. The idea was quickly picked up by the Japanese, who are especially sensitive to their health, and thanks to one of their doctors, half a century ago they discovered a way for deep penetration of heat during such warming of the human body. This is how zirconium emitters were invented, which emit waves with a length of 2 to 5.6 microns and which have a powerful positive effect on the human body.
Now the infrared sauna is one of the integral elements of modern homes in the USA and Western Europe. Such luxury has long ceased to be an attribute of fitness clubs and beauty salons in Russia - all this can be easily equipped even in a cramped Khrushchev-era building, not to mention the fact that the question of how to build a sauna of this type in a dacha is not even raised.
So, how to make an infrared sauna yourself and what are its advantages over conventional steam rooms.
Operating principle of an infrared sauna
The radiation spectrum of the heating elements is such that when it hits the human body, it is deeply heated. As a result, blood flow improves, fluid circulates better throughout the body, metabolic processes are restored, and cells are better supplied with oxygen.
An infrared sauna makes a person sweat no worse than in a regular bath. Together with sweat, fats and toxins are removed from the body, and the process itself is 2-3 times more effective than in a regular steam room! This type of sauna is universally recognized as so beneficial that it is used for athletes in the preparatory stages for competitions, as well as as a restorative measure after their completion.
Ventilation
As for ventilation in such a product, it is simply superfluous here, since during the procedure in this type of sauna there is no formation of elevated temperatures and steam. In this option, it is enough to simply create a small hole, which will make it easy to adjust the special valve to open and close inside the booth itself. You don’t have to create such a hole at all, but make sure that the sauna is ventilated periodically, not when it is turned off.
Advantages of infrared saunas compared to a conventional sauna
Before you build an infrared sauna with your own hands, it is worth studying its main advantages compared to a Finnish sauna.
In Russia, infrared saunas are loved because:
- Such a sauna has significantly lower energy consumption, because there is no need to warm up all the air. Heating elements are very economical.
- There is no chance of getting burned, because all dangerous elements are hidden in the wall of the cabin.
- The minimum number of contraindications, unlike the Finnish sauna. This is especially true for those who were previously unable to steam and enjoy this process - in an infrared sauna you can pamper yourself with warmth for a long time. This is because wave heating has a better effect on the cardiovascular system, in contrast to incredible humidity and air that burns the body and internal organs.
Stage 4. Electricity
Electrical connection in an infrared sauna
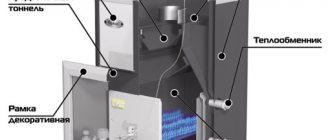
An infrared sauna, as noted earlier, does not require either sewerage or water supply. The booth should not be connected to a common outlet or, worse, use an extension cord when connecting. It is advisable to draw a separate branch from the electrical panel and install a new outlet.
Special IR emitters are used to heat the structure. They can be bought in the same specialized stores, but before purchasing you need to accurately calculate the required number of devices. A single-person sauna is taken as an example; approximate calculations for it are given below.
- One device is installed under the bench to warm the feet.
- The other is installed in the back area of a person sitting on a bench.
- There are four more emitters on the sides.
This is enough for one person. Based on the calculations made, you can determine how many devices are needed for two or three people.
Now a few words about wiring. It must be double insulated and rated for 350 W.
All that remains is to install the control panel. A section is allocated on the outer part of the structure. Humidity and temperature indicators are located on the inside opposite the remote control.
Assembling a finished infrared sauna
Building an infrared sauna with your own hands
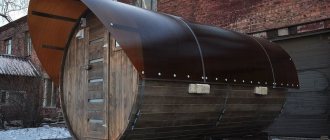
There are, of course, ready-made cabins of this type, however, due to their exorbitant cost, it is better to make an infrared sauna at home with your own hands. You just need to decide on a location and start assembling. The good news is that all the necessary equipment is already built into it, and the temperature in it warms up to 40 ° C in a modest 5-10 minutes.
The finished system will consume 1.8-2.2 kW, which is comparable to an average iron, so you will always fit into the requirements of the electrical network.
Alternatively, you can make an infrared sauna with your own hands - you can always get the drawings. The main thing is that it can accommodate 1-2 people, and its dimensions, as a rule, are 110x213 cm.
Panels
A sauna made from this type of material is quite a durable creation, and the advantages of this particular option are that you can not only easily assemble such a sauna with your own hands, but also, if necessary, disassemble the finished structure; easy dismantling of the work allows you to move such a product from place to place, and without using super strong influence. The connection here is provided using a fastening and joining technology similar to standard workpieces. This material also contains special channels in the walls, thanks to which it is easy and simple to lay the required cable.
You can easily install this type of structure right in your own apartment. Moreover, the panels for creating such a simple, easy-to-use design exist in various sizes, from smaller parts to parts that cover an entire wall. This is certainly convenient: if you need products in your own apartment, you can easily take smaller parts and simply create nice designs in a matter of seconds. If such a design is intended for a large building, then you can easily create it without any questions, since special full-wall elements are already on sale for this purpose, so they help do the work faster, without reducing the quality of the finished result.
Calculation of the electrical network for a sauna
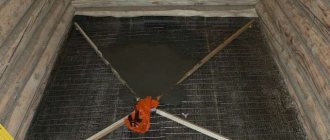
Arranging an infrared sauna in an apartment with your own hands should begin with laying out the wiring, which must first be correctly calculated. The most important thing is the wire; it must be double braided. This rule is described in the relevant documentation for the operation of electrical installations.
The wire must withstand 400 V at a current of more than 15 A. It is better if it is single-core and has a cross-section of 1.5 square. If you are going to lay stranded wire, then a cross-section of 0.75 square will be enough. The length of the cable is determined individually, depending on the dimensions of the booth - as a rule, it is 15-30 meters.
What tools and materials will be needed
The easiest way, of course, is to purchase a ready-made infrared sauna in a store. It will not be difficult to install such a structure yourself. A ready-made sauna with infrared rays is simply installed in the right place in the apartment and connected to the electrical network. These saunas look very prestigious, but at the same time they are expensive. With your own hands, meanwhile, you can make an equally beautiful infrared bath and spend much less money.
The following materials will need to be purchased to assemble such a sauna:
- pine timber 50x50 mm for the frame of the sauna box;
- lining (linden or pine);
- fire protection solution;
- steel corners;
- wooden slats 60x25 mm;
- 8mm tempered glass for door;
Tools you will need: a screwdriver, a tape measure, a hacksaw, a construction level, a large ruler.
Mounting infrared emitters
Special emitters for saunas can be purchased separately at one of the hardware stores, and then installed in a regular sauna. Thus, therapeutic measures can be carried out alternately. The only condition is that they cannot be combined, since moisture is a barrier to such rays. Therefore, we can only talk about building a sauna on our own, and not a bathhouse, because infrared heating is used only for arranging saunas.
It is best to place infrared heaters vertically, because in saunas people are usually in a sitting position. If the sauna is designed for one person, then installing five heaters is enough, the main thing is that in the end they emit a single favorable field. To do this, it is better to place them in the following sequence: 2 pieces on the back wall, 2 in the front corners, and the fifth under the bench, so that the lower extremities are heated, but horizontally.
The gap between the heaters on the rear wall should be 50-60 cm, and their distance on the rear wall from the ceiling should be 7-12 cm. It should be taken into account that all emitters, except for the one located at the feet, are installed at the same height.
The lower heater should be positioned so that the canopy rises slightly less than 2 cm above it. The emitter must be placed clearly in the middle of the side paneling of the canopy. Regarding the emitters in the front panel, they are usually installed at 45°, which corresponds to the middle part of the cabin.
The determining factor in the correct installation of infrared saunas is the correct installation of the heaters themselves.
Stage 3. Assembling the structure
During the assembly process, haste is unacceptable, as it can lead to the most unexpected consequences. To ensure that work goes smoothly, it is necessary to plan all stages of assembly in advance. In short, you need to make a plan.
Step 1. First, a strong and reliable timber frame is created. The dimensions of a sauna designed for two people should be approximately 2x2x1.1 m. The shape, as already mentioned, is rectangular.
First, a strong and reliable timber frame is created
The racks are attached to the lower base and reinforced with jumpers. Another rectangle similar to the base is installed on top. At this stage, the door hole is also formed. All work is carried out carefully, with utmost precision.
Step 2. Next comes the sheathing of the frame. The inside of the sauna is lined with natural wood, and for the exterior you can use fiberboard or OSB.
First, the frame is sheathed from the inside, electrical cables are supplied, and only after that the outer cladding is carried out.
Step 3. Next, IR emitters and a bench are installed, and the remaining space is sheathed with natural wood (lining). All formed joints are sealed with sealant and covered with decorative elements.
Infrared emitters
The distance between the heaters behind a person’s back should be 50-60 cm, the height of those on the back wall is 7-12 from the shelf
Step 4. The door is inserted. Regardless of the chosen design, the door should stand level and without any gaps. The food is also decorated with decorative elements.
Step 5. Upon completion of the carpentry work, remove all debris and connect the electricity.
Due to the fact that the IR sauna is installed indoors, it does not lack any insulation. Moreover, there is no need to worry about possible heat loss, because infrared rays act directly on the body of the person in the cabin and do not spread throughout the entire structure.
Finishing the infrared sauna from the inside
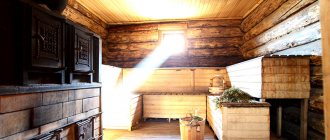
It is not necessary to painstakingly insulate the walls of this type of sauna, since the radiators will generally heat only the human body, without heating the walls and air. The sauna is traditionally lined on the outside and inside with wooden clapboard, which, when heated, will release beneficial phytoncides that have a beneficial effect on the body and produce an antiseptic effect.
The best species are pine, linden and Canadian cedar. The material for the shelves in the sauna is not so important; everyone chooses it for themselves individually, based on their preferences.
And at the last stage, before making the infrared sauna completely, you need to install a modern glass door. The result will be very beautiful and impressive, and the IR sauna will look 100 percent, and it doesn’t matter where it is located, in a bathhouse or in an ordinary apartment.
Stage 2. Selection of materials
As noted earlier, a well-designed project will help accurately calculate the volumes of required materials. Regarding the choice of this material, everything depends only on financial capabilities, but practice shows that extra costs in this case are impractical.
Here is a list of materials needed to build a mini-sauna:
- panels made of wood or fiberboard;
- corners for finishing the ceiling and opening;
- swing or sliding door (the second option is preferable);
- blanks for benches;
- timber ø6-8 mm for constructing the frame;
- decorative elements for IR heaters;
- fasteners.
Note! All this should be purchased only after all the calculations have been made, so as not to take too much.
In addition, you will need the following tools:
- hammer;
- screwdriver;
- emery;
- screwdriver;
- electric saw;
- file.
In many cities there are specialized stores where you can buy all the necessary elements for an infrared sauna. The components are quite expensive, but in the absence of carpentry skills this is the only possible option.
What to do first
Baths and infrared saunas, as already mentioned, are installed not only in private houses, but also in city apartments. In the latter case, it is impossible to install such a structure just like that, at your own request. First you need to obtain permission from organizations such as:
- BTI;
- Fire Department.
Such permits are usually issued only when:
- according to the project, the size of the sauna is at least two times smaller than the room in which it will be installed;
- the distance between the walls of the cabin and the bathroom is at least 5-7 cm.
How to make a bench
The dimensions of this structure will depend on the width of the cabin itself. To assemble the bench you will need:
- seat board;
- bars (four for legs and crossbars and two for struts).
You can attach the bench elements to each other using screws or nails. Although the air temperature in an infrared sauna usually does not exceed 50 degrees, nail heads should be sunk into the wood. Before you start assembling the bench, you should make a drawing of it. This will avoid unnecessary mistakes.
Mount the bench in the following sequence:
- cut lumber according to the drawing;
- in the legs they make inserts for crossbars “half a tree”;
- fasten the legs and crossbars;
- screw the seat to the resulting structures;
- The struts are secured with one end to the seat and the other to the lower crossbars.