There are two types of columnar foundations - a foundation made of blocks and drilled piles. Ordinary brick is often used as a basis for blocks, but its use is only permissible as a last resort if the building has minimal weight and the soil is sufficiently stable. The standard, according to GOST 6133-84, when arranging a columnar foundation is the use of special foundation blocks 20x20x40 cm. As for drilled piles, they are usually made of concrete poured into asbestos-cement pipes, which are dug into the ground below the freezing depth of the soil.
By the way, if you have problems with sand during the sauna, look and order. This website contains all types of sand, and it will be sent to you when you order 3 or more cubes
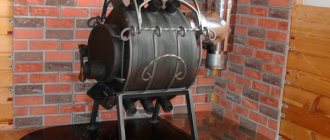
Construction of a load-bearing building structure from various materials
Initially, the question arises of choosing a suitable and accessible material. The columnar foundation is made of:
- From wooden pillars - logs with a diameter of 200 or maybe timber using insulating materials and treatment with antiseptics. Least durable. Practical if the structure is being built for a period of up to 10 years;
- Made of brick, the size of the columns in plan is 380x380, stone 500x600;
- Made of concrete blocks 400x400;
- From steel pipes or asbestos-cement pipes filled with concrete;
- Made of monolithic concrete 400x400.
A bathhouse on a columnar foundation is being built on a prepared site; below are step-by-step instructions for its construction.
Preparation of work
First, the site is cleared of debris and graded. The top plant layer, at least 30 cm thick, is cut off. If necessary, the site is drained to drain the water. On clay soil, gravel-sand preparation of the required thickness is arranged with leveling. If there is a large difference in height between the sides of the site, it is necessary to level the surface to avoid distortions of the walls.
The plan of the bathhouse is transferred to the land using a tape measure, level, stakes and twine, marking the axes of the building.
Excavation
The laying depth of non-buried columns, as a rule, is from 40 to 50 cm; it should be less than the soil freezing depth by one third of the value.
It is typical for a recessed columnar foundation that the supports are laid to a depth less than the freezing depth by 50-70%. So, if the soil has a freezing depth of 1.2 m, then the laying depth should be from 60 to 80 cm.
Holes for supports are dug manually or using a drill. Their depth is greater than the calculated backfill depth by the thickness of the sand bedding. The cross-sectional size of the pits is made larger by 10-15 cm for ease of installation of the reinforcement frame and formwork.
Blocks for foundation pillars: basic requirements
The main criteria for self-construction of a house or other structure are considered to be the availability of understanding of construction processes, as well as the possibility of using simple, lightweight and small-sized materials. Wall blocks made of monolithic concrete are the most appropriate material for building foundations, subject to the following conditions:
- optimal dimensions: 400 mm length, 200 mm width and height;
- geometric shape - a regular parallelepiped with precise angles and dimensions;
- a monolithic concrete block should weigh within 35 kg;
- the structure of concrete can be rough, but smooth, without chips, growths, cracks and potholes;
- voids in foundation blocks are unacceptable;
- concrete must gain strength of at least 70% of the design value, that is, lie from production to use for at least 28 days to gain natural strength;
- a simple check of quality and strength: when a block is lightly hit with a hammer, it bounces off, and when dropped from a height of 1 m to the ground, the block does not receive damage.
Basic principles of construction
Regardless of the chosen material, the columnar foundation is installed almost according to the same scheme - a hole of the required depth is prepared, filled with 15-20 cm of sand, which is compacted after pouring with water, then a support is placed. Let's look in detail at how to install poles made of various materials.
Wooden foundation
The construction of a lightweight building, such as a bathhouse, allows the use of wooden poles. For the “chair” posts, the lower part of the log is used - the butt with a diameter of 25-30 cm. It is better to use pine or oak. The size of the pit should be 1.5 times the diameter of the support. Preparation for installation consists of burning the lower part of the support with a blowtorch, treating it with an antiseptic solution and coating it with bitumen in accordance with building codes. These measures will extend the life of the tree. As a rule, pine supports last up to 10-15 years, and oak supports up to 25-30 years.
When building a bathhouse, one of two methods of constructing pillars is used - non-buried, in which a wooden pillar, the height of which is 70 cm, rests on a wooden base and is buried with a pillar height of 1.2-1.4 m. In the latter case, it is better if the support is installed on a concrete preparation in a hole for reliable fixation, followed by backfilling with crushed stone and soil.
Brick foundation
The installation of brick pillars dictates the condition of durable and high-quality masonry in order to avoid destruction of the pillars and deformation of the walls of the bathhouse itself.
The cross-sectional area of the pillar consists of 4 bricks. The pillars are laid to a depth of 0.5 to 0.7 meters. The service life of a foundation made of brick pillars can be 50-100 years, depending on factors such as climatic conditions, soil characteristics, brick quality and masonry strength.
It is important to use only solid red fired brick, which has the least properties to absorb moisture and good strength. Sand-lime brick is completely unsuitable for this purpose.
A sand and gravel cushion up to 20 cm thick is placed along the bottom of the pit, poured with liquid cement mortar and laid with a steel mesh made of wire with a diameter of 3-4 mm or reinforcing bars.
After completion of the masonry, waterproofing is installed on the surface of each pillar, for which roofing felt and bitumen are used, preventing contact of the masonry with the ground.
The sinuses are filled with soil or crushed stone and compacted.
Foundation made of concrete blocks
Scheme of a buried and shallow foundation on a sand cushion.
The obvious advantage of this type of foundation is the speed of its installation. Ready-made concrete blocks are used. These are solid blocks, or with small voids, which have dimensions of 20x20x40 cm. The quantity is calculated based on the design of the future construction.
The foundation of blocks is installed in the same way as brick pillars. Each row consists of at least two blocks. The next row is laid perpendicular to the previous one on masonry cement mortar and so on until the required height is reached. As a rule, 20-30 cm from the surface of the area is sufficient. Then work is carried out to waterproof all surfaces of the structure using roofing felt and bitumen mastic. The seams need to be treated especially carefully. It is necessary to finish by backfilling the sinuses with previously removed soil.
Pipe foundation
Load-bearing building structure on asbestos-cement pipes with a diameter of 200 mm.
Metal or asbestos-cement pipes with a diameter of 200 mm are considered a convenient type of columnar foundation. Their advantage is that they can be easily cut to the required length using a regular grinder with discs for cement or metal. The pipe should protrude approximately 40 cm from the ground surface.
Pipe surfaces must be waterproofed. It is done either by coating with bitumen or by covering with roofing felt on bitumen mastic in order to avoid corrosion and the negative effects of external factors.
Basics of columnar foundation technology made of concrete blocks
What is interesting about this version of the foundation:
- If you have the skills and certain knowledge about the construction methodology, you can build such a columnar foundation from blocks with your own hands within one, maximum two days;
- The cost of building a simple columnar foundation system of ten supports will be around 3 thousand rubles, provided that the blocks for the columnar foundation were purchased ready-made for 50 rubles apiece, and most of the work was done by hand;
- There is simply no simpler, faster and cheaper way to make a foundation for a lightweight wooden structure, and the most difficult thing in construction will be to maintain the geometry and horizon levels of the supporting surfaces of the columnar field.
What is the best way to make a floor on this type of foundation?
In order to protect the floor in the bathhouse from cold air and snow, a special wall is usually made of brick or concrete between the pillars with technological openings for communications and ventilation. This wall is called a fence. It serves to enclose the underground space; later, additional insulation of the space can be carried out with polystyrene foam. The question of how to close it is solved when covering the facade of the entire bathhouse.
The problem of organizing drainage in a bathhouse must be solved at the stage of constructing the foundation. This is relevant if it is planned to install a pourable floor. The device of the pouring floor has an extremely simple design, in which a ladder is arranged for draining water.
Watch a video on how to prevent the pillars of a supporting structure from rising due to winter soil heaving
We build a columnar foundation from foundation blocks
Like any construction on a summer cottage, a block version of the foundation can be built several hours a day if you have free time and physical strength. The work is not hard and does not require a huge amount of digging of trenches or foundation pits. But there is one feature - the construction of a columnar foundation, first of all, will require very serious preparatory work. It is necessary to lay out the blocks, install beacons and landmarks along which the material will be laid on the cement mortar. The easiest way is to do this delicate part of the work right away, while the necessary details of how to mark the area are fresh in your memory. See how to seal and level a cushion under a columnar foundation of 20x20x40 blocks:
Two words about building blocks for a columnar foundation
For the construction of the foundation, in most cases, monolithic stones are used, cast on a vibrating machine or press from concrete grade M100-150. The easiest and cheapest way is to buy such material than to try to make it yourself. It is relatively inexpensive; during the construction of a summer house or utility room, you can buy leftover material from the owners, especially since you won’t need much of it, 40-50 pieces.
A 20x20 block with a length of 40 cm is most often used for the construction of columnar foundations for quite objective reasons:
- The size of the block determines its light weight. Depending on the filler used, the weight of one stone ranges from 30 to 32 kg, which makes it relatively easy to lift and lay out blocks without additional tools and devices;
- Most often, blocks are made on vibrating presses, in standard forms for foam concrete or cinder block. In this case, a cast stone is obtained with an initial strength that is significantly higher than an artisanal concrete casting;
- The successful proportions of the material make it relatively easy to fold the foundation column and level the plane, without using a grinder to trim the top of the support.
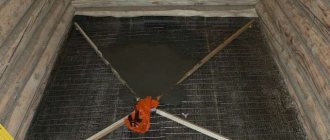
Marking the site and preparing the cushion for columnar supports
At the initial stage of preparation, you will need to correctly mark the installation points of the columnar foundation supports. For this purpose, the dimensions and shape of the frame of the dressing timber grillage, which will rest on the pillars, are used. Based on the project sketch, it is necessary to calculate the exact dimensions of the midline of the beam and transfer it to the ground using cords. In addition to observing the lengths of the sides of the future foundation with millimeter accuracy, you will need to check that a right angle is maintained between the adjacent sides.
The result should be four main installation points for corner column supports, between which a construction or marking cord will be stretched without sagging. In this case, the stakes on which the thread or cord is attached must be located outside the perimeter of the foundation.
In a similar way, you need to align the position of the marking cord in height so that the plane is perfectly aligned with the horizon.
The next step is to prepare the cushions for laying the blocks. It would be more reliable to bury the columnar supports into the ground by 20-25 cm, but in this case you will need to use an additional pair of blocks for each pillar, instead of laying three rows.
If you perform additional soil compaction within a radius of 50 cm around the support, you can get by with a non-buried version of a columnar foundation. In a pit dug to a depth of 30-35 cm, it is necessary to pour two layers of sand with the thickest layer of crushed stone in between. The poured material is carefully compacted layer by layer so that a small layer of spreading sand remains on the surface.
Installation of columnar foundation supports
Laying blocks at the base of a columnar support is carried out using the same technology as laying bricks. High mechanical strength is not required from the masonry mortar; the main thing is that it is plastic, but does not spread on the concrete. The sand base on which the block will be laid is moistened and immediately covered with a thin layer of mortar 1-1.5 cm thick. Blocks can be placed on the concreted layer.
The position of the block must be aligned with the stretched cords and the building level so that the supporting surface is well filled with the solution and there is no blockage along the horizon.
When laying the next pair of blocks, they are turned a quarter turn, thereby ensuring the ligation of the rows. If there is a third row, it also needs to be tied with the bottom pair.
In some cases, craftsmen make a cushion for laying blocks in the form of a concrete screed, which, after preliminary setting of the mortar, is cleaned with a lath and leveled horizontally. In this case, the top layer of sand is not poured onto the cushion, but the masonry mortar is laid directly on the crushed stone with liquid concrete poured over the gravel.
Finishing work and laying of strapping
After the masonry mortar has set, the base of the blocks in the columnar supports is cleaned, the cracks are filled with mortar, plastered and waterproofing is laid. If the pillars are installed correctly along the beacons, without blockages of the supporting surface, you can proceed to tying the foundation with timber.
The wooden frame of the grillage is made in carpentry in advance, most often in the form of two L-shaped elements. The lower part of the corner joint, which will rest on the columnar masonry of blocks, is reinforced with a metal plate. There will be an anchor pin running through a pair of metal flashings, embedded in the seam between the top two blocks.
The two halves of the frame are laid out on supports and centered along the axes of the columnar supports, after which they are connected by overhead plates. The timber is also attached to the intermediate supports with reinforcement, but without plates; the beams are simply tied with soft wire to the upper blocks, or as in the video:
Do-it-yourself columnar foundation for a bathhouse
There are two types of columnar foundations - a foundation made of blocks and drilled piles. Ordinary brick is often used as a basis for blocks, but its use is only permissible as a last resort if the building has minimal weight and the soil is sufficiently stable. The standard, according to GOST 6133-84, when arranging a columnar foundation is the use of special foundation blocks 20x20x40 cm. As for drilled piles, they are usually made of concrete poured into asbestos-cement pipes, which are dug into the ground below the freezing depth of the soil.
Choosing the type of base
The choice between them depends on the following factors:
- Material and dimensions of the room. A columnar base is less durable, so it is not the best option for massive brick buildings.
- Presence/absence of a basement. Of all types of foundations, only a strip foundation allows you to equip a full-fledged basement, which, if desired, can be made residential.
- Soil quality. A columnar foundation is not installed on unstable soils, as this can lead to distortion and collapse of the structure.
If we are talking about a traditional wooden bathhouse, then a columnar base is sufficient for it. Wood is not only the most environmentally friendly, but also a very lightweight building material that does not require the installation of a solid foundation.
Preparing to install a columnar block base
How is marking done?
Before you build a columnar foundation for a bathhouse from FBS blocks, you need to prepare the area for construction:
- First of all, we purchase blocks for the foundation for the bathhouse. Solid blocks measuring 390 by 190 by 180 mm are perfect for this. The mass of one block is about 30 kg, and therefore all work can be carried out alone. However, to speed up the process, it is still advisable to get an assistant.
- We clear the area of garbage.
Advice! When installing a columnar foundation, the soil does not need to be leveled.
- We remove the fertile layer of soil, which is about 10 cm. This helps prevent decomposition processes under the building.
Advice! In order to stop the growth of grass, the area should be covered with geotextiles, on top of which sand or crushed stone should be poured.
- Using pegs and twine, we mark the territory. To do this, we carry out the external and internal contours of the future foundation. At the intersection of the twine, angles are formed along which the pillars are aligned when laying.
- We check the horizontalness of the string according to the level.
- We mark the installation locations of the support pillars: at the intersection of the walls, in the corners of the bathhouse and under the walls at a distance of 1.5 - 2 meters. To support the floors, we install additional pillars in the center of the building.
Marking using rods and rope.
Advice! The posts must be located under all loaded elements of the building, including the furnace.
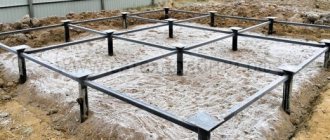
Carrying out work
The following instructions will help you do the work yourself:
- At the installation sites, it is necessary to dig holes that are about 50 cm deep and slightly wider than the size of the pillars. For heaving soils, it is necessary to backfill a “cushion” of sand and crushed stone, the thickness of which is 20-30 cm. To do this, the bottom is carefully compacted, after which it is filled with crushed stone and sand. After this, the bedding should be compacted by pouring water, and a roll of waterproofing - a sheet of roofing material - should be laid on top of it.
- Preparing the mortar for masonry. Mix 1 part M400 cement with 4 parts sifted sand.
Installation of a columnar base.
- We install support pillars. Using foundation blocks for a bathhouse, we form pillars with rows tied so that each of them contains 2-3 blocks. We place the blocks on the prepared mortar with a joint thickness of about 1 cm.
- We check the horizontalness of the masonry with a building level.
- After the solution has completely dried, the foundation should be waterproofed, protecting it from the effects of ground moisture. For these purposes, it is best to use coating waterproofing using bitumen mastic. Before applying bitumen, the surface of the blocks is treated with a primer and dried. After this, mastic is applied in 2-3 layers using a roller or brush. The horizontal surface of the pillars must be additionally waterproofed with roofing felt, which is glued on top of the bitumen mastic.
- We backfill the holes using sand or soil. After backfilling, you can begin installing the grillage, which can be either wooden or concrete. In the case of a wooden grillage, wooden beams are simply laid on the pillars.
Wooden grillage on top of a columnar base.
The concrete analogue is made as follows:
- We install plank formwork on top of the pillars.
- We knit a frame from reinforcing bars. We put it in the formwork.
- We fill the formwork with concrete.
- After the concrete has dried, we lay the grillage with sheets of roofing material.
Installing a strip foundation
For baths made of brick, foam concrete, two-story massive structures, it is necessary to use a strip foundation, which can withstand significant loads, but at the same time is not much more expensive than a columnar one. Like the previous option, the strip base is installed in several stages.
Preparing for work
- We clear the site for the foundation.
- Leveling the site.
- We remove the fertile layer.
Setting up a strip base
- We dig a shallow trench under the strip base, which should be slightly wider than the foundation.
We dig a trench under the strip base.
- We fill the bottom of the trench with a mixture of crushed stone and sand in a 1:1 ratio. This is done to improve the waterproofing of the bath and helps remove moisture. On wet soils, drainage should be done. In this case, the backfill layer must be at least 20 cm. It must be carefully leveled and compacted.
- We lay two layers of roofing material on top of the backfill.
- The laying is carried out with a dressing, the width of which is one block. We use the same cement mortar as for the previous version of the foundation. In this case, the density of the solution should be such that it has sufficient plasticity, but does not flow off the trowel.
Simple columnar foundation
As you know, before starting the construction of any building on a site, you need to carry out all the necessary calculations. And first of all, this applies to the calculation of the foundation, since the integrity of the entire structure will depend on its reliability. The main thing to consider here is the type of soil and the weight of the structure. Determining the type of soil is carried out using a series of tests and ideally requires calling specialists to carry out geological exploration work.
Let's consider the process of making such a foundation using the example of a foundation for a small one-story bathhouse made of timber. This technology is suitable if the groundwater level in the area does not rise above 2 meters in the spring. The surface of the soil should not have any noticeable slope, and its composition should include either medium sand or clay of medium density or harder.
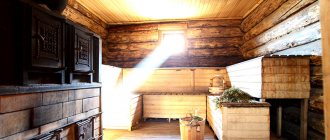
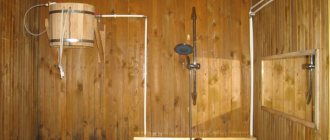
Floor in a Russian bath
For a Russian bath, a plank floor is a simple and cost-effective solution. A feature of the arrangement of the floor covering is the presence of cracks. The boards are not laid closely, but with a small gap. During bathing, water escapes through cracks under the floor. Her further path from the bathhouse depends on the arrangement of the area.
The design of the poured floor is made from lumber. When wood was cheap, thick boards were used. Floor lumber made from coniferous trees was considered popular. Larch lasted the longest. A thick board increased the life of the floor in conditions of increased dampness. Without repairs, the bathhouse could stand for more than 10 years. When the wooden elements of the structure rotted to a critical state, they were replaced with new ones. The wooden bathhouse was propped up with jacks. The lower part of the walls was updated by replacing 1-2 crowns. A new floor was laid along with the joists.
Now prices for lumber are high. Even once a decade, major floor renovations are expensive. However, new technologies have come to the aid of Russian bath lovers. Many special impregnations and varnishes have been developed to protect wood from rotting, mold formation, and destruction by grinder beetles. Due to protective compounds, the service life of wood increases. Boards for laying poured floors can now be used with a smaller thickness, which reduces the cost of the material.
Important! Impregnations are produced on a chemical and organic basis. To avoid poisoning, the board in the steam room cannot be treated with compounds from the first group.
Installation of heated floors
Diagram of thermal insulation capacity for different materials
- Foam plastic, extruded polystyrene foam and expanded clay of different fractions can be used as insulation in rooms of this type. The choice of insulator will primarily be influenced not by its price, but by the design of the floor; for example, polystyrene foam cannot be used for pouring cement-sand or concrete screed.
- We should not forget that the boardwalk is also insulation, so its thickness will be of no small importance in this device. Also pay attention to the sand cushion and, although not a single instruction considers the material as a thermal insulator, nevertheless, it is one. The fact is that some lay cut-off waterproofing on top of the sand, and then fill it with expanded clay, but the sand below gets wet and, as a result, its thermal conductivity increases, and the film can be damaged by expanded clay granules.
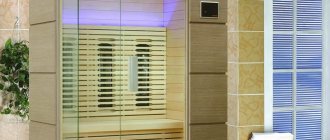
Foundation from blocks for a bathhouse - tips for self-construction
The bathhouse is one of the most important buildings on a personal plot. When purchasing a plot of land, summer residents think about building a bathhouse almost first of all. And this is quite simple to explain, because this is where you can relax after gardening or household work.
The bathhouse is a lightweight building, therefore, in order to save money, instead of a massive monolithic slab or strip, in this case a foundation is often built from blocks. At the same time, a block foundation has a lot of advantages: it does not require the use of heavy equipment, mixing concrete or creating a reinforcement frame.
The photo shows a wooden bathhouse on a block base.
It is quickly erected, can withstand high loads, and its price is relatively low.