What is wool felting?
This type of needlework is the process of creating a variety of products from unspun wool by interlocking and weaving its fibers using various methods using special hardened steel needles.
This process is also called felting (or felting). This exciting activity helps develop creativity.
Reference! Not all wool is suitable for felting, but only natural fibers. The best choice in this case would be mohair and alpaca wool.
Felting allows you to create original designs on fabric, beautiful toys and various decorative elements (photo). Let's look at how to felt a wool picture with your own hands with step-by-step instructions.
Necessary materials
For this type of needlework you will need the following materials:
- natural wool;
- felting needles with several notches at the bottom (for the dry method);
- tweezers (for laying out small parts when making paintings);
- flannel or non-woven fabric (for the base when making paintings);
- liquid soap or warm soap solution (for the wet method);
- eyes, noses and stuffing material (used in making toys).
If you do not yet have experience in purchasing suitable material for felting, it is advisable to purchase ready-made kits for creating paintings in craft stores.
Such kits may include different volumes of material, needles of different sizes and a special solution for wet felting. Each set comes with detailed instructions, which will be especially convenient for beginners. The undeniable advantage of such sets is that after creating one product, needles and solution will remain, which can be used repeatedly later.
Master class on creating a painting from wool “Stranger”
Friends, I am sharing with you a new master class on creating a painting from wool “Stranger”.
I wanted to simplify the perception of the material as much as possible, so I signed all the necessary instructions right on the photo. A text description of the process is also included!
Happy creativity!!!
1. Required tools:
- frame with glass (or plastic), I used the 30*40 format;
— two types of scissors: sharp stationery and manicure;
- fabric (I use rolled dust cloths, laying them in two rows);
- glue stick;
- tweezers;
- iron.
2. Materials:
- wool - combed ribbon of different colors. As for the quality of wool, it is better to take “fine” or “merino”, but a coarser one will do. If you have carded wool, it will be ideal for the background;
- openwork ribbon for creating an umbrella. I cut it into pieces.
3. Preparation for work.
We disassemble the frame (we will need cardboard).
We attach the fabric to the cardboard using an adhesive stick. Sometimes I use a stapler or paper clips (I remove the paper clips when finished).
It is necessary to attach the fabric so that during the work the wool does not move off the base (the material must be rough).
3. Background.
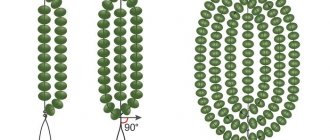
The technique we will use to lay out the background is called “pinching.” Fibers of the desired color must be wrapped tightly around your finger and plucked off (see photo). The final strand should be tangled, but without loops or knots, the hairs should be arranged randomly.
We lay out the background, starting with the darkest color from the edges of the picture and moving toward the center to lighten it.
Add the following colors to the background: brown and red.
In order for the transitions of shades to be smooth, the colors must be overlapped and worked in thin airy strands.
We tint the white area of the background with yellow strands to get a light yellow tint.
After the background is completely ready, iron the picture. The background will be compacted, fixed, and it will be convenient to lay out the following elements of the picture on it.
How to iron?
You can iron at any temperature through a clean sheet of paper. The wool is fixed after just one or two movements.
There should be no printed text on the sheet, as printer ink melts when heated!
5. Lay out tree trunks.
In order for the path to visually go into the distance, it is necessary to observe the law of perspective: the further the image object is from the viewer, the smaller it is and its color is paler. Distant trees should be depicted as thinner and paler than the trees in the foreground.
To begin, mark the bases of the tree trunks with segments (see previous photo).
Then we separate the dark brown wool fibers from the main strand, twist them a little into a “sausage” and lay out the trunks. Let's iron it.
To give the trees volume, add light (to the right) and shadow (to the left) of the trunk.
We lay a thin layer of yellow wool between the trees.
For the branches, we separate the thinnest strands of dark brown color and twist them on the palm in one direction.
If you twist in different directions, the strands will unwind.
6. Outline the silhouette.
In order not to be mistaken in proportions, we outline the contours of the figure in short thin segments (not one long one).
These marks will be completely covered by the next layers, they will not be visible.
Please note that the lines are angular and not smooth. Do not try to lay out a full outline at this stage!
- height of the figure - 17 cm. Let's mark the top and bottom. We will also indicate the lines of the shoulders and waist;
— lay out the side lines of the body and head;
- let's outline the hands. The length of the line from shoulder to elbow should be the same;
— iron the workpiece and cut off those hairs that interfere with perception;
- straighten the ironed figure with tweezers.
7. Fill the outline with color.
I prefer to work in small strands, tearing them off with my hands. But, perhaps, it will be convenient for someone not to tear off, but to cut the wool or cut out the elements of a figure from a large piece of combed tape.
Do what is most convenient for you. After ironing, the texture, volume and “hairiness” usually go away.
After the outline is completely filled with brown wool, we iron the picture thoroughly.
We cut off all excess hairs, as well as inaccuracies in the figure, with nail scissors.
At this stage, the figure can also be separated from the background, moved or stretched.
We combine the lower part of the figure with the plane. Add brown and red shades, as well as thin long ribbon strands (second photo). They can also be made with decorative fibers (silk, viscose).
8. Create an umbrella.
I decided to make the base for the umbrella from openwork ribbons, since they already have the necessary bends. I cut out pieces of different shapes from two types of ribbons (see photo).
You may have other types of tapes.
I recommend initially laying out the umbrella figure separately from the painting. Experimenting with a painting can be problematic, as the wool constantly gets caught on pieces of tape.
The curves at the bottom of the umbrella are smaller than at the top (visual effect).
I used 7 bends (each 2 cm long) for the lower part of the umbrella. On the top - four.
We “paint” the inside of the umbrella with brown color. We lay out the strands of wool in a circle.
From pieces of tape we create the inner oval of the umbrella and its top.
We tint the edge of the umbrella with the finest yellow strands, placing them in a circle. We lay out the ribs of the umbrella from thin, loosely twisted fibers. Using the same fibers (but shorter) we separate the umbrella and the figure (see photo). Ironing.
9. Cut the foliage.
Foliage is created using the “cutting” technique.
— we form the strand so that it is convenient to cut, twist it;
- cut with sharp scissors directly into the picture;
— the length of the villi should be from one to five mm.
The larger the cut, the more blurry the result will be.
To cut the leaves, I used 4 colors, which I mixed in one strand.
You can adjust the number of colors and thickness of cutting as desired.
10. Shutdown.
Before covering the picture with glass, we correct all the details.
The glass is placed on top of the picture, aligned with the base and covered with a frame on top.
Only after this is the excess hair cut off.
The picture is ready!
I hope the master class was useful for you!
Thank you for your attention!
Elena Kozlova.
Types of felting
There are two methods of felting - dry and wet. When dry felting, compaction of the material is carried out using special needles with notches. Such notches catch the fibers and push them into the lower layers, resulting in felting. Repeatedly sticking a needle into the same place allows you to give the product the desired shape. This method of felting is most often used to create jewelry, toys and various figurines.
The wet felting method involves the use of warm soapy water and straightened wool strands. The layout of the material is soaked in a soap solution, after which it is rubbed and ironed in different directions, gradually increasing the degree of pressure. This method is in most cases used for the manufacture of flat objects: panels, paintings and decorations for fabric and clothing.
Advice! When making a pattern for a product, it should be taken into account that during wet felting the wool will shrink by about 30-40%.
Dry felting wool to create paintings
Paintings from a similar material are created by alternately laying strands of wool in layers on a base fixed with a frame in glass.
Making a painting this way using a simple master class is a great way to master dry felting. By applying material of different shades in thin strands to each other, a smooth transition of colors from one to another is achieved. The production of such a picture must begin with the creation of a background, which is recommended to be laid out from top to bottom in accordance with the chosen scheme.
The strands should be translucent, light and not particularly large. First, use tweezers to lay out the edges of the background, and then the middle.
Important! After each stage of work, the product should be held under glass to secure it.
After this, you can begin to lay out the main motive of the painting. Schemes for beginners, as a rule, contain large motifs with a minimum number of shades. The first step is to lay out the contours of the main figure and fill them with material of the required shades.
Then, using additional colors, you need to “draw” the contours of the remaining figures with thin, slightly twisted strands. During the process, you need to constantly check the diagram. There is no need to rush. Continuing to “paint” the picture with thin colored strands, you need to lay them out along the lines outlined in this way, if necessary, straightening with tweezers or adjusting with scissors if the strands are too long.
Moving little by little to the foreground of the picture, you need to lay out small fragments of it, twisting and rolling the material. If the main figure turns out to be too voluminous, the wool can be slightly squished.
When the work is completed, the picture must be covered with a transparent stencil and the ends of the strands sticking out at the edges must be cut off. After this, the product can be inserted into the frame.
Winter evening
Many needlewomen love to make paintings about autumn and spring. But winter, despite its cold and frost, is also incredibly beautiful.
To work on the painting you will need:
- combed wool ribbons in colors such as: white, blue, dark blue, light blue, turquoise, dark brown, brown, yellow, orange, red;
- non-woven fabric 18 x 24 cm for backing;
- sharp scissors;
- tweezers;
- photo frame;
- glass.
Each stage must be secured, leaving the work under glass. But this is only necessary when working with dry wool.
At the very beginning of the work, it is necessary to pull out all the strands of wool from the tape and cover the surface of the substrate with it. Lay them in different directions, the ends of the threads should extend beyond the non-woven fabric by 1-2 centimeters. Trim off excess by attaching glass.
Related article: DIY cardboard vase: master class with diagrams and video
Pluck the wool to make cotton wool. Create a background in layers, layer from dark to lighter shades. Control the quality of laying the material by applying glass.
Make snowdrifts using white strands laid parallel to the horizon. This technique can be seen when looking at landscapes made of wool.
Pull strands from the dark blue ribbon and twist them a little. This is how tree silhouettes are drawn.
Then add white wool trees.
Collect fluffy wool with your own hands and give it the desired shape for the tree crown.
Use a thin ring of wool to mark the outline of the moon. Fill it with wool fluff, chopped as finely as possible.
Next, cut and lay the wool for the house from dark brown and brown wool. The part on the right should be darker than the left.
Make a roof for the house from dense white strands.
Cover the lower part of the picture with snowdrifts made of white wool.
Cut out the windows, add the finest strands of turquoise and blue to the snow.
Add light with yellow and orange strands. The light should slightly block the house.
Mk for beginners is finished. The product is already ready!