Stylish and well-executed interior decor speaks of the excellent sense of taste of the owners, and the original decor with hand-made candles emphasizes the individuality of the home.
Today you will learn how to make a candle yourself, spending a minimum of time and money.
All that is required from you is just desire! In this article we will talk not only about all the stages and subtleties of creating a candle, but also consider some ideas for decorating candles that will delight the eyes of both hosts and guests.
Making candles with your own hands
It may be hard to believe, but making and decorating candles with your own hands does not require any expensive or rare materials.
We will use only what is in the arsenal of any housewife. So, for work we will need:
- A vessel in which we will melt the wax;
- Any shapes for candles;
- A large container with which we will make a water bath;
- Wooden sticks (2 pcs.);
- Various details for decorating finished candles (lace, beads, shells, cinnamon sticks, coffee beans);
- Any wax pencils (crayons will do);
- If available, use the stubs of used candles; if not, use regular paraffin candles;
- Paper yarn (cotton threads).
This is all that will be useful to us in creating our own wax candle. Who knows, what if we end up with a real decorative miracle?
Popular candle options with photos
Decorating candles with your own hands can be varied, the main thing is to use your imagination. Some home craftsmen decorate the product directly during production, and some decorate the finished product.
Carved compositions
The process of creating a carved candle is more labor-intensive, but the result is a real masterpiece. The main difficulty in this case is to find a suitable tool (a small and sharp knife) that will be convenient for working with small parts. The creation process is as follows:
- Prepare the form. It is better to use the original five-pointed mold, created specifically for such products. At home, any available silicone mold will do.
- A wick is inserted into the mold and secured.
- Pour in molten paraffin and allow the mold to harden.
- Prepare containers with paraffin of different shades. Their number can be any.
- The resulting workpiece is alternately dipped into baths with colored paraffin, each layer is fixed in cold water.
- When the application of color layers is completed, you can begin cutting with a special knife. All kinds of patterns are formed, each of which is secured by immersing the workpiece in cold water.
Thanks to multi-layering, multi-colored curls are obtained
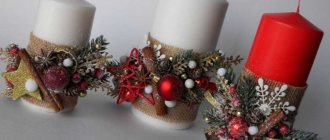
Burlap decor
Burlap is often used in decor as a simple yet effective way to create a stylish decoration. The finished candle is wrapped in burlap and complemented with other elements: twine, satin ribbons, lace, clocks, dried leaves and flowers, twigs. Such souvenirs will decorate the interior in the autumn-winter season.
Burlap and dried pine cones turned an ordinary candle into a stylish decorative element.
Fruit
Making candles from fruits is a creative approach. Often they use halves, or more precisely, the peels of fruits - lemon, orange, coconut, grapefruit.
Candle souvenir made from half a coconut with coffee beans
You can add flavorings to these “molds,” such as lavender oil or dried lavender flowers. Do-it-yourself decorative candles from fruits are made very simply: cut the fruit in half and remove the pulp. A wick is attached to the center of each half. The wax is melted in a water bath, mixed with oil, dye, flowers, then poured into a fruit mold and left to harden in a cool place (note: it is not recommended to place candles in the refrigerator, as the wax will harden unevenly).
Composition of half an orange
Dried flower decor
Dried flowers will help you create an original, unique design. The difficulty of decorating with dried flowers and leaves lies in the fragility of this material.
Dried flowers add a special charm to an ordinary paraffin product
The decorating process is simple: heat a spoon over a fire, then smooth the plants with it, gently pressing them to the surface of the candle. If some parts of the dried flowers do not stick, you can use glue or cut them off altogether. To consolidate the result, the candle with decoration is dipped into molten paraffin.
It is not necessary to glue dried flowers - you can simply tie them with hemp
Compositions with sparkles
Glitter can create a festive decoration from any decorative element. Glitter, foil, beads, and rhinestones are used for decoration. The easiest way to decorate these souvenirs is to stick glitter on double-sided tape, which is used to wrap the surface of the candle in strips. Instead of tape, you can use glue: using a glue gun, it is applied pointwise to the product, then these areas are sprinkled with glitter.
Glitter from any souvenir will make a festive decoration
Decoupage technique
Decoupage is a popular way to decorate candles. The technique involves applying a pattern to a plain surface of a product using heat. You can use ordinary napkins with a pattern: remove a thin layer with the image and wrap it around the candle. The picture is smoothed well over its surface, then they begin to heat it with a hairdryer. The wax will melt a little and the picture will stick to it.
Decoupage is a simple means of applying a design to a souvenir
You can do it another way: cut out the desired image on a napkin and glue it onto a candle. Wrap the picture on top with wax paper and start heating it with a hairdryer. After applying the image, the product is coated with candle varnish.
Eco-decor in design
Decorating candles in a natural style is more relevant than ever. Eco-decor consists of using various natural materials as decorations: pebbles, shells, seeds, pieces of cinnamon, dried fruit, etc. They are laid out before pouring along the edges of the mold.
Wooden candlestick in eco-style
Cinnamon stick decor will help create a New Year's mood
Original compositions from shells
It’s not difficult to create an original decoration for a holiday or everyday interior in the form of a decorative candle. All you need for a successful creative process is a rich imagination and the availability of the necessary materials. Having once created a beautiful souvenir for yourself or as a gift to loved ones, you are unlikely to want to stop and repeat this experiment again. And numerous photos of DIY decorative candles will help you get inspired with creative ideas.
Selecting the shape for the future candle
Let's start with the good news - there are no restrictions or strict rules in this matter. Your imagination will have plenty of room to run wild!
The most convenient are ready-made silicone molds, but if you decide to do everything yourself, you can easily use improvised materials. Yogurt boxes, tin cans, plastic cups are all perfect for making candles at home.
For example, let's take a plastic cup from your favorite yogurt. At the bottom, in the middle, you need to make a hole with a thick needle - this will be the place where we will insert the pre-prepared wick.
How to make candles yourself: step-by-step instructions
To make candles with your own hands, you should read the step-by-step instructions. The step-by-step manufacturing process is as follows:
- Form. There are no strict requirements for the shape of the future product - it all depends on your imagination. You can use ready-made silicone molds or take any available material - a jar of yogurt, canned food, or even a matchbox.
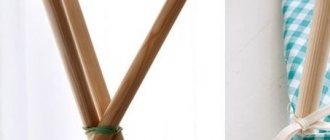
- Wick. Making the wick is an important step in the creation process. To do this, you can take a thread from cotton fabric without impurities, colored yarn, or make a wick from many intertwined thin threads. In the latter case, three main threads are formed, which, in turn, also intertwine with each other. For different types of candle materials, a wick crocheted in the form of a braid is also suitable. This will be an original solution.
When the material for the wick is found, it needs to be prepared: three parts of yarn or threads are soaked in a saline solution and left to dry for 10-12 hours. After this time, each of the parts is twisted together. After this, it needs to be soaked in molten wax so that the flame burns evenly and beautifully.After preparing the wick, it is inserted into the mold: you need to make a hole in the middle of the container, thread a thread through it, tying it in a knot on the back side so that the wax does not leak out. Place a stick (wooden or plastic) on the upper edge of the mold and tie a thread to its center so that it is taut.
- Color. To make beautiful candles, you need to pay special attention to their coloring and further decoration. The easiest way to color wax is to add grated shavings from children's colored wax crayons. The shavings are mixed with cinders and melted to the desired state.
- Filling. The materials that will make up the composition are placed in a tin can, then it is sent to a water bath. When the material is completely melted, begin pouring the product into the prepared mold. Do this gradually, one layer after another. As the mold is filled, the candle is allowed to cool at room temperature. After it has cooled completely, remove it from the mold, cut off the excess part of the wick and begin decorating.
Eggshells were used to fill the egg-shaped candle.
An original souvenir with several wicks
Each layer of wax can have its own color
Let's give the candles some color
If you just wanted to learn the technology of making candles at home, then this step could be omitted. If you need unique candles to decorate your room, don’t neglect coloring.
For this purpose we will take children's colored wax crayons. They are the best option because... do not dissolve in water, mix well with paraffin and will not “delight” you with a surprise in the form of an incomprehensible sediment at the bottom.
The technology for adding color to a candle is very simple: you just need to select a piece of chalk of the desired color and grate it. Mix the resulting shavings with cinders using a wooden stick and send to melt. This seemingly simple process plays a big role in decorating candles and should not be skipped.
Coloring a candle
You will get really beautiful candles if you don’t forget to color them. The simplest and most acceptable way is to color candles using simple children's wax crayons.
Do you think it would be smarter to use watercolor or gouache? Indeed, the palette of these paints is richer than the color variety of crayons. But the problem is that both gouache and watercolor are made on a water-soluble basis: these dyes are not suitable for working with a candle. They do not mix well with wax or paraffin, they can float in them in strange-colored flakes, and then completely settle to the bottom.
Decorating candles can and should be done only with fat-soluble dyes, and these are our wax crayons.
Often, many craftsmen use lipsticks or shadows to decorate candles. If you don't mind your cosmetics, please feel free to follow their example. But rest assured that the aroma of lipstick will linger throughout the house, which is not always pleasant. Many people may find this smell intrusive.
If you decide to make decorative candles with your own hands, it is better to use less aggressive materials. When choosing wax crayons, we focus on soft types of this dye. Candles made using mother-of-pearl wax crayons are especially good.
If you come across hard crayons, melting them will be difficult. Yes, and planing them is quite problematic. So, we chose a piece of chalk, sharpened it using a grater, and added these shavings to the wax cinders. Mix the shavings and cinders thoroughly with a stick.
However, there is another coloring option. In specialty stores it is easy to find tableted pigments of different colors. They can be mixed with each other and dosed. Using such pigments, you will be able to make a truly unusual, bright or delicate candle. Pigments in tablets significantly expand the possibility of obtaining interesting shades.
You should not refuse to use dyes: they give the candle a unique look and create a unique pattern.
Decorative candles for every smell and taste
In addition to regular paraffin or wax candles, you can try to make more original options:
Gel candles. Making them yourself will not be difficult, because the recipe is already written on the packages of gel wax - use it! A much more interesting process is decorating gel candles. Any decorations that you like are laid out on the bottom of the mold, and then everything is filled with gel wax. The effect is simply incredible!
Aroma candles. As you know, hand-made candles not only have an aesthetic function, but are also able to exude the favorite aroma of the owners of the house. Add a drop of aromatic oil to the candle base, and you can arrange a whole aromatherapy session at home!
The interior of the entire room depends on the correct decoration of candles. If you want to make the design of the room truly original, photos of the decor of candles made and decorated with your own hands will help you with this.
Choose the option that you like, listen to yourself, experiment, create and you will definitely be able to create a real wax masterpiece.