How to decorate a bottle
You can make your own bottle decor using various materials. The following is often used as a basis:
- - leg-split;
- - ropes;
- - tapes;
- - paper;
- - skin;
- - eggshells;
- - salty dough;
- - pasta;
- - cereals.
You can also use beads, decorative stones, sea salt, paint for decoration...
Other decor ideas
You can take the techniques described above as a basis and come up with many different creative ideas on how to decorate simple or shaped bottles with your own hands so that they become a real decoration for your home.
IDEAS FOR INSPIRATION
A craftswoman will always have fragments of stitching, lace or guipure in her closets. Using them in combination with beads, glass beads, and glass beads in the decoration of glass containers, you can create surprisingly delicate souvenirs.
BOTTLE DECOR USING FABRIC AND LACE
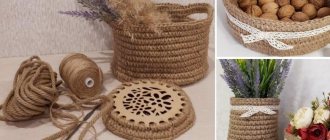
An interesting technique is macrame, which allows you to create openwork splendor, with which you can interestingly decorate bottles of champagne. Or use the crochet technique for this.
FOR FANS OF MACRAME SOME PHOTOS
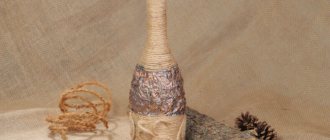
Even just wrapping a bottle with twine or spinning thread and decorating it with bows, beads, shells or lace - you can already get a rather interesting option that will decorate and enliven the interior.
NEW APPLICATION OF SPIPE FROM CREATIVE PEOPLE
Using old newspapers with original fonts or foreign words, as well as clippings with inspiring quotes from magazines, you can apply the decoupage technique to decorating bottles.
You can paste over glass containers with all sorts of objects. Seashells will evoke a nautical theme, and silver-painted keys will hint at the techno style.
MARINE STYLE DECOR WILL BE AN OPTIMAL COMPLEMENT FOR A SIMILAR INTERIOR
Using stencil technology, beautiful ornaments can be easily applied to colored glass using PVA glue. It can be left white or painted a different color without removing the stencil.
For those who own a brush, decorating a bottle will not be difficult - just apply a multi-colored painting on the glass.
IF YOU DON'T KNOW DRAWING, USE A STENCIL
If you apply several decorating techniques, using different colors, you can create unusual, and at the same time beautiful, original products that will add zest to any home. Ideas for decoration will be suggested by the style of the interior itself, according to which the decor is selected. And the implementation is so simple that even a child can handle it.
Coffee bottle made of twine
For this bottle decor you will need:
- - Glass bottle;
- - leg-split;
- - glue gun and sticks for it;
- - coffee beans.
Progress:
- 1. It is necessary to wash the bottle well and degrease it, using alcohol.
- 2. Using a glue gun, wrap the bottle from the neck to the bottom with twine.
- 3. Repeat another layer with twine, there should be no show-through, each roll of twine should be pressed tightly against each other.
- 4. Glue the coffee beans in a fairly orderly manner, with the convex side.
This bottle will fit very well into almost any interior, both in the kitchen and in the living room.
Master class No. 2: Vase with stickers
Triangles are a rather old, but still relevant theme in decoration. I use them for finishing furniture, dishes and other interior items. Decorating a bottle or other container using triangles is very simple, and the products will look impressive. Try turning an ordinary bottle into an original vase with geometric patterns.
Materials and tools
For work, prepare:
- glass bottles;
- white paint (aerosol or regular);
- scissors;
- black self-adhesive paper;
- sandpaper or primer for glass surfaces.
Operating procedure
- First you need to clean the bottle - wash it inside and out, remove label residues. To make the process easier, you can pre-soak the bottles in a hot soda solution to soak the paper.
- After this, dry the cleaned containers.
- Before you start painting, treat the glass - this is necessary so that the paint lays evenly on the surface and adheres firmly to it.
- To do this, use one of two options: sand the outer walls of the bottle with sandpaper or cover the surface of the bottle from neck to bottom with a primer (any form of primer is suitable - liquid, spray or varnish).
- While the bottles are drying, cut triangles out of black paper. Their size and quantity will depend on the size of the containers to be decorated and what kind of design you plan to make. However, all triangles must be the same. It is most convenient to cut out one first, and then use it as a stencil for all subsequent ones.
- Decide exactly how you want to decorate the bottle. Then you can start gluing the triangles as planned. Attach the paper to the glass carefully so that it fits tightly to the surface and does not form wrinkles.
That's all, the product is ready. For the next bottle, if you decide to decorate several containers with triangles, you can come up with a different scheme for gluing decorative elements, or you can make all the vases in the same style.
Bottle decor with paper or napkins
Bottles decorated with paper or napkins look very interesting. Very often, this is the method used to make New Year’s bottle decorations with your own hands. This technique of decorating bottles is not too complicated and does not require special skills or a significant amount of time.
The main thing is to choose good quality napkins for use, preferably they consist of 3 balls. Decorating a bottle with napkins or paper is called decoupage.
Complex drawings
There are many interesting and beautiful techniques that allow you to create original drawings. For example, this could be a contour technique or dot painting of bottles with acrylic paints. In this case, thick varieties of materials are used. Lines or dots turn out voluminous.
A bottle painted using such techniques looks especially elegant. To apply points to the surface, you need to create a sketch with a pencil. The dots are applied not with a brush, but with a tube. In this case, you need to press on it with the same force so that the dots are the same size.
Using the dot-contour technique, you can create openwork painting reminiscent of lace, chic designs reminiscent of antique vases and other decor.
Having considered how to paint a bottle with acrylic paints, you can create an original gift with your own hands for all occasions.
Decoupage bottles
To decorate a bottle using decoupage technique you will need:
- - bottle;
- — three-layer napkins with the desired pattern;
- - white acrylic paint;
- - acrylic transparent varnish;
- - scissors.
Progress:
- 1. It is necessary to wash and degrease the bottle well.
- 2. Paint the entire bottle with white acrylic paint and let dry.
- 3. Divide the napkins into layers.
- 4. Cut out the desired piece of the napkin or you can use it entirely.
- 5. Carefully apply the napkin to the bottle and cover with acrylic varnish.
- 6. Let the bottle sit and dry.
When covering a napkin with acrylic varnish, you should act carefully but quickly so that bubbles do not form on the surface. You can also use various ribbons, lace, sparkles for additional decoration...
Decoupage technique
The essence of decoupage is to transfer a picture/drawing to a surface and fix it with a special varnish. Decoupage is a very old technique for decorating bottles and more.
It received a new life literally a decade ago, when many craftswomen began to learn it from scratch and gradually dilute it with modern design techniques.
To work you will need:
- Tassels;
- Glue;
- Base with a pattern;
- Varnish.
Painting on toilet paper on wine bottles.
A clean surface is varnished and the design is transferred to it. After complete drying, the drawing is coated with varnish to secure it. It is best to use bristle brushes for such purposes. At the discretion of the needlewoman, you can add a border of silk ribbon or beads to the design.
Covering a bottle with newspaper at home is a simple and effective technique.
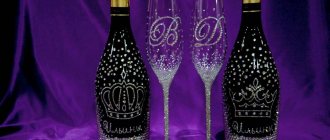
Candy bottle decor
Decorating a bottle with candies is one of the most popular options for decorating a bottle of champagne or wine. This method requires a minimum amount of materials and little time.
It is worth preparing:
- - a bottle of alcohol;
- — candies in a wrapper, preferably round;
- - glue gun and sticks for it;
- - thin decorative tape.
Using a glue gun, you need to glue the candies over the entire area of the bottle. Apply a minimal amount of glue so that it does not leak outside the wrapper.
It is necessary to glue the candies in such a way that there is no translucence, and to place them close to each other. Tie a bow of decorative ribbon near the neck.
If desired, you can use double-sided tape instead of a glue gun.
Original ideas for interiors made from bottles
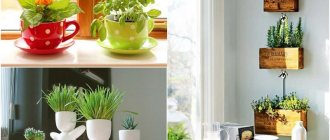
Let's start with the simplest options for how to use glass bottles in the interior. The easiest way is to pour various bulk materials into it and place it on a shelf. At the same time, remember two small nuances: you need to take a transparent bottle, not a tinted one, and it is better to lay bulk materials in layers, using not only different colors, but also different textures. For example, it could be sand painted in different colors or a bottle filled with layers of fine salt (you can take “extra” salt), ground coffee, or cinnamon. You can also use various cereals, peas, beans and coarse sea salt for this idea. This decor is used not only to decorate the kitchen and dining room, it can also be placed in the living room, hallway or on the balcony.
Bottle design in a marine style
Glass bottles in the interior
If you use bottles and square sheets of chipboard (or plywood), you can build an unusual shelf-shelf. To do this, cut round holes of the same size in the sheets and thread the neck of the bottle through them. It turns out that it stands with its base on the bottom shelf, and the neck is threaded through the top. Such shelves are more suitable for decorative purposes, for example, neatly arranged photos in frames, shells, pebbles and other decor will look quite appropriate here.
Shelf made of bottles and wood
Shelf made of bottles and wood
Craftsmen make amazing panels from the cut-off bases of bottles, and they select and combine the colors of the elements so skillfully that their creative imagination would be the envy of famous abstract artists. Such panels can be located on some part of the wall, or they can occupy the entire wall. This bottle decor looks impressive and very impressive.
Panel made of glass bottles in the interior
And the next idea is suitable for a summer house or for decorating a balcony. You can use bottles to make a hanging flower pot. There are several ways to secure such “pots”. The first is that each bottle is individually attached to the wall by threading the neck into a narrow pipe clamp and attaching it to the wall or hanging it from a hook from the ceiling. The second is to create a single composition from several bottles and hang them from a hook from the ceiling. To bring the second idea to life, you need to cut off the base of all the bottles, turn them upside down and secure them on a metal ring, then pour soil into each bottle and plant flowers. That's it, our flower garden is ready!
How to fix bottle vases on the wall photo
Small vases from bottles photo
Simple vases made from plastic bottles photo
Simple vases from bottles
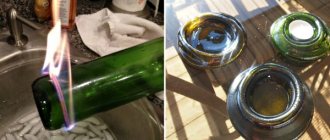
Bottle decor with salt
You can decorate a bottle with salt in several ways: internal and external decoration. Each method is quite interesting and exciting to work with.
For the first method of decorating a bottle with salt you will need: acrylic paint of different colors and salt. It is necessary to place the salt in a heat-resistant bowl, mix with the desired color of acrylic paint to obtain a homogeneous consistency. Place in a preheated oven and bake for 1 hour at 100 degrees.
Take out the mixture, mash with a fork and sift through a sieve. The glass bottle must be completely dry and clean in appearance. Pour sand into the bottle using different colors and pour them in layers.
In order to decorate the outside of a bottle with salt, you need to prepare: an elastic band about 5-8 mm, white paint, glue, salt. Before you start decorating, you should wash the bottle well, remove all paper labels from it, and degrease it with alcohol. Place a rubber band on the bottle in the form of a spiral or other desired shape.
Cover the bottle with an even layer of white paint and let dry. Apply glue and dip the bottle in salt, let dry. Remove the rubber bands from the bottle. This simple method produces a rather original bottle. You can use various sparkles, rhinestones, and decorative stones as decoration.
Bottle painting
Decorating bottles with your own hands is one of the basic creative techniques that is taught in every art school. As a rule, both adults and children enjoy this activity. We will tell you more about it, give some useful tips for beginners and show a couple of ideas for inspiration to those who are just getting acquainted with this art, and to those who have already mastered it for a long time.
Painted bottles can be used as a vase or decanter. The latter is very convenient during large home feasts: you can place a beautifully decorated bottle or jar directly on the table and make it a unique element of holiday table decor. During the evening, simply add a drink to it (this works especially well with homemade drinks: tinctures, compotes, etc.).
Plus, these bottles are a great gift idea. If you occasionally give someone drinks in a glass container, try painting it and presenting it in an unusual way. On New Year's Day, for example. However, painted bottles are an excellent decorative element in themselves. Just place a few of them right on your kitchen shelf or in your closet and it will look great. If it’s a pity that they take up space but stand empty, pour sugar or grains like buckwheat or semolina into them. You won't believe it, but it's very convenient.
In a word, you will definitely find a use for these bottles. It remains to figure out how to paint them.
What we need:
- empty glass bottle or jar (absolutely clean and dry);
- paints (acrylic, stained glass, oil, water-based or gouache);
- palette or thick cardboard;
- craft varnish;
- brushes of different sizes (you shouldn’t take natural ones, give preference to synthetics) and wooden skewers.
An inexpensive set of acrylic paints can be ordered on AliExpress (check this link). Bright colors, excellent quality, high durability - a universal option for a wide variety of crafts.
Tip: to decorate bottles, it is best to take special stained glass paints, as they are intended for painting glass. But if you need a more practical and budget option, and you want to have a richer range of colors, then take acrylic ones. All other types of paints listed above are also suitable, but working with them is less convenient
The easiest way to paint is to take a ready-made stencil. Let's give you a practical tip: place the printed picture inside the bottle and simply trace its outline directly onto the glass, and then cover it with paints.
One of the standard painting techniques is to cover a bottle in one base color and decorate it with a pattern. Take a wide brush and paint the bottle. And after it has completely dried, apply the design using a very thin brush or even a wooden skewer. At the same time, remember that it is much better to take paint from a palette rather than from tubes - this way it goes on more evenly.
If you don’t know how to draw, take a ready-made stencil film (they are available in every creativity department). Simply dip it in a contrasting color of paint, then stick it onto the bottle and peel off the film. There are also stencils that work as transfer stickers. There are also films in which you wrap the bottle and then just paint indiscriminately. When you remove it, only the drawing will remain.
Large strokes and ordinary shapes like rectangles, rhombuses, and triangles also look good. At the same time, smooth transitions are not at all necessary when painting bottles in this way.
For those who know how to draw, it is much easier to create a beautiful picture.
But if this is not your case, don’t worry. We have already mastered stencils. Moreover, you can use them without painting the bottle - it also looks very beautiful.
Another solution for those who are bad at drawing is ready-made three-dimensional decor. Simply paint the bottle one tone using a wide brush, and then glue foamiran flowers, rhinestones, artificial flowers, etc. to it. In this case, you can get a very beautiful finished composition.
Choose any idea you like or come up with something of your own. And don’t worry: acrylic paints are very easy to wash off glass, so anything that doesn’t work out the first time can be carefully corrected. For the same reason, we will need to varnish the finished product. This way it won’t get your hands dirty and won’t wash off. Have fun creating!
8+
Bottle decor with shells.
Decorating a bottle with shells is a great idea for nautical-themed decor. On the Internet you can find master classes on decorating bottles from this material.
Bottles decorated with shells, sea pebbles, and sand are very stylish and add additional coziness to the room in which they are placed.
One of the easiest ways to decorate a bottle with shells.
You need to prepare:
- - glass bottle;
- - shells of various sizes;
- - acrylic paints;
- - glue gun and sticks for it.
Progress:
- 1. Wash and degrease the bottle with alcohol.
- 2. Paint the bottle with acrylic paint of the desired color and let dry.
- 3. Apply another layer evenly and let dry.
- 4. Using a glue gun, glue the shells around the bottle in a fairly orderly manner.
You can also decorate a bottle with shells if the base is made of twine, salt, sand...
Features of working with acrylic paint
Painting glass bottles with acrylic paints is usually not difficult. However, before starting work, you need to know the features of this material. Acrylic-based paints can be matte or glossy. The choice depends on the artist's preferences.
Paints can be diluted with water or used as a paste. Most often, there are universal varieties on sale. Such paints can be applied not only to glass. If desired, they can be used to restore metal, wood, and fabric surfaces.
Acrylic paint dries within an hour. Professional artists recommend not to start re-coating for two hours after applying the base. The paint may darken slightly as it dries. If for some reason the drawing needs to be removed before the paint has dried, it can be washed off with water. Once dry, this becomes impossible. The layer can only be removed with sandpaper or a special type of solvent. If necessary, paint colors can be mixed to achieve the desired shade.
Tips for decorating a bottle
1. Regardless of how the bottle will be decorated, it must first be degreased.
2. The bottle must be completely clean, dry and without any labels.
3. It is best to use acrylic paints to decorate the bottle.
4. It is best to start wrapping the bottle with twine or thread from the neck to the bottom.