Reads: 976
Reading time: 16 min.
no comments
Factory-made decorations for the New Year cannot replicate the energy of handmade products. Perhaps the handmade is not so flawless, but the master puts his soul into it. In this master class we will tell you how to make a New Year's ball with your own hands, so that you can proudly decorate the interior of your own home with it.
In addition, you can engage your children with this creativity. Making jewelry in the family circle develops children's motor skills, brings loved ones closer together, and also allows you to get a lot of beautiful jewelry much faster.
The most affordable material: how to make a New Year's ball out of paper with your own hands
Initially, glassblowers made Christmas tree decorations, but today, thanks to a large number of different materials, you can make a wonderful New Year's decoration at home yourself. The paper industry offers different types of products: velvet paper, waxed paper, glossy paper, corrugated paper, colored paper. People with a creative approach took advantage of such a convenient material, and the world saw origami balls, Christmas tree toys made of corrugated roses, and much more.
Delicate balls for the New Year: we create from corrugated paper
Both adults and children make Christmas tree balls from corrugated paper. The soft paper is easy to curl and mold. The color palette allows you to make a decoration that looks perfect indoors or on the Christmas tree.
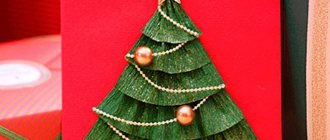
New Year's balls made of corrugated paper: flowers in the depths of winter!
If you make several different-sized balls with floral decorations, the Christmas tree will be decorated in the same style
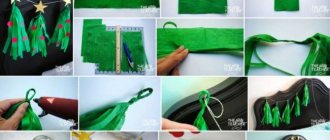
The photo shows the step-by-step production of such a toy.
| Illustration | Description of action |
| We will prepare corrugated paper of any color, a ruler, scissors and a heat gun. | |
| You need to cut several strips of paper approximately 0.8-1 cm wide. Each strip must be twisted around its axis. | |
| We get several long flagella. We apply a drop of hot glue to the tip of one and begin to roll the flagellum around itself in different directions. | |
| We continue to wrap the resulting ball with a tourniquet. | |
| As soon as one rope ends, secure it with a drop of hot glue and attach a new rope to the ball. Work continues until the toy reaches the desired size. | |
| This way you can get a lot of beautiful jewelry of different colors. |
Advice! To make the mood completely New Year's, you can grease the balls with PVA glue and sprinkle with glitter.
Balls made from paper tubes
New Year's paper balls can be made using the method described above, but only from ordinary newspaper tubes. This decor is also used after the New Year - there will be no need to hide the beauty in a distant drawer.
| Illustration | Description of action |
| We cut strips of newspaper about 5 cm wide. We prepare a thin long knitting needle and PVA glue for work. | |
| We begin to wrap the strip around the knitting needles so that there is an acute angle between them. As soon as we reach almost the end (not reaching 2 cm), we coat the remaining triangle of paper with a drop of glue, wrap it up and hold it with our fingers for several seconds. Carefully remove the knitting needle from the tube and begin making the next one. | |
| Dip the finished tubes one at a time into paint or wood stain of a suitable shade. It is better to place the painted tubes on a sieve. | |
| First, we roll the tube into a ring and secure the donut with hot glue - it will be faster. We wrap the resulting ring in any order. Gradually our ball grows and becomes the size we need. |
Balls of paper flowers, patterns and music strips
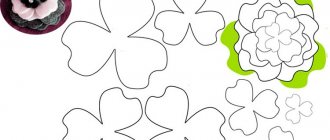
Let's learn how to make a New Year's ball with your own hands using blanks from paper flowers. Here are two options for obtaining a variety of floral elements: purchasing a figured hole punch in the shape of a flower or using a cardboard template. The second method promises a lot of time and effort, but if you do it with the whole family, then the minus turns into a significant plus.
A finished foam ball-base, many flowers in two shades and pins with beads at the ends. Regular sewing pins will do. Each flower is assembled from two elements and secured with a pin
You will need several circles of the same size, drawn as in the photo, scissors, glue and thread. If you do the same with each element as with the template, you get a lot of interesting stars that are connected with glue into a fluffy ball. Don’t forget to attach a thread to tie the toy when gluing the last element.
It’s not a problem to get sheets of music: we find any piece of music on the Internet and print out a couple of pages. We cut identical strips and glue them in the center: we get a star with many rays directed radially from the center. All rays should also alternately converge at one point at the top. How to attach the toy to the Christmas tree? You can attach a ready-made holder to the ball, or you can be creative: attach an artificial sprig of holly (holly) to the craft and hide a string under it
Balls using origami and kusudama techniques
Not everyone has a good relationship with origami, but what better time to show patience than on a holiday that promises miracles? We gather our willpower and set about a very interesting activity - we turn paper into a three-dimensional toy. The kusudama technique is complex and requires perseverance, but admire the results you can achieve!
It’s not easy to fold such beauty, and you probably won’t get an elegant ball the first time. It’s better to try to assemble it from newspapers first, and only then try your hand at colored paper. We offer several schemes for assembling such decoration.
You can start by assembling one element. As soon as such an origami flower appears in your hands, you will want to make them again and again.
A more complex circuit requires careful assembly
An origami ball can consist of one color or many
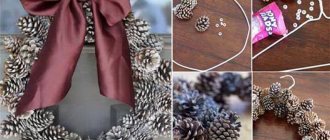
Related article:
How to make a New Year's wreath with your own hands : history and tradition, a master class on how to create it, what to make the base for the product from (newspaper, cardboard, pipe insulation), decorating a New Year's wreath with various materials - read the publication.
From paper
Original New Year's balls can be made simply from paper, without using any base.
Ball of colored paper
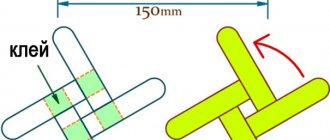
To do this you will need thick (approximately 120 g/m2) paper, scissors, pins, and tape. Making the blank yourself is very simple.
- Cut 12 strips of paper measuring 15 mm x 100 mm
- Fasten all the strips on one side and the other with pins, retreating from the edge by 5-10 mm.
- Spread the strips in a circle, forming a sphere.
- Attach the ribbon to the base of the ball.
The strips can be cut not straight, but with other uneven lines. You can use curly scissors.
Corrugated paper
Corrugated paper will also come in handy. Pom-pom balls are created from it. For this you will need: corrugated paper, glue, scissors, tape.
- If the paper is new and packaged, then measure 5 cm from the edge and cut it off. Then measure 5 cm again and cut off.
- Cut two blanks into a “scallop” with an interval of strips of 1 cm without cutting to the base 1.5 cm.
- Unravel one piece and begin to twist it into a “flower” in a circle, gradually gluing it together. You will get a fluffy pompom. Repeat the same steps with the second workpiece.
- Connect two pompom blanks with glue at the gluing site. You will get a fluffy ball. Attach a loop tape to the gluing area. Fluff the resulting pompom.
Made from double-sided colored paper
You can also make a ball from double-sided colored paper. To do this you need: colored paper, scissors, glue, a round object (a cup, for example), tape.
- Trace the cup on paper 8 times. You will get 8 equal circles. Cut them out.
- Fold each circle into quarters.
- Cut an additional circle with a smaller diameter.
- Glue the blanks to it with the corners to the center on one side (4 pieces will fit), and on the other side the same.
- Open each fold and glue it together at the joint. You will get a ball with “petals”.
- Attach the ribbon.
Paper balls, as a rule, do not last long and are used for one season. You shouldn’t place them in large numbers on the tree; it’s better to “dilute” them with other decorations.
Working with felt: how to make Christmas balls with your own hands
How to make New Year's balls if you have a lot of felt of different colors? We select suitable floss threads, take a needle, scissors, a little padding polyester and a good mood.
Balls with felt flowers
Even children can make a beautiful ball: it requires a foam base and a lot of tailor’s pins.
Many flowers are cut out of felt according to a template and, placing them one on top of the other, they are secured to the base with a pin.
Balloons with felt applique
Felt is easy to cut, easily stitched by hand, and requires virtually no effort: a miracle, not a material. Take a cardboard circle template, apply it to felt and cut out two identical circles.
Soft fabric balls
If you have bright scraps of fabric, then it's time to put them to work. First you need to make the base. In extreme cases, it can be a sock cut off and filled with rags, the main thing is that you get a tightly stuffed bun in shape. Or you can use store-bought foam balls. Further decoration is a matter of imagination. You can make ruffles from the scraps or, by folding small rectangles of fabric, sew them tightly to each other, then you will get shaggy products.
Try decorating fabric decorations by sewing bright buttons onto them.
How to make a New Year's ball from fabric
Woven material comes in a wide variety, and much of this splendor can be used as a New Year's tree decoration. Ribbons, satin pieces, linen cuts, even floss threads - everything goes into use.
New Year's balls made from ribbons: master class
The tapes are cheap, there is a wide choice, and the work does not require any special skills.
| Illustration | Description of action |
| We prepare two types of satin ribbons, tiny carnations and a foam round base. We cut the ribbons into equal pieces (2.5 × 6 cm) and one square. We take 1 of the largest pieces and place it on the base, securing it with nails from each corner. | |
| Glue decor (bead, half-bead, rhinestone) to the center | |
| We work with segments of a different color. | |
| Fold a piece of a different color into a triangle. | |
| We apply the triangle with the front side as in the photo and secure it at the corners with nails. | |
| We do this three more times. There is a small distance between the triangles. | |
| Having done this one row, we begin the next one. | |
| We alternate colors side by side until the very end or to the middle of the toy. In the second case, the pattern of triangles is also applied on the reverse side, expanding it towards the middle. A satin ribbon is glued to the center and tied with a bow. |
You get the most interesting Christmas tree decorations!
Patchwork or kinusaiga: shreds and New Year
New Year's decorations made from balls can be decorated using patchwork or kinusaiga techniques. Patchwork is patchwork, and kinusaiga is almost the same, but the base is polystyrene foam, and there is no need for seams.
On the base with the pattern applied on it, cuts are made with a stationery knife. The shreds are literally pressed into the slot with the blunt end of a knife or a thick needle. It turns out sewing without sewing as such
It's time to put all the scraps in the apartment to good use!
Kusudama technique
Making balls using the kusudama technique is a godsend for creative people. The results are very interesting and original products. It may seem difficult at first glance to make them, but even a beginner can cope with this task. This type of art came to our country from the Far East - Japan, where children learn to work with paper from a very early age. The result is beautiful balls, which are made from readily available materials. Kusudama is also a type of origami where you can create a ball using modules. Our master class will show you how to make a ball in this style in the shape of a lily flower.
What you need to prepare:
- thick paper of different colors, we need three;
- needle and thread;
- ribbon and beads.
At the first stage we will make a flower. We will need a leaf from which we will make an equilateral square of 9 by 9 cm. We bend the resulting figure in half and smooth it thoroughly with our fingers.
Related article: “Butterfly” application from leaves: stencils and templates with photos and videos
We align the leaf and now you need to fold corner to corner in the form of a scarf, iron it. Then, we align and repeat the first two steps again. Press the middle of the leaf and fold the leaf so that we form a double square. Look at the photo below for the sequence of actions. Now we unbend and iron each edge of the figure, as shown in the picture, thus doing the same with the four corners.
Now we bend the corners of the resulting product to the center. Straighten the resulting pocket, while bending the lower part of the pocket upward. We do this with all four corners.
Now the product needs to be turned over so that the flat side is on top. Now fold the corners towards the middle. Spread the resulting petals so that they look down. All that remains is to straighten it and use scissors to make it rounded. The flower is ready. To create a ball you need to make 36 lilies.
When everything is ready, you need to sew three lilies together using a needle and thread. We do this with everyone else, in the end we should get 12 inflorescences, which we connect into one ball.
For decoration, you can attach a ribbon in the middle with beads strung on it, and the ball will be finally ready.
Tips for decorating Christmas balls
The final result depends on the chosen material. The phrase is simple, but when faced with the need to create a beautiful craft, many people get lost. We'll show you how to choose original decor and surprise everyone in the coming New Year.
Beads, beads
Beads and beads will be a stunning decoration for Christmas tree balls for your home decor. There are several ways to create an interesting design using this material: depending on what you choose, you will need fishing line, thread or a heat gun.
You can simply wrap a toy with a garland of beads, securing everything with hot glue
Real pictures are woven from beads, but such work may not be possible for a child
Using bead weaving patterns, a non-standard decorative Christmas tree toy is obtained.
Sequins will add brightness and sparkle to the tree. Their cost is not particularly high; they are attached to the ball with glue
This type of braiding requires time and attention. But preparing for the celebration together only strengthens family relationships.
A simple warp braiding pattern
Showing your imagination and surprising everyone with special beauty is not so difficult: it is better to attach beads and beads not to a fishing line, but to a thin wire
The toy is like wearing a cape of jewels. Looks especially elegant
Buttons and pasta
Button decor will appeal to children: bright buttons are easily glued using ceiling tile adhesive and do not require painting. Although, if you wish, you can paint the entire toy at once from a spray can.
Bright and beautiful, and most importantly - easy
Pasta has long been receiving increased attention from Handmade lovers
The various shapes of pasta are original in themselves. Painted, they make fun decor
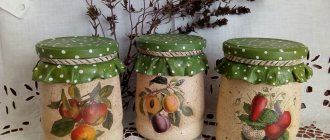
How to make decoupage balloons for the New Year with your own hands
The decoupage technique attracts more and more lovers of beautiful, sophisticated decor. The product requires a base ball, a beautiful New Year's napkin, and PVA glue.
We take the toy and smear it with PVA. We tear off a piece from the napkin and place it on the ball. Using a brush, we straighten the passage, avoiding any unevenness or breaks.
If desired, use crackle varnish - pay attention to the creation of spectacular antique cracks that result
New Year is a holiday that creates a mood, gives a feeling of family warmth and a fairy tale. And, as you know, a fairy tale comes only where it is expected! Let's make a special New Year with beautiful balls for the Christmas tree!
Video: DIY Christmas balls
Save time: selected articles delivered to your inbox every week
Christmas balls, created with their own hands by parents and children, are not just symbols of celebration, but inexhaustible sources of precious memories that will last as long as the toys themselves last. Each such ball is a real work of art, into which a piece of the creator’s soul is invested. Therefore, their value is incredibly high. We invite you to familiarize yourself with a selection of interesting and unusual ideas that will tell you how you can decorate New Year's balls with your own hands for 2017 .
DIY New Year's Crafts
How to make Christmas balls with your own hands?
Making New Year's balls at home today will not be a problem. Handicraft and creative stores provide a wide selection of decorative elements, as well as special blanks that can be used as the basis for future toys.
DIY Christmas balls made from thread and glue
You can create original Christmas balls with your own hands from thread and glue. For this you will need the following materials:
- balloons;
- decorative threads (preferably thick);
- PVA glue;
- container for glue;
- needle;
- scissors.
Let's look at how to make balls of thread with your own hands step by step.
1. First, you should inflate the balloon to the required size and tie it tightly. To give the ball a rounded shape, it is recommended to slightly knead it. Next, you need to thread the thread chosen for decoration into a needle, pierce it near the bottom of the plastic container taken under the glue. Afterwards, the thread should be passed through the container and glue should be poured into the latter.
Attention! To make the ball durable and not lose its appearance, it is not recommended to dilute the glue with water.
2. Next, the thread must be soaked with glue. To do this, it should be pulled through a container filled with PVA. It is immediately wound onto the base balloon. While the thread is being wound, the ball should be turned very intensively. Since the balloon will be removed from the inside at the end of the procedure, the winding should not be very tight in the place where it is tied. It is better to leave a small free space below.
3. When the ball is as dense as intended, you need to cut the thread, but leave a small tail so that you can form a loop later.
4. It is recommended to put such a ball in a dry place for a while until it is completely dry. If you don’t want to wait, you can use a hairdryer and speed up the drying process of the toy. This will only take 5 to 10 minutes. When the threads are completely dry, you can pierce the base balloon with a needle and pull it out from inside the toy in the place where the string was, but very carefully so as not to damage the created beauty. You need to make a loop from the tail of the thread and you can decorate the New Year tree.
DIY New Year's toys - https://home-ideas.ru/2016/11/novogodnie-igrushki-svoimi-rukami-na-2017-god/
Balls made of beads, buttons and threads
Balls made of cord and beads
One of the easiest ways to decorate New Year's balls with your own hands is to paste them with threads or decorative cords. To make the ball look more festive, take a string of beads along with the cord and glue them, alternating with each other.
The author of the ball is Irina Lysenko
Balls of buttons and pasta
Even children can glue colorful buttons onto balls, and all you have to do is admire the result and help them a little if necessary)
And instead of buttons, you can glue pasta or coins, and you will get the most unusual New Year's balls with your own hands!
Wrap the foam or any other ball in gold foil to mask the gaps. Alternatively, after gluing the small parts, the entire ball can be painted with gold spray paint.
Balls of thread
Making balls from threads is also not at all difficult. An ordinary ball is taken as a basis (you can use an old Christmas tree decoration, from which, for example, the paint has peeled off in places) and wrapped with knitting threads. Show a little creativity and it will turn into a ball-ball! Knitting needles are made from toothpicks and a couple of wooden beads.
Another method is based on the use of a balloon, which is wrapped with threads smeared in PVA glue. You can wind the threads in any order, and at the end it won’t hurt to coat the entire surface with glue again.
After the glue has dried, pierce the balloon and carefully remove it, and decorate the finished ball of thread with a festive bow.
DIY foam ball
Foam balls have many designs. Blanks made from this material are chosen as the basis for future New Year's decorations. Such balls are decorated using multi-colored pieces of felt, sequins, paper flowers, beads, threads, etc.
28 Christmas decorations that can be made in 10 minutes
As one of the ways to create an original decoration made of polystyrene foam for a Christmas tree, you can consider the “cake ball”. To make such a delicious decorative element, you will need:
- foam blank in the shape of a ball;
- PVA glue;
- small white sparkles;
- a thread;
- scissors;
- red bead.
To begin with, the foam spherical blank must be generously coated with glue. Then you need to lower it into a container with previously poured out small sparkles and carefully roll it in them so that there are no missing spots left. Then you need to let the ball dry thoroughly.
After final drying, using fabric or corrugated paper, you can form a beautiful skirt - a cake wrapper, which is attached to the bottom. A red cherry bead should be glued onto the top of the resulting decorative delicacy. The last step is to form the string pendant onto the foam ball.
Other options for foam balls
DIY Christmas balls - decoupage
Decoupage is considered an interesting type of modern decor. This art can also be used to create New Year's balls.
To do this, you need a set of tools and materials, consisting of:
- plastic balls (about 8 cm in diameter);
- napkins with New Year's drawings;
- multi-colored acrylic paints;
- brushes;
- PVA glue;
- acrylic varnish;
- semolina;
- sequin;
- sponges for washing dishes;
- boards for modeling;
- contours for working with ceramics and glass.
Place a small amount of white acrylic paint on the board, dip a sponge in it and apply it to the ball using dotted movements.
Important! It is recommended to carefully ensure that the sponge is evenly and well saturated with paint. Otherwise, decoupage of New Year's balls with your own hands will be spoiled by the visual effect of the presence of snow on their surface.
This is how you need to paint all the balls that you plan to decorate. While they dry (about an hour), you should begin preparing the napkins. The top painted layer must be separated from the bottom and carefully cut out the New Year's design. Next, you should dilute the glue with water in a 50/50 ratio. The cut out pattern must be moistened in an adhesive solution and applied to the ball. It is recommended to start the gluing process from the middle, smoothly moving towards the edges.
And then around the pasted picture you need to create a background of the appropriate color. To do this, acrylic paint must again be laid out on the board and, using a sponge, applied on top of the white background on the ball. After this procedure, the Christmas tree decorations should be left in a dry place until completely dry, and then their surface should be completely covered with acrylic varnish.
You can create the snow effect like this: mix white paint with semolina (you should get a thick porridge-like consistency) and apply it with a thin brush to the places of the ball where the snow should lie. When the snowball has dried, you can decorate it with silver sparkles, which must be applied to a surface previously coated with varnish. Using a thread, a loop is made, and the creative process is completed.
Manufacturing process
Before starting work, you should prepare your workplace. If the products will be made on the table, then cover its surface with film. If you plan to make the balls in a suspended state, you will need to cover the floor under the workplace with film. Use rubber gloves to protect your hands from glue.
How to make a ball of thread and glue step by step is described in the following instructions:
- Pour glue into a small container. If you prepared it yourself, make sure that it has a fairly liquid, but not too thick consistency - when immersed, the threads should be quickly and well saturated with glue.
- Depending on the size of your craft from a balloon, thread and glue, inflate the balloon to the desired size.
- Then apply greasy cream, Vaseline or sunflower oil to the surface of the ball. This will be required so that later the threads are well separated from the surface of the balloon.
- Now dip the thread into the glue and then wrap it around the balloon, tying a strong knot. Having fixed the thread on the ball, begin to wind it in a random order. During the process, you must ensure that the thread is well saturated with glue, otherwise the finished decoration will delaminate.
- At this stage, many people ask the question: how to wrap a ball with threads and glue correctly, and how many turns are required? The more layers you wrap, the stronger your product will be. If there is too little thread, the ball will eventually not hold its shape and will become deformed.
- When you have wound enough layers on the base ball, you can send the product to dry. To do this, simply hang it by a thread, after placing a large oilcloth underneath. Complete drying time depends on the room temperature. On average, drying takes 1-2 days. It is important that the glue dries well and hardens.
When the product is completely dry and hard, carefully remove the balloon. To do this, it must be untied and deflated. If desired, simply pierce it with a needle.
To separate the deflated balloon from the threads, use a pencil with an eraser at the end.
You need to remove the ball as carefully as possible so as not to damage the finished decoration. If the threads have moved, you can simply carefully move them back into place.
Products from threads, glue and a balloon can be made in a simpler way. To do this, you need to wind a dry thread around the ball, and then coat its entire surface with glue using a brush. The advantage of this method is that you do not need to get your hands dirty with glue. But when working with a large ball, dry threads can constantly slip off. Therefore, if you are thinking about how to make a large ball of thread, it is better to use the “wet” method.”
There is an original way of wrapping a ball with threads. The whole point is that you leave your hands clean. You will learn all this from the video:
Other ideas for DIY Christmas balls
Other ways to make Christmas balls with your own hands include:
- Soft fabric balls . To bring this idea to life, you will need scraps of different sizes. As a base, you can use an old sock, well filled with rags or cotton wool so that you get a spherical shape. You can also purchase foam blanks. Decorating the balls with flaps is possible both in the form of ruffles and by tightly sewing fabric rectangles to each other to give the toy a “shaggy” appearance. It’s a good idea to decorate fabric balls with buttons of various sizes and shapes.
- Christmas lace balls . You also need to take foam plastic blanks, which you will cover with pieces of openwork lace. It can also be tinted to provide an antique look. You can make lace yourself - knit it using a thin thread and a hook.
- Toys made from floral sponge (“oasis”) . A ball should be cut out of this material, to which small toys and spruce branches should be attached using wire pins. They are suitable for a large and lush New Year tree.
- Balls from old CDs . The latter should be cut into small pieces of different shapes and carefully pasted over the transparent glass balls. Using the same principle, you can decorate balls using beads.
DIY Christmas balls and master classes on how to make them, reviewed by us, will certainly help you get inspired to create creative designs for Christmas tree decorations. Create with pleasure, share your experience, replenish your collection of creative ideas and the best examples of their implementation!
Happy New Year!
Reading time: 10 minutes No time?
New Year's chores are pleasant, especially when they involve creating beautiful and festive decor. There are many interior design ideas that can be implemented by making different themed decorations. We offer you to create New Year's balls with your own hands along with tips, instructions and master classes from HouseChief.ru magazine.
Any fairy tale is quite accessible: patience and work, as they say.
Read in the article
How to make Christmas balls from felt with your own hands: flowers and applications
How to make a New Year's ball with your own hands? We buy bright and obedient felt!
Balls with felt flowers
Using a foam blank, tailor's pins, scissors and felt, it's easy to make beautiful balls with flowers. The work is labor-intensive in the sense that you will need to make a large number of identical small-sized templates.
Enough time will be spent on work, because each petal will have to be stitched manually.
Felt and foam balls
It’s so good that you can easily purchase ready-made foam blanks! There are countless ways to decorate them, let’s focus on felt decoration.
Cut out 6 almond-shaped petals from the wind. To avoid mistakes, first cut one out of paper, attach it to the ball and adjust its shape. And then you can cut the felt.
You can choose any decor, and cover the joints with braid or tape.
Openwork toys
In the next master class, the main idea is to use a balloon as a base.
To create a toy you will need:
- glue;
- thick white threads, such as iris;
- glitter;
- balloon.
Inflate the balloon according to the desired size of the toy. Tie the end of the thread to it. Tie with threads as in the photo. Dip it into glue (or treat the thread with glue using a brush), sprinkle glitter on top. Wait until the frame is completely dry and pierce the ball inside. Carefully remove it through the hole. You will have a light and beautiful Christmas ball in your hands.
In a similar way, you can make a New Year's ball from lace. The manufacturing method is the same, only you need to glue not thread, but pieces of lace.
How to make a New Year's ball from textiles
Any fabric, shreds, ribbons, embroidery - all this has long been successfully used by various craftswomen to create New Year's decorations. You don't have to be a highly skilled tailor to create textile beauty with your own hands.
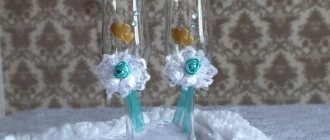
Balls for the New Year: satin ribbons
There are two ways to make a satin ribbon ball. In the first case, wider tapes are used, and in the second, narrow ones.
Color variations and additional decor give you unlimited scope for festive creativity.
They work differently with narrow ribbons: select a top on a foam ball and mark it with a marker, tracing a small circle. There, closely spaced tailor's pins are placed in one row. They do the same from below. Now secure the tip of the ribbon with hot glue and begin to pull the ribbon up and down through each pin. Having wrapped the entire ball in this way, secure the remaining tip of the tape.
Now you need to decorate the lower and upper circles.
Balls made from scraps using the kinusaiga technique
The art of working with foam plastic and scraps of fabric is surprising and inspiring. Sew without sewing - this phrase is confusing at first. But once you understand it, it becomes clear what we are talking about. The principle of the Kinusaiga technique is that lines are drawn on the foam to make up the design. Then each line is cut with a sharp knife, scissors, or cutter.
There are practically no restrictions in patterns and designs.
Balloons with embroidery
Embroidery is a noble cause and deserves its place on the branches of the New Year tree. First, a drawing diagram is selected according to which the work will be embroidered. The pattern is embroidered on an element of the future decoration.
Sometimes embroidery is placed on the ball using hot glue and decoration.
Master classes and tips: creating New Year's balls
If the muse has already visited, then you should not let her go: even if there is nothing special in the house in terms of decor, there will always be a skein of thread, pasta and buttons.
Buttons and pasta
How to make New Year's balls from buttons? We take any base ball, get a heat gun with a set of rods, a bunch of beautiful or not so beautiful buttons and don’t forget about inspiration.
Each button is applied to a drop of hot glue. If desired, the finished product can be painted with acrylic paint and decorated with a bow or ribbons.
With pasta, the principle of operation is slightly different. Let's look at a photo of making pasta decoration.
| Illustration | Description of action |
Cover the workpiece with glue so that the thick adhesive mass does not flow down. This is only possible when using high-quality glue.
Using tweezers, place each pasta element on the glue. We are waiting for the product to dry completely.
We paint the ball and dry it.
The leaves are made from ribbons: first, use a soldering iron to trace the outline of the template on a white ribbon.
Then they make outer and inner contours on red tape and glue them together with a soldering iron. The leaves are glued with hot glue. To complete the work, attach the holder to the top.
Threads for a volumetric ball
Thread creativity can be done right the first time if you follow the instructions. What do you need:
- threads: wool, iris, jute, twine;
- PVA glue;
- hand cream.
Now let's move on to describing the process.
| Illustration | Description of action |
Pour glue into a bowl.
Dip a skein of thread into the glue and leave it there for half an hour. During this time, we will inflate the required number of balls of the desired size.
We tie each ball and lightly coat it with cream. We begin to wrap the ball, trying not to lay the thread chaotically. We wrap it without sparing the threads! Leave everything until completely dry, pierce it and remove the ball.
The result depends on the colors chosen.
The simplest and most practical ways to make a topiary ball with your own hands
Base for topiary from newspapers
To make a topiary ball, you will need old newspapers, scraps of cardboard, magazines, notebooks, sheets of paper - any waste paper that can be crumpled up -). We press the newspapers tightly, layer by layer we form a sphere of the required diameter, and fasten it with tape. The technique is excellent for preparing the base for a large crown (with a diameter of 20 cm).
If the waste material is small, for example, fabric scraps, then we put everything in a plastic bag before wrapping it with tape.
Padded padding ball
We tamp padding polyester, scraps of fabric, cotton wool or any other similar material into an underwear, stocking or sock. We give the product the desired shape, insert the barrel and wind the ball very tightly with ordinary sewing threads. This creates a strong and elastic base for topiary. The method is ideal for a small crown (with a base diameter of up to 10 cm) and is not very suitable for a large tree of happiness.
The video below clearly shows how to make a ball for topiary from padding polyester, immediately securing the trunk inside.
Interesting ways to easily decorate Christmas tree balls
New Year's decorations made from balls are the most preferable for many. Therefore, we will consider simple ways to decorate various round blanks.
We use children's fingers
Any ball can be decorated with acrylic paints. All you need is paint, a blank and your fingers!
It's very easy to turn prints into garlands on a toy.
Children really like crafts where you need to work with your fingers rather than brushes.
How to make decoupage balloons for the New Year with your own hands
If you want an amazing and wonderful world on the Christmas tree, then get ready to buy acrylic paint-primer, beautiful napkins, PVA glue, varnish and brushes. If someone wants to make a New Year's ball with snow, then they can make an imitation of snow cover with salt and glue.
Decoupage is a simple technique, using which you can inadvertently create a masterpiece.
First, clean the surface of the toy if any irregularities are suddenly discovered on it. Zero grade sandpaper is suitable for this. Then the workpiece needs to be primed.
You need to prime with a sponge or a regular dishwashing sponge.
As soon as the layer dries, you can begin the creative component of the process. The entire napkin is not needed, we look closely at the desired image and carefully tear it out with our hands. Then a piece with a picture is placed on the ball and very carefully they begin to smooth it with a brush with PVA glue. This is a crucial moment - haste will lead to damage to the napkin.
Gradually the image will smooth out. If you need to apply another image next to it, then do exactly the same.
The dried ball is first coated with varnish, waits until it dries, and then decorates it.
The decor can be anything: liquid pearls, acrylic paints, beads, beads, imitation snow.