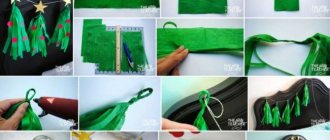
New Year card with a Christmas tree made of corrugated paper
You will need: thick colored A4 cardboard, scissors, corrugated paper, PVA glue or double-sided tape, a simple pencil, decorative elements (sparkles, beads, ribbons...).
Master Class
- Fold the cardboard in half and sketch the tree with a pencil on the right half.
- Cut corrugated paper into strips 1.5 cm high, 5 cm to 25 cm long. (There should be 5 strips of different lengths as shown in the picture).
- Glue the strips of corrugated paper, starting from the bottom and working up. (Gather the strips while gluing).
- Decorate the Christmas tree to your taste with sparkles, rain, stars...
I recommend watching this video!
New Year 3D CARD 2021 ❄ Gift for the NEW YEAR
DIY New Year cards with Santa Claus
YouTube channel Shafeeka Hamit
What do you need
- White paper or cardboard;
- pencil;
- scissors;
- ruler;
- black paper or cardboard;
- orange paper or cardboard;
- peach paper or cardboard;
- red paper or cardboard;
- green paper or cardboard;
- stationery knife;
- hole puncher;
- light blue cardboard;
- glue;
- bulky double-sided tape;
- red rhinestones;
- pink paper or cardboard.
How to do
Fold the white paper in half crosswise and cut off half. Draw a beard on one part, as shown in the photo and video below, and cut it out.
YouTube channel Shafeeka Hamit
On the other half of the white sheet, draw a mustache and cut it out.
YouTube channel Shafeeka Hamit
From black paper, cut out a strip measuring 15 x 2.5 cm, from orange paper - a square with sides of 4 cm. On the square, draw two parallel lines at a distance from each other. Go through them with a knife. Punch three holes on the strip approximately in the middle with a hole punch. Insert the strip into the square to form a belt.
YouTube channel Shafeeka Hamit
Cut out a rectangle measuring 9 x 4 cm from peach paper. Draw a leaf-like shape on it and cut it out.
YouTube channel Shafeeka Hamit
From red paper, cut out two rectangles measuring 10 x 4 cm and 15 x 11 cm. On one narrow side of the large piece, slightly round the corners. On a small piece, draw the top of the cap, as shown in the photo and video below.
YouTube channel Shafeeka Hamit
Cut out two rectangles measuring 3 x 1.5 cm from green paper. Fold them in half lengthwise. Draw half of a long, embossed leaf on the fold. Cut and straighten. Fold a small square of white paper diagonally, then fold it twice more. Draw a semicircle in the corner and cut it out - you will get a flower.
YouTube channel Shafeeka Hamit
Fold a piece of blue cardstock in half crosswise. Glue the large red piece to the bottom of the cover, with the curves facing up. Coat the top of the large white piece with glue, and attach several pieces of tape to the bottom. Glue the piece just above the middle. Where the tape is, there will be a beard.
YouTube channel Shafeeka Hamit
Glue a red hat on top. Attach a white flower to the side between the hat and beard with tape, green leaves on it, and rhinestones in the middle. Glue the peach detail under the hat.
YouTube channel Shafeeka Hamit
Add black round paper eyes and a round pink nose. Attach the mustache to the tape below.
YouTube channel Shafeeka Hamit
Glue a paper strap to the bottom of the card.
What other options are there?
Santa Claus made using applique technique:
And here we show how to make a New Year's character with a cotton beard:
New Year card in scrapbooking style
Scrapbooking is an entire art that teaches you how to create and decorate photo albums (in our case, a postcard) with your own hands. Scrapbooking has a whole history of how a notebook turned into an album. At the end of the 17th century, notebooks with additional blank pages appeared. Their owners pasted in images, creating entire collections. This is how scrapbooking began to develop.
You will need: thick colored A4 cardboard, PVA glue or double-sided tape, scissors, scrap paper, pencil, decorative elements (sequins, beads, rain, buttons, sequins...).
Master Class
- Make 12 rectangles from scrap paper. The size of each rectangle should be different, starting from the smallest to the largest. (Width from 1 to 12 cm, length 5 cm for all rectangles).
- Roll each rectangle into a cylinder in the width direction, using a simple pencil to secure each cylinder with glue.
- Glue all the tubes together, starting with the largest and ending with the smallest, creating a Christmas tree shape.
- Make the base of the card by folding a piece of cardboard in half.
- Let the Christmas tree dry well, then glue it onto the right half of the card.
- Decorate the card to your taste with sparkles, sequins, buttons, rhinestones...
I recommend watching the video master class!
Postcard “Christmas tree made of tubes” / CRAFTS FOR THE NEW YEAR
Traditions and creativity of Inna Lukanova
Inna Lukanova is a designer, artist, teacher at the Modern School of Design. This year, Inna decided to resume a tradition from her childhood - handmade New Year cards. The plot ideas turned out to be different. Among the illustrations we see traditional ones - animals and winter, as well as in the pop art style - here the dog became the main character of the events as a symbol of the coming year. Among the designer's postcards, everyone will find a story to their liking; it all depends on whose gift you want to complement - whether it is a reserved/tender nature or a daring, mischievous one with a good sense of humor.
@lukanovainna inna.lukanova
Happy New Year and Merry Christmas! Welcome 2018 with happy smiles, beautiful interiors and stylish decor around!
New Year card for children
You will need: A4 colored cardboard, wrapping paper or candy wrapper, thin black marker, scissors, PVA glue or hot melt glue, stapler, decorative elements (sequins, beads, rain, buttons, sequins, bows...).
Master Class
- Make the base of the card by folding a piece of cardboard in half.
- Take green cardboard, cut it in half and make an accordion on one of the halves. The distance of each fold of the accordion should be 1-2 cm.
- Secure the end of the accordion with a stapler.
- Cut a rectangle from a candy wrapper or wrapping paper. (This will be the base of the Christmas tree).
- Glue the Christmas tree to the right half of the card, then glue the candy wrapper base.
- Decorate the Christmas tree to your taste with sparkles, sequins, buttons, rhinestones...
- Write a wish.
I recommend watching this video!
NEW YEAR'S CARD WITH YOUR OWN HANDS ❄ What to give for the new year? DIY
Bull postcard: DIY New Year symbol
2021 will be held under the auspices of the Ox, so it’s worth making a beautiful New Year’s card Ox from paper .
Prepare templates for a New Year's card with your own hands, colored paper, glue stick, shiny foamiran, glitter, PVA glue, marker.
Step-by-step master class
1. Print and cut out the templates.
2. Trace the details of the card - each on a different color of paper.
3. We begin to gradually glue the parts, as shown in the step-by-step photos.
4. First we make the head of the bull, gluing all the elements together with a glue stick.
5. Then glue on the cap, bow, body . We connect all the elements together.
6. Slightly bend and glue the ears, a gift. We outline the borders with a marker and decorate the bow with glue and glitter.
7. Make the base of a New Year’s card in the form of a ball, glue a bull to it.
8. Grease the rim of the card with a thin layer of glue and sprinkle with glitter.
The New Year's card in the form of the symbol of 2021 is ready. Also watch the video on how to make a bull New Year's card with your own hands.
New Year card in minimalist style
Minimalism (from Latin - smallest) is a style that is characterized by simplicity and laconic composition.
You will need: A4 colored cardboard, a shaped hole punch or a stationery knife, thread, needle, sequins, a simple pencil, a ruler and scissors.
Master Class
- Make the base of the card by folding a piece of cardboard in half.
- On the right half of the card, sketch out a Christmas tree and a star top. Use a ruler and pencil.
- Cut through the star with a shaped hole punch or a stationery knife.
- Use a needle to make holes in the shape of a Christmas tree - a triangle.
- Take a thread and a needle and make stitches. After each stitch, string sequins.
- Carefully fasten the thread on the reverse side.
I recommend watching the video master class!
HAND MADE Christmas card “Christmas tree made of threads and beads”
New Year cards from Inga Azhgirey
Inga Azhgirey is a designer, decorator and painting artist. Inga loves to use unusual objects in the interior; she conducts master classes in painting and decorative painting for children and adults. The designer’s illustrations have already been presented in the article “Designer Postcards”. Inga’s pages on social networks are always full of illustrations on various topics, for example, her paper coffee cup will definitely acquire its own individual design, and ordinary napkins often serve as an alternative to a sketchbook.
@ingaazh inga.azhgirei
New Year card in origami style
Origami is a type of decorative and applied art, literally translated from Japanese as “folding paper” into various figures.
You will need: multi-colored A4 cardboard, PVA glue, scrapbooking paper or thick paper, decorative elements (sequins, beads, rain, buttons, sequins, bows...).
Master Class
- Make the base of the card by folding a piece of cardboard in half.
- Take 3 squares of thick paper whose sides are 20cm long.
- Fold the square diagonally, unfold it and fold it crosswise again diagonally (conditionally marking 4 triangles).
- Fold 2 opposite triangles inside.
- Press the resulting triangle to the surface and mark the conditional center.
- Fold the bottom corner parallel to the middle. Repeat this procedure with the second corner. The module is ready!
- Make 2 more of these modules, maybe in different colors.
- Assemble the Christmas tree in this way: glue the origami module to the right side of the postcard, form the Christmas tree from top to bottom, insert the next module into the previous one.
- Decorate the Christmas tree to your taste with sparkles, sequins, buttons, rhinestones...
I recommend watching the video master class!
Volumetric Christmas tree made of paper for a postcard. Paper Christmas tree
New Year card in retro style
You will need: A4 colored cardboard, scissors, a simple pencil, ribbons, PVA glue, decorative elements (sequins, beads, rain, buttons, sequins, bows...).
Master Class
- Make the base of the card by folding a piece of cardboard in half.
- Glue the tree trunk to the center right side of the card. The trunk should be made of brown tape and shaped like a trapezoid.
- Cut 6 strips of ribbons 2 cm wide, 2, 4,6,8,10,12 cm long.
- Cut the corners of the ribbons on both sides.
- Glue the tapes from bottom to top, in the shape of a triangle.
- Decorate the Christmas tree to your taste with sparkles, sequins, buttons, rhinestones, stars, bows...
I recommend watching this video!
DIY New Year Cards ✎ WITH YOUR OWN HANDS ✎ On a budget✎ New Year