Beginners, deciding to do all the work of installing interior doors themselves, often miss important nuances that are well known to experienced craftsmen. An important point will be careful preparation for installation work and the use of reliable fasteners.
A correctly installed door will close without unnecessary effort, without falling apart, even if it slams periodically. The supporting base is the box. The reliability of the structure depends on how strong it is.
The structure must be correctly aligned - for this you need to purchase a building level. It is best to use a laser, as it is very convenient to work with.
Installation of interior doors is carried out in several stages. The door leaf and frame must be equipped with fittings. To make it convenient to close the door, you need to install a handle. If required, it can have a lock with a spring mechanism. Hinges should be made on the door and frame. The canvas can only be hung after preliminary adjustments have been made. After this, you can proceed to the installation of platbands.
How to markup
Installing doors with your own hands will require labor from a beginner. If the master completes the installation in 1 day, then a novice builder can spend much more time. This point must be taken into account if emergency installation of the structure is required.
It is important to complete all stages in a clear sequence, strictly observing building codes. A number of door blocks already have fastenings for installation. But there are products whose box will have to be assembled on your own. They are sets that include blocks of wood and strips for platbands. In addition, the manufacturer includes a door leaf in the finished kit.
If you decide to assemble the box yourself, you can use different methods. You need to pay close attention to the quality of the work, because if even the slightest error occurs in the measurements, you will either have to do all the work again or buy new parts of the structure.
You can install a door in an interior partition with or without a threshold. The simplest option would be to install a structure without a threshold, but option 2 will require a timber strip. In this case, the finished structure will look like a rectangle.
Step-by-step instructions will be of help. Before starting work, it is necessary to take exact measurements. First you need to find out the dimensions of the opening. Then you should make calculations by determining the dimensions of the side posts and the lintel. Then you need to determine the optimal size of the door leaf, not forgetting about the technological gaps. Having made the markings, the elements are sawed off using a hacksaw, and then the assembly of the interior doors begins.
It is important to correctly calculate the thickness of the box, which should be no less than the thickness of the wall. To ensure accurate measurements, you need to use a tape measure. Beginning builders should not rely on identical elements, such as side posts, being “mirror-like.” To avoid measurement errors, each element must be measured separately on the right side, and then on the left. If deviations are found in the process, they must be taken into account in further work.
How to install an interior door yourself? Particular care must be taken to position the fender beam, which must have a gap for the mounting foam. It is enough to allocate 1 cm to it. The same should be done with the lintel and hinge bar.
The gap on the inside should be much smaller, 0.3 cm is enough. If the interior door has a threshold, then the gap should go along the entire perimeter of the structure. When installing a structure without a threshold, a gap must be left between the floor and the canvas. The average value is 1 cm. Such assembly and installation of interior doors will be considered completed correctly.
On vertical posts, marks for sawing are required, which are determined on the inside of the block. If the hole size is insufficient, it must be enlarged. If the hole is too large, it can be reduced by laying plasterboard cut to size.
Step-by-step installation of interior doors
In general, there are many subtleties. We will try to describe and illustrate the most common moments in photo or video material.
Door frame assembly
If you did not buy an assembled door block, the first thing you will have to do is assemble the door frame. It consists of two long posts located on the sides, and one shorter crossbar at the top - the lintel.
Connection methods
There are at least two options for how to connect these planks to each other:
- At 45°. The option is the most correct from an aesthetic point of view, but the most difficult to implement. High precision cutting is required so that there are no gaps. If you have the skill, you can saw off using a carpenter's miter box, but you need to do it carefully. The second point is that if you cut laminated material with a hacksaw, chips will remain on it. The solution is to use a well-sharpened tool.
One way to connect a door frame
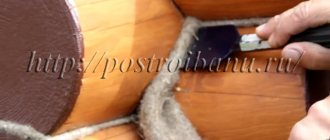
- Install end-to-end at 90°. This method is simpler - there is less room for error, but it is necessary to remove part of the protrusion at the junction of the racks and the lintel. To do this, we attach to the corner a section cut off with a substantial margin for the lintel. We outline with a pencil the part that interferes with the connection. Using a chisel, remove excess. After trying it on a couple of times, we connect it, set the angle exactly, and make sure that the relief matches. In this position, drill holes for the screws. The diameter of the drill is 1-2 mm less than the diameter of the fastener. Then we connect this node, constantly monitoring 90° and the accuracy of matching the relief.
- for hinges - 5-6 mm;
- at the top, bottom and sides - 3 mm;
- bottom - 1-2 cm.
How to connect a door frame
Regardless of exactly how you plan to connect the elements of the door frame, the first step is to cut down the pillars and lintels on one side. Then they are placed in a box on the floor, checking the correct connection. Next, you need to decide on the height of the side parts of the door frame.
Determining the dimensions
When folded, the required length is measured along the inside of the rack. The racks are not always made the same - the floor is often uneven and this must be taken into account. To do this, take a level and check how level the floor is. If it is perfectly level, the posts will be the same. If there is a deviation, it must be taken into account: make one of the racks longer. Usually this is a few millimeters, but this is also enough for the doors to warp.
When calculating the height, keep in mind that the racks should be 1-2 cm longer than the door leaf (including cuts). Make a 1 cm gap under the door if you are not planning to put a rug under it. If there is a rug/carpet/carpet, it is better to make it larger. Don't be afraid to leave gaps. They are necessary for normal ventilation in the room. Please note once again that the height is measured along the inside of the door frame - from the bottom edge to the cut. Having cut it off, try on the racks in the doorway.
Gaps when installing interior doors
Now you need to saw off the lintel to length and, if necessary, saw on the other side (if the joint is at 45°). The length of the lintel should be such that when folded, the distance between the posts is greater than the width of the door leaf. The minimum gap is 7 mm, but more is often done. 7-8 mm are distributed as follows: 2 mm for hinges, and 2.5-3 mm for expansion gaps. Any interior doors - MDF, fiberboard, wood - change their dimensions depending on humidity. To accommodate these changes, clearances are required. And 5-6 mm is not always enough, especially in damp rooms. For the bathroom, definitely leave a little more, otherwise in high humidity they may have difficulty opening.
So, we have decided on the minimum gaps when installing interior doors:
After you have cut all the pieces and made the cuts, fold the box on the floor. If you notice any shortcomings in the joint, correct them using sandpaper attached to a block. The more accurate the match, the smaller the gap.
Door installation options
To make the cut, it is better to use a lathe. In this case, installing the door frame will take little time. If you don’t have a machine, then a hacksaw and miter box are suitable alternatives.
When installing an interior door, you can use the following 2 methods:
- make a cut at an angle of 45º;
- do the work at an angle of 90º.
How to install an interior door with your own hands? If we talk about option 1, it is quite complicated. The work will require increased attention from an inexperienced carpenter. But as a result of carefully executed joining, you will get a product that looks very beautiful.
In order to connect several elements, you need to use self-tapping screws. You need to make special holes for them. If the door is made of MDF, then the work should be carried out in advance, which will avoid damage to the workpieces. It is most convenient to work using a drill whose diameter is 3/4 of the diameter of the fasteners. It is best to buy self-tapping screws whose threads reach the head.
If we talk about method 2, it assumes that the cutting angle will be 90º. To perform the work you will need a hacksaw with fine teeth. The upper beam is attached to the vertical posts with 2 self-tapping screws; they are screwed in on each side. In order to make a threshold, the timber must be cut at a right angle.
The easiest way to assemble the structure is to lay out the elements on the floor or a large table. The master must install the fittings. When performing interior finishing, it is necessary to properly secure the functional fittings.
Don't forget about fire safety. In order to quickly evacuate the premises, it is necessary to install a door that opens outward.
How to install interior doors? There are several options. The hinges are hung on the right or left - there are universal products on sale. If previously it was possible to buy hinges that required careful insertion, now you can purchase products that do not require cutting the veneer.
You need to make an indent from the top edge of the canvas, 20 cm is enough. Then hang the loops. You should retreat the same distance from the bottom. Variations are possible: in these cases, they retreat 5 cm in both directions. The structure can be further strengthened by hanging 3 loops. It is placed 50 cm from the top line.
Self-installation of the door frame
In order to fix the box in the opening, you need to buy an anchor. The door will be held securely by 3 long screws. In addition, the structure will be supported by polyurethane foam.
You can drill a door frame made of wood without any preparatory work. The installation procedure is as follows:
- The door base is assembled on the floor.
- The structure is lifted and installed in the opening.
- Wedges are made from leftover lumber and placed between the walls and the frame. This creates a gap for the polyurethane foam.
- Screwing in self-tapping screws. Leveling the base using a building level. The accuracy of the installation can be checked with a plumb line. If deviations are detected, they can be corrected by loosening or tightening the screws.
- Installation of hinges and fabric. Before applying polyurethane foam, the box must be sealed with tape. You need to insert cardboard into the gap. The door is closed and the cavity is filled with foam.
After completing the installation work, you need to wait for the foam to dry completely. The excess can be trimmed off, and then the platbands can be installed.
Installation work
First they make the ends in the box. Then the structure is assembled. The upper part of the box is fixed with wedges. Using a level, check the correct position horizontally and vertically. The wedges are hammered. The spacers are installed opposite the lower previous elements. Its parameters should be equal to the length of the door plus 5 mm.
Grip box device.
When installing the door, check the gaps. The structure must open and close freely. The box is foamed with polyurethane foam. The concrete surface is pre-wetted with water. Since the previous material is poisonous, it has a negative effect on the varnish. It can be protected with mounting tape. The wedges are dismantled after the foam has completely dried. Its excess is cut off with a knife.
Related article: Toilet cabinet above or behind the toilet - options and ideas
To install the platbands, you will need to find out their length. To cut it in a miter box, use a hacksaw. Then the casing is fixed with finishing nails. You can increase the service life of a door if you care for it properly. To do this, use wood surface care products. Contact of the fabric with alkalis and acids is prohibited.
MDF box
If the box is presented in the form of MDF, then the door is installed taking into account the weak mechanical properties characteristic of the first design. The frame elements are assembled depending on the type of doors being mounted. The removable cover is installed according to the specified parameters. This technology helps to form a quarter of the required width.
Installation of an interior door.
Then they measure the part of the box that is in contact with the canvas at the junction of the canopies. The excess is cut off. The last element is connected to the door using butterfly hinges. They do not need to be sunk. This factor is important when installing MDF doors. Then the remaining parts of the box are assembled. They are fixed with self-tapping screws. Manufacturers advise additionally sealing the places where the elements are fixed using wooden choppers. For this, PVA glue is used. Pre-drill holes.
To create an equal gap between the canvas and the box, it is recommended to lay linoleum or other material around the perimeter of the parts. A step of 50 cm is observed. The frame is pulled together with ropes to the door leaf in 3-4 places. The method used aligns the frame with the door, taking into account the required gaps.
The next step involves installing the door into the opening using spacers made of beams. The resulting space between the box and the opening is filled with construction foam. After 24 hours you can remove the rope. Then the handles are cut in and the lock with platbands is installed.