DIY plywood doors
If you have the necessary skills in working with plywood, you can make interior doors with your own hands. Firstly, it is cheaper than buying a ready-made structure or ordering a door from a manufacturer. Secondly, you can make a door that exactly matches the required dimensions, choose your design and decoration. Thirdly, you will be 100% confident in the quality and reliability of the design.
General principles
When making doors yourself, the first thing you do is measure the doorway: you need to make a door frame. In most cases, it has the shape of the letter “P”: two vertical posts are installed and one horizontal one is installed at the top - the lintel or crossbar.
The strip, which is attached below, is rarely used today, but there are special-purpose rooms in which a threshold is required. For example, in the steam room of a Russian bath. A threshold is needed here to prevent steam from escaping.
Having previously assembled the door frame on the floor, you can decide on the dimensions of the future door: they should be a couple of centimeters smaller than the frame you made. After you make the door leaf, cut in the hinges. Doors made of wood are heavy, and it is very difficult to carry them and try on the hinges. Therefore, it is more convenient to do everything on the floor. Mark the fastenings for the hinges, make a recess to the required depth, install them on the jamb and on the door leaf.
Schematically, the door installation technology looks exactly like this
Then you install the box in the opening, secure it, and only then hang the doors. Here's a general outline of how the process works. Now let’s learn more about how to make doors with your own hands.
In what cases is it better to install
Sliding doors and sliding doors are installed between rooms. They are especially relevant in the following rooms:
- Kitchen where there is never enough space
- Interior space when two rooms are separated from each other
- Toilet and bathroom
- Dressing room, mirrored doors are often installed here
Doors can be made not only from plywood, but also from solid wood. However, plywood is preferable if you need to make a door leaf of a curved shape. Such designs are in demand mainly for dressing rooms. Plywood bends well, so giving it the desired shape will not be a problem. Radius doors are attached to the same curved profiles.
In addition, plywood is lightweight, it is resistant to high humidity and temperature changes, and is not afraid of direct sunlight. Plywood is easy to care for, as the material tolerates synthetic detergents well.
Sliding
The sliding door opening mechanism has the following advantages over standard swing structures:
- Doesn't take up extra space
- Do not accidentally open when there is a draft
- They do not slam shut on their own, which is important in families with small children
Plywood sheets are also lightweight, so the load on the walls is minimal.
Coupe doors
A sliding door is one of the options for sliding doors. Before you begin its manufacture and installation, you need to study the main features. The structure consists of the following elements:
- Door leaf
- Rollers for moving the web along the guides
- Profile
- Stoppers limiting door movement
Sliding doors have all the advantages of sliding structures. The difference is that the sashes remain outside and move along the walls, rather than being “recessed” inside. The main advantage compared to swing models is the saving of space in the room by using the usable area that is usually left for opening the door.
Compared to sliding structures, sliding doors are easier to install. For those who plan to install doors on their own, this is an important advantage. For such doors, only guides and rollers are needed. Complex work on installing the box, which is usually planned at the repair design stage, is absent here.
How to make a frame for an interior door
All three parameters must be combined so that the frame is located freely, with a margin of 2.5–3 cm, inside the opening. And at the same time, the door leaf placed inside the frame should have a gap of 2.5 to 4 mm. Calculations, as a rule, are made based on the dimensions of the canvas, if it is already ready. A board with a thickness of 35 to 60 mm is selected. Naturally, the thicker the door frame, the stronger and more reliable it is.
Let's look at a specific example. Let’s say the width of the door leaf is 80 cm.
- To determine the internal size of the box, you need to add another 6 mm (2 · 3 mm) to 80 cm - you get 806 mm.
- Taking into account the thickness of the board, we calculate the external dimensions of the door frame. For a piece with a thickness of 50 mm, add 4 cm, since 1 cm will be spent on making the quarter. We get 806 40 = 846 mm.
The thickness of the box is usually tied to the depth of the doorway (wall thickness). In practice, this value varies from 70 mm to 125 mm (brick thickness).
Having finished with the calculations, we move on to making the box.
- The workpiece is planed from the front side, ground and polished.
- The shape of the groove in which the door leaf will be located in the closed position is marked.
The depth is equal to the thickness of the door leaf. The supporting plane is made with a width of 10 to 12 mm. If you plan to equip the frame with a rubber seal, an additional groove is cut to install it - A quarter is cut out.
To do this, you need to adjust the depth of cut in the circular saw. First, a deep cut is made, then a shallow one. An even passage is carried out using a ruler attached to the end of the circular to the desired width. The quarter is selected using a circular saw - The quarter is sanded and leveled with a chisel to perfect condition for painting.
- A U-shaped frame structure is assembled.
The connection is made either using screws or by cutting a tenon on the top crossbar and sidewalls. In the latter case, additional brackets are used to increase the rigidity of the connection. The tenon connection of the frame requires precise fitting of the parts
The frame is ready. You can install it in a doorway.
Assembly order
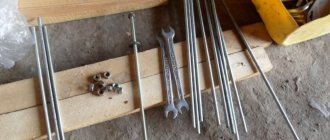
Required materials and tools
Installation of sliding plywood doors begins with preparatory work. You need to stock up on the necessary materials and tools so that nothing later distracts you from your work. To create a simple door you will need the following materials:
- Beams in the amount of 5 pieces, length 3 m and cross section 45 x 20 mm.
- Waterproof plywood, coniferous varieties are suitable. The dimensions of the sheet depend on the size of the door leaf.
- Insulation or filler. For a regular interior door, you can choose an inexpensive option that does not have noise and heat insulation properties. But even in interior structures, inexpensive mineral wool or expanded polystyrene can be used as insulation.
- PVA construction adhesive
- Rail
- Profile to be used as guides
- Rollers
- Wood putty
- Acrylic sealant for wood
The tools you need to prepare are:
- Circular saw, hand or electric
- Jigsaw
- Sandpaper
- Spatulas of different sizes
- Screwdriver
- Electric drill
- Fraser
- Ruler
- Pencil
- Masking tape
- Tassels
If you are planning decorative surface treatment, then a milling machine and a miter box will be useful to you.
Where is it profitable to buy a wooden entrance door for a house?
The price of metal entrance doors for a home depends on many factors: the technology used (thermal break), exterior finishing (ship sheet), design features - three-circuit or double-circuit. Elite options can cost several hundred thousand rubles. Budget - from 40 thousand. Entrance doors to a house with glass and forging will be a little more expensive due to the complexity of execution. On the Beldoorss website you can order an affordable option, and during the sales period you will have the opportunity to buy an elite model at an economy price.
DIY plywood doors. Step-by-step instruction
If you follow the detailed instructions for installing a sliding door, then installing it yourself will not be a problem. It is quite possible to do without the help of specialists to make a plywood door yourself. This does not require extensive experience; basic repair skills and the ability to handle tools are sufficient.
Making a single-layer plywood door
- A sheet of plywood with a thickness of at least 1 cm must be cut according to predetermined parameters
- Slats or wooden planks are attached along the perimeter of the sheet. This is necessary to give rigidity to the door leaf. You can fasten the planks with screws, small nails or using wood glue.
- To increase the strength of the structure, horizontal jumpers are needed, for which the same rail is used. First they are installed on one side of the sheet, then on the other.
- To give the door a more aesthetic appearance, you can smooth out the transition from the slats to the main panel using glazing beads.
- Next, the door needs to be sanded, putty and painted in the desired color. You can simply coat the plywood with varnish.
- Fittings are installed on the finished door
Making a frame door
This product will require two plywood sheets, which will be attached to a frame made of bars and planks. The frame is made according to the dimensions of the doorway. Wooden parts are fastened into one structure with self-tapping screws or metal plates.
The first sheet of plywood is fixed on one side of the frame using self-tapping screws. Then a layer of thermal insulation material or simply filler is laid so that the door is not hollow. Next, a second plywood plate is attached to the other side of the structure. All that remains is to treat the canvas with putty and paint it in the desired color, fasten the fittings - and the sliding door is ready for installation.
Installation of the structure
- Attaching the rollers to the door leaf depends on the system used. Manufacturers' recommendations must be followed. Most of them recommend retreating a certain distance from the edge and attaching the plates under the rollers there. They are fastened with self-tapping screws, the length of which should not be less than 70 mm. They need to be screwed strictly perpendicularly. Supports for the rollers are installed in the plates, and the platforms themselves with wheels are already attached to them.
- The guides are installed from above the doorway. The best option is to first hang the profile on a dry beam using self-tapping screws, and then secure this structure above the doorway.
- Hanging doors on guides. It is important to leave a distance between the floor and the door leaf so that the door does not shuffle across the floor when opening and closing.
- Installation of stoppers. They are mounted from above directly into the profile, starting from the sides. At the bottom, the stopper is needed at the same level as at the top.
Article on the topic: Is it possible to break a door lock?
The final work is finishing. The top beam can be covered with a strip that matches the color of the door.
Calculations and drawings for the manufacture of interior doors
Before preparing the necessary materials, the door area is calculated. The total area of the door leaf is the product of height and width: S = a · b, where S is the area, a is the width, b is the height of the door. For convenience, a drawing is drawn up on a reduced scale. The actual dimensions of the doorway are plotted on the plan, and the dimensions of the door block are calculated taking into account the technological gaps around the perimeter of the leaf.
When drawing up a working drawing, any convenient scale is used
It must be taken into account that at least 2.5–3 cm of free space is required between the frame and the wall. It is thanks to this gap that the door can be aligned inside the opening in the horizontal and vertical plane.
The thicker the door leaf, the larger the gaps need to be left.
For example, if the hole in the wall is 1 m in width and 2.05 m in height, the dimensions of the door block at the extreme points will be:
- width 100 - 6 = 94 cm;
- height 205 - 6 = 199 cm.
If we take into account that the frame is assembled from timber, then to determine the dimensions of the canvas it is necessary to subtract the thickness of the timber plus 6 mm (3 mm on each side). Let's assume that the door frame is a block 60 mm wide. This means that the width of the door leaf will be 94 - 2 6 - 2 0.3 = 94 - 12 - 0.6 = 81.4 cm.
The vertical size is calculated in the same way. The only adjustment is the height of the door leaf above the floor. It can be made from 3–4 to 10 mm. Using the lower gap, air ventilation between rooms is regulated.
Advice from professionals
- If the doorway is smooth, then the canvas can be measured strictly according to size. When opening with a curvature, take the canvas with a margin so that it covers all deviations.
- Sliding doors are hung after renovation, that is, the walls must be covered with wallpaper, and the opening itself must be plastered or painted.
- When installing the decorative beam, place it so that it covers the rollers. The design will look more beautiful and neat.
Thus, even a non-professional builder can make and install a sliding door with his own hands. The main thing is the ability to work with the tool, strict adherence to instructions and the desire to make a truly high-quality product.
An example of sliding door installation can be seen in the video.
Instructions with photos and videos on how to make plywood doors with your own hands
Making plywood doors with your own hands is not as difficult as many people think. And this activity is very inexpensive and will save the family budget on purchasing ready-made doors. Both entrance and interior doors, including sliding ones, can be made from plywood. How to do this will be described and shown in this article.
Plywood door
Preparing tools
Anyone can make a door out of plywood with their own hands, but to do this you need to acquire not only sheet material, but also special tools and equipment. To create a simple panel version of doors you will need the following materials:
- Bar 3000x45x20 mm (5 pcs.).
- Rail 50x30 mm.
- Waterproof plywood grade FSF 3/3 (can be coniferous). Sheet parameters 1220x2440x9 mm.
- Insulation (for the entrance structure) or simply filler (expanded polystyrene).
- Self-tapping screws 30x3 mm (about 200 pcs.).
- PVA construction glue.
- Putty for wood products or acrylic-based sealant for wood.
- Dye.
You will also need various tools:
- Sandpaper;
- Spatulas;
- Brushes;
- Masking tape;
- Hand or electric circular saw;
- Jigsaw;
- For decoration you may need a miter box and a milling machine;
- Screwdrivers, screwdriver.
- Ruler, pencil.
Creating an entrance door from plywood
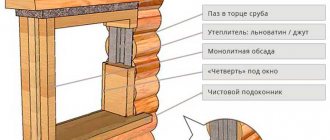
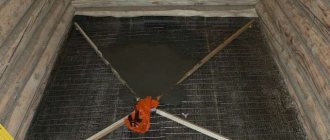
First of all, you need to create a drawing, then make a door casing, for this you will need a block. The easiest way is to make a U-shaped structure for the doorway, the diagram of which is presented below. After this, you can proceed to creating a frame for future doors from the slats. It is also possible to make connecting jumpers for plywood sheets.
Slat door frame
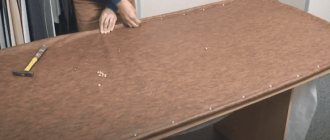
You can connect all the sections of the rail using screws - this is the easiest way and does not require much time. Then, using centering, we make a countersunk hole and screw the prepared plywood to the frame with screws. Each fastener is located at a distance of 20 cm from each other.
Tools for screwing in self-tapping screws
Note!
The hole under the putty is made in such a way as to hide the head of the self-tapping screw to a depth of 1 mm, but if a wooden plug is intended, then 3 mm.
We cut the plywood for the frame with a saw (manual or electric).
Now we need to insulate our door. To do this, you need to put mineral wool or other insulation inside. This will also eliminate extraneous sounds from outside and keep you warm.
Insulating a plywood door
We screw a second sheet of plywood on top, thereby covering the insulation. The door as such is ready. Decoration can be done using a hand router.
Decorating a plywood door
Now you can sand the surface with a machine and then with sandpaper (120 grit). The drawing is sanded entirely by hand.
All possible defects and holes must be filled with putty.
Puttying cracks and other holes
All that remains are decorative measures, cutting in locks and handles, priming the structure and painting it.
Embedding a lock with a handle and the finished door
How to make such doors from plywood with your own hands is demonstrated in more detail in the video.
Creating a sliding interior door from plywood
As an internal partition in the house, you can make a sliding door from plywood with your own hands. To do this, you will need guides, which can be purchased at a hardware store. Choose the length you need for your room and doorway. Mostly they already come with the mechanism, but if not, then you need to purchase the mechanism as well.
Sliding door kit
Note!
Rollers in a steel mechanism are more durable than rubber ones.
A plywood partition will be lightweight and to create it you will need, in addition to sheet material, wooden slats and glazing beads. From the slats we make a frame for the future partition, which is connected using glue and spikes. In the finished frame, you need to fix the plywood sheets using glazing beads and that’s it, the structure is ready.
All that remains is the decorative side of the process. Here, whatever you want, you can glue a special decorative film over the plywood, cover it with fabric, or simply varnish it, and paint it. You can create a more complex design with inserts from other materials: plastic, glass, etc.
Important! When calculating the materials for creating sliding doors, you must remember that it is recommended to make the canvas wider than the opening by 5-7 cm, and also 10-15 cm higher in height, unless of course the opening is the entire height of the room. This is necessary to avoid the appearance of large gaps around the perimeter.
Manufacturing a single-layer interior door
This design is suitable for residential premises and utility rooms where sound and heat insulation is not needed. It is a timber frame structure with slats nailed across a plywood sheet. For a single-layer door, any brand of grade 1-2 plywood is suitable so that there are fewer defects and chips on its surface.
Related article: How to open a rim lock with a semicircular key
You can also choose the thickness of the plywood at your discretion from 3 to 21 mm. If the room has high humidity, then you can purchase moisture-resistant sheets. Laminated material will not require subsequent decorative finishing. The main thing when choosing is not to take plywood that is made using phenol-formaldehyde adhesive mixtures.
The creation of the structure itself is similar to a combination of the two previous procedures, that is, the frame and the door itself are made like a sliding one, only a lock and handle are also embedded into it, and hinges are hung, as is the case with the entrance structure.
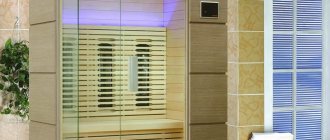
There is also an option for a multi-layer plywood door, an example would be the entrance structure presented above, where thermal insulation material is also laid between the layers of plywood. This door can also be installed in a steam room. But in this case, it is necessary to use moisture-resistant material.
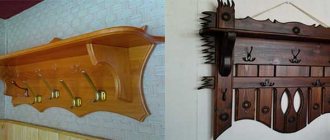
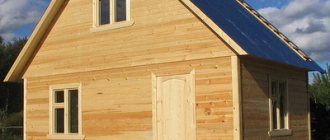
Wooden doors to a bathhouse or country house
Doors made of wood can have a complex design. Beginners should not immediately take on such work: they need to learn from simple things. Doors to a bathhouse, a summer house, etc. are ideal in this regard. They rarely come in complex designs. The main thing here is reliability and functionality. Attractiveness is also important, but even simple DIY steam room doors are a result you can be proud of. If they are well processed, they look very decent: the material is beautiful, it does not need any decorations. It is important to properly process and varnish.
Materials
Good commercial wood is used for the manufacture of joinery, without knots or with a minimum number of them. If there are knots, they should not be black. You also need dry wood with a moisture content of no more than 12-15%. Ideally, take chamber-drying boards - they will definitely not be damaged. Also look at their geometry: “propellers” and “waves” do not suit us. The boards must be level.
You can buy sanded boards with a molded tongue and groove - there will be less work
Thickness - from 25 mm to 50 mm. Depending on the purpose and design of the door. Before use, their surface is brought to a perfectly smooth state - with grinding machines or manually using sandpaper, attached for convenience to a small block.
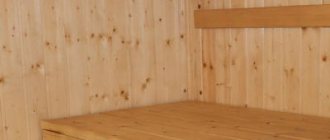
A simple option made from planed boards
The simplest wooden interior door can be made from one row of boards 30-40 mm thick, fastened together with transverse strips. Planed and sanded boards are stacked close to one another. There should be no gaps, the match is perfect.
The dimensions of the door leaf should be 4 mm smaller in width and length of the manufactured door frame. Only in this case will it be possible to close them without problems.
To avoid drafts, the boards can be made with profiled edges: make a tenon half the thickness or saw the edges at 45o. This option is more labor-intensive, but the room will be warm.
The edges of the door boards can be made curly
According to the rules, grooves are cut out in the boards for transverse strips - dowels. The dowels are driven into this groove, fastening the boards together. Having a special wood saw - a reward - is easy to do:
- Make two cuts at 45o. To prevent the saw from slipping, the angle was kept even; a block with the same angle was nailed to the edge. By sliding the saw along it, you will make an even cut at the desired angle.
- On the other side, at a distance of 30 mm, make a similar cut in the other direction.
- Use a chisel to select wood between them. The result is a trapezoidal groove into which a key of the same format is driven. For greater reliability, you can use wood glue. It is better not to use PVA glue. Moreover, for the doors to the steam room: it will not withstand such temperatures. For steam rooms and wet rooms, glue is chosen with a high moisture resistance class (from D3 and above).
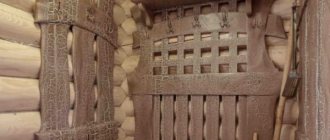
As a result, you will get doors to the steam room, assembled with your own hands, without nails.
You can make wooden doors without nails
You can assemble a similar door easier: by screwing the transverse and oblique strips 25-30 mm thick onto self-tapping screws. If you are installing it in a steam room, it is advisable to recess the caps into the wood, or screw them in from the side of the washing and changing rooms. So, when you touch the door, you will not get burned by the heated metal.
You might be interested in: “Do-it-yourself barrel sauna”
Entrance door made of two rows of boards
If the doors are made from two rows of boards, and insulation is laid between them, you will get a good entrance door or an excellent heat-saving option for a steam room. But then the steam room will need good ventilation - with such a device, air does not pass through the doors.
The first row is assembled in exactly the same way as in the previous version: the boards are tightly fitted to one another and fastened with transverse strips.
Doors made of two rows of boards are already entrance doors
Another row will be laid on top, and the gap can be filled with heat insulation. It is selected depending on the installation location: for the front door it is important that if moisture gets in, the insulation does not lose its properties and is not afraid of freezing. A good option is polystyrene foam; polystyrene foam is cheaper. Mineral wool is not suitable - they are afraid of moisture, unless they are protected with a layer of moisture insulation. Then they will keep warm well.
Having laid the heat insulator, it is pressed with a second layer of boards, which are attached to the transverse planks with self-tapping screws. If you have a door without nails on one side, you can turn this side towards the street: this way you won’t have to worry about unsightly dark streaks coming from the caps during use.
The final stage of manufacturing a wooden entrance door is finishing around the perimeter. In principle, it was possible to fill (screw with self-tapping screws) slats onto the first layer. This is a more correct option. But you can, having assembled both layers, attach thin - 5-7 mm - strips around the perimeter from the ends, covering the insides.
The very last thing: cut in the hinges and install the handles. Then you can install the doors in the doorway. How to do this, read the article “Installing door frames with your own hands”
The final stage is finishing the doorway. This is, firstly, the installation of door trims - if the width of the door frame is not enough, and platbands, which give a finished look.
See the video for one of the options for such a door.
Plywood doors: design, tools and materials, production of frame and single-layer products
Nowadays, beautiful doors are quite expensive, however, you can make them yourself from plywood, and thereby save money. The only thing is that you should first familiarize yourself with all the nuances of this work. Therefore, next we will look in detail at how to make a door out of plywood with your own hands.
Related article: How to make an iron door yourself
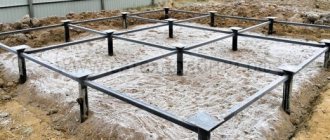
Making a door frame
According to the rules, the door frame pillars must be hidden in the floor and rest on the joists. But today, wooden floors are not made everywhere in our country, and therefore more often they are simply rested on the finished floor. But by the time the door is installed, the floor must be ready, only the baseboards have not been nailed down.
We assume that the floor and doorway are ready. Decide what type of box you will install: “U”-shaped or with a lower jumper. Draw a diagram, measure the opening, and plot the measurement results on the image.
When installing the door frame and hanging the door leaf, it is important to align everything evenly: both the posts and the leaf
For brick, concrete or other similar walls, the dimensions of the box should be a couple of centimeters smaller than the opening: a gap is needed for mounting elements and foam. For walls made of timber or logs, they generally make a frame or casing - bars installed around the perimeter with a small gap, which will compensate for the shrinkage of the building, and at the same time fasten the logs or beams that have become loose after cutting out the opening. This, of course, requires additional materials and work, but this is the only way to guarantee that the doors will not jam.
As a result of measurements, the height of the two side bars - racks - may differ slightly. It's not scary. It is important that they are vertical, and the horizontal top bar - the lintel - is strictly horizontal.
The door frame is made from one board with a molded groove or a composite one - from several boards glued together. The width of the groove should match the thickness of the door leaf or be a couple of millimeters larger.
To make the box, use planks with a solid or prefabricated protrusion against which the doors will rest.
If you have a woodworking machine on your farm, you do everything yourself. No - you buy it in a carpentry shop, hardware store, etc. You will need two strips for the side posts and one or two (depending on the type of box) for the horizontal jumpers.
The bars from which the jambs are made can be simple, or they can have a shaped (profile) front part. You can install a rubber or silicone seal at the end of the protrusion against which the door leaf rests. To do this, make a shallow cut into it using a special roller (or a regular screwdriver) and install an elastic band. These seals are much more effective and durable than foam rubber ones, they come in different colors and shapes, and are sold in hardware stores.
The planks are polished on three sides to perfection. The fourth will be leaning against the wall; it does not need to be processed.
The shape of the door frame slats may vary
Assembly order
At the first stage of assembling the door frame, you need to work with a saw and chisels.
Saw off the top lintel of the required width. Now you need to make grooves in it into which the racks will fit. To do this, you need to remove the protrusion to the width of the block. It sounds confusing, but if you look at the photo, everything will become clearer.
Measure the width of the counter, mark this distance on the ceiling, and draw a straight line. Make a cut to the depth of the tenon (with a hand saw). Now use chisels to remove excess. Having smoothed it with sandpaper, make two holes for the screws: this is how they will be fastened to the posts.
Do the same on the other side. Just don’t start sawing without measuring the second post: the joinery may differ by a couple of millimeters, and this can lead to the appearance of cracks. First you measure, then you mark, and only then you cut and work with a chisel.
If the structure has a threshold, it is processed in exactly the same way.
Now all that remains is to adjust the height of the side strips. From the total height of the doorway, subtract the thickness of the transverse strips (upper and, if any, lower) and the distance for the mounting foam (1-2 cm). Get the height of the racks. You saw them off and assemble the whole structure together. The door frame was assembled with your own hands. Let's start making the door leaf.
The procedure for making the door frame lintel
Before final finishing (coating with decorative film), it is necessary to prepare samples for the hinges and latch. Accurate measurements are taken and the location of the loops is determined. Hinges are placed on the side edge of the door leaf at the required distance from the end and their contours are traced. The boundaries are cut with a chisel, after which a sample is made: a layer of material is removed to a depth equal to the thickness of the loop map.
Having completed the preparatory work, they begin to cover the door leaf. To create a perfectly smooth surface, the plywood is sanded with fine-grained sandpaper, wiped and coated with a layer of varnish. It is more convenient to paste with an assistant who will hold the free part of the film and separate the paper backing.
If you don’t have experience working with self-adhesive film, you can watch the video and learn the nuances. To avoid the appearance of wrinkles and small bubbles, the film should be glued evenly across its entire width, carefully smoothing it out, but not allowing it to stretch. The film is folded over the side edges of the door leaf and overlapped. After completing this important process, screw the hinges with screws and install the latch with handles. They hang the door.
One of the methods for manufacturing a panel door is presented. You can choose a “lightweight” version of the canvas and not fill the voids with polystyrene foam, but use MDF instead of plywood.
itemprop=»video» {amp}gt;
Installing a latch on an interior door
Despite the fact that today doors are made from a wide variety of modern materials, wood products still remain the most in demand. Wooden doors are installed between rooms, at the entrance to a house or outbuildings, and they are also installed in all functional rooms of the bathhouse. The popularity of wooden doors remains unchanged due to the warmth of the material and its environmental friendliness, as well as the amazing natural beauty of textured patterns.
To figure out how to make a door from boards with your own hands, you need to decide where it will be installed. The fact is that all wooden doors, from the simplest to the most elite examples, are made of boards, but the material can have different quality and processing. There are also significant differences in wood species.
In addition, door leaves are divided into types according to their design, and in order to decide which one is more suitable for a particular case, you need to find out what they are.
Wooden doors can have several types of structures - paneled and solid, panel (hollow and solid) and frame.
Next, mark the places for the handles and drill holes. A latch is inserted into the previously prepared slot and the contours of the fastening strip are marked with a pencil. They cut a recess under it.
One of the methods for manufacturing a panel door is presented. You can choose a “lightweight” version of the canvas and not fill the voids with polystyrene foam, but use MDF instead of plywood.
/p{amp}gt;
Making a door
Project
The process of making a door is not as complicated as it might seem at first glance. The most important thing is to prepare the project correctly. It will serve as a kind of instruction for further work and will prevent errors during work. The only thing is that you first need to decide on the type of construction.
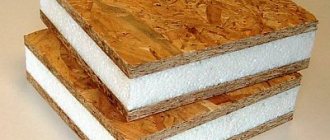
Most often, plywood doors are made of two types:
| Construction type | Peculiarities |
| Panel | They are a frame structure, which is sheathed on both sides with plywood. As a rule, insulation or stiffeners are located between two sheets. This type of door can be used in cases where good noise and heat insulation is required. |
| Single layer | They consist of one sheet of plywood, which is reinforced along the contour on both sides with strips. This design resembles paneled doors, however, it has low noise and thermal insulation rates. Therefore, it is usually used as interior furniture. |
Frame door design
Having decided on the type of construction, you should measure the door frame and indicate the size of the future product. After this, you need to draw its main details on paper and indicate their dimensions.
Note! The size of the doors should be slightly smaller than the size of the frame, otherwise they will not close well.
Tools and materials
When choosing plywood, first of all, you should pay attention to its brand. If you plan to manufacture an external door, you need to purchase material with increased moisture resistance, for example, FSF brand. True, its price is quite high, so for the manufacture of interior doors you can use cheaper FK plywood.
If you plan to open the product with transparent varnish, you should also pay attention to the type of sheets. It is desirable that they correspond to the first or, in extreme cases, second grade.
Plywood sheets FSF
In addition to plywood, you need to prepare wooden planks 100-150 mm wide. The thickness of all materials is selected taking into account the fact that the total thickness of the product should be 35-40 mm. To make a frame structure, you will also need insulation, which can be mineral wool or expanded polystyrene.
Advice! You can increase the moisture resistance of plywood yourself by impregnating the sheets with PVA glue, drying oil or other protective compound.
As for the tools, you will need the following set for work:
- jigsaw or regular hacksaw;
- electric drill;
- screwdriver or screwdriver;
- tape measure and pencil;
- sandpaper;
- wood glue;
- varnish or paint.
In addition, it is advisable to have a router that will allow you to make tenons and grooves for connecting frame parts, as well as a socket for the lock.
Option for connecting bars to a wooden floor using tongue and groove
Making a frame door
After preparing the project, you can proceed directly to the manufacture of the product. First of all, let's look at how a frame door is made.
So, the instructions for its manufacture are as follows:
- First of all, the frame is made, which is a frame with several jumpers. There are several ways to connect the frame strips. The most reliable is through tenons and grooves using wood glue. You can also use metal corners and screws;
- the locations of the locks should be reinforced with additional bars;
Door frame with insulation
- Next, you need to cut a sheet of plywood to the size of the door leaf and secure it with self-tapping screws to the frame. In this case, the caps must be recessed below the level of the sheet;
- then you need to lay heat-insulating material into the space in the frame and cover the second side of the door with plywood;
- The next step is to mortise the lock. To do this, you need to mill out a socket for it and drill holes for the handles;
- At the end of the work finishing is done. The product must be sanded, the screw heads and other defects must be filled, and then the surface must be varnished.
This completes the process of manufacturing the frame structure. It must be said that the product can be decorated at your discretion in different ways, for example, by gluing false panels or a wooden figure cut out with a jigsaw. You can also apply a design with a router or come up with your own version of decoration.
Single layer plywood door
Making a single-layer door
A do-it-yourself single-layer interior door from plywood is made in the following sequence:
- work should begin by preparing a sheet of plywood according to the size of the door. It is advisable to use a fairly thick sheet, at least 1 cm;
- Then, along the perimeter of the sheet, strips are attached, which can also be made from plywood. To fix them, use self-tapping screws and wood glue. It is also necessary to secure the lintels like a paneled door. To connect the planks to each other, you can use a tongue/groove or furniture tongues;
- Next, you need to attach the strips on the back side of the door in exactly the same way;
The photo shows the finished door leaf
- then you should mill out the space for the lock and the holes for the handles;
- to give the structure a complete and attractive appearance, the transition from the planks to the plywood should be decorated with profiled glazing beads;
- Now the product needs to be sanded and puttied. If you plan to open the door with varnish, then putty should be used to match the color of the wood;
- To complete the work, you need to open the product with varnish or paint.
Advice! To give the structure a certain color, but at the same time preserve the texture of the wood, it should be treated with stain before opening the varnish.
Here, in fact, are all the most optimal ways to make a plywood door yourself.
Manufacturing technology of interior doors
The production of doors on an industrial scale has been put on a conveyor belt. Computer-controlled machines with robotic assembly are capable of producing several high-quality products per minute. In fact, such units are prototypes of narrow-purpose 3D printers. Door blocks are stamped from any materials and can have any required dimensions.
But if you break down the technological process into its component parts, it turns out that it is quite possible to recreate it at home. The main share of financial costs and labor falls on the installation of the door leaf and only 5–8% on the assembly of the door frame. Some hand-assembled doors are superior in quality to factory-made ones, especially if they are inlaid with artistic decoration.
Despite the high cost, handmade doors are in great demand
The only condition necessary for this is the use of quality materials. It is quite difficult to obtain them at home. First of all, this concerns drying. Wood moisture content should not exceed 10–12%, which is impossible to achieve without a special dryer.
It is possible to achieve wood moisture content within 8–12% only in factory conditions
The timber is connected using glue and internal mini-spikes
Independent production of a door block consists of several stages.
- Drawing up a project that meets specific conditions.
It reflects the dimensions of the doorway, the design of the door (hinged, sliding or pendulum), the material available, and door fittings. A detailed drawing shows the door block in several projections indicating all dimensions and decorative elements - Manufacturing of door panels. It is necessary to decide and prepare the required amount of the selected material - wooden boards, plywood or MDF.
- Making a door frame. As a rule, at home, the door frame is made of wooden beams.
- Selection of fasteners for assembly.
Confirmants, screws, wood glue, dowels (wooden nails), etc. To enhance the rigidity of the structure, it is possible to use additional elements - metal brackets, corners and similar parts. The dimensions and shape of the fasteners are selected based on the assigned tasks
Conclusion
Making plywood wooden doors is beneficial from an economic point of view, and in addition, doing something yourself is always interesting. However, for this you need to stock up on time and patience, since the work must be done carefully and slowly. Only in this case the product will turn out beautiful and durable.
The video in this article contains some additional information on the topic discussed. If after reading the material you have any questions, you can ask them in the comments, and we will be happy to answer them.