Which pipes are best to use?
For floor lines, only those circuits that can withstand high temperatures are suitable.
Today on the market there is a variety of products made from the following materials: copper, metal-plastic, cross-linked polyethylene. Separately, we will talk about galvanized pipe materials.
Each type has its own characteristics and is intended for use in specific conditions.
PEX pipes made of cross-linked polyethylene
Pipes made of cross-linked polyethylene have excellent performance characteristics, which give them an undeniable advantage over other materials, and are therefore popular both for cold water supply and for installation in heated floor structures.
The material for their manufacture is polyethylene with a certain density. Stitching of products is carried out using several methods.
Depending on the production process, the pipeline is of different classes:
- PEX-a - high-density polyethylene is used in production. The production method is peroxide, which involves melting polyethylene under high temperature. After which, the resulting amorphous mixture is squeezed out through a special forming hole, this method is called extrusion.
PEX-a is a multi-layer construction, with an aluminum insert placed between the layers, which helps maintain the shape of the product. A special glue is used to connect the layers; it does not change its properties under the influence of temperature.
For your information! The product is capable of transmitting oxygen to the coolant. To eliminate penetration, manufacturers began to equip it with an EVOH protective coating on the outside - this is a layer of thin plastic (polyvinylethylene).
- PEX-b - for its production, medium-density polyethylene is taken, which is softened to a solid consistency. With this method, crosslinking is done after extrusion.
- PEX-c - the raw material in this case is also medium-density polyethylene. Crosslinking is carried out at a temperature equal to the environment, while the state of the material is solid.
Hoses made of cross-linked polyethylene are widely used in the installation of heated floors, but PEX-a is more often used, as they have good elasticity and allow laying a line with a bend of up to 5 diameters.
PEX-b is harder and therefore breaks easily. And PEX-c does not tolerate high temperatures well, and therefore is more often used for cold water. In addition, products made from this material are durable and lightweight, which is a plus when installing it yourself.
PEX-a pipes have memory - when deformed, they are able to completely restore their shape; for this they need to be heated. PEX-b does not have such properties, while PEX-c has this property reduced.
Polyethylene PE-RT
PE-RT pipes are modified; they differ from PEX in the absence of seams. A system made from such tubes is practically silent and withstands sub-zero temperatures, but although it tolerates high positive temperatures well, it does not last long.
In addition, this material is susceptible to the action of aggressive substances, and there is no structural memory. But, despite this, heat-resistant polyethylene is widely used in heated floors, as it has a reasonable price.
Metal-plastic
A metal-plastic pipe for underfloor heating is an excellent option. It is flexible and plastic, and can be bent even without heating. In addition, the material is durable, tolerates temperature changes well and is environmentally friendly.
The metal-plastic pipeline consists of several layers - cross-linked polyethylene inside, then metallized foil, and a polymer coating on the outside, which protects against mechanical damage. In this design, corrosion does not form and scale deposits do not occur. If installed correctly, the pipeline will last more than 50 years.
If we compare which is better - metal-plastic or cross-linked polyethylene for heated floors, we can note the high thermal conductivity of plastic. But at the same time, there is a high risk of the coil breaking, and since such a product does not have the ability to restore its shape, this section will have to be removed.
Metal
Metal pipes for warm water floors are available in the following types:
- Copper ones have a high cost, so they are not very popular when installing hydrofloors. In addition, laying such a pipeline is not easy; special equipment is required, and it is unlikely that it will be possible to install it yourself.
However, it is worth noting that a copper pipe is an ideal option for heated floors, as it has excellent characteristics:
- high thermal conductivity;
- durability;
- not susceptible to corrosion;
- ductility and strength.
- Stainless steel corrugated steel is a relatively new type that is well suited for heated floors, but due to its high price it is not used often. The product has a protective polymer coating, and the stainless metal is not subject to corrosion and is resistant to mechanical, chemical and temperature influences.
In addition, this model has increased flexibility; installation in the most complex patterns is possible, without the risk of creasing.
To summarize , we can say that the most popular models that are used for heated floors are a metal-plastic pipe or a cross-linked polyethylene pipe .
They have good performance characteristics and are affordable. But if financial resources allow, then it is better to use a metal (copper) pipeline; it has high thermal conductivity and durability.
Connecting underfloor heating with electric heating
Let's look at how to connect a warm floor with electric heating. For such heating, a silicone heating cable is used, and the heating temperature is automatically regulated. All work consists of the following stages:
- For such a warm floor, you will first need to prepare the walls. Grooves are made in them, into which the cable is laid. The cable can be placed only in a horizontal or only in a vertical direction. It is advisable to mark the walls before gating and determine exactly where the distribution boxes will be located. Naturally, the place where the distribution panel will be located is initially selected, and only then further wiring is planned. It is also necessary to take into account that the thermostat for the bathroom and toilet is installed in adjacent rooms;
- from the thermostat there should be grooves for cold cables and a temperature sensor; they are installed above the surface of the floor covering;
- When electrically connecting a heated floor, it is also necessary to perform waterproofing. A special material is used as thermal insulation. The thickness of the insulation should not be too large, but it should not be less than 10 cm. If you choose a thin material, there is a risk that it will not be able to provide a large amount of warm energy, so all the heat will go to the slabs, and the floor will remain barely warm. In no case should the efficiency be reduced, as this will require large costs for heating the premises. If you consider that some rooms may be too damp, then you need to use a special film. For such a warm floor, you will need a 4 cm cement screed. It is strictly forbidden to lay the electrical cable on a damp or damp base, so the screed must dry well;
- On the floor itself, you need to make markings to indicate the places where floor heating will not be installed. For example, there is no need to insulate the floor under a bathtub or toilet; you can also bypass large furniture. The marking is done with adhesive tape; it shows up well on the floor, so it won’t get lost during installation work;
- A metal strip is attached to the tie, which has slots for inserting the cable. Such tapes will significantly help speed up the installation of the floor;
- Next, the connection to electricity is made.
We recommend: How to lay heated floors on planks?
As you can see, there are quite a lot of options for connecting underfloor heating. Among all the methods presented, the most popular is the traditional connection method. It is advisable to organize separate heating control in the room.
Naturally, in this case it will not be possible to install one pipe in the middle; such a floor will require special equipment and many pipes, but for this reason, stability of operation will be guaranteed. The operating principle itself is that the regulators are installed separately on each circuit.
Each option has its advantages and disadvantages, but basically you have to choose based on the heating system that is installed in the room.
- Related Posts
- What are the advantages of Heat plus underfloor heating?
- How to lay heated floors on a balcony?
- How is the length of a heated floor pipe calculated?
- How to install a water heated floor with your own hands?
- What materials are suitable for waterproofing underfloor heating?
- Should I use penoplex for heated floors?
Is it possible to connect underfloor heating pipes or not?
When laying a pipeline for a heated floor, often the length of the circuit is not enough to make a solid loop. In this case, the question arises: is it possible to connect the pipes to each other, and how to do this? There are several methods for connecting contours, which depend on the type of material.
Important! When choosing a method to join floor pipes, you should take into account the operating pressure, since each connection is designed to withstand a certain load.
Let's take a closer look at the methods of how to connect underfloor heating pipes.
Connection of cross-linked polyethylene and metal-plastic pipes
Contours made of polyethylene or metal-plastic can be sewn together using fittings (brass, bronze and plastic); they can withstand high temperatures. Fittings are:
- Electric welding ones are effective, but their installation requires special equipment, so they are rarely used. The process looks like this:
- An electric welding fitting is placed on the pipe cut;
- welding equipment is connected to the terminals, it will supply voltage to the element, which will lead to heating and fusion of the joints;
- the device turns off, the resulting connection can withstand pressure up to 12 Amp.
- Pressing - the main advantage is that when pressing, the entire space is filled with polymer, thereby creating a high-strength connection.
- A nut is placed on the edge of the crimp tube, with the thread facing the connection;
- the split ring is put on with an indentation of 1 cm from the cut and fixed;
- the hose with the fitting device is stretched;
- The crimp nut is tightened tightly using two wrenches.
- Crimp fittings - these fittings are the easiest to install at home:
- a clamping sleeve is placed on the polymer hose;
- the end of the contour is stretched in diameter using an expander;
- with the stretched edge, the tube is pulled all the way onto the fitting fitting;
- the connection point is fixed in this position for several minutes, this is enough for the fitting to be tightly spliced.
Copper pipe stitching
Just as when installing a plastic circuit, copper can be joined using press or push fittings. This method is recommended in open areas, so that in case of leakage the part can be easily changed.
But the most reliable and practical way is to solder copper pipes. This is a more labor-intensive process, but the connection is durable and reliable. Sequencing:
- contour sections are cleaned from the outside and inside;
- a special connector for soldering copper floor heating pipes is used to lubricate the edges of the parts - only from the top;
- the products are joined, and the excess mixture is removed;
- the joint is heated with a gas burner and solder fills the gaps.
How to connect underfloor heating pipes (press fitting)
As mentioned above, the pipeline can be joined using press fittings. This part consists of:
- housings - come in different shapes (angle, tee, coupling);
- sleeves are the basis of the fitting, the raw material for its production is stainless steel;
- clips - an elastic ring (gasket) that connects the body and the sleeve.
For your information! The fitting body is equipped with a “window” to control the correct insertion of the tubular product. Only when the tube is visible in this hole can you begin pressing.
Pressing is carried out using special press jaws. The essence of the procedure is to compress the handles of the tool. The process is quick and easy, and no special skills are required to carry out this work.
The advantage of using such a connection is strength, long service life and the design does not require maintenance.
Connection of underfloor heating pipes in a screed
Although experts advise laying a water-heated floor under a screed without joints, it is not prohibited to do so.
But it is worth noting that it is impossible to connect the floor contours using a threaded method: “American” or PRH. It is better if the pipes are connected using a press fitting or coupling.
Important! When filling such areas with screed, fittings or couplings should be isolated from the concrete solution. This can be done by wrapping them in plastic film.
Preparing the base
When building a house, you can literally immediately organize the correct heating system, but when installing a heated floor in a living space, it is important to consider this issue from preparing the foundation:
- You need to understand that the entire floor consists of several layers. First of all, waterproofing is provided, which will protect the ceiling from leaks. This stage is especially important in multi-storey buildings;
- then the insulation is laid, it will not heat the slab, the heat should go up, so it is important to use polystyrene foam or special foam substrates;
- Next, pipes are laid through which hot water will flow, which heats the entire floor. The pipes used are metal-plastic;
- on top of the work you need to make a screed, the thickness of which reaches 8.5 cm;
- Considering that all laid layers significantly raise the floor, you can use some tricks when preparing the floor;
- you can knock down the old screed to the very base, but you must take into account that the work is hard and there will be a lot of dust and debris;
- if the floors are laid in your own home, then you can go deep into the ground as much as necessary;
- if polystyrene foam is used as insulation, it takes up a lot of space, you can replace it with foil backings, for example, penofol;
- professionals often reduce the thickness of the screed, this gives them the opportunity to save 6 cm in height;
- sometimes a heated floor system is used using a special substrate; glue can be applied to it and tiles can be installed. In this case, neither waterproofing nor thermal insulation will be required;
- You can choose a dry underfloor heating system, when a special heat-insulating base is placed, and metal plates are placed in the grooves, they distribute heat evenly over the entire surface.
We recommend: How to install water-heated floors?
Once the issue with the floor level is resolved, you can move on to the most basic thing - connecting the pipes to the central heating system.
How to solder a heated floor pipe
Soldering is a common method of connecting plastic pipes for underfloor heating. The technology is simple and does not require large financial investments. There are two soldering techniques:
- Coupling - for this, a shaped part is used (coupling or contour with a large diameter). This method is suitable for tubes measuring 63 mm. The welding process consists of melting the edge of the product on the outside and part of the coupling on the inside. After which, the parts are joined, forming a tight connection.
- Direct - involves melting small sections of two plastic pipes, which are then joined at the ends. This fairly simple method reliably combines two parts into a single outline.
For your information! Along with hot technologies, the method of “cold” soldering is practiced. A special solvent is used that softens the plastic.
How to connect a heated floor pipe with a metal-plastic pipe
Although experts recommend using a pipeline made of one material when installing a heated floor, sometimes it becomes necessary to connect a metal-plastic circuit with products made from other raw materials.
For example, when connecting this circuit to steel (copper) parts of the plumbing or heating system. To do this, you will need a compression fitting and a calibrator. When joining products made of different materials, the thread should be selected according to the size of the steel pipe, and the cuffs and washers should be selected according to the metal-plastic pipeline.
Tow is wound onto the copper pipe, and then the fitting is screwed on. The edge of the product is pushed onto the cone and the nut is tightened.
If it is necessary to connect a metal-plastic circuit with polyethylene products, special threaded fittings can be used as a connector for underfloor heating pipes. This joint is most often made when connecting a heated floor to a boiler.
Subscribe to the newsletter
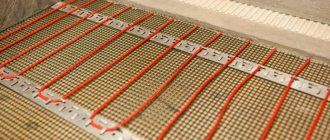
It is difficult to overestimate the comfort of heated floors, especially in rooms such as the bathroom and toilet. But we don’t always have the opportunity to “raise” the floor in a room by filling the heating cable with screed. And here a heating mat comes to our rescue, on which you can lay tiles without a screed. We will tell you how to install mats for heated floors in our article.
In order to connect a heated floor, we will need the following materials and tools:
• heating mats for heated floors (for example, production); • thermostat; • power cable for supplying power from the distribution board to the thermostat, as well as for making the “cold end” of the heating mat; • heat and waterproofing materials; • mounting box; • insulated or non-insulated connecting sleeve, heat shrink, mounting wire PuGV for connecting mat sections; • megohmmeter or multimeter; • colored adhesive tape.
As in our previous articles, we warn that electrical installation work should only be carried out in full compliance with safety requirements.
It should be noted that the dimensions of the heated floor mat in production must correspond to the area on which it is planned to be laid. The width of the mat “track” is 0.7 and 1 m.
Heated floor connection diagram
The installation of electric underfloor heating and its connection are carried out after construction work.
We prepare grooves for laying the power cable from the distribution board to the installation box in which it is planned to install the thermostat. It is important to remember that when installing heated floors in wet rooms (bathroom, toilet, etc.), the thermostat must be placed in an adjacent dry room. The installation height of the thermostat, in accordance with the manufacturer’s recommendations, must be at least 30 centimeters from the floor level.
The grooves and holes for laying the cold end of the heated floor and the temperature sensor to the thermostat are prepared in the same way.
Next, heat and waterproofing work is carried out. We lay thermal insulation material on the subfloor. For this, you can use expanded polystyrene (PP) boards with a thickness of 20 to 50 mm, depending on the type of room (for example, if there is an unheated room below, then you need to use a 50 mm thick PP board). It should be noted that the use of foil or three-millimeter Penofol-type insulator will not provide the necessary thermal insulation effect.
If the heated floor is installed in damp rooms, it is necessary to lay waterproofing material on top of the thermal insulation. We make a cement-sand screed about 20-30 mm thick and leave it to dry for at least three days. Only after this can you begin installing the heating mat.
So, after the screed has dried, we proceed to marking the areas in which the heating mat will not be installed (it is best to use colored adhesive tape for marking). These include locations where permanent equipment is installed, such as bathtubs, toilets and cabinets, as well as clearances from walls, heating pipes and heating appliances. The distances from the walls should be 10-20 cm, from heating devices - at least 20 cm.
Before installation, we determine the integrity of the heating mat. To do this, measure its resistance using a megohmmeter or multimeter. If it is equal to or slightly different from that indicated on the label, it means that the integrity of the section is not compromised. The permissible change in core resistance cannot exceed 10%.
Now you can start installation. We start from the point where the cable exits to the thermostat box. We lay out the heating mat on the floor surface, avoiding the areas marked with tape.
To rotate the heating mat, it is necessary to cut the section in a specially marked place, affecting only the mesh and power cable. The heating cable must not be cut!
After laying out, it is necessary to connect the heating mat’s power supply wires. To connect the two sections, we cut off the required length of the PuGV installation wire with a cross-section of 1.5 mm² and strip it. We put heat shrink on it and connect the cores using an insulated connecting sleeve. Next, we slide the heat shrink on and heat it up.
After connecting the heating sections, we install plugs for the supply wires at the end of the heating mat. To do this, install heat shrink, heat and compress it.
Next, we proceed to making the “cold” end of the heating mat and connecting it to the thermostat.
We lay a two-core power cable in the next room to the place where the thermostat is installed. Having laid the cable, we connect it to the heating section. We clean the cores, put on heat shrink and connect them using an insulated connecting sleeve. Then we put the heat shrink on and heat it up. We proceed in the same way with the second core of the cable.
We also clean the second end of the cable, and crimp the stranded conductors with lugs and mark them:
• the first core of the “cold” end is “Ltp”; • second core of the “cold” end - “Ntp”
Let's start installing the temperature sensor. We fix the corrugated pipe between the turns of the cable so that it is located at the same distance between them. We stretch the temperature sensor through the fixed tube and bring it out to the installation location of the thermostat.
It is recommended to install the temperature sensor at a distance of 0.5-1 m from the wall.
We crimp both stranded conductors with lugs and mark them (“DT”).
To prevent mortar from getting inside the tube, install a plug at its end.
After laying the heating mat and installing the temperature sensor, we measure the resistance again. If the indicators correspond to the norm, you can carry out the finishing coating, for example, laying tiles. Operation of the heated floor should begin only after the screed has completely dried, which is 28 days.
Next, we connect the thermostat. In a pre-prepared groove we lay a 2-core flat cable VVG-P from the distribution board to the installation box, into which the thermostat will later be installed.
Please note that the connection of a heated floor must be carried out through an RCD or a differential circuit breaker.
In the shield we connect the cable cores to the differential circuit breaker:
• connect the gray wire to terminal “2”, • connect the blue wire to terminal “N” of the difavtomat.
In the installation box, we strip the cable cores and
mark them:
• core with gray insulation – marked “L”; • blue – “N”
The diagram for connecting a heated floor to a thermostat looks like this:
• conductors marked “L”—terminal “L” of the thermostat; • core “N” – terminal “N”; • cable core marked Ltp - with terminal L1; • Ntp core - with terminal N1; • temperature sensor cores marked DT - with terminals marked as Sensor.
What to do if a heated floor pipe is broken?
If there are warm water floors in a house or apartment, there are times when the floor pipeline may be broken. First of all, if the floor is functioning, you should disconnect it from the water supply. But more often, such damage occurs during installation or repair of the system, when the topcoat is not laid and the screed is not poured - this is a huge plus.
If there is a concrete screed, in order to find the location of the damage, you will need a hammer drill, a chisel and a hammer to destroy the concrete. This should be done carefully so as not to damage the entire circuit.
When pipes made of metal-plastic or polyethylene are pierced, they are repaired using press couplings using a special press.
For your information! If the heating element is filled with screed after repair, then the use of threaded fittings is not possible.
Having calculated the location of the breakdown, you should remove the damaged area and install a whole circuit in its place. The connection is made using press couplings, which should be wrapped in plastic film to protect them from cement mortar.
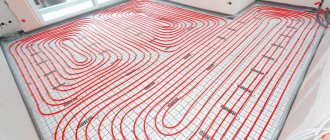
How is the main line installed?
For water underfloor heating you will need a flat subfloor surface. It is recommended to use a screed, self-leveling floor, or use a self-leveling mixture. The water pipeline is laid on a dry surface. It is recommended to use insulating materials so that all the heat from the water circuit is directed to the floor.
- The base is covered with a thin plastic film.
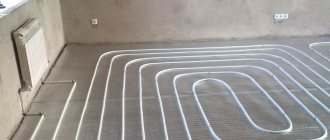
- I'm laying insulation. It is recommended to use a contour coating made of polystyrene foam "Rehau". The PEX underfloor heating pipe fits well into the contour of the coating. The highway is laid in a “snake” or “snail” pattern, outlining the protruding contours of the bosses. They crimp the pipe from the sides, securely fixing it in a certain place.
- The main is connected to a collector, which has an outlet for hot and chilled water. Connect the entire system to the heating boiler. Testing the heating system.
- The heated floor with PEX pipes is poured with a concrete screed up to 8 cm deep.
We recommend: Which rod infrared heated floor to choose?
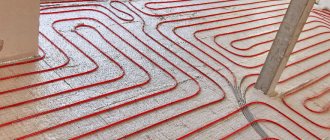
Foam boards are used as insulation for the subfloor. Foil material is placed on the plates. This is a reflective screen that will direct the heat upward. To strengthen the highway, reinforced mesh and mounting brackets are used.
The staples are installed on the mesh with a certain pitch. They are made of plastic and have teeth pointing down. The teeth will not allow the water circuit to change position or exit the groove.
PEX pipes are used not only for underfloor heating, but also for cold and hot water supply. No corrosion or salt deposits form on the inner surface of the product, which prolongs the service life of the water circuit.
When heated, cross-linked polyethylene PEX does not emit toxic substances. The products are used in pharmaceutical enterprises. Cross-linked polyethylene for PEX-a and PEX-c is included in the group of environmentally friendly products.
YouTube responded with an error: The request cannot be completed because you have exceeded your quota.
- Related Posts
- What should a laminate be like for a warm water floor?
- How to install heated flooring under a shower stall?
- How to connect a warm water floor in a house from a gas boiler?
- Features of Fenix heated floors
- What is film heated flooring?
- How is xl pipe heated floor installed?
Is it possible to extend pipes if they are not long enough?
As you know, it is better to make a loop of a warm water floor than a solid one, this gives the system reliability, and connections are made at the points of attachment with the collector. If the heated room is large, it is recommended to divide the area into several branches.
In order not to make a mistake in the size of the loop, you should make the calculation correctly. To do this, you can use an online calculator.
However, if necessary, it is still possible to lengthen the contour of the heated floor by connecting the missing section of pipe to it, which, by the way, is allowed according to GOST. It is possible to extend heated floor loops using various methods; for this, butt joints are used, most often press fittings.
For your information! In such cases, it is recommended to use pipelines and fittings from the same manufacturer.
To summarize, we can say that connecting underfloor heating pipes is acceptable, and there are various ways. But it is more practical and reliable to lay a single loop, especially under the screed, so that in case of leakage you do not have to destroy the concrete layer.
In addition, preference should be given to high-quality pipe products and connecting parts from trusted manufacturers. In such cases, the heating floor will serve you for a long time and will create a comfortable atmosphere in the house.